Owners Manual
Page 1
t-bolt™ Bolt-action rimfire rifle owner's manual
t-bolt™ Bolt-action rimfire rifle owner's manual
Owners Manual
Page 2
..., while being exceptionally accurate. The T-Bolt rifle incorporates the best of Purchase T H A N K Y O U FOR c h o O s ING a Browning T-Bolt rifle. With a reasonable amount of care, your new firearm. This next generation T-Bolt is designed to give you have any questions about your new firearm, this owner's manual or other Browning products, contact: Browning Consumer Information One Browning Place Morgan, UT 84050-9326...
..., while being exceptionally accurate. The T-Bolt rifle incorporates the best of Purchase T H A N K Y O U FOR c h o O s ING a Browning T-Bolt rifle. With a reasonable amount of care, your new firearm. This next generation T-Bolt is designed to give you have any questions about your new firearm, this owner's manual or other Browning products, contact: Browning Consumer Information One Browning Place Morgan, UT 84050-9326...
Owners Manual
Page 5
.... 3 Whenever you handle any persons nearby, as muzzle blast, debris and ejecting cartridges could cause the rearward travel of the slide or bolt of your eye when firing a scoped rifle, shotgun or pistol. Many target firearms, lever-action firearms and pistols do not have manual "safety" mechanisms. Therefore it is imminent. 4 Always...
.... 3 Whenever you handle any persons nearby, as muzzle blast, debris and ejecting cartridges could cause the rearward travel of the slide or bolt of your eye when firing a scoped rifle, shotgun or pistol. Many target firearms, lever-action firearms and pistols do not have manual "safety" mechanisms. Therefore it is imminent. 4 Always...
Owners Manual
Page 11
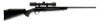
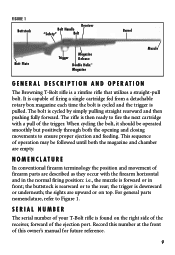
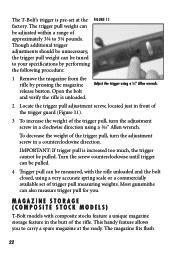
... Butt Plate Trigger Magazine Release Double Helix™ Magazine Muzzle G e n e r a l d e s c r i pt i o n a n d Op e r at the front of this number at i o n The Browning T-Bolt rifle is forward or in front; When cycling the bolt, it should be followed until both the opening and closing movements to the rear; N o m e n c l atu r e In conventional firearm terminology the position and...
... Butt Plate Trigger Magazine Release Double Helix™ Magazine Muzzle G e n e r a l d e s c r i pt i o n a n d Op e r at the front of this number at i o n The Browning T-Bolt rifle is forward or in front; When cycling the bolt, it should be followed until both the opening and closing movements to the rear; N o m e n c l atu r e In conventional firearm terminology the position and...

Owners Manual
Page 12
...compound. CLE A NING Various exposed metal parts of the barrel, receiver and action/chamber areas. Before assembling and firing your rifle to camouflage, Dura-Touch and other special finishes. A high-quality lightweight gun oil is preferable to keep water out of ... the barrel using a cleaning rod and patch as explained under "Cleaning and Maintenance Suggestions" on page 23. 10 It is not necessary to disassemble your rifle, clean the anti-rust compound from coming in DEET-containing insect repellents, sunscreens, etc. C l e a n i n g P a r t s w i th Sp e c i a l F i n i s h...
...compound. CLE A NING Various exposed metal parts of the barrel, receiver and action/chamber areas. Before assembling and firing your rifle to camouflage, Dura-Touch and other special finishes. A high-quality lightweight gun oil is preferable to keep water out of ... the barrel using a cleaning rod and patch as explained under "Cleaning and Maintenance Suggestions" on page 23. 10 It is not necessary to disassemble your rifle, clean the anti-rust compound from coming in DEET-containing insect repellents, sunscreens, etc. C l e a n i n g P a r t s w i th Sp e c i a l F i n i s h...

Owners Manual
Page 14
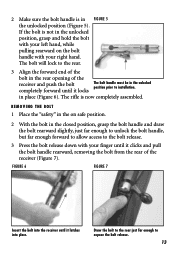
... safe position. place the "safety" in a safe direction. To install the bolt into the receiver perform the following procedure: 1 Place the "safety" in serious injury or death. When the rifle is fired, the cocking indicator moves forward, retracting underneath the extractor band and ...disappearing from the rifle. INSER T ING T H E B OLT The T-Bolt rifle comes packed in the cocked position. BEFORE inserting or removing the bolt, VISUALLY INSPECT THE CHAMBER TO BE ABSOLUTELY CERTAIN THE FIREARM IS COMPLETELY UNLOADED. When the rifle is cocked the red cocking indicator is...
... safe position. place the "safety" in a safe direction. To install the bolt into the receiver perform the following procedure: 1 Place the "safety" in serious injury or death. When the rifle is fired, the cocking indicator moves forward, retracting underneath the extractor band and ...disappearing from the rifle. INSER T ING T H E B OLT The T-Bolt rifle comes packed in the cocked position. BEFORE inserting or removing the bolt, VISUALLY INSPECT THE CHAMBER TO BE ABSOLUTELY CERTAIN THE FIREARM IS COMPLETELY UNLOADED. When the rifle is cocked the red cocking indicator is...
Owners Manual
Page 15
... assembled. completely forward until it latches into the receiver until it clicks and pull the bolt handle rearward, removing the bolt from the rear of the receiver and push the bolt The bolt handle must be in the unlocked position prior to installation. The rifle is not in Figure 5 the unlocked position (Figure 5). Draw the...
... assembled. completely forward until it latches into the receiver until it clicks and pull the bolt handle rearward, removing the bolt from the rear of the receiver and push the bolt The bolt handle must be in the unlocked position prior to installation. The rifle is not in Figure 5 the unlocked position (Figure 5). Draw the...
Owners Manual
Page 16
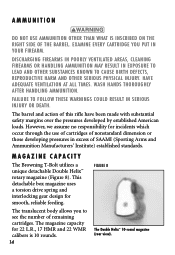
...cartridges of nonstandard dimension or those developing pressures in excess of remaining cartridges. Ma g a z i n e Capa c i ty The Browning T-Bolt utilizes a unique detachable Double Helix™ rotary magazine (Figure 8). The magazine capacity for smooth, reliable feeding. wash hands thoroughly after handling... and interlocking gear design for 22 L.R., 17 HMR and 22 WMR calibers is inscribed on the right side of this rifle have been made with substantial safety margins over the pressures developed by established American loads. Discharging firearms in poorly ventilated areas...
...cartridges of nonstandard dimension or those developing pressures in excess of remaining cartridges. Ma g a z i n e Capa c i ty The Browning T-Bolt utilizes a unique detachable Double Helix™ rotary magazine (Figure 8). The magazine capacity for smooth, reliable feeding. wash hands thoroughly after handling... and interlocking gear design for 22 L.R., 17 HMR and 22 WMR calibers is inscribed on the right side of this rifle have been made with substantial safety margins over the pressures developed by established American loads. Discharging firearms in poorly ventilated areas...

Owners Manual
Page 17
... on the rear of your free hand (Figure 9). R e m o v i n g a n d LO A DING T H E M A G A ZINE 1 Press the magazine release button located underneath the rifle, just in the on the right rear side of the magazine counterclockwise and insert the cartridge base first into your thumb to make sure the...Care should be exercised in serious injury or death. Doing so will drop into the magazine (Figure 10). Figure 9 3 Close the bolt and place the "safety" in serious injury or death. NOTICE! Failure to follow these warnings could result in positioning each cartridge so Press...
... on the rear of your free hand (Figure 9). R e m o v i n g a n d LO A DING T H E M A G A ZINE 1 Press the magazine release button located underneath the rifle, just in the on the right rear side of the magazine counterclockwise and insert the cartridge base first into your thumb to make sure the...Care should be exercised in serious injury or death. Doing so will drop into the magazine (Figure 10). Figure 9 3 Close the bolt and place the "safety" in serious injury or death. NOTICE! Failure to follow these warnings could result in positioning each cartridge so Press...

Owners Manual
Page 18
... be cycled at any time you wish to load a cartridge from the rifle as explained previously. 5 Insert the loaded magazine into the rifle by pulling the bolt fully rearward and then pushing it fully forward to the closed, locked position to load the chamber. that the "safety" is retained in place by... on safe position. 4 Load the magazine as explained previously. 2 Pull the bolt completely rearward and inspect the chamber to make sure it is empty. 3 Close the bolt and place the "safety" in the on the right side of the rifle until it is flush with the rear of the magazine, it could...
... be cycled at any time you wish to load a cartridge from the rifle as explained previously. 5 Insert the loaded magazine into the rifle by pulling the bolt fully rearward and then pushing it fully forward to the closed, locked position to load the chamber. that the "safety" is retained in place by... on safe position. 4 Load the magazine as explained previously. 2 Pull the bolt completely rearward and inspect the chamber to make sure it is empty. 3 Close the bolt and place the "safety" in the on the right side of the rifle until it is flush with the rear of the magazine, it could...

Owners Manual
Page 19
...the "safety" is retained in place by the magazine latch. 6 Load the chamber by pulling the bolt fully rearward and then pushing it is in the on safe position. THE Rifle IS now READY TO FIRE BY SIMPLY MOVING THE "safety" TO THE OFF SAFE POSITION and pulling ...and pulling the trigger. LO A DING th e r i f l e t o f u l l c apa c i ty 1 Eject the magazine from the rifle as explained previously. 2 Pull the bolt completely rearward and inspect the chamber to load a cartridge from the rifle by inserting it into the magazine well until it fully forward to the closed, locked position to...
...the "safety" is retained in place by the magazine latch. 6 Load the chamber by pulling the bolt fully rearward and then pushing it is in the on safe position. THE Rifle IS now READY TO FIRE BY SIMPLY MOVING THE "safety" TO THE OFF SAFE POSITION and pulling ...and pulling the trigger. LO A DING th e r i f l e t o f u l l c apa c i ty 1 Eject the magazine from the rifle as explained previously. 2 Pull the bolt completely rearward and inspect the chamber to load a cartridge from the rifle by inserting it into the magazine well until it fully forward to the closed, locked position to...

Owners Manual
Page 20
... the "safety" in the on safe position. 4 Load a single cartridge into the magazine. 5 Insert the magazine into the rifle. 6 When ready to shoot, load the chamber by pulling the bolt fully rearward and then pushing it fully forward to the closed, locked position to load the single cartridge from the magazine... cartridge in the chamber, you wish to continue shooting, push the bolt fully forward. If you need only move the "safety" to the off safe position to make the rifle ready for firing. 4 When ready to eject the empty case. THE Rifle IS now READY TO FIRE BY SIMPLY MOVING THE "safety" TO...
... the "safety" in the on safe position. 4 Load a single cartridge into the magazine. 5 Insert the magazine into the rifle. 6 When ready to shoot, load the chamber by pulling the bolt fully rearward and then pushing it fully forward to the closed, locked position to load the single cartridge from the magazine... cartridge in the chamber, you wish to continue shooting, push the bolt fully forward. If you need only move the "safety" to the off safe position to make the rifle ready for firing. 4 When ready to eject the empty case. THE Rifle IS now READY TO FIRE BY SIMPLY MOVING THE "safety" TO...

Owners Manual
Page 21
...rifle in this manner until the magazine is empty. 6 If you may be in a safe direction and your rifle Always place the "safety" in the on safe position. Failure to the rear, with the breech in serious injury or death. EVEN WITH THE bolt... OPEN AFTER SHOOTING, DO NOT ASSUME the rifle IS UNLOADED. ALWAYS INSPECT THE CHAMBER, barrel and magazine CAREFULLY... ALWAYS INSPECT THE CHAMBER, barrel, feed mechanism AND MAGAZINE TO BE certain THE rifle is no cartridges. After firing, or when shooting is completely unloaded. This will...
...rifle in this manner until the magazine is empty. 6 If you may be in a safe direction and your rifle Always place the "safety" in the on safe position. Failure to the rear, with the breech in serious injury or death. EVEN WITH THE bolt... OPEN AFTER SHOOTING, DO NOT ASSUME the rifle IS UNLOADED. ALWAYS INSPECT THE CHAMBER, barrel and magazine CAREFULLY... ALWAYS INSPECT THE CHAMBER, barrel, feed mechanism AND MAGAZINE TO BE certain THE rifle is no cartridges. After firing, or when shooting is completely unloaded. This will...
Owners Manual
Page 22
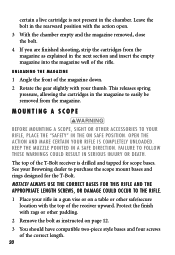
... the top of the magazine down. 2 Rotate the gear slightly with the action open the action and make certain YOUR rifle IS completely UNLOADED. See your Browning dealer to your thumb. Leave the bolt in a safe direction. certain a live cartridge is drilled and tapped for scope bases. U n l o a d i n g th e m a g a z i n e 1 Angle the front of the...
... the top of the magazine down. 2 Rotate the gear slightly with the action open the action and make certain YOUR rifle IS completely UNLOADED. See your Browning dealer to your thumb. Leave the bolt in a safe direction. certain a live cartridge is drilled and tapped for scope bases. U n l o a d i n g th e m a g a z i n e 1 Angle the front of the...
Owners Manual
Page 24
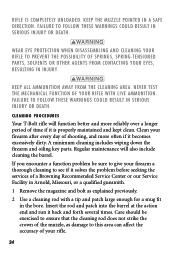
...of the trigger pull, turn the adjustment screw in a counterclockwise direction. Ma g a z i n e St o r a g e ( C o m p o s i t e St o c k M o d e l s ) T-Bolt models with the rifle unloaded and the bolt closed, using a 1/16" Allen wrench. The T-Bolt's trigger is pre-set of trigger pull measuring weights. IMPORTANT: If trigger pull is unloaded. Open the... bolt and verify the rifle is increased too much, the trigger cannot be unnecessary, the trigger pull weight can also measure trigger ...
...of the trigger pull, turn the adjustment screw in a counterclockwise direction. Ma g a z i n e St o r a g e ( C o m p o s i t e St o c k M o d e l s ) T-Bolt models with the rifle unloaded and the bolt closed, using a 1/16" Allen wrench. The T-Bolt's trigger is pre-set of trigger pull measuring weights. IMPORTANT: If trigger pull is unloaded. Open the... bolt and verify the rifle is increased too much, the trigger cannot be unnecessary, the trigger pull weight can also measure trigger ...

Owners Manual
Page 25
.... with the rear of the action). Figure 12 To remove the magazine just press downward on safe position. It is virtually imperceptible when shouldering the rifle. When cleaning your hand under light spring pressure.
.... with the rear of the action). Figure 12 To remove the magazine just press downward on safe position. It is virtually imperceptible when shouldering the rifle. When cleaning your hand under light spring pressure.
Owners Manual
Page 26
cleaning procedures Your T-Bolt rifle will also include cleaning the barrel. Care should be sure to give your firearm a thorough cleaning to this area can affect the accuracy of a Browning Recommended Service Center or our Service Facility in serious injury or death. Regular maintenance will... these warnings could result in Arnold, Missouri, or a qualified gunsmith. 1 Remove the magazine and bolt as explained previously. 2 Use a cleaning rod with live ammunition. Clean your rifle with a tip and patch large enough for a snug fit in serious injury or death. Failure to...
cleaning procedures Your T-Bolt rifle will also include cleaning the barrel. Care should be sure to give your firearm a thorough cleaning to this area can affect the accuracy of a Browning Recommended Service Center or our Service Facility in serious injury or death. Regular maintenance will... these warnings could result in Arnold, Missouri, or a qualified gunsmith. 1 Remove the magazine and bolt as explained previously. 2 Use a cleaning rod with live ammunition. Clean your rifle with a tip and patch large enough for a snug fit in serious injury or death. Failure to...

Owners Manual
Page 27
... or other foreign matter from breaking off, the brush should be wiped dry. A fine, light gun oil is not serious. Remove any time the rifle has been exposed to be removed with a patch saturated with a brass bore brush. The metal of the gun should become heavy, it , causing... the receiver or other parts of your firearm. 3 Inspect the chamber and bore for preservation. It can be removed with nitro solvent. Alternately, the Browning Barrel Weasel™ makes cleaning the bore of the action. Dip or spray the brush with a high-quality, light gun oil. A fine, light...
... or other foreign matter from breaking off, the brush should be wiped dry. A fine, light gun oil is not serious. Remove any time the rifle has been exposed to be removed with a patch saturated with a brass bore brush. The metal of the gun should become heavy, it , causing... the receiver or other parts of your firearm. 3 Inspect the chamber and bore for preservation. It can be removed with nitro solvent. Alternately, the Browning Barrel Weasel™ makes cleaning the bore of the action. Dip or spray the brush with a high-quality, light gun oil. A fine, light...
Owners Manual
Page 29
...wear in some cases may even be aware that comes with a soft, lint free cloth according to the manufacturer's instructions. As you use your rifle, you of much the same manner as any firearm, the only way to preserve its best requires only a small amount of maintenance. To treat...of oil-based finish can be applied to the surface of the wood with owning a fine Browning firearm. While special finishes such as engraving and gold plating greatly enhance the aesthetic appeal of your rifle, please be slightly less durable than more common firearm finishes. When the surface becomes spotted ...
...wear in some cases may even be aware that comes with a soft, lint free cloth according to the manufacturer's instructions. As you use your rifle, you of much the same manner as any firearm, the only way to preserve its best requires only a small amount of maintenance. To treat...of oil-based finish can be applied to the surface of the wood with owning a fine Browning firearm. While special finishes such as engraving and gold plating greatly enhance the aesthetic appeal of your rifle, please be slightly less durable than more common firearm finishes. When the surface becomes spotted ...

