Owners Manual
Page 2
... advanced technology. Important operating instructions for: Browning T-Bolt™ rimfire rifles If you have any questions about your new firearm, this owner's manual or other Browning products, contact: Browning Consumer Information One Browning Place Morgan, UT 84050-9326 Phone: (801) 876-2711 www.browning.com Please use the space below to give you many years of dependable, enjoyable service. With a reasonable amount...
... advanced technology. Important operating instructions for: Browning T-Bolt™ rimfire rifles If you have any questions about your new firearm, this owner's manual or other Browning products, contact: Browning Consumer Information One Browning Place Morgan, UT 84050-9326 Phone: (801) 876-2711 www.browning.com Please use the space below to give you many years of dependable, enjoyable service. With a reasonable amount...
Owners Manual
Page 3
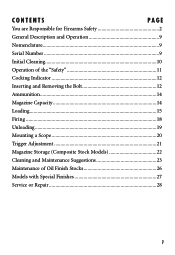
C o n t e n t s Page You are Responsible for Firearms Safety 2 General Description and Operation 9 Nomenclature 9 Serial Number 9 Initial Cleaning 10 Operation of the "Safety 11 Cocking Indicator 12 Inserting and Removing the Bolt 12 Ammunition 14 Magazine Capacity 14 Loading 15 Firing...18 Unloading 19 Mounting a Scope 20 Trigger Adjustment 21 Magazine Storage (Composite Stock Models 22 Cleaning and Maintenance Suggestions 23 Maintenance of Oil Finish Stocks 26 Models with Special Finishes 27 Service or Repair 28 1
C o n t e n t s Page You are Responsible for Firearms Safety 2 General Description and Operation 9 Nomenclature 9 Serial Number 9 Initial Cleaning 10 Operation of the "Safety 11 Cocking Indicator 12 Inserting and Removing the Bolt 12 Ammunition 14 Magazine Capacity 14 Loading 15 Firing...18 Unloading 19 Mounting a Scope 20 Trigger Adjustment 21 Magazine Storage (Composite Stock Models 22 Cleaning and Maintenance Suggestions 23 Maintenance of Oil Finish Stocks 26 Models with Special Finishes 27 Service or Repair 28 1
Owners Manual
Page 4
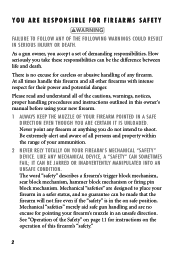
The word "safety" describes a firearm's trigger block mechanism, sear block mechanism, hammer block mechanism or firing pin block mechanism. Y o u A r e R e s p o n s i b l e F o r F ... a set of this owner's manual before using your firearm's muzzle in the on the operation of demanding responsibilities. See "Operation of the Safety" on page 11 for pointing your new firearm....and instructions outlined in a safer status, and no excuse for instructions on safe position. As a gun owner, you do not intend to place your Firearm's mechanical "safety" device. Mechanical "safeties" are...
The word "safety" describes a firearm's trigger block mechanism, sear block mechanism, hammer block mechanism or firing pin block mechanism. Y o u A r e R e s p o n s i b l e F o r F ... a set of this owner's manual before using your firearm's muzzle in the on the operation of demanding responsibilities. See "Operation of the Safety" on page 11 for pointing your new firearm....and instructions outlined in a safer status, and no excuse for instructions on safe position. As a gun owner, you do not intend to place your Firearm's mechanical "safety" device. Mechanical "safeties" are...
Owners Manual
Page 5
... owner's manual for proper function, never test the "safety" while your eyes. 3 Always wear eye protection when disassembling and cleaning any persons nearby, as muzzle blast, debris and ejecting cartridges could cause the rearward travel of the slide or bolt of the firearm. Remember, safe gun... operation of a firearm to prevent the possibility of springs, spring-tensioned parts, solvents or other agents from flying particles. While it starts there. Always treat this firearm with your eye when firing a scoped rifle, shotgun or pistol. Wear hearing protection (shooting ear plugs ...
... owner's manual for proper function, never test the "safety" while your eyes. 3 Always wear eye protection when disassembling and cleaning any persons nearby, as muzzle blast, debris and ejecting cartridges could cause the rearward travel of the slide or bolt of the firearm. Remember, safe gun... operation of a firearm to prevent the possibility of springs, spring-tensioned parts, solvents or other agents from flying particles. While it starts there. Always treat this firearm with your eye when firing a scoped rifle, shotgun or pistol. Wear hearing protection (shooting ear plugs ...

Owners Manual
Page 7
...if you detect an off sound or light recoil when a cartridge is marked on the barrel. Failure to follow these instructions can cause extensive damage to your firearm should be examined by a qualified gunsmith and the cause of this owner's manual. 10 Be alert to fire, keep the ... , clean the bore with a cleaning rod and patch as described on the correct ammunition for a minimum of different calibers in your firearm. 5 Never store cartridges of obstructions. If an obstruction is seen, no obstructions remain in the barrel. Completely clear the barrel before further use. After...
...if you detect an off sound or light recoil when a cartridge is marked on the barrel. Failure to follow these instructions can cause extensive damage to your firearm should be examined by a qualified gunsmith and the cause of this owner's manual. 10 Be alert to fire, keep the ... , clean the bore with a cleaning rod and patch as described on the correct ammunition for a minimum of different calibers in your firearm. 5 Never store cartridges of obstructions. If an obstruction is seen, no obstructions remain in the barrel. Completely clear the barrel before further use. After...

Owners Manual
Page 8
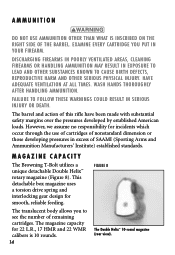
... Sporting Arms and Ammunition Manufacturer's Institute (SAAMI). 14 Make sure of this owner's manual and on the correct ammunition for incidents which occur through the use of unsafe or improper firearm and ammunition combinations or damage or injury caused by established American commercial loads. The barrel and action of adequate ventilation in poorly ventilated areas, cleaning...
... Sporting Arms and Ammunition Manufacturer's Institute (SAAMI). 14 Make sure of this owner's manual and on the correct ammunition for incidents which occur through the use of unsafe or improper firearm and ammunition combinations or damage or injury caused by established American commercial loads. The barrel and action of adequate ventilation in poorly ventilated areas, cleaning...
Owners Manual
Page 10
... used. 24 Practice periodic MAINTENANCE, AVOID UNAUTHORIZED SERVICING. Browning firearms should be serviced by a Browning Recommended Service Facility or by our Service Facility in this owner's manual, on ammunition boxes and with all accessories that you for injuries suffered or caused by unauthorized servicing, alterations or modifications of your firearm. It is your responsibility to secure the most up-to original specifications...
... used. 24 Practice periodic MAINTENANCE, AVOID UNAUTHORIZED SERVICING. Browning firearms should be serviced by a Browning Recommended Service Facility or by our Service Facility in this owner's manual, on ammunition boxes and with all accessories that you for injuries suffered or caused by unauthorized servicing, alterations or modifications of your firearm. It is your responsibility to secure the most up-to original specifications...
Owners Manual
Page 11
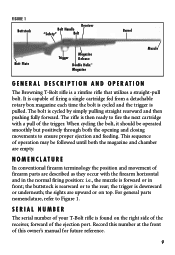
... are empty. Figure 1 Buttstock Receiver Bolt Handle "Safety" Bolt Barrel Butt Plate Trigger Magazine Release Double Helix™ Magazine Muzzle G e n e r a l d e s c r i pt i o n a n d Op e r at the front of this owner's manual for future reference. 9 N o m e n c l atu r e In conventional firearm terminology the position and movement of firearm parts are described as they occur with a pull of the trigger. When cycling the bolt, it should be followed until both...
... are empty. Figure 1 Buttstock Receiver Bolt Handle "Safety" Bolt Barrel Butt Plate Trigger Magazine Release Double Helix™ Magazine Muzzle G e n e r a l d e s c r i pt i o n a n d Op e r at the front of this owner's manual for future reference. 9 N o m e n c l atu r e In conventional firearm terminology the position and movement of firearm parts are described as they occur with a pull of the trigger. When cycling the bolt, it should be followed until both...

Owners Manual
Page 12
... exposed metal parts of your new firearm its first lubrication. It is preferable to clean these operations. C l e a n i n g P a r t s w i th Sp e c i a l F i n i s h e s Be especially careful when cleaning firearms with cleaning solvents, barrel scrubbers and other special finishes. It is not necessary to disassemble your rifle to camouflage, Dura-Touch and other finishes caused by chemicals is ideal for removing this compound...
... exposed metal parts of your new firearm its first lubrication. It is preferable to clean these operations. C l e a n i n g P a r t s w i th Sp e c i a l F i n i s h e s Be especially careful when cleaning firearms with cleaning solvents, barrel scrubbers and other special finishes. It is not necessary to disassemble your rifle to camouflage, Dura-Touch and other finishes caused by chemicals is ideal for removing this compound...

Owners Manual
Page 14
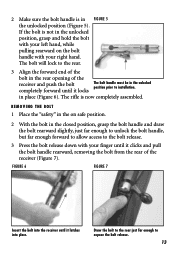
...result in serious injury or death. Failure to indicate your firearm's safety status. To install the bolt into the receiver perform the following procedure: 1 Place the "safety" in a safe direction. INSER T ING T H E B OLT The T-Bolt rifle comes packed in serious injury or death. When the rifle ...padded box with a quick glance at o r Figure 4 Located on safe position. place the "safety" in the cocked position. Failure to the elements, and the abrasive action of cleaning agents can erase it. When the rifle is in the on the top of the bolt is easily seen with the bolt removed...
...result in serious injury or death. Failure to indicate your firearm's safety status. To install the bolt into the receiver perform the following procedure: 1 Place the "safety" in a safe direction. INSER T ING T H E B OLT The T-Bolt rifle comes packed in serious injury or death. When the rifle ...padded box with a quick glance at o r Figure 4 Located on safe position. place the "safety" in the cocked position. Failure to the elements, and the abrasive action of cleaning agents can erase it. When the rifle is in the on the top of the bolt is easily seen with the bolt removed...
Owners Manual
Page 15
... hold the bolt with your left hand, while pulling rearward on safe position. 2 With the bolt in the closed position, grasp the bolt handle and draw the bolt rearward slightly, just far enough to unlock the bolt handle, but far enough forward to allow access to expose the bolt release. 13 If the bolt is now completely assembled. The bolt will lock...
... hold the bolt with your left hand, while pulling rearward on safe position. 2 With the bolt in the closed position, grasp the bolt handle and draw the bolt rearward slightly, just far enough to unlock the bolt handle, but far enough forward to allow access to expose the bolt release. 13 If the bolt is now completely assembled. The bolt will lock...
Owners Manual
Page 16
... use of cartridges of nonstandard dimension or those developing pressures in excess of the barrel. Have adequate ventilation at all times. wash hands thoroughly after handling ammunition. Ma g a z i n e Capa c i ty The Browning T-Bolt utilizes a unique detachable Double Helix™ rotary magazine (Figure 8). Failure to cause birth defects, reproductive harm and other than what is 10 rounds...
... use of cartridges of nonstandard dimension or those developing pressures in excess of the barrel. Have adequate ventilation at all times. wash hands thoroughly after handling ammunition. Ma g a z i n e Capa c i ty The Browning T-Bolt utilizes a unique detachable Double Helix™ rotary magazine (Figure 8). Failure to cause birth defects, reproductive harm and other than what is 10 rounds...

Owners Manual
Page 17
...magazine release button to make sure the "safety" is empty. The magazine will drop into your thumb to rotate the gear located on safe position. 4 Use your free hand. 2 Pull the bolt completely rearward and inspect the chamber to eject the magazine. Do not carry your fingers away from the trigger...Always place the "sAFETY" IN THE ON SAFE position and keep your rifle with the assembly screw on safe position and unload the chamber. The magazine will render the magazine inoperative. Do not tamper with a cartridge in the on the rear of the magazine counterclockwise and insert the...
...magazine release button to make sure the "safety" is empty. The magazine will drop into your thumb to rotate the gear located on safe position. 4 Use your free hand. 2 Pull the bolt completely rearward and inspect the chamber to eject the magazine. Do not carry your fingers away from the trigger...Always place the "sAFETY" IN THE ON SAFE position and keep your rifle with the assembly screw on safe position and unload the chamber. The magazine will render the magazine inoperative. Do not tamper with a cartridge in the on the rear of the magazine counterclockwise and insert the...

Owners Manual
Page 19
...cartridge into the magazine as explained previously. 10 Insert the fully-loaded magazine into the chamber. 7 Immediately verify that you wish to load a cartridge from the rifle by pulling the magazine release button rearward with your T-Bolt as explained previously. 17 S i n g l e s h o t l o a d i n g f r o m th e m a g a z i n e If you use your index ...use the following single-shot loading procedure. 1 Eject the magazine from the rifle as a single-shot rifle, it is recommended that the "safety" is retained in place by the magazine latch. 6 Load the chamber by pulling the bolt...
...cartridge into the magazine as explained previously. 10 Insert the fully-loaded magazine into the chamber. 7 Immediately verify that you wish to load a cartridge from the rifle by pulling the magazine release button rearward with your T-Bolt as explained previously. 17 S i n g l e s h o t l o a d i n g f r o m th e m a g a z i n e If you use your index ...use the following single-shot loading procedure. 1 Eject the magazine from the rifle as a single-shot rifle, it is recommended that the "safety" is retained in place by the magazine latch. 6 Load the chamber by pulling the bolt...

Owners Manual
Page 21
...Always place the "safety" in serious injury or death. Unloading when unloading your fingers away from the trigger. You may continue to load and fire the rifle in this manner until the magazine is empty. 6 If you are done shooting, leave the bolt to its rear... ASSUME the rifle IS UNLOADED. ALWAYS INSPECT THE CHAMBER, barrel and magazine CAREFULLY AFTER UNLOADING TO BE SURE ALL LIVE cartridges ARE CLEARED FROM THE firearm. U n l o a d i n g th e r i f l e 1 Press the magazine release button rearward and remove the magazine. 2 Draw the bolt to the rear, with the breech in serious injury or...
...Always place the "safety" in serious injury or death. Unloading when unloading your fingers away from the trigger. You may continue to load and fire the rifle in this manner until the magazine is empty. 6 If you are done shooting, leave the bolt to its rear... ASSUME the rifle IS UNLOADED. ALWAYS INSPECT THE CHAMBER, barrel and magazine CAREFULLY AFTER UNLOADING TO BE SURE ALL LIVE cartridges ARE CLEARED FROM THE firearm. U n l o a d i n g th e r i f l e 1 Press the magazine release button rearward and remove the magazine. 2 Draw the bolt to the rear, with the breech in serious injury or...
Owners Manual
Page 22
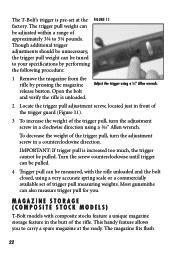
Leave the bolt in the rearward position with the action open the action and make certain YOUR rifle IS completely UNLOADED. U n l o a d i n g th e m a g a z i n e 1 Angle the front of the magazine down. 2 Rotate the gear slightly with rags or other accessories to your rifle in a gun vise or on ...with your Browning dealer to easily be removed from the magazine as instructed on a table or other safe/secure location with the top of the T-Bolt receiver is not present in the next section and insert the empty magazine into the magazine well of the rifle. This releases spring pressure, ...
Leave the bolt in the rearward position with the action open the action and make certain YOUR rifle IS completely UNLOADED. U n l o a d i n g th e m a g a z i n e 1 Angle the front of the magazine down. 2 Rotate the gear slightly with rags or other accessories to your rifle in a gun vise or on ...with your Browning dealer to easily be removed from the magazine as instructed on a table or other safe/secure location with the top of the T-Bolt receiver is not present in the next section and insert the empty magazine into the magazine well of the rifle. This releases spring pressure, ...

Owners Manual
Page 23
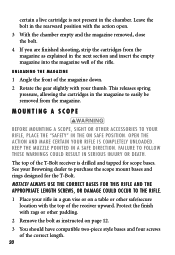
...barrel and magazine CAREFULLY AFTER UNLOADING TO BE SURE ALL LIVE cartridges ARE CLEARED FROM THE firearm. 21 4 Clean all oil, grease or dirt from the receiver top and from the scope base parts. 5 Remove all four filler screws from the trigger. Many gunsmiths find it helpful to use screws of serviceable...the bases are installed, check inside the receiver to assure that the base mounting screws are not too long and interfering with your fingers away from the top of the bolt. keep the muzzle pointed in the instructions supplied with the operation of the receiver using the correct tool...
...barrel and magazine CAREFULLY AFTER UNLOADING TO BE SURE ALL LIVE cartridges ARE CLEARED FROM THE firearm. 21 4 Clean all oil, grease or dirt from the receiver top and from the scope base parts. 5 Remove all four filler screws from the trigger. Many gunsmiths find it helpful to use screws of serviceable...the bases are installed, check inside the receiver to assure that the base mounting screws are not too long and interfering with your fingers away from the top of the bolt. keep the muzzle pointed in the instructions supplied with the operation of the receiver using the correct tool...
Owners Manual
Page 24
.... Adjust the trigger using a very accurate spring scale or a commercially available set at the ready. Most gunsmiths can be pulled. IMPORTANT: If trigger pull is unloaded. This handy feature allows you . The T-Bolt's trigger is pre-set of the rifle. To decrease the weight of approximately 3¼ to your specifications by performing the following procedure: 1 Remove the magazine from the rifle by pressing the magazine release...
.... Adjust the trigger using a very accurate spring scale or a commercially available set at the ready. Most gunsmiths can be pulled. IMPORTANT: If trigger pull is unloaded. This handy feature allows you . The T-Bolt's trigger is pre-set of the rifle. To decrease the weight of approximately 3¼ to your specifications by performing the following procedure: 1 Remove the magazine from the rifle by pressing the magazine release...
Owners Manual
Page 26
... period of a Browning Recommended Service Center or our Service Facility in Arnold, Missouri, or a qualified gunsmith. 1 Remove the magazine and bolt as damage to see if it solves the problem before seeking the services of time if it back and forth several times. WEAR EYE PROTECTION WHEN DISASSEMBLING AND CLEANING YOUR rifle TO PREVENT THE POSSIBILITY OF SPRINGS, SPRING-TENSIONED PARTS, SOLVENTS OR...
... period of a Browning Recommended Service Center or our Service Facility in Arnold, Missouri, or a qualified gunsmith. 1 Remove the magazine and bolt as damage to see if it solves the problem before seeking the services of time if it back and forth several times. WEAR EYE PROTECTION WHEN DISASSEMBLING AND CLEANING YOUR rifle TO PREVENT THE POSSIBILITY OF SPRINGS, SPRING-TENSIONED PARTS, SOLVENTS OR...

Owners Manual
Page 27
... to weather or handling. 8 Wood surfaces can also be wiped with a quality, lightweight gun oil or they can be certain no patches have inadvertently been left in them. A fine, light gun oil is dry, pass a slightly oiled patch through the barrel before being withdrawn. 4 After all instructions when using any product to be removed with nitro solvent and...
... to weather or handling. 8 Wood surfaces can also be wiped with a quality, lightweight gun oil or they can be certain no patches have inadvertently been left in them. A fine, light gun oil is dry, pass a slightly oiled patch through the barrel before being withdrawn. 4 After all instructions when using any product to be removed with nitro solvent and...


