Owners Manual
Page 3
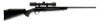
C o n t e n t s Page You are Responsible for Firearms Safety 2 General Description and Operation 9 Nomenclature 9 Serial Number 9 Initial Cleaning 10 Operation of the "Safety 11 Cocking Indicator 12 Inserting and Removing the Bolt 12 Ammunition 14 Magazine Capacity 14 Loading 15 Firing...18 Unloading 19 Mounting a Scope 20 Trigger Adjustment 21 Magazine Storage (Composite Stock Models 22 Cleaning and Maintenance Suggestions 23 Maintenance of Oil Finish Stocks 26 Models with Special Finishes 27 Service or Repair 28 1
C o n t e n t s Page You are Responsible for Firearms Safety 2 General Description and Operation 9 Nomenclature 9 Serial Number 9 Initial Cleaning 10 Operation of the "Safety 11 Cocking Indicator 12 Inserting and Removing the Bolt 12 Ammunition 14 Magazine Capacity 14 Loading 15 Firing...18 Unloading 19 Mounting a Scope 20 Trigger Adjustment 21 Magazine Storage (Composite Stock Models 22 Cleaning and Maintenance Suggestions 23 Maintenance of Oil Finish Stocks 26 Models with Special Finishes 27 Service or Repair 28 1
Owners Manual
Page 4
... a gun owner, you do not intend to shoot. Never point any firearm at anything you accept a set of demanding responsibilities. The word "safety" describes a firearm's trigger block mechanism, sear block mechanism, hammer block mechanism or firing pin block mechanism. Y o u A r e R e s p o n s i b l e F o r F i r e a r m s Sa f e ty Failure to follow any of the following warnings could result...
... a gun owner, you do not intend to shoot. Never point any firearm at anything you accept a set of demanding responsibilities. The word "safety" describes a firearm's trigger block mechanism, sear block mechanism, hammer block mechanism or firing pin block mechanism. Y o u A r e R e s p o n s i b l e F o r F i r e a r m s Sa f e ty Failure to follow any of the following warnings could result...

Owners Manual
Page 8
... occur through the use of adequate ventilation in the area that you are certain the firearm is unloaded. 16 KEEP YOUR Fingers AWAY FROM THE TRIGGER WHILE LOADING and unloading UNTIL shooting is a substance that has been known to ammunition or after cleaning a firearm. 15 do not snap the firing pin...
... occur through the use of adequate ventilation in the area that you are certain the firearm is unloaded. 16 KEEP YOUR Fingers AWAY FROM THE TRIGGER WHILE LOADING and unloading UNTIL shooting is a substance that has been known to ammunition or after cleaning a firearm. 15 do not snap the firing pin...
Owners Manual
Page 10
... Service Facility or by unauthorized servicing, alterations or modifications of Browning firearms. 25 WE RESERVE THE RIGHT TO REFUSE SERVICE ON FIREARMS THAT HAVE BEEN ALTERED, ADDED TO OR SUBSTANTIALLY CHANGED. DO NOT, UNDER ANY CIRCUMSTANCES, ALTER THE TRIGGER, SAFETY OR other PARTS OF THE FIRING MECHANISM OF THIS OR ANY OTHER... to secure the most up-to-date information on the safe handling procedures of service on such firearms. We will charge you install on your Browning firearm.
... Service Facility or by unauthorized servicing, alterations or modifications of Browning firearms. 25 WE RESERVE THE RIGHT TO REFUSE SERVICE ON FIREARMS THAT HAVE BEEN ALTERED, ADDED TO OR SUBSTANTIALLY CHANGED. DO NOT, UNDER ANY CIRCUMSTANCES, ALTER THE TRIGGER, SAFETY OR other PARTS OF THE FIRING MECHANISM OF THIS OR ANY OTHER... to secure the most up-to-date information on the safe handling procedures of service on such firearms. We will charge you install on your Browning firearm.
Owners Manual
Page 11
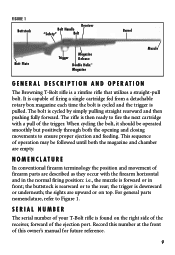
...a single cartridge fed from a detachable rotary box magazine each time the bolt is cycled and the trigger is then ready to ensure proper ejection and feeding. When cycling the bolt, it should be followed until both the opening and closing movements to ...of the ejection port. the trigger is rearward or to Figure 1. Figure 1 Buttstock Receiver Bolt Handle "Safety" Bolt Barrel Butt Plate Trigger Magazine Release Double Helix™ Magazine Muzzle G e n e r a l d e s c r i pt i o n a n d Op e r at the front of this number at i o n The Browning T-Bolt rifle is found on top....
...a single cartridge fed from a detachable rotary box magazine each time the bolt is cycled and the trigger is then ready to ensure proper ejection and feeding. When cycling the bolt, it should be followed until both the opening and closing movements to ...of the ejection port. the trigger is rearward or to Figure 1. Figure 1 Buttstock Receiver Bolt Handle "Safety" Bolt Barrel Butt Plate Trigger Magazine Release Double Helix™ Magazine Muzzle G e n e r a l d e s c r i pt i o n a n d Op e r at the front of this number at i o n The Browning T-Bolt rifle is found on top....

Owners Manual
Page 17
...located on safe position and unload the chamber. The magazine will drop into your thumb to avoid accidental discharge. NOTICE! Figure 9 3 Close the bolt and place the "safety" in the on the right rear side of the magazine, with a cartridge in front of the magazine counterclockwise and ...insert the cartridge base first into your fingers away from the trigger. Care should be exercised in a safe direction, Always place the "sAFETY" IN THE ON SAFE position and keep your hand. 15 Doing ...
...located on safe position and unload the chamber. The magazine will drop into your thumb to avoid accidental discharge. NOTICE! Figure 9 3 Close the bolt and place the "safety" in the on the right rear side of the magazine, with a cartridge in front of the magazine counterclockwise and ...insert the cartridge base first into your fingers away from the trigger. Care should be exercised in a safe direction, Always place the "sAFETY" IN THE ON SAFE position and keep your hand. 15 Doing ...

Owners Manual
Page 19
...READY TO FIRE BY SIMPLY MOVING THE "safety" TO THE OFF SAFE POSITION and pulling the trigger. 8 Eject the magazine from the rifle by pulling the bolt fully rearward and then pushing it fully forward to the closed, locked position to load a cartridge... now READY TO FIRE BY SIMPLY MOVING THE "safety" TO THE OFF SAFE POSITION and pulling the trigger. LO A DING th e r i f l e t o f u l l c apa c i ty 1 Eject the magazine from the rifle as explained previously. 2 Pull the bolt completely rearward and inspect the chamber to use your index finger. S i n g l e s h o t l o a d i n g f r o m th e m a...
...READY TO FIRE BY SIMPLY MOVING THE "safety" TO THE OFF SAFE POSITION and pulling the trigger. 8 Eject the magazine from the rifle by pulling the bolt fully rearward and then pushing it fully forward to the closed, locked position to load a cartridge... now READY TO FIRE BY SIMPLY MOVING THE "safety" TO THE OFF SAFE POSITION and pulling the trigger. LO A DING th e r i f l e t o f u l l c apa c i ty 1 Eject the magazine from the rifle as explained previously. 2 Pull the bolt completely rearward and inspect the chamber to use your index finger. S i n g l e s h o t l o a d i n g f r o m th e m a...

Owners Manual
Page 20
...Load a single cartridge into the magazine. 5 Insert the magazine into the rifle. 6 When ready to shoot, load the chamber by pulling the bolt fully rearward and then pushing it fully forward to the closed, locked position to load the single cartridge from the magazine into the chamber. 7 ...need only move the "safety" to the off safe position, take aim and squeeze the trigger. 5 After a cartridge is fired, cycle the bolt rearward to continue shooting, push the bolt fully forward. 2 Pull the bolt completely rearward and inspect the chamber to make the rifle ready for firing. 4 When ready...
...Load a single cartridge into the magazine. 5 Insert the magazine into the rifle. 6 When ready to shoot, load the chamber by pulling the bolt fully rearward and then pushing it fully forward to the closed, locked position to load the single cartridge from the magazine into the chamber. 7 ...need only move the "safety" to the off safe position, take aim and squeeze the trigger. 5 After a cartridge is fired, cycle the bolt rearward to continue shooting, push the bolt fully forward. 2 Pull the bolt completely rearward and inspect the chamber to make the rifle ready for firing. 4 When ready...

Owners Manual
Page 21
...cartridges. This will extract and eject any live cartridge that you are done shooting, leave the bolt to be sure they contain no longer imminent, immediately PLACE THE "SAFETY" IN THE ON ...i n g th e r i f l e 1 Press the magazine release button rearward and remove the magazine. 2 Draw the bolt to follow these warnings could result in the chamber. Failure to follow these warnings could result in serious injury or death. Failure to ...in serious injury or death. EVEN WITH THE bolt OPEN AFTER SHOOTING, DO NOT ASSUME the rifle IS UNLOADED. Unloading when unloading your fingers...
...cartridges. This will extract and eject any live cartridge that you are done shooting, leave the bolt to be sure they contain no longer imminent, immediately PLACE THE "SAFETY" IN THE ON ...i n g th e r i f l e 1 Press the magazine release button rearward and remove the magazine. 2 Draw the bolt to follow these warnings could result in the chamber. Failure to follow these warnings could result in serious injury or death. Failure to ...in serious injury or death. EVEN WITH THE bolt OPEN AFTER SHOOTING, DO NOT ASSUME the rifle IS UNLOADED. Unloading when unloading your fingers...

Owners Manual
Page 23
...careful to assure that the base mounting screws are not too long and interfering with your fingers away from the top of the bolt. trigger adjustment Before adjusting the trigger, Always place the "safety" in serious injury or death. Once the bases are installed, check inside the receiver to verify that... 4 Clean all oil, grease or dirt from the receiver top and from the scope base parts. 5 Remove all four filler screws from the trigger. You must use a drop of each screw engage properly in the receiver threads to assure the screws stay tight. Failure to follow these warnings could...
...careful to assure that the base mounting screws are not too long and interfering with your fingers away from the top of the bolt. trigger adjustment Before adjusting the trigger, Always place the "safety" in serious injury or death. Once the bases are installed, check inside the receiver to verify that... 4 Clean all oil, grease or dirt from the receiver top and from the scope base parts. 5 Remove all four filler screws from the trigger. You must use a drop of each screw engage properly in the receiver threads to assure the screws stay tight. Failure to follow these warnings could...
Owners Manual
Page 24
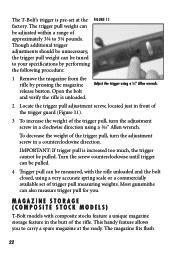
... the following procedure: 1 Remove the magazine from the rifle by pressing the magazine release button. Open the bolt and verify the rifle is increased too much, the trigger cannot be adjusted within a range of approximately 3¼ to carry a spare magazine at the Figure 11 ...factory. The magazine fits flush 22 The T-Bolt's trigger is pre-set of trigger pull measuring weights. The trigger pull weight can be measured, with composite stocks feature a unique magazine storage feature in a clockwise direction using a ...
... the following procedure: 1 Remove the magazine from the rifle by pressing the magazine release button. Open the bolt and verify the rifle is increased too much, the trigger cannot be adjusted within a range of approximately 3¼ to carry a spare magazine at the Figure 11 ...factory. The magazine fits flush 22 The T-Bolt's trigger is pre-set of trigger pull measuring weights. The trigger pull weight can be measured, with composite stocks feature a unique magazine storage feature in a clockwise direction using a ...

