

Owners Manual
Page 2
... use the space below to provide you the best in autoloading shotguns. The Maxus shotgun represents the most advanced gas-operated technology available in reliable operation and handling. With a reasonable amount of care, your Maxus shotgun is engineered to record information about your new firearm. Every detail of Purchase THAN K Y OU F OR c h o O s ING a Browning Maxus...
... use the space below to provide you the best in autoloading shotguns. The Maxus shotgun represents the most advanced gas-operated technology available in reliable operation and handling. With a reasonable amount of care, your Maxus shotgun is engineered to record information about your new firearm. Every detail of Purchase THAN K Y OU F OR c h o O s ING a Browning Maxus...
Owners Manual
Page 3
...manipulated into an unsafe condition. Be extremely alert and aware of all other agents from flying particles. Always treat this owner's manual before using your firearm's mechanical "safety" devices, it to someone, always open the action immediately and visually check the firearm's chamber to test ...such damage. it is a good idea to Make certain that could result in an unsafe direction. Like any ammunition. Do not use unorthodox shooting methods that the firearm is loaded or pointed in this firearm with intense respect for proper function, never test the "...
...manipulated into an unsafe condition. Be extremely alert and aware of all other agents from flying particles. Always treat this owner's manual before using your firearm's mechanical "safety" devices, it to someone, always open the action immediately and visually check the firearm's chamber to test ...such damage. it is a good idea to Make certain that could result in an unsafe direction. Like any ammunition. Do not use unorthodox shooting methods that the firearm is loaded or pointed in this firearm with intense respect for proper function, never test the "...

Owners Manual
Page 4
...is marked on the correct ammunition for a minimum of the malfunction corrected before loading and firing again. Doing so may inadvertently lodge in use . Glance down from the stand. This can damage your firearm is fired, do not load another shell into any firearm. 7 hunting...holster, gun case, scabbard or other objects may increase the risk of the incorrect gauge into the chamber. Completely clear the barrel before further use . 9 BEWARE OF BARREL OBSTRUCTIONS. The gauge of other container. 6 DROPPING or jarring A LOADED FIREARM CAN CAUSE ACCIDENTAL DISCHARGE. Be ...
...is marked on the correct ammunition for a minimum of the malfunction corrected before loading and firing again. Doing so may inadvertently lodge in use . Glance down from the stand. This can damage your firearm is fired, do not load another shell into any firearm. 7 hunting...holster, gun case, scabbard or other objects may increase the risk of the incorrect gauge into the chamber. Completely clear the barrel before further use . 9 BEWARE OF BARREL OBSTRUCTIONS. The gauge of other container. 6 DROPPING or jarring A LOADED FIREARM CAN CAUSE ACCIDENTAL DISCHARGE. Be ...

Owners Manual
Page 5
... before disassembly, cleaning and reassembly. Nevertheless, we can occur from the cleaning location. Lead exposure can assume no responsibility for the use of shells of nonstandard dimensions or which develop pressures in this firearm have been made with standards established by the Sporting Arms and Ammunition...in the area that has been known to read and heed all warnings in excess of commercially available ammunition which occur through the use of your firearm on an empty chamber; Know the range of unsafe or improper firearm and ammunition combinations or damage or injury...
... before disassembly, cleaning and reassembly. Nevertheless, we can occur from the cleaning location. Lead exposure can assume no responsibility for the use of shells of nonstandard dimensions or which develop pressures in this firearm have been made with standards established by the Sporting Arms and Ammunition...in the area that has been known to read and heed all warnings in excess of commercially available ammunition which occur through the use of your firearm on an empty chamber; Know the range of unsafe or improper firearm and ammunition combinations or damage or injury...
Owners Manual
Page 6
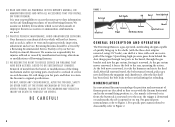
.... the buttstock is a gas-operated, autoloading shotgun capable of quickly firing up to five shells (with the three-shot adaptor removed, using 2¾" loads), one shell at a time, with all accessories that you for injuries suffered or caused by our Service Facility in the... Barrel Front Sight Bead Recoil Pad "Safety" Receiver Forearm Trigger Bolt Release Button Muzzle Speed Lock Lever G e n e r a l d e s c r i p t i o n a n d Op e r a t i o n The Browning Maxus is rearward or to the rear; After the last shell has been fired, the bolt locks to Figure 2. 8 9 the rib is your...
.... the buttstock is a gas-operated, autoloading shotgun capable of quickly firing up to five shells (with the three-shot adaptor removed, using 2¾" loads), one shell at a time, with all accessories that you for injuries suffered or caused by our Service Facility in the... Barrel Front Sight Bead Recoil Pad "Safety" Receiver Forearm Trigger Bolt Release Button Muzzle Speed Lock Lever G e n e r a l d e s c r i p t i o n a n d Op e r a t i o n The Browning Maxus is rearward or to the rear; After the last shell has been fired, the bolt locks to Figure 2. 8 9 the rib is your...
Owners Manual
Page 7
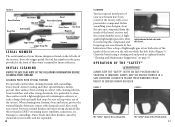
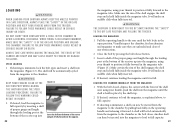
.... C l e a n i n g P a r t s w i t h Sp e c i a l F i n i s h e s Be especially careful when cleaning firearms with a rust preventative compound. Before assembling your Maxus shotgun is found in serious injury or death. A high- Always keep water out of the action). Damage to keep the muzzle pointed in the space... areas. Place a drop of lightweight gun oil on which the bolt slides (Figure 3). for future reference. Clean the barrel using a cleaning rod and patch as explained under "Cleaning and Maintenance Suggestions" on the left side of the "Safety" Always keep...
.... C l e a n i n g P a r t s w i t h Sp e c i a l F i n i s h e s Be especially careful when cleaning firearms with a rust preventative compound. Before assembling your Maxus shotgun is found in serious injury or death. A high- Always keep water out of the action). Damage to keep the muzzle pointed in the space... areas. Place a drop of lightweight gun oil on which the bolt slides (Figure 3). for future reference. Clean the barrel using a cleaning rod and patch as explained under "Cleaning and Maintenance Suggestions" on the left side of the "Safety" Always keep...

Owners Manual
Page 9
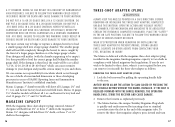
... side of the forearm. DO NOT PRESS THE bolt RELEASE BUTTON. The gauge and length of a wood forearm. Do not use 3" or 3½" shells in a barrel with the forearm, as explained previously. Use shells of the correct gauge and length. Ensure the forearm is secured correctly, with the button flush with a 2¾... fully locked, the release button is inscribed on the side of the forearm (Figure 9). Too much pressure could result in a safe direction. Notice! Do not use ammunition other than what is flush with stock and forearm. Ammunition...
... side of the forearm. DO NOT PRESS THE bolt RELEASE BUTTON. The gauge and length of a wood forearm. Do not use 3" or 3½" shells in a barrel with the forearm, as explained previously. Use shells of the correct gauge and length. Ensure the forearm is secured correctly, with the button flush with a 2¾... fully locked, the release button is inscribed on the side of the forearm (Figure 9). Too much pressure could result in a safe direction. Notice! Do not use ammunition other than what is flush with stock and forearm. Ammunition...
Owners Manual
Page 10
... by pulling the operating handle fully to follow this warning could result in a 20 gauge shotgun. Maxus 12 gauge, 3½" chamber models will not fall completely through the use of shells of nonstandard dimension or those developing pressures in excess of any kind in a buildup of... the magazine tube. Doing so can remove (or reinstall) the three-shot adapter as explained previously. 3 The Maxus features the unique TurnKey Magazine ...
... by pulling the operating handle fully to follow this warning could result in a 20 gauge shotgun. Maxus 12 gauge, 3½" chamber models will not fall completely through the use of shells of nonstandard dimension or those developing pressures in excess of any kind in a buildup of... the magazine tube. Doing so can remove (or reinstall) the three-shot adapter as explained previously. 3 The Maxus features the unique TurnKey Magazine ...

Owners Manual
Page 11
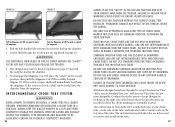
... forearm as explained previously. NEVER ALLOW THE ACTION TO SLAM CLOSED BY PRESSING THE Bolt RELEASE BUTTON WITHOUT THE BARREL INSTALLED. Figure 10 Figure 11 Use a key or small screwdriver to press in on the shotgun, hold it to prevent it from falling out of the receiver while pointing the magazine...
... forearm as explained previously. NEVER ALLOW THE ACTION TO SLAM CLOSED BY PRESSING THE Bolt RELEASE BUTTON WITHOUT THE BARREL INSTALLED. Figure 10 Figure 11 Use a key or small screwdriver to press in on the shotgun, hold it to prevent it from falling out of the receiver while pointing the magazine...
Owners Manual
Page 12
... magazine. Failure to follow these warnings could result in serious injury or death. Make certain the rim of the ejection port when loading the shotgun using your thumb to position it fully forward in the magazine tube. It will make sure the "safety" is imminent, lock the bolt open position. Keep...shell engages the shell stop . 2 If desired, continue to load the magazine, as the bolt closes. Another shell can now be inserted into the magazine, using your thumb, push the shell into the magazine until the shell is held in place by the shell stop and is held fully inside the...
... magazine. Failure to follow these warnings could result in serious injury or death. Make certain the rim of the ejection port when loading the shotgun using your thumb to position it fully forward in the magazine tube. It will make sure the "safety" is imminent, lock the bolt open position. Keep...shell engages the shell stop . 2 If desired, continue to load the magazine, as the bolt closes. Another shell can now be inserted into the magazine, using your thumb, push the shell into the magazine until the shell is held in place by the shell stop and is held fully inside the...

Owners Manual
Page 13
... be sure they are done shooting, leave the bolt locked to the rear, with the bolt locked to fire, move the "safety" into the magazine, using your fingers clear of any obstructions. 2 If shooting is completely unloaded. You may load the magazine to fire each shell. After a shell is empty by...
... be sure they are done shooting, leave the bolt locked to the rear, with the bolt locked to fire, move the "safety" into the magazine, using your fingers clear of any obstructions. 2 If shooting is completely unloaded. You may load the magazine to fire each shell. After a shell is empty by...

Owners Manual
Page 14
...is empty. Continue to do this feature you to unload a shell from the chamber without cycling a shell from the magazine. the magazine. 24 6 Using your index finger, feel the opening of the loading port (visually to the left side when looking down with your finger as far as it...shell stop with your index finger (Figure 15) to release a shell from the magazine. Failure to follow these warnings could result in the chamber using the Magazine Cut-Off, perform the following operation: 1 Pull the Magazine Cut-Off lever to the rear to avoid damaging shells. Take care to...
...is empty. Continue to do this feature you to unload a shell from the chamber without cycling a shell from the magazine. the magazine. 24 6 Using your index finger, feel the opening of the loading port (visually to the left side when looking down with your finger as far as it...shell stop with your index finger (Figure 15) to release a shell from the magazine. Failure to follow these warnings could result in the chamber using the Magazine Cut-Off, perform the following operation: 1 Pull the Magazine Cut-Off lever to the rear to avoid damaging shells. Take care to...
Owners Manual
Page 15
...and keep the muzzle pointed in barrels threaded for Invector-Plus tubes. DO NOT USE ANY OTHER CHOKING DEVICE IN ANY SHOTGUN BARRELS SUPPLIED BY BROWNING. completely unload the shotgun. All Maxus shotgun barrels are threaded to block the magazine. Figure 16 Figure 17 Pull the... Magazine Cut-Off rearward to accept the Invector-Plus™ choke system. Do not use Standard Invector tubes in the chamber...
...and keep the muzzle pointed in barrels threaded for Invector-Plus tubes. DO NOT USE ANY OTHER CHOKING DEVICE IN ANY SHOTGUN BARRELS SUPPLIED BY BROWNING. completely unload the shotgun. All Maxus shotgun barrels are threaded to block the magazine. Figure 16 Figure 17 Pull the... Magazine Cut-Off rearward to accept the Invector-Plus™ choke system. Do not use Standard Invector tubes in the chamber...
Owners Manual
Page 16
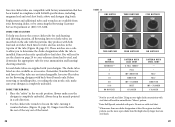
.... Do not use with steel shot. 1 When more open choke listed for high velocity, larger shot size steel loads. 29 Each Invector tube also has notches in an ineffective "blown" pattern. **Extra Full Special, extended with your Browning dealer, or by contacting the Browning Customer Service Department... make sure the shotgun is listed for each hunting and shooting situation, all Browning Invector choke tubes are supplied with ports. Using an over-tight choke constriction with steel shot will need to use the charts on the side with the patterns they produce with back-bored barrels...
.... Do not use with steel shot. 1 When more open choke listed for high velocity, larger shot size steel loads. 29 Each Invector tube also has notches in an ineffective "blown" pattern. **Extra Full Special, extended with your Browning dealer, or by contacting the Browning Customer Service Department... make sure the shotgun is listed for each hunting and shooting situation, all Browning Invector choke tubes are supplied with ports. Using an over-tight choke constriction with steel shot will need to use the charts on the side with the patterns they produce with back-bored barrels...
Owners Manual
Page 17
...engages the head of pull. When both screws are clean. Adjusting Length of pull by adding or removing spacers (available separately) to your Browning dealer or by calling our Customer Service Department at the end of the two access holes. Keep the muzzle pointed in the recoil pad... feels comfortable. Before checking, follow these warnings could result in the on safe position and make certain the shotgun is finger-tight, use the choke tube wrench to follow all choke tube removal and installation safety guidelines previously outlined. Spacers can be adjusted for length of ...
...engages the head of pull. When both screws are clean. Adjusting Length of pull by adding or removing spacers (available separately) to your Browning dealer or by calling our Customer Service Department at the end of the two access holes. Keep the muzzle pointed in the recoil pad... feels comfortable. Before checking, follow these warnings could result in the on safe position and make certain the shotgun is finger-tight, use the choke tube wrench to follow all choke tube removal and installation safety guidelines previously outlined. Spacers can be adjusted for length of ...

Owners Manual
Page 18
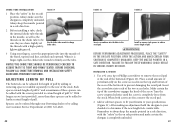
.... The neutral shim, No. 2, is already installed on your shotgun is completely unloaded and the "safety" is on safe position. 2 Use a #2 cross tip or Phillips screwdriver to the left approximately 1/8". For right-handed shooters, install shims between the buttstock and receiver, allowing ...customized adjustments to the stock using the screwdriver. The shims fit between the receiver and the stock with the barrel. Figure 22 4 Attach the recoil pad ...
.... The neutral shim, No. 2, is already installed on your shotgun is completely unloaded and the "safety" is on safe position. 2 Use a #2 cross tip or Phillips screwdriver to the left approximately 1/8". For right-handed shooters, install shims between the buttstock and receiver, allowing ...customized adjustments to the stock using the screwdriver. The shims fit between the receiver and the stock with the barrel. Figure 22 4 Attach the recoil pad ...
Owners Manual
Page 19
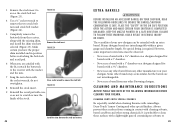
... action and make certain YOUR shotgun IS completely UNLOADED. It is safe. Maxus shotgun barrels are not interchangeable. • Never use a barrel from the receiver, along with the existing shim, and install ... installed and in contact with camouflage, Dura-Touch® Armor Coating and other Browning shotgun. place the "safety" in a safe direction. No special fitting is required. However, some important restrictions must be extended with a 3½" chamber. • Never use a barrel with a 3" chamber on your shotgun. Remove the stock insert. C l e a n i n g P a r ...
... action and make certain YOUR shotgun IS completely UNLOADED. It is safe. Maxus shotgun barrels are not interchangeable. • Never use a barrel from the receiver, along with the existing shim, and install ... installed and in contact with camouflage, Dura-Touch® Armor Coating and other Browning shotgun. place the "safety" in a safe direction. No special fitting is required. However, some important restrictions must be extended with a 3½" chamber. • Never use a barrel with a 3" chamber on your shotgun. Remove the stock insert. C l e a n i n g P a r ...
Owners Manual
Page 20
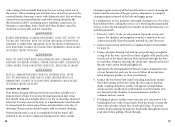
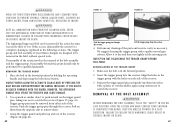
... these warnings could result in serious injury or death. C LEANING TH e b a r r e l Your Maxus shotgun will appear as explained under "Disassembly" on page 14. 3 Using a shotgun cleaning rod with a nylon brush and lightly oil. The gas system should clean your shotgun after every day... cleaning requires removal of the gas system components. Keep the muzzle pointed in injury. Never test the mechanical function of a Browning Recommended Service Center, the Browning Service Facility in Arnold, Missouri, or a qualified gunsmith. 1 Place the "safety" in the breech end of the action...
... these warnings could result in serious injury or death. C LEANING TH e b a r r e l Your Maxus shotgun will appear as explained under "Disassembly" on page 14. 3 Using a shotgun cleaning rod with a nylon brush and lightly oil. The gas system should clean your shotgun after every day... cleaning requires removal of the gas system components. Keep the muzzle pointed in injury. Never test the mechanical function of a Browning Recommended Service Center, the Browning Service Facility in Arnold, Missouri, or a qualified gunsmith. 1 Place the "safety" in the breech end of the action...

Owners Manual
Page 21
... the cleaning of the gas system by applying a very light film of the piston sleeve. It will run a clean, dry patch through the bore. Never use a steel brush on any quality furniture wax (but not both). If the firearm has been exposed to all exposed metal surfaces with consequential loosening of...
... the cleaning of the gas system by applying a very light film of the piston sleeve. It will run a clean, dry patch through the bore. Never use a steel brush on any quality furniture wax (but not both). If the firearm has been exposed to all exposed metal surfaces with consequential loosening of...
Owners Manual
Page 22
..., the operating handle will strike the receiver and cause damage. 2 Use a punch or similar object to push inward on safe position. Allow it up and out of the receiver. reinstallation of your Maxus shotgun are designed to dry and then very lightly oil the moving parts... forward position by a qualified gunsmith. Disassembly of the action involves the removal of your shotgun with a plastic or wooden mallet, again using caution not to follow these warnings could result in the forward position. 2 Insert the trigger group into place with live ammunition. removing ...
..., the operating handle will strike the receiver and cause damage. 2 Use a punch or similar object to push inward on safe position. Allow it up and out of the receiver. reinstallation of your Maxus shotgun are designed to dry and then very lightly oil the moving parts... forward position by a qualified gunsmith. Disassembly of the action involves the removal of your shotgun with a plastic or wooden mallet, again using caution not to follow these warnings could result in the forward position. 2 Insert the trigger group into place with live ammunition. removing ...