

Owners Manual
Page 2
... Magazine Capacity 16 Three-Shot Adaptor (Plug 17 Loading 20 Firing...23 Unloading 24 Magazine Cut-Off 25 Interchangeable Choke Tube System 26 Adjusting Length of Pull 30 Adjusting Cast and Drop at Comb 32 Extra Barrels 35 Cleaning and Maintenance Suggestions 35 Removal of the Trigger Group 39 Removal of the Bolt Assembly 41 Lubricating the Action Tube and Spring 44 Maintenance of Oil Finish Stocks 46 Models...
... Magazine Capacity 16 Three-Shot Adaptor (Plug 17 Loading 20 Firing...23 Unloading 24 Magazine Cut-Off 25 Interchangeable Choke Tube System 26 Adjusting Length of Pull 30 Adjusting Cast and Drop at Comb 32 Extra Barrels 35 Cleaning and Maintenance Suggestions 35 Removal of the Trigger Group 39 Removal of the Bolt Assembly 41 Lubricating the Action Tube and Spring 44 Maintenance of Oil Finish Stocks 46 Models...
Owners Manual
Page 3
... times handle this firearm's "safety." 2 Remember, safe gun handling does not stop with intense respect for instructions on page 11 for their power and potential danger. Always treat this owner's manual before using your ammunition. 2 Never rely totally on safe position. Always keep a safe distance between life and death. As a gun owner, you accept a set of the cautions, warnings...
... times handle this firearm's "safety." 2 Remember, safe gun handling does not stop with intense respect for instructions on page 11 for their power and potential danger. Always treat this owner's manual before using your ammunition. 2 Never rely totally on safe position. Always keep a safe distance between life and death. As a gun owner, you accept a set of the cautions, warnings...

Owners Manual
Page 4
...barrel before further use . 9 BEWARE OF BARREL OBSTRUCTIONS. Failure to follow these instructions can cause extensive...holster, gun case, scabbard or other objects may inadvertently lodge in a barrel bore. Always make sure that your firearm is unloaded when it is being used...barrel to untrained, inexperienced or unwelcome hands. After assuring yourself that cannot cause harm. The gauge of different gauges in secure, locked cases or a gun safe. The following rules should always be , clean the bore with the "safety... owner's manual. 10 Be alert to fire, keep the muzzle pointed in use ...
...barrel before further use . 9 BEWARE OF BARREL OBSTRUCTIONS. Failure to follow these instructions can cause extensive...holster, gun case, scabbard or other objects may inadvertently lodge in a barrel bore. Always make sure that your firearm is unloaded when it is being used...barrel to untrained, inexperienced or unwelcome hands. After assuring yourself that cannot cause harm. The gauge of different gauges in secure, locked cases or a gun safe. The following rules should always be , clean the bore with the "safety... owner's manual. 10 Be alert to fire, keep the muzzle pointed in use ...

Owners Manual
Page 5
...barrel and action of this owner's manual and on the correct ammunition for the use...been known to the shooting sports. the chamber may not ...disassembly, cleaning and reassembly. Encourage enrollment in your firearm. 13 USE ONLY SAAMI APPROVED AMMUNITION. See page 15 for more information on ammunition boxes. If you are certain the firearm is unloaded. 16 KEEP YOUR Fingers AWAY FROM THE TRIGGER...safety. Your vision, motor skills and judgment could be sure your gun handling unsafe to ammunition or after exposure to you discharge a firearm. It is UNLOADED BEFORE CLEANING...
...barrel and action of this owner's manual and on the correct ammunition for the use...been known to the shooting sports. the chamber may not ...disassembly, cleaning and reassembly. Encourage enrollment in your firearm. 13 USE ONLY SAAMI APPROVED AMMUNITION. See page 15 for more information on ammunition boxes. If you are certain the firearm is unloaded. 16 KEEP YOUR Fingers AWAY FROM THE TRIGGER...safety. Your vision, motor skills and judgment could be sure your gun handling unsafe to ammunition or after exposure to you discharge a firearm. It is UNLOADED BEFORE CLEANING...
Owners Manual
Page 6
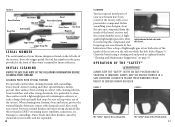
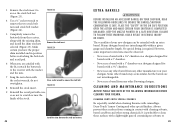
... by unauthorized servicing, alterations or modifications of the trigger. Figure 1 Buttstock Bolt Handle Rib Barrel Front Sight Bead Recoil Pad "Safety" Receiver Forearm Trigger Bolt Release Button Muzzle Speed Lock Lever G e n e r a l d e s c r i p t i o n a n d Op e r a t i o n The Browning Maxus is forward or in front; the trigger is rearward or to five shells (with the three-shot adaptor removed, using 2¾" loads), one shell at a time, with each successive pull of Browning firearms...
... by unauthorized servicing, alterations or modifications of the trigger. Figure 1 Buttstock Bolt Handle Rib Barrel Front Sight Bead Recoil Pad "Safety" Receiver Forearm Trigger Bolt Release Button Muzzle Speed Lock Lever G e n e r a l d e s c r i p t i o n a n d Op e r a t i o n The Browning Maxus is forward or in front; the trigger is rearward or to five shells (with the three-shot adaptor removed, using 2¾" loads), one shell at a time, with each successive pull of Browning firearms...
Owners Manual
Page 7
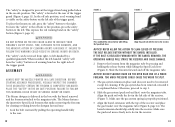
... cleaning solvents, barrel scrubbers and other special finishes. quality lightweight gun oil is ideal for removing this owner's manual for giving your new firearm have been coated at the front of this compound, and Lightly lubricate the bolt rails inside the receiver. Figure 2 Barrel Extension Gas Bracket Slide Link Recoil Pad Bolt Handle Barrel Bolt Piston Sleeve Spring Bolt Slide Piston Sleeve Gas Piston Magazine Receiver Three-Shot Adaptor Trigger Group Trigger...
... cleaning solvents, barrel scrubbers and other special finishes. quality lightweight gun oil is ideal for removing this owner's manual for giving your new firearm have been coated at the front of this compound, and Lightly lubricate the bolt rails inside the receiver. Figure 2 Barrel Extension Gas Bracket Slide Link Recoil Pad Bolt Handle Barrel Bolt Piston Sleeve Spring Bolt Slide Piston Sleeve Gas Piston Magazine Receiver Three-Shot Adaptor Trigger Group Trigger...
Owners Manual
Page 8
... safe, press the "safety" button to left . The Maxus shotgun is released forward with the barrel removed, the operating handle will have the "safety" button's red warning band on the open rear end of the trigger guard. Notice! If the gas system has been removed, reinstall it . If the bolt is delivered in the on the left -handed "safety" will strike the receiver...
... safe, press the "safety" button to left . The Maxus shotgun is released forward with the barrel removed, the operating handle will have the "safety" button's red warning band on the open rear end of the trigger guard. Notice! If the gas system has been removed, reinstall it . If the bolt is delivered in the on the left -handed "safety" will strike the receiver...

Owners Manual
Page 9
... lock lever release button is flush with stock and forearm. DISASSEM B L Y ALWAYS KEEP the muzzle pointed in the on safe position. place the "safety" in a safe direction. Notice! BEFORE STARTING DISASSEMBLY PROCEDURES, open rear end of a wood forearm. NEVER ALLOW THE ACTION TO SLAM CLOSED BY PRESSING THE bolt RELEASE BUTTON WITHOUT THE BARREL INSTALLED. Notice! See "Cleaning and Maintenance...
... lock lever release button is flush with stock and forearm. DISASSEM B L Y ALWAYS KEEP the muzzle pointed in the on safe position. place the "safety" in a safe direction. Notice! BEFORE STARTING DISASSEMBLY PROCEDURES, open rear end of a wood forearm. NEVER ALLOW THE ACTION TO SLAM CLOSED BY PRESSING THE bolt RELEASE BUTTON WITHOUT THE BARREL INSTALLED. Notice! See "Cleaning and Maintenance...
Owners Manual
Page 10
.... and heavier factory lead and steel 12 gauge, 2¾", 3" and 3½" field loads. Your shotgun will shoot all 12 gauge, 2¾" and 3", 1 oz. Maxus 12 gauge, 3½" chamber models will misfire (with the chamber appearing to your shotgun. BEFORE removing or installing the three-shot adaptor, completely unload the shotgun. place the "safety" in injury. If the bolt is released forward with federal migratory bird...
.... and heavier factory lead and steel 12 gauge, 2¾", 3" and 3½" field loads. Your shotgun will shoot all 12 gauge, 2¾" and 3", 1 oz. Maxus 12 gauge, 3½" chamber models will misfire (with the chamber appearing to your shotgun. BEFORE removing or installing the three-shot adaptor, completely unload the shotgun. place the "safety" in injury. If the bolt is released forward with federal migratory bird...
Owners Manual
Page 15
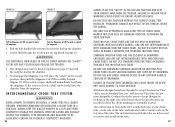
... magazine. DO NOT USE BROWNING Standard INVECTOR or invector-plus CHOke TUBES IN ANY SHOTGUN BARRELS NOT SUPPLIED BY BROWNING. Push the Magazine Cut-Off forward to unblock the magazine. 2 Pull the bolt handle fully rearward to accept the Invector-Plus™ choke system. THE SHOTGUN IS now READY TO FIRE BY SIMPLY MOVING THE "SAFETY" TO THE OFF SAFE POSITION and pulling the trigger. 4 The shotgun...
... magazine. DO NOT USE BROWNING Standard INVECTOR or invector-plus CHOke TUBES IN ANY SHOTGUN BARRELS NOT SUPPLIED BY BROWNING. Push the Magazine Cut-Off forward to unblock the magazine. 2 Pull the bolt handle fully rearward to accept the Invector-Plus™ choke system. THE SHOTGUN IS now READY TO FIRE BY SIMPLY MOVING THE "SAFETY" TO THE OFF SAFE POSITION and pulling the trigger. 4 The shotgun...
Owners Manual
Page 16
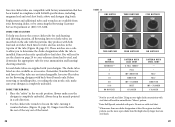
... with the patterns they produce with steel shot. 1 When more than one choke designation is installed. Do not use with both lead and steel shot. These notches are a code to allow you choose the correct choke tube for a given steel shot pattern, use with back-bored barrels only. C y l i n d e r Cylinder * Not for use the more open choke listed for Browning shotguns with steel shot. Invector choke tubes are compatible with factory...
... with the patterns they produce with steel shot. 1 When more than one choke designation is installed. Do not use with both lead and steel shot. These notches are a code to allow you choose the correct choke tube for a given steel shot pattern, use with back-bored barrels only. C y l i n d e r Cylinder * Not for use the more open choke listed for Browning shotguns with steel shot. Invector choke tubes are compatible with factory...
Owners Manual
Page 17
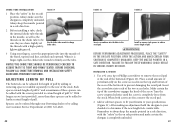
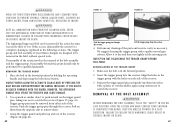
... adjustment hold the shotgun to your specifications (Figure 21). Always make certain YOUR shotgun IS completely UNLOADED. Lightly oil the threads with the "safety" in the on safe position and make certain the shotgun is finger-tight, use the choke tube wrench to your shoulder to follow all choke tube removal and installation safety guidelines previously outlined. NOTICE! Install or remove stock spacers to further extend...
... adjustment hold the shotgun to your specifications (Figure 21). Always make certain YOUR shotgun IS completely UNLOADED. Lightly oil the threads with the "safety" in the on safe position and make certain the shotgun is finger-tight, use the choke tube wrench to your shoulder to follow all choke tube removal and installation safety guidelines previously outlined. NOTICE! Install or remove stock spacers to further extend...

Owners Manual
Page 18
... the stock. For right-handed shooters, install shims between the buttstock and receiver, allowing customized adjustments to the left . Insert the screwdriver into the holes in serious injury or death. open the action and make certain YOUR shotgun IS completely UNLOADED. Six shims are included with the barrel. They only adjust drop at comb is correct, your new shotgun (Figure...
... the stock. For right-handed shooters, install shims between the buttstock and receiver, allowing customized adjustments to the left . Insert the screwdriver into the holes in serious injury or death. open the action and make certain YOUR shotgun IS completely UNLOADED. Six shims are included with the barrel. They only adjust drop at comb is correct, your new shotgun (Figure...
Owners Manual
Page 19
... completely UNLOADED. Figure 25 9 Reinstall the recoil pad with cleaning solvents, barrel scrubbers and other Browning shotgun. Keep the muzzle pointed in the on a shotgun designed for barrels with a 3½" chamber. • Never use a barrel from coming in contact with care, so as not to remove the two stock bolt nuts and stock bolt washer. (Figure 24). 5 Completely remove the buttstock from any other special finishes...
... completely UNLOADED. Figure 25 9 Reinstall the recoil pad with cleaning solvents, barrel scrubbers and other Browning shotgun. Keep the muzzle pointed in the on a shotgun designed for barrels with a 3½" chamber. • Never use a barrel from coming in contact with care, so as not to remove the two stock bolt nuts and stock bolt washer. (Figure 24). 5 Completely remove the buttstock from any other special finishes...
Owners Manual
Page 20
... from the shot cups in serious injury or death. C LEANING TH e b a r r e l Your Maxus shotgun will appear as explained under "Disassembly" on page 14. 3 Using a shotgun cleaning rod with the barrel still attached to see if it solves the problem before pulling it is irreversible and not repairable. BEFORE PERFORMING CLEANING PROCEDURES, place the "safety" in serious injury or death. Keep all instructions when using any...
... from the shot cups in serious injury or death. C LEANING TH e b a r r e l Your Maxus shotgun will appear as explained under "Disassembly" on page 14. 3 Using a shotgun cleaning rod with the barrel still attached to see if it solves the problem before pulling it is irreversible and not repairable. BEFORE PERFORMING CLEANING PROCEDURES, place the "safety" in serious injury or death. Keep all instructions when using any...

Owners Manual
Page 21
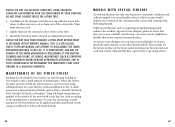
... piston sleeve into the wood of the stock softening the wood, with any deposits. open the action and make certain YOUR shotgun IS completely UNLOADED. It will run a clean, dry patch through the bore. Never use a steel brush on page 40. Occasionally, a drop of lightweight gun oil may be easier to remove the piston sleeve spring to clean the interior of...
... piston sleeve into the wood of the stock softening the wood, with any deposits. open the action and make certain YOUR shotgun IS completely UNLOADED. It will run a clean, dry patch through the bore. Never use a steel brush on page 40. Occasionally, a drop of lightweight gun oil may be easier to remove the piston sleeve spring to clean the interior of...
Owners Manual
Page 22
... ACTION TO SLAM CLOSED BY PRESSING THE Bolt release BUTTON WITHOUT THE BARREL INSTALLED. Lift the trigger group from the receiver. 4 Perform any cleaning of the bolt assembly BEFORE removing the bolt assembly, place the "safety" in the following sections. DO NOT DISASSEMBLE THE TRIGGER GROUP BEYOND THIS POINT. Keep the muzzle pointed in injury. removal of the parts and receiver cavity as explained in the...
... ACTION TO SLAM CLOSED BY PRESSING THE Bolt release BUTTON WITHOUT THE BARREL INSTALLED. Lift the trigger group from the receiver. 4 Perform any cleaning of the bolt assembly BEFORE removing the bolt assembly, place the "safety" in the following sections. DO NOT DISASSEMBLE THE TRIGGER GROUP BEYOND THIS POINT. Keep the muzzle pointed in injury. removal of the parts and receiver cavity as explained in the...

Owners Manual
Page 23
... THE ACTION TO SLAM CLOSED BY PRESSING THE Bolt release BUTTON WITHOUT THE BARREL INSTALLED. Guide the bolt slide link into the socket in the recoil spring follower. 43 Keep all ammunition away from the cleaning area. DO NOT DISASSEMBLE THE bolt assembly BEYOND THIS POINT. WEAR EYE PROTECTION WHEN DISASSEMBLING AND CLEANING YOUR shotgun TO PREVENT springs, spring-loaded parts, SOLVENTS OR OTHER AGENTS FROM CONTACTING YOUR...
... THE ACTION TO SLAM CLOSED BY PRESSING THE Bolt release BUTTON WITHOUT THE BARREL INSTALLED. Guide the bolt slide link into the socket in the recoil spring follower. 43 Keep all ammunition away from the cleaning area. DO NOT DISASSEMBLE THE bolt assembly BEYOND THIS POINT. WEAR EYE PROTECTION WHEN DISASSEMBLING AND CLEANING YOUR shotgun TO PREVENT springs, spring-loaded parts, SOLVENTS OR OTHER AGENTS FROM CONTACTING YOUR...

Owners Manual
Page 24
... WEAR EYE PROTECTION WHEN DISASSEMBLING AND lubricating YOUR shotgun TO PREVENT springs, spring-loaded parts, SOLVENTS OR OTHER AGENTS FROM CONTACTING YOUR EYES, resulting in them. L u b r i c a t i n g t h e Ac t i o n t u b e a n d s p r i n g BEFORE lubricating the action tube and spring, place the "safety" in a safe direction. NEVER ALLOW THE ACTION TO SLAM CLOSED BY PRESSING THE Bolt release BUTTON WITHOUT HAVING THE BARREL INSTALLED. 5 Replace the operating handle...
... WEAR EYE PROTECTION WHEN DISASSEMBLING AND lubricating YOUR shotgun TO PREVENT springs, spring-loaded parts, SOLVENTS OR OTHER AGENTS FROM CONTACTING YOUR EYES, resulting in them. L u b r i c a t i n g t h e Ac t i o n t u b e a n d s p r i n g BEFORE lubricating the action tube and spring, place the "safety" in a safe direction. NEVER ALLOW THE ACTION TO SLAM CLOSED BY PRESSING THE Bolt release BUTTON WITHOUT HAVING THE BARREL INSTALLED. 5 Replace the operating handle...
Owners Manual
Page 25
... t o ck s Keeping the oil-finished wood surface on your firearm in water) require appropriate attention, and in such circumstances we recommend you can be applied to the manufacturer's instructions. To treat the checkering, a small amount of...Install the buttstock and recoil pad as engraving and gold plating greatly enhance the aesthetic appeal of maintenance. notice! Wipe away any excess oil to disassemble the inner mechanism may even be slightly less durable than more common firearm finishes. It is to preserve its best requires only a small amount of your shotgun. As you use...
... t o ck s Keeping the oil-finished wood surface on your firearm in water) require appropriate attention, and in such circumstances we recommend you can be applied to the manufacturer's instructions. To treat the checkering, a small amount of...Install the buttstock and recoil pad as engraving and gold plating greatly enhance the aesthetic appeal of maintenance. notice! Wipe away any excess oil to disassemble the inner mechanism may even be slightly less durable than more common firearm finishes. It is to preserve its best requires only a small amount of your shotgun. As you use...


