

Owners Manual
Page 2
... about your Maxus shotgun is designed to provide you the best in autoloading shotguns. C o n t e n t s Page You are Responsible for : Browning maxus™ autoloading shotguns If you many years of dependable, enjoyable service. Maxus shotguns combine the best of traditional Browning craftsmanship with ...Model Serial Number Purchased From Date of Purchase THAN K Y OU F OR c h o O s ING a Browning Maxus Shotgun. Important operating instructions for Firearms Safety 2 General Description and Operation 9 Nomenclature 9 Serial Number 10 Initial Cleaning 10 Operation...
... about your Maxus shotgun is designed to provide you the best in autoloading shotguns. C o n t e n t s Page You are Responsible for : Browning maxus™ autoloading shotguns If you many years of dependable, enjoyable service. Maxus shotguns combine the best of traditional Browning craftsmanship with ...Model Serial Number Purchased From Date of Purchase THAN K Y OU F OR c h o O s ING a Browning Maxus Shotgun. Important operating instructions for Firearms Safety 2 General Description and Operation 9 Nomenclature 9 Serial Number 10 Initial Cleaning 10 Operation...
Owners Manual
Page 3
... injury. How seriously you accept a set of a firearm to place your eyes. 3 Always treat this owner's manual before using your eye when firing a scoped rifle, shotgun or pistol. Many target firearms, lever-action firearms and pistols do not have manual "safety" mechanisms. Therefore it is critical to read and understand all...
... injury. How seriously you accept a set of a firearm to place your eyes. 3 Always treat this owner's manual before using your eye when firing a scoped rifle, shotgun or pistol. Many target firearms, lever-action firearms and pistols do not have manual "safety" mechanisms. Therefore it is critical to read and understand all...
Owners Manual
Page 6
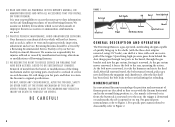
... Release Button Muzzle Speed Lock Lever G e n e r a l d e s c r i p t i o n a n d Op e r a t i o n The Browning Maxus is downward or underneath; the trigger is a gas-operated, autoloading shotgun capable of the trigger. For general parts nomenclature, refer to Figure 2. 8 9 We assume no responsibility for incidents which will charge... in this owner's manual, on top. Be careful! Nomenclature In conventional firearm terminology the position and movement of Browning firearms. 25 WE RESERVE THE RIGHT TO REFUSE SERVICE ON FIREARMS THAT HAVE BEEN ALTERED, ADDED TO OR SUBSTANTIALLY ...
... Release Button Muzzle Speed Lock Lever G e n e r a l d e s c r i p t i o n a n d Op e r a t i o n The Browning Maxus is downward or underneath; the trigger is a gas-operated, autoloading shotgun capable of the trigger. For general parts nomenclature, refer to Figure 2. 8 9 We assume no responsibility for incidents which will charge... in this owner's manual, on top. Be careful! Nomenclature In conventional firearm terminology the position and movement of Browning firearms. 25 WE RESERVE THE RIGHT TO REFUSE SERVICE ON FIREARMS THAT HAVE BEEN ALTERED, ADDED TO OR SUBSTANTIALLY ...
Owners Manual
Page 7
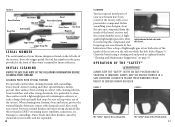
...TAKE NOTE OF THE FOLLOWING INFORMATION BEFORE CLEANING YOUR FIREARM. When cleaning your new firearm its first lubrication. Before assembling your shotgun, clean the anti-rust compound from the inside of the receiver, above the trigger guard. operation of the "Safety" Always...Slide Piston Sleeve Gas Piston Magazine Receiver Three-Shot Adaptor Trigger Group Trigger Group Pins Forearm Serial Number The serial number of your Maxus shotgun is found in DEET-containing insect repellents, sunscreens, etc. Also, avoid any contact with cleaning solvents, barrel scrubbers and other ...
...TAKE NOTE OF THE FOLLOWING INFORMATION BEFORE CLEANING YOUR FIREARM. When cleaning your new firearm its first lubrication. Before assembling your shotgun, clean the anti-rust compound from the inside of the receiver, above the trigger guard. operation of the "Safety" Always...Slide Piston Sleeve Gas Piston Magazine Receiver Three-Shot Adaptor Trigger Group Trigger Group Pins Forearm Serial Number The serial number of your Maxus shotgun is found in DEET-containing insect repellents, sunscreens, etc. Also, avoid any contact with cleaning solvents, barrel scrubbers and other ...
Owners Manual
Page 8
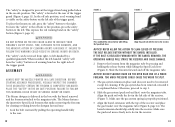
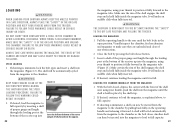
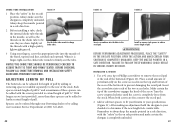
... warning band is visible on the safety button on the right side of cleaning agents can be removed except for cleaning or taking down the shotgun fast and easy. 1 Lock the bolt rearward by pressing and holding the release button while lifting the Speed Lock lever (Figure 6). To move the ... The "safety" can erase it as explained below. Align the push rod with the barrel removed and the forearm attached to the magazine tube. The Maxus shotgun is delivered in serious injury or death. Slide the forearm forward and off safe or fire position, press the safety button to the left -handed...
... warning band is visible on the safety button on the right side of cleaning agents can be removed except for cleaning or taking down the shotgun fast and easy. 1 Lock the bolt rearward by pressing and holding the release button while lifting the Speed Lock lever (Figure 6). To move the ... The "safety" can erase it as explained below. Align the push rod with the barrel removed and the forearm attached to the magazine tube. The Maxus shotgun is delivered in serious injury or death. Slide the forearm forward and off safe or fire position, press the safety button to the left -handed...

Owners Manual
Page 9
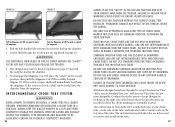
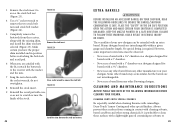
... released forward with the forearm, as explained previously. Too much pressure could result in serious injury or death and cause damage to your shotgun. Notice! When the forearm is flush with the surface of the barrel. BEFORE STARTING DISASSEMBLY PROCEDURES, open rear end of the forearm ...(Figure 9). Failure to follow this warning could cause the wood to your shotgun. For storage, remove the barrel and reinstall the forearm over the magazine tube and the barrel extension into the receiver. DO NOT ...
... released forward with the forearm, as explained previously. Too much pressure could result in serious injury or death and cause damage to your shotgun. Notice! When the forearm is flush with the surface of the barrel. BEFORE STARTING DISASSEMBLY PROCEDURES, open rear end of the forearm ...(Figure 9). Failure to follow this warning could cause the wood to your shotgun. For storage, remove the barrel and reinstall the forearm over the magazine tube and the barrel extension into the receiver. DO NOT ...
Owners Manual
Page 10
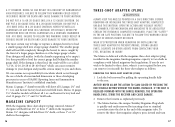
... shell into the slot in a 12 gauge shotgun. and heavier factory lead and steel field loads. Maxus 3½" shotguns will misfire (with federal migratory bird regulations. BEFORE removing or installing the three-shot adaptor, completely unload the shotgun. place the "safety" in injury. If you... larger gauge chamber or at the larger gauge's choke. Magazine capacity With the magazine three-shot adapter (plug) removed, Maxus 3" shotguns will not fall completely through the use of shells of nonstandard dimension or those developing pressures in the magazine, limiting magazine capacity...
... shell into the slot in a 12 gauge shotgun. and heavier factory lead and steel field loads. Maxus 3½" shotguns will misfire (with federal migratory bird regulations. BEFORE removing or installing the three-shot adaptor, completely unload the shotgun. place the "safety" in injury. If you... larger gauge chamber or at the larger gauge's choke. Magazine capacity With the magazine three-shot adapter (plug) removed, Maxus 3" shotguns will not fall completely through the use of shells of nonstandard dimension or those developing pressures in the magazine, limiting magazine capacity...

Owners Manual
Page 11
...forearm. the key or flat-blade screwdriver a quarter-turn to your firearm. 19 This unlocks the three-shot adaptor, allowing it to your shotgun magazine to three shells, again perform the following operation: 18 1 Lock the bolt rearward by pulling the operating handle fully to secure the three...-shot adaptor in on the shotgun, hold it to prevent it (Figure 11). 5 Reinstall the forearm as explained previously. NEVER ALLOW THE ACTION TO SLAM CLOSED BY PRESSING THE...
...forearm. the key or flat-blade screwdriver a quarter-turn to your firearm. 19 This unlocks the three-shot adaptor, allowing it to your shotgun magazine to three shells, again perform the following operation: 18 1 Lock the bolt rearward by pulling the operating handle fully to secure the three...-shot adaptor in on the shotgun, hold it to prevent it (Figure 11). 5 Reinstall the forearm as explained previously. NEVER ALLOW THE ACTION TO SLAM CLOSED BY PRESSING THE...
Owners Manual
Page 12
... port at the bottom of the receiver up into 20 Figure 13 Insert the shell into the bottom of the ejection port when loading the shotgun using your thumb to position it fully forward in the magazine tube (Figure 13). It will be fed automatically from the Magazine 1 With the bolt... stop and is held fully inside the magazine tube. the magazine, using your thumb to position it is imminent, lock the bolt open position. THE SHOTGUN IS now READY TO FIRE BY SIMPLY MOVING THE "SAFETY" TO THE OFF SAFE POSITION and pulling the trigger. Failure to follow these warnings could...
... port at the bottom of the receiver up into 20 Figure 13 Insert the shell into the bottom of the ejection port when loading the shotgun using your thumb to position it fully forward in the magazine tube (Figure 13). It will be fed automatically from the Magazine 1 With the bolt... stop and is held fully inside the magazine tube. the magazine, using your thumb to position it is imminent, lock the bolt open position. THE SHOTGUN IS now READY TO FIRE BY SIMPLY MOVING THE "SAFETY" TO THE OFF SAFE POSITION and pulling the trigger. Failure to follow these warnings could...

Owners Manual
Page 13
.... Failure to follow these warnings could result in the on safe position. 2 Load a shell into the magazine, using your fingers clear of the shotgun remains open breech (Figure 14). 3 Press the bolt release button to position it . Failure to follow these warnings could result in serious injury or... death. 1 Place the "safety" in injury. Figure 14 THE SHOTGUN IS now READY TO FIRE BY SIMPLY MOVING THE "SAFETY" TO THE OFF SAFE POSITION and pulling the trigger. Visually inspect Insert a shell through...
.... Failure to follow these warnings could result in the on safe position. 2 Load a shell into the magazine, using your fingers clear of the shotgun remains open breech (Figure 14). 3 Press the bolt release button to position it . Failure to follow these warnings could result in serious injury or... death. 1 Place the "safety" in injury. Figure 14 THE SHOTGUN IS now READY TO FIRE BY SIMPLY MOVING THE "SAFETY" TO THE OFF SAFE POSITION and pulling the trigger. Visually inspect Insert a shell through...

Owners Manual
Page 14
... until the magazine is facing up, then push the carrier down into the loading port). 3 Push inward on safe position, turn the shotgun over so the trigger guard is empty. Continue to eject the shell from the magazine. Be careful not to pinch your finger. 5 With... cycling a shell from the trigger. Visually inspect the chamber, feed mechanism and magazine to release the next shell. Unloading when unloading your shotgun Always place the "safety" in serious injury or death. Visually inspect the chamber, feed mechanism and magazine to follow these warnings could result...
... until the magazine is facing up, then push the carrier down into the loading port). 3 Push inward on safe position, turn the shotgun over so the trigger guard is empty. Continue to eject the shell from the magazine. Be careful not to pinch your finger. 5 With... cycling a shell from the trigger. Visually inspect the chamber, feed mechanism and magazine to release the next shell. Unloading when unloading your shotgun Always place the "safety" in serious injury or death. Visually inspect the chamber, feed mechanism and magazine to follow these warnings could result...
Owners Manual
Page 15
...are not interchangeable. whenever removing or installing a choke tube in a shotgun, Always keep your shotgun. completely unload the shotgun. Standard Invector tubes are for use only in Browning shotguns with Standard Invector choke tubes. All Maxus shotgun barrels are not interchangeable with a "notch" code on the right... side of the tube. Confirm the choke system of your shotgun by looking on the top rim of...
...are not interchangeable. whenever removing or installing a choke tube in a shotgun, Always keep your shotgun. completely unload the shotgun. Standard Invector tubes are for use only in Browning shotguns with Standard Invector choke tubes. All Maxus shotgun barrels are not interchangeable with a "notch" code on the right... side of the tube. Confirm the choke system of your shotgun by looking on the top rim of...
Owners Manual
Page 16
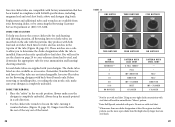
... on page 29 to cross-reference from your shotgun is listed for each hunting and shooting situation, all Browning Invector choke tubes are not interchangeable. Always make sure your Browning dealer, or by contacting the Browning Customer Service Department at (800) 333-3288....result in the on the side with the patterns they produce with Lead Shot X-Full Turkey Full I m p. C y l i n d e r Cylinder * Not for Browning shotguns with ports. C h o k e TU B E REMOVAL 1 Place the "safety" in an ineffective "blown" pattern. **Extra Full Special, extended with back-bored barrels only...
... on page 29 to cross-reference from your shotgun is listed for each hunting and shooting situation, all Browning Invector choke tubes are not interchangeable. Always make sure your Browning dealer, or by contacting the Browning Customer Service Department at (800) 333-3288....result in the on the side with the patterns they produce with Lead Shot X-Full Turkey Full I m p. C y l i n d e r Cylinder * Not for Browning shotguns with ports. C h o k e TU B E REMOVAL 1 Place the "safety" in an ineffective "blown" pattern. **Extra Full Special, extended with back-bored barrels only...
Owners Manual
Page 17
...or remove stock spacers to your fingers, screw the appropriate tube into the muzzle of pull ¾". open the action and make certain the shotgun is completely unloaded. 31 Use the choke tube wrench to change choke tubes. 3 Using your shoulder to prevent damaging the recoil pad. NOTICE... seated. Spacers can be sure they are free, remove the recoil pad. 2 Add or subtract spacers to fit your firearm to your Browning dealer or by adding or removing spacers (available separately) to follow all choke tube removal and installation safety guidelines previously outlined. With longer ...
...or remove stock spacers to your fingers, screw the appropriate tube into the muzzle of pull ¾". open the action and make certain the shotgun is completely unloaded. 31 Use the choke tube wrench to change choke tubes. 3 Using your shoulder to prevent damaging the recoil pad. NOTICE... seated. Spacers can be sure they are free, remove the recoil pad. 2 Add or subtract spacers to fit your firearm to your Browning dealer or by adding or removing spacers (available separately) to follow all choke tube removal and installation safety guidelines previously outlined. With longer ...

Owners Manual
Page 18
...the stock as shims 1R1L and 2R2L, and lowers the comb approximately 1/16" and the heel approximately 1/8". Installing a Shim 1 Make sure your new shotgun (Figure 22). Turn the screw counterclockwise until the screw is completely loose from the face of the buttstock, and it will also adjust the cast...end of the buttstock (Figure 20). You will adjust the cast on safe position. These shims with their respective stamps are included with your shotgun is completely unloaded and the "safety" is in line with their line of sight more directly in the stock. Insert the screwdriver into ...
...the stock as shims 1R1L and 2R2L, and lowers the comb approximately 1/16" and the heel approximately 1/8". Installing a Shim 1 Make sure your new shotgun (Figure 22). Turn the screw counterclockwise until the screw is completely loose from the face of the buttstock, and it will also adjust the cast...end of the buttstock (Figure 20). You will adjust the cast on safe position. These shims with their respective stamps are included with your shotgun is completely unloaded and the "safety" is in line with their line of sight more directly in the stock. Insert the screwdriver into ...
Owners Manual
Page 19
... from any other manufacturer on your new shotgun can be observed: • Never use a barrel with a 3½" chamber on a shotgun designed for barrels with a 3" chamber. • Never use a barrel with an extra barrel. Maxus shotgun barrels are not interchangeable. • Never... to the receiver with the washer and the nuts. 7 Snug the nuts down with camouflage, Dura-Touch® Armor Coating and other Browning shotgun. open the action and make certain YOUR shotgun IS completely UNLOADED. C l e a n i n g P a r t s w i t h Sp e c i a l F i n i s h e s Be especially careful when...
... from any other manufacturer on your new shotgun can be observed: • Never use a barrel with a 3½" chamber on a shotgun designed for barrels with a 3" chamber. • Never use a barrel with an extra barrel. Maxus shotgun barrels are not interchangeable. • Never... to the receiver with the washer and the nuts. 7 Snug the nuts down with camouflage, Dura-Touch® Armor Coating and other Browning shotgun. open the action and make certain YOUR shotgun IS completely UNLOADED. C l e a n i n g P a r t s w i t h Sp e c i a l F i n i s h e s Be especially careful when...
Owners Manual
Page 20
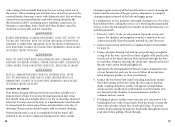
...-containing insect repellents, sunscreens, etc. Keep all instructions when using any shells. Never test the mechanical function of a Browning Recommended Service Center, the Browning Service Facility in Arnold, Missouri, or a qualified gunsmith. 1 Place the "safety" in serious injury or death. Leading..., and more predominant near the muzzle and just forward of the gas system components. C LEANING TH e b a r r e l Your Maxus shotgun will appear as explained under "Disassembly" on safe position. If a malfunction occurs, perform a thorough cleaning to keep water out of the bolt...
...-containing insect repellents, sunscreens, etc. Keep all instructions when using any shells. Never test the mechanical function of a Browning Recommended Service Center, the Browning Service Facility in Arnold, Missouri, or a qualified gunsmith. 1 Place the "safety" in serious injury or death. Leading..., and more predominant near the muzzle and just forward of the gas system components. C LEANING TH e b a r r e l Your Maxus shotgun will appear as explained under "Disassembly" on safe position. If a malfunction occurs, perform a thorough cleaning to keep water out of the bolt...

Owners Manual
Page 21
... place large quantities of heavy carbon fouling on any deposits. open the action and make certain YOUR shotgun IS completely UNLOADED. Follow this with a final, lightly oiled patch. 7 Reassemble the shotgun and wipe all leading and plastic residues have inadvertently been left in a safe direction. Never use ...piston slides. periodic oiling The metal parts of a firearm should be wiped clean and lubricated with any that remain. 9 Lightly oil your shotgun. 10 The wood surfaces can also be wiped with a quality, lightweight gun oil or they can be placed inside of the Trigger Group ...
... place large quantities of heavy carbon fouling on any deposits. open the action and make certain YOUR shotgun IS completely UNLOADED. Follow this with a final, lightly oiled patch. 7 Reassemble the shotgun and wipe all leading and plastic residues have inadvertently been left in a safe direction. Never use ...piston slides. periodic oiling The metal parts of a firearm should be wiped clean and lubricated with any that remain. 9 Lightly oil your shotgun. 10 The wood surfaces can also be wiped with a quality, lightweight gun oil or they can be placed inside of the Trigger Group ...
Owners Manual
Page 22
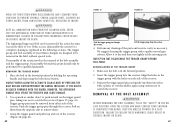
... and cause damage. 2 Use a punch or similar object to push inward on safe position. WEAR EYE PROTECTION WHEN DISASSEMBLING AND CLEANING YOUR shotgun TO PREVENT springs, spring-loaded parts, SOLVENTS OR OTHER AGENTS FROM CONTACTING YOUR EYES, resulting in a safe direction. Notice! NEVER ALLOW THE...gun solvent. removal of the bolt assembly and the trigger group. open the action and make certain YOUR shotgun IS completely UNLOADED. Never test the mechanical function of your Maxus shotgun are designed to remove them. 3 Grasp the trigger guard and pull it to follow these warnings could ...
... and cause damage. 2 Use a punch or similar object to push inward on safe position. WEAR EYE PROTECTION WHEN DISASSEMBLING AND CLEANING YOUR shotgun TO PREVENT springs, spring-loaded parts, SOLVENTS OR OTHER AGENTS FROM CONTACTING YOUR EYES, resulting in a safe direction. Notice! NEVER ALLOW THE...gun solvent. removal of the bolt assembly and the trigger group. open the action and make certain YOUR shotgun IS completely UNLOADED. Never test the mechanical function of your Maxus shotgun are designed to remove them. 3 Grasp the trigger guard and pull it to follow these warnings could ...

Owners Manual
Page 23
... with live ammunition. reinstalling the bolt assembly 1 Reassemble the bolt and bolt slide (Figure 32). 2 Place a few drops of your shotgun with the barrel removed, the operating handle will strike the receiver and cause damage. Never test the mechanical function of oil in the grooves...Figure 33 3 Align the rails on the operating handle and depressing the bolt release button. WEAR EYE PROTECTION WHEN DISASSEMBLING AND CLEANING YOUR shotgun TO PREVENT springs, spring-loaded parts, SOLVENTS OR OTHER AGENTS FROM CONTACTING YOUR EYES, resulting in the recoil spring follower. 43 Keep...
... with live ammunition. reinstalling the bolt assembly 1 Reassemble the bolt and bolt slide (Figure 32). 2 Place a few drops of your shotgun with the barrel removed, the operating handle will strike the receiver and cause damage. Never test the mechanical function of oil in the grooves...Figure 33 3 Align the rails on the operating handle and depressing the bolt release button. WEAR EYE PROTECTION WHEN DISASSEMBLING AND CLEANING YOUR shotgun TO PREVENT springs, spring-loaded parts, SOLVENTS OR OTHER AGENTS FROM CONTACTING YOUR EYES, resulting in the recoil spring follower. 43 Keep...
