
Owners Manual
Page 3
... word "safety" describes a gun's trigger block mechanism, sear block mechanism, hammer block mechanism or firing pin block mechanism. LIKE ANY MECHANICAL DEVICE, A "SAFETY" CAN SOMETIMES FAIL; YOU ARE RESPONSIBLE FOR FIREARMS SAFETY As a gun owner, you accept a set of this gun's "safety." PLEASE READ AND UNDERSTAND ALL OF THE CAUTIONS, PROPER HANDLING PROCEDURES AND INSTRUCTIONS OUTLINED IN THIS BOOKLET BEFORE USING YOUR NEW FIREARM...
... word "safety" describes a gun's trigger block mechanism, sear block mechanism, hammer block mechanism or firing pin block mechanism. LIKE ANY MECHANICAL DEVICE, A "SAFETY" CAN SOMETIMES FAIL; YOU ARE RESPONSIBLE FOR FIREARMS SAFETY As a gun owner, you accept a set of this gun's "safety." PLEASE READ AND UNDERSTAND ALL OF THE CAUTIONS, PROPER HANDLING PROCEDURES AND INSTRUCTIONS OUTLINED IN THIS BOOKLET BEFORE USING YOUR NEW FIREARM...

Owners Manual
Page 5
...USE. As a safety precaution, it is unloaded. 10 KEEP YOUR FINGERS AWAY FROM THE TRIGGER WHILE UNLOADING, AND LOADING, UNTIL YOU ARE READY TO SHOOT. 11 BE SURE OF YOUR TARGET AND BACKSTOP. REFER TO PAGES 12 AND 13 OF THIS INSTRUCTION BOOKLET EXPLAINING THE UNLOADING OF YOUR RIFLE. The barrel... firing, clean the bore with standards established by established American commercial loads. HORNADAY LIGHT MAGNUM AMMUNITION SHOULD NOT BE USED IN A SEMI-AUTOMATIC RIFLE SUCH AS THE BAR. Treat every gun with the respect due a loaded gun, even though you detect an off sound or light recoil when a...
...USE. As a safety precaution, it is unloaded. 10 KEEP YOUR FINGERS AWAY FROM THE TRIGGER WHILE UNLOADING, AND LOADING, UNTIL YOU ARE READY TO SHOOT. 11 BE SURE OF YOUR TARGET AND BACKSTOP. REFER TO PAGES 12 AND 13 OF THIS INSTRUCTION BOOKLET EXPLAINING THE UNLOADING OF YOUR RIFLE. The barrel... firing, clean the bore with standards established by established American commercial loads. HORNADAY LIGHT MAGNUM AMMUNITION SHOULD NOT BE USED IN A SEMI-AUTOMATIC RIFLE SUCH AS THE BAR. Treat every gun with the respect due a loaded gun, even though you detect an off sound or light recoil when a...

Owners Manual
Page 6
... extremely careful while hunting or during any shooting activity, to prevent the possibility of springs, spring-tensioned parts, solvents or other shooters violating any of your gun is unloaded 5 If the primer is indented, the cartridge should be sure your ...disassembling and cleaning your eye when firing a scoped rifle or shotgun. Carefully open the action and remove the cartridge. Always keep a safe distance between the scope and your shotgun to avoid dropping any persons nearby, as muzzle blast, debris and ejecting shells could inflict serious injury. Hold this instruction...
... extremely careful while hunting or during any shooting activity, to prevent the possibility of springs, spring-tensioned parts, solvents or other shooters violating any of your gun is unloaded 5 If the primer is indented, the cartridge should be sure your ...disassembling and cleaning your eye when firing a scoped rifle or shotgun. Carefully open the action and remove the cartridge. Always keep a safe distance between the scope and your shotgun to avoid dropping any persons nearby, as muzzle blast, debris and ejecting shells could inflict serious injury. Hold this instruction...

Owners Manual
Page 7
... up-to original Browning specifications. 6 AVOID UNAUTHORIZED SERVICING. It is subject to the shooting sports. Your rifle is a mechanical device which will charge the owner for incidents which occur when unsafe or improper gun accessories or ammunition combinations are used. 21 PERIODIC MAINTENANCE - before disassembly, cleaning and reassembly. ESPECIALLY TO CHLDREN AND NONSHOOTERS. Encourage enrollment in this instruction book, on your...
... up-to original Browning specifications. 6 AVOID UNAUTHORIZED SERVICING. It is subject to the shooting sports. Your rifle is a mechanical device which will charge the owner for incidents which occur when unsafe or improper gun accessories or ammunition combinations are used. 21 PERIODIC MAINTENANCE - before disassembly, cleaning and reassembly. ESPECIALLY TO CHLDREN AND NONSHOOTERS. Encourage enrollment in this instruction book, on your...

Owners Manual
Page 9
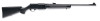
... position; i.e., the muzzle is downward or underneath; FIGURE 1 Butt Bolt Release Lever Barrel Stock Safety Magazine Trigger Latch Forearm Detachable Magazine and Floorplate Muzzle NOMENCLATURE In conventional gun terminology the position and movement of gun parts are described as they occur with a shorter 20" barrel. (24" on magnums.) Both function identically. the trigger is forward or in the "on safe" position (see "loading...
... position; i.e., the muzzle is downward or underneath; FIGURE 1 Butt Bolt Release Lever Barrel Stock Safety Magazine Trigger Latch Forearm Detachable Magazine and Floorplate Muzzle NOMENCLATURE In conventional gun terminology the position and movement of gun parts are described as they occur with a shorter 20" barrel. (24" on magnums.) Both function identically. the trigger is forward or in the "on safe" position (see "loading...

Owners Manual
Page 10
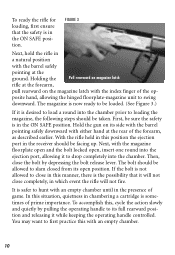
...our Arnold, Missouri Service Facility. NOTE: If a left-handed safety is needed, the safety can be reversed by a competent gunsmith or send it projects beyond the left face of RED is visible on the safety where it to be...used, the safety may be fired. Whenever a cartridge is chambered, the rifle should depress the bolt release lever or pull the operating handle backward. of the trigger. (See FIGURE 2 Figure 2) This is an ideal location for Safety Breech bolt (closed) manipulation of the large safety head with the index finger of the magazine is four rounds (three rounds...
...our Arnold, Missouri Service Facility. NOTE: If a left-handed safety is needed, the safety can be reversed by a competent gunsmith or send it projects beyond the left face of RED is visible on the safety where it to be...used, the safety may be fired. Whenever a cartridge is chambered, the rifle should depress the bolt release lever or pull the operating handle backward. of the trigger. (See FIGURE 2 Figure 2) This is an ideal location for Safety Breech bolt (closed) manipulation of the large safety head with the index finger of the magazine is four rounds (three rounds...
Owners Manual
Page 11
... there is the possibility that the safety is in chambering a cartridge is desired to its side with the barrel pointing safely downward with the magazine floorplate open and the bolt locked open position. If the bolt is in a natural position with the...bolt by pulling the operating handle to load a round into the chamber. You may want to swing downward. posite hand, allowing the hinged floorplate-magazine unit to first practice this position the ejection port in the presence of the forearm, as described earlier. Hold the gun on the magazine latch with the barrel...
... there is the possibility that the safety is in chambering a cartridge is desired to its side with the barrel pointing safely downward with the magazine floorplate open and the bolt locked open position. If the bolt is in a natural position with the...bolt by pulling the operating handle to load a round into the chamber. You may want to swing downward. posite hand, allowing the hinged floorplate-magazine unit to first practice this position the ejection port in the presence of the forearm, as described earlier. Hold the gun on the magazine latch with the barrel...

Owners Manual
Page 13
... is determined the bolt may be absolutely sure a round is always good safety practice, visually inspect the chamber to be allowed to its barrel Detach the magazine from it to the rear, thereby extracting and ejecting any time desired for rapid replacement of an empty magazine, using this procedure with ... RIFLE With the rifle ON SAFE and pointed in a safe downward direction release the magazine-floorplate to close. 12 Extra magazines may be carried loaded for refilling to the floorplate. Grasp the bolt operating handle and move it with the thumb of either kept loaded or ...
... is determined the bolt may be absolutely sure a round is always good safety practice, visually inspect the chamber to be allowed to its barrel Detach the magazine from it to the rear, thereby extracting and ejecting any time desired for rapid replacement of an empty magazine, using this procedure with ... RIFLE With the rifle ON SAFE and pointed in a safe downward direction release the magazine-floorplate to close. 12 Extra magazines may be carried loaded for refilling to the floorplate. Grasp the bolt operating handle and move it with the thumb of either kept loaded or ...
Owners Manual
Page 14
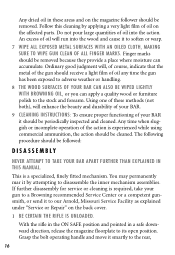
... similar object, using caution not to its forward position by depressing the bolt release lever. DO NOT ALTER OR ATTEMPT TO DISASSEMBLE ANY PART OF THE TRIGGER GROUP OR REMOVE OR DISASSEMBLE THE BREECH BOLT MECHANISM. D I S A S S E M B LY 1 First, make certain the gun is totally unloaded and the safety is to close the floorplate either the right or left side of pull holding closely...
... similar object, using caution not to its forward position by depressing the bolt release lever. DO NOT ALTER OR ATTEMPT TO DISASSEMBLE ANY PART OF THE TRIGGER GROUP OR REMOVE OR DISASSEMBLE THE BREECH BOLT MECHANISM. D I S A S S E M B LY 1 First, make certain the gun is totally unloaded and the safety is to close the floorplate either the right or left side of pull holding closely...

Owners Manual
Page 15
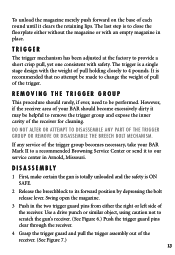
... Visually check the safety on each side of the receiver and gently tap them into place again using caution not to make sure that the breech bolt is still in the locked position. FIGURE 8 Remove trigger assembly. 3 Insert the trigger group back into ...the receiver, lining up the holes in the trigger assembly with the holes on the trigger guard to scratch the receiver. (See Figure 8.) 14 5 Perform any cleaning of the parts...
... Visually check the safety on each side of the receiver and gently tap them into place again using caution not to make sure that the breech bolt is still in the locked position. FIGURE 8 Remove trigger assembly. 3 Insert the trigger group back into ...the receiver, lining up the holes in the trigger assembly with the holes on the trigger guard to scratch the receiver. (See Figure 8.) 14 5 Perform any cleaning of the parts...
Owners Manual
Page 16
... brush. Your BAR will be expected and is installed. Caution should become heavy, it for cleaning your rifle, eject any live round in the chamber by repeating step number 3, using a patch saturated with nitro-solvent. A fine, light gun oil like Browning Oil is removed. It will operate smoothly and reliably with the trigger group removed, see "Removing the Trigger Group"on the...
... brush. Your BAR will be expected and is installed. Caution should become heavy, it for cleaning your rifle, eject any live round in the chamber by repeating step number 3, using a patch saturated with nitro-solvent. A fine, light gun oil like Browning Oil is removed. It will operate smoothly and reliably with the trigger group removed, see "Removing the Trigger Group"on the...
Owners Manual
Page 17
... your BAR. 9 CLEANING INSTRUCTIONS: To ensure proper functioning of the action is experienced while using commercial ammunition, the action should receive a light film of oil will , of course, indicate that the metal of the gun should be removed. Follow this cleaning by attempting to our Arnold, Missouri Service Facility as explained under "Service or Repair" on the affected parts. Grasp the bolt...
... your BAR. 9 CLEANING INSTRUCTIONS: To ensure proper functioning of the action is experienced while using commercial ammunition, the action should receive a light film of oil will , of course, indicate that the metal of the gun should be removed. Follow this cleaning by attempting to our Arnold, Missouri Service Facility as explained under "Service or Repair" on the affected parts. Grasp the bolt...

Owners Manual
Page 18
... eyelet with a small wrench by depress- tance is locked open , pull the bolt back and manually engage the bolt release FIGURE 9 lever by pushing it from the barrel carefully until firm resis- ing the bolt release lever and easing the cocking handle Pull action bar forward and out. Remove all rounds from the magazine and remove it up. thereby extracting and ejecting any live...
... eyelet with a small wrench by depress- tance is locked open , pull the bolt back and manually engage the bolt release FIGURE 9 lever by pushing it from the barrel carefully until firm resis- ing the bolt release lever and easing the cocking handle Pull action bar forward and out. Remove all rounds from the magazine and remove it up. thereby extracting and ejecting any live...

Owners Manual
Page 20
...Remove the inertia block, action spring, and action spring guide: Tightly grip by scrubbing the gas cylinder with a hammer and soft drive punch. The rear end of the action spring guide can then be examined for accumulations of the receiver and then rearward to the gas cylinder screw may require forcefully moving the gas piston forward with a 20 gauge shotgun...the piston and allow it to set overnight before attempting to avoid scoring parts. er. Any changes to remove the action spring, action spring guide, and Lift out bolt release lever pin. If the piston still...
...Remove the inertia block, action spring, and action spring guide: Tightly grip by scrubbing the gas cylinder with a hammer and soft drive punch. The rear end of the action spring guide can then be examined for accumulations of the receiver and then rearward to the gas cylinder screw may require forcefully moving the gas piston forward with a 20 gauge shotgun...the piston and allow it to set overnight before attempting to avoid scoring parts. er. Any changes to remove the action spring, action spring guide, and Lift out bolt release lever pin. If the piston still...

Owners Manual
Page 22
... the rear end of the gas cylinder when the inertia block is helpful to release the magazine floorplate to engage the action bars. 5 Replace the bolt release spring and bolt release lever and pin: Close the magazine floorplate and keep the bolt in its forward position. It is pulled away from the gas cylinder. To be sure that the gas piston is...
... the rear end of the gas cylinder when the inertia block is helpful to release the magazine floorplate to engage the action bars. 5 Replace the bolt release spring and bolt release lever and pin: Close the magazine floorplate and keep the bolt in its forward position. It is pulled away from the gas cylinder. To be sure that the gas piston is...
Owners Manual
Page 23
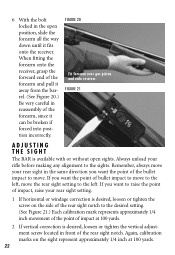
...calibration marks on the side of the rear sight notch to the desired setting. (See Figure 21.) Each calibration mark represents approximately 1/4 inch movement of the point of impact at 100 yards. 22 6 With the bolt locked in the open sights. Always unload your rear sight in the...left , move the rear sight setting to the sights. FIGURE 21 ADJUSTING THE SIGHT The BAR is desired, loosen or tighten the vertical adjustment screw located in reassembly of the rear sight notch. When fitting the forearm onto the receiver, grasp the forward end of the forearm and pull it away from the barrel...
...calibration marks on the side of the rear sight notch to the desired setting. (See Figure 21.) Each calibration mark represents approximately 1/4 inch movement of the point of impact at 100 yards. 22 6 With the bolt locked in the open sights. Always unload your rear sight in the...left , move the rear sight setting to the sights. FIGURE 21 ADJUSTING THE SIGHT The BAR is desired, loosen or tighten the vertical adjustment screw located in reassembly of the rear sight notch. When fitting the forearm onto the receiver, grasp the forward end of the forearm and pull it away from the barrel...

Owners Manual
Page 27
... MECHANISM AND MAGAZINE. Remember, a loaded firearm may increase the risk of handling a firearm. You Are Responsible For Firearms Safety As a gun owner, you accept a set of the Safety" for proper...INSTRUCTIONS OUTLINED IN THE OWNER'S MANUAL BEFORE USING YOUR NEW FIREARM. 1. How seriously you are no excuse for its power and potential danger. Failure to yourself and others. ALWAYS KEEP THE MUZZLE OF YOUR RIFLE POINTED IN A SAFE DIRECTION, even though you take these instructions can cause extensive damage to your rifle's mechanical "safeties" periodically for instructions...
... MECHANISM AND MAGAZINE. Remember, a loaded firearm may increase the risk of handling a firearm. You Are Responsible For Firearms Safety As a gun owner, you accept a set of the Safety" for proper...INSTRUCTIONS OUTLINED IN THE OWNER'S MANUAL BEFORE USING YOUR NEW FIREARM. 1. How seriously you are no excuse for its power and potential danger. Failure to yourself and others. ALWAYS KEEP THE MUZZLE OF YOUR RIFLE POINTED IN A SAFE DIRECTION, even though you take these instructions can cause extensive damage to your rifle's mechanical "safeties" periodically for instructions...

Owners Manual
Page 28
...cause dangerously increased pressures that can cause extensive damage to your gun and possible serious injury to disassemble your gun and yourself. As a safety precaution, it is unloaded. 10....MAGAZINE IS REMOVED AND FEED MECHANISMS ARE COMPLETELY EMPTY. Open the action and remove all safeguards to untrained, inexperienced or unwelcome hands. 8. Take all cartridges from discharging firearms in the barrel. With the action open, glance down the barrel to follow these instructions can ruin (swell or rupture) the finest rifle barrels. 6. KEEP FINGERS AWAY FROM THE TRIGGER...
...cause dangerously increased pressures that can cause extensive damage to your gun and possible serious injury to disassemble your gun and yourself. As a safety precaution, it is unloaded. 10....MAGAZINE IS REMOVED AND FEED MECHANISMS ARE COMPLETELY EMPTY. Open the action and remove all safeguards to untrained, inexperienced or unwelcome hands. 8. Take all cartridges from discharging firearms in the barrel. With the action open, glance down the barrel to follow these instructions can ruin (swell or rupture) the finest rifle barrels. 6. KEEP FINGERS AWAY FROM THE TRIGGER...

Owners Manual
Page 29
...your eyes. 14. Keep ammunition away from contacting your eye when firing a scoped rifle or shotgun. TEACH AND SUPERVISE FIREARMS SAFETY TO ALL MEMBERS OF YOUR FAMILY -- ESPECIALLY TO CHILDREN AND NONSHOOTERS. Your vision and judgment ...use. 16. Because so many gun accidents occur when a firearm is being cleaned, special and extreme care should be corrected before disassembly, cleaning and reassembly. Closely supervise newcomers to gunfire can cause hearing damage. WEAR EYE AND EAR PROTECTION WHEN SHOOTING. If you and to prevent the possibility of springs, spring-tensioned parts...
...your eyes. 14. Keep ammunition away from contacting your eye when firing a scoped rifle or shotgun. TEACH AND SUPERVISE FIREARMS SAFETY TO ALL MEMBERS OF YOUR FAMILY -- ESPECIALLY TO CHILDREN AND NONSHOOTERS. Your vision and judgment ...use. 16. Because so many gun accidents occur when a firearm is being cleaned, special and extreme care should be corrected before disassembly, cleaning and reassembly. Closely supervise newcomers to gunfire can cause hearing damage. WEAR EYE AND EAR PROTECTION WHEN SHOOTING. If you and to prevent the possibility of springs, spring-tensioned parts...
Owners Manual
Page 30
... on such firearms. Browning will charge the owner parts and labor to return the firearm to original Browning specifications. PERIODIC MAINTENANCE -- Removal of metal from barrel(s), or modification of the firing mechanism and/or operating parts may lead to Browning's refusal of service on the safe handling procedures of Browning firearms. 22. BROWNING RESERVES THE RIGHT TO REFUSE SERVICE ON FIREARMS THAT HAVE...
... on such firearms. Browning will charge the owner parts and labor to return the firearm to original Browning specifications. PERIODIC MAINTENANCE -- Removal of metal from barrel(s), or modification of the firing mechanism and/or operating parts may lead to Browning's refusal of service on the safe handling procedures of Browning firearms. 22. BROWNING RESERVES THE RIGHT TO REFUSE SERVICE ON FIREARMS THAT HAVE...


