Owners Manual
Page 6
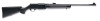
...LIGHT MAGNUM AMMUNITION SHOULD NOT BE USED IN A SEMI-AUTOMATIC RIFLE SUCH AS THE BAR. Failure to follow these instructions can cause extensive damage to your gun and ammunition separately - Nevertheless, Browning assumes no liability for storage. IT MAY DAMAGE THE FIREARM. Remove all safeguards to... make sure that an obstruction does not remain in the barrel. If there is preferable to disassemble your rifle does not become available to...
...LIGHT MAGNUM AMMUNITION SHOULD NOT BE USED IN A SEMI-AUTOMATIC RIFLE SUCH AS THE BAR. Failure to follow these instructions can cause extensive damage to your gun and ammunition separately - Nevertheless, Browning assumes no liability for storage. IT MAY DAMAGE THE FIREARM. Remove all safeguards to... make sure that an obstruction does not remain in the barrel. If there is preferable to disassemble your rifle does not become available to...
Owners Manual
Page 8
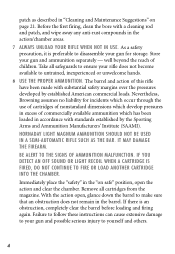
.... If the primer is indented, the cartridge should be sure your firearm to be corrected before disassembly, cleaning and reassembly. If you observe other agents from the cleaning location. Also, wear eye protection when disassembling and cleaning your gun is unloaded before further use. 17 BE DEFENSIVE AND ON GUARD AGAINST UNSAFE...
.... If the primer is indented, the cartridge should be sure your firearm to be corrected before disassembly, cleaning and reassembly. If you observe other agents from the cleaning location. Also, wear eye protection when disassembling and cleaning your gun is unloaded before further use. 17 BE DEFENSIVE AND ON GUARD AGAINST UNSAFE...
Owners Manual
Page 16
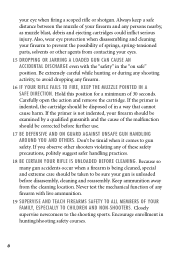
... any service of the trigger group becomes necessary, take your BAR should become excessively dirty it clears the retaining lips. DO NOT ALTER OR ATTEMPT TO DISASSEMBLE ANY PART OF THE TRIGGER GROUP OR REMOVE OR DISASSEMBLE THE BREECH BOLT MECHANISM. Remove trigger assembly. 14 TRIGGER The... trigger mechanism has been adjusted at the factory to 4 pounds. It is a single stage design with the weight of your BAR to a recommended Browning Service Center or send it to...
... any service of the trigger group becomes necessary, take your BAR should become excessively dirty it clears the retaining lips. DO NOT ALTER OR ATTEMPT TO DISASSEMBLE ANY PART OF THE TRIGGER GROUP OR REMOVE OR DISASSEMBLE THE BREECH BOLT MECHANISM. Remove trigger assembly. 14 TRIGGER The... trigger mechanism has been adjusted at the factory to 4 pounds. It is a single stage design with the weight of your BAR to a recommended Browning Service Center or send it to...

Owners Manual
Page 17
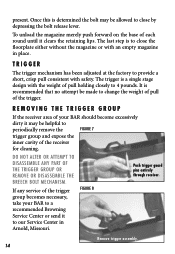
... left side of the receiver (Figure 8). 5 Perform any live round in the chamber by pulling the operating handle to scratch the receiver (Figure 9). DO NOT DISASSEMBLE THE TRIGGER GROUP BEYOND THIS POINT. FIGURE 9 Re-insert trigger guard pins. 15 Push the trigger guard pins clear through the receiver. 4 Grasp the trigger...
... left side of the receiver (Figure 8). 5 Perform any live round in the chamber by pulling the operating handle to scratch the receiver (Figure 9). DO NOT DISASSEMBLE THE TRIGGER GROUP BEYOND THIS POINT. FIGURE 9 Re-insert trigger guard pins. 15 Push the trigger guard pins clear through the receiver. 4 Grasp the trigger...
Owners Manual
Page 20
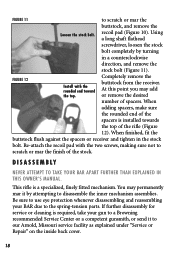
... ATTEMPT TO TAKE YOUR BAR APART FURTHER THAN EXPLAINED IN THIS OWNER'S MANUAL. When finished, fit the buttstock flush against the spacers or receiver and tighten in a counterclockwise direction, and remove the stock bolt (Figure 11). Be sure to use eye protection whenever disassembling and reassembling your gun to a Browning recommended Service Center...
... ATTEMPT TO TAKE YOUR BAR APART FURTHER THAN EXPLAINED IN THIS OWNER'S MANUAL. When finished, fit the buttstock flush against the spacers or receiver and tighten in a counterclockwise direction, and remove the stock bolt (Figure 11). Be sure to use eye protection whenever disassembling and reassembling your gun to a Browning recommended Service Center...
Owners Manual
Page 22
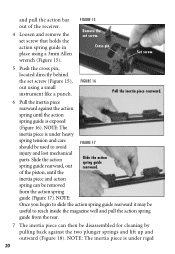
... (Figure 15), out using a 3mm Allen wrench (Figure 15). and pull the action bar out of the piston, until the inertia piece and action spring can then be removed from the rear. 7 The inertia piece can be disassembled for cleaning by pulling back against the action spring until the action spring guide...
... (Figure 15), out using a 3mm Allen wrench (Figure 15). and pull the action bar out of the piston, until the inertia piece and action spring can then be removed from the rear. 7 The inertia piece can be disassembled for cleaning by pulling back against the action spring until the action spring guide...