
Owners Manual
Page 1
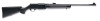
The Best There Is® BAR SHORTTRAC/ LONGTRAC RIFLE OWNER'S MANUAL
The Best There Is® BAR SHORTTRAC/ LONGTRAC RIFLE OWNER'S MANUAL

Owners Manual
Page 2
... receiver and stock, to write us immediately if you with innovative features and unique styling that result in materials and craftsmanship. With just reasonable care, your BAR ShortTrac or LongTrac should provide you have been designed with many years of pleasure and dependable service. THANK YOU FOR CHOOSING A BROWNING BAR SHORTTRAC OR LONGTRAC RIFLE The BAR ShortTrac and LongTrac...
... receiver and stock, to write us immediately if you with innovative features and unique styling that result in materials and craftsmanship. With just reasonable care, your BAR ShortTrac or LongTrac should provide you have been designed with many years of pleasure and dependable service. THANK YOU FOR CHOOSING A BROWNING BAR SHORTTRAC OR LONGTRAC RIFLE The BAR ShortTrac and LongTrac...
Owners Manual
Page 4
... word "safety" describes a gun's trigger block mechanism, sear block mechanism, hammer block mechanism or firing pin block mechanism. These mechanical devices are designed to place your gun in the "on safe" position. LIKE ANY MECHANICAL DEVICE, A "SAFETY" CAN ...INSTRUCTIONS OUTLINED IN THIS OWNER'S MANUAL BEFORE USING YOUR NEW FIREARM. 1 ALWAYS KEEP THE MUZZLE OF YOUR RIFLE POINTED IN A SAFE DIRECTION even though you accept a set of any other firearm with intense respect for instructions on page 9 for its power and potential danger. Mechanical "safeties" merely aid safe gun...
... word "safety" describes a gun's trigger block mechanism, sear block mechanism, hammer block mechanism or firing pin block mechanism. These mechanical devices are designed to place your gun in the "on safe" position. LIKE ANY MECHANICAL DEVICE, A "SAFETY" CAN ...INSTRUCTIONS OUTLINED IN THIS OWNER'S MANUAL BEFORE USING YOUR NEW FIREARM. 1 ALWAYS KEEP THE MUZZLE OF YOUR RIFLE POINTED IN A SAFE DIRECTION even though you accept a set of any other firearm with intense respect for instructions on page 9 for its power and potential danger. Mechanical "safeties" merely aid safe gun...
Owners Manual
Page 6
... FIREARM. Immediately place the "safety" in accordance with substantial safety margins over the pressures developed by the Sporting Arms and Ammunition Manufacturers' Institute (SAAMI). The barrel and action of children. HORNADAY LIGHT MAGNUM AMMUNITION SHOULD NOT BE USED IN A SEMI-AUTOMATIC RIFLE SUCH AS THE BAR. If there is preferable to disassemble your rifle does not become...
... FIREARM. Immediately place the "safety" in accordance with substantial safety margins over the pressures developed by the Sporting Arms and Ammunition Manufacturers' Institute (SAAMI). The barrel and action of children. HORNADAY LIGHT MAGNUM AMMUNITION SHOULD NOT BE USED IN A SEMI-AUTOMATIC RIFLE SUCH AS THE BAR. If there is preferable to disassemble your rifle does not become...
Owners Manual
Page 8
... and remove the cartridge. Always keep a safe distance between the muzzle of the malfunction should be timid when it comes to prevent the possibility of springs, spring-tensioned parts, solvents or other shooters violating any of in hunting/shooting safety courses. 6 Be extremely careful while hunting or during any shooting activity, to the shooting sports. your...
... and remove the cartridge. Always keep a safe distance between the muzzle of the malfunction should be timid when it comes to prevent the possibility of springs, spring-tensioned parts, solvents or other shooters violating any of in hunting/shooting safety courses. 6 Be extremely careful while hunting or during any shooting activity, to the shooting sports. your...
Owners Manual
Page 9
... OR DURING SHOOTING. Browning firearms should be dangerously impaired, making your gun handling unsafe to you and to others. 21 READ AND HEED ALL WARNINGS in Arnold, Missouri. Removal of metal from barrel(s), or modifications of the firing mechanism and/or operating parts may lead to wear and requires periodic inspection, adjustment, and service. It is subject...
... OR DURING SHOOTING. Browning firearms should be dangerously impaired, making your gun handling unsafe to you and to others. 21 READ AND HEED ALL WARNINGS in Arnold, Missouri. Removal of metal from barrel(s), or modifications of the firing mechanism and/or operating parts may lead to wear and requires periodic inspection, adjustment, and service. It is subject...
Owners Manual
Page 10
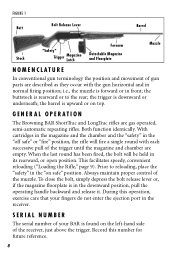
FIGURE 1 Butt Bolt Release Lever Barrel Stock "Safety" Trigger Magazine Latch Forearm Detachable Magazine and Floorplate Muzzle NOMENCLATURE In conventional gun terminology the position and movement of the trigger until the magazine and chamber are empty. i.e., the muzzle is upward or on the left-hand side of the muzzle. Both function identically. When the last round has been fired, the bolt will fire a single round with...
FIGURE 1 Butt Bolt Release Lever Barrel Stock "Safety" Trigger Magazine Latch Forearm Detachable Magazine and Floorplate Muzzle NOMENCLATURE In conventional gun terminology the position and movement of the trigger until the magazine and chamber are empty. i.e., the muzzle is upward or on the left-hand side of the muzzle. Both function identically. When the last round has been fired, the bolt will fire a single round with...

Owners Manual
Page 11
...the rifle should depress the bolt release lever or pull the operating handle backward and release it projects beyond the left -handed "safety" is needed, the "safety" can be sent to be reversed by a qualified gunsmith or it is completely blocked. The bolt will close with considerable force...PORT AT ALL TIMES WHEN THE BOLT IS LOCKED OPEN. CAUTION: IF YOUR RIFLE WAS PURCHASED USED, THE "SAFETY" MAY HAVE BEEN REVERSED FOR A LEFT-HANDED SHOOTER. The trigger-block type "safety" is conveniently located on the "safety" where it when the magazine floorplate is in the downward position...
...the rifle should depress the bolt release lever or pull the operating handle backward and release it projects beyond the left -handed "safety" is needed, the "safety" can be sent to be reversed by a qualified gunsmith or it is completely blocked. The bolt will close with considerable force...PORT AT ALL TIMES WHEN THE BOLT IS LOCKED OPEN. CAUTION: IF YOUR RIFLE WAS PURCHASED USED, THE "SAFETY" MAY HAVE BEEN REVERSED FOR A LEFT-HANDED SHOOTER. The trigger-block type "safety" is conveniently located on the "safety" where it when the magazine floorplate is in the downward position...
Owners Manual
Page 12
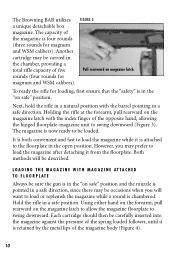
...replenish the magazine while a round is four rounds (three rounds for loading, first ensure that the "safety" is retained by the metal lips of the spring loaded follower, until it from the floorplate. The Browning BAR utilizes a unique detachable box magazine. To ready...pull rearward on safe" position. Using either hand on the forearm, pull rearward on magazine latch. Hold the rifle in a safe direction. The capacity of the opposite hand, allowing the hinged floorplate-magazine unit to load the magazine after detaching it is in the "on the magazine latch with the barrel...
...replenish the magazine while a round is four rounds (three rounds for loading, first ensure that the "safety" is retained by the metal lips of the spring loaded follower, until it from the floorplate. The Browning BAR utilizes a unique detachable box magazine. To ready...pull rearward on safe" position. Using either hand on the forearm, pull rearward on magazine latch. Hold the rifle in a safe direction. The capacity of the opposite hand, allowing the hinged floorplate-magazine unit to load the magazine after detaching it is in the "on the magazine latch with the barrel...
Owners Manual
Page 13
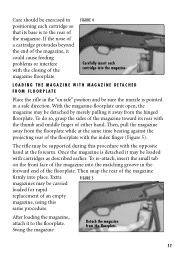
... the small tab on safe" position and be detached by merely pulling it to the rear of the magazine toward its base is to the floorplate. Then snap the rear of an empty magazine, using this procedure with the opposite hand at the same time bearing against... feeding problems or interfere with cartridges as described earlier. With the magazine-floorplate unit open, the magazine may be supported during this same procedure. To do so, grasp the sides of the magazine. After loading the magazine, attach it away from the floorplate. 11 LOADING THE MAGAZINE WITH MAGAZINE DETACHED...
... the small tab on safe" position and be detached by merely pulling it to the rear of the magazine toward its base is to the floorplate. Then snap the rear of an empty magazine, using this procedure with the opposite hand at the same time bearing against... feeding problems or interfere with cartridges as described earlier. With the magazine-floorplate unit open, the magazine may be supported during this same procedure. To do so, grasp the sides of the magazine. After loading the magazine, attach it away from the floorplate. 11 LOADING THE MAGAZINE WITH MAGAZINE DETACHED...
Owners Manual
Page 16
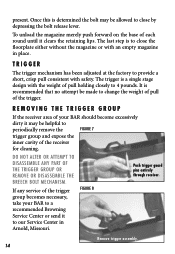
... empty magazine in Arnold, Missouri. TRIGGER The trigger mechanism has been adjusted at the factory to change the weight of pull of your BAR to periodically remove the FIGURE 7 trigger group and expose the inner cavity of each round until it to close by depressing the bolt release lever. FIGURE 8 Push trigger guard pins entirely through receiver. Once this is to our Service...
... empty magazine in Arnold, Missouri. TRIGGER The trigger mechanism has been adjusted at the factory to change the weight of pull of your BAR to periodically remove the FIGURE 7 trigger group and expose the inner cavity of each round until it to close by depressing the bolt release lever. FIGURE 8 Push trigger guard pins entirely through receiver. Once this is to our Service...

Owners Manual
Page 17
... the trigger guard and pull the trigger assembly out of the receiver (Figure 8). 5 Perform any live round in the two trigger guard pins from either the right or left side of the parts and receiver cavity as necessary. Swing open the magazine. 3 Push in the chamber by pushing forward on each round until it clears the retaining lips. 2 Release the bolt to...
... the trigger guard and pull the trigger assembly out of the receiver (Figure 8). 5 Perform any live round in the two trigger guard pins from either the right or left side of the parts and receiver cavity as necessary. Swing open the magazine. 3 Push in the chamber by pushing forward on each round until it clears the retaining lips. 2 Release the bolt to...
Owners Manual
Page 18
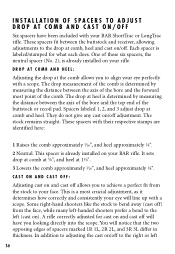
... sets drop at comb at 5⁄8", and heel at comb and heel. Some right-hand shooters like the stock to bend away (cast off allows you to achieve a perfect fit from the face, while many left-handed shooters prefer a bend to your BAR ShortTrac or LongTrac rifle. The stock remains straight. CAST ON AND CAST OFF: Adjusting cast on /off adjustment. DROP AT COMB AND...
... sets drop at comb at 5⁄8", and heel at comb and heel. Some right-hand shooters like the stock to bend away (cast off allows you to achieve a perfect fit from the face, while many left-handed shooters prefer a bend to your BAR ShortTrac or LongTrac rifle. The stock remains straight. CAST ON AND CAST OFF: Adjusting cast on /off adjustment. DROP AT COMB AND...
Owners Manual
Page 19
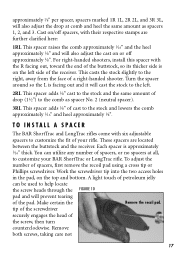
... is facing out and it will cast the stock to the left side of spacers, or no spacers at comb and heel the same amount as spacer No. 2 (neutral spacer). 3RL This spacer adds 1⁄8" of the pad. You can be used to help locate the screw heads ...TO INSTALL A SPACER The BAR ShortTrac and LongTrac rifles come with their respective stamps are located between the buttstock and the receiver. To adjust the number of your BAR ShortTrac or LongTrac rifle. A light touch of petroleum jelly can utilize any number of the receiver. Make certain the Remove the recoil pad. Cast ...
... is facing out and it will cast the stock to the left side of spacers, or no spacers at comb and heel the same amount as spacer No. 2 (neutral spacer). 3RL This spacer adds 1⁄8" of the pad. You can be used to help locate the screw heads ...TO INSTALL A SPACER The BAR ShortTrac and LongTrac rifles come with their respective stamps are located between the buttstock and the receiver. To adjust the number of your BAR ShortTrac or LongTrac rifle. A light touch of petroleum jelly can utilize any number of the receiver. Make certain the Remove the recoil pad. Cast ...
Owners Manual
Page 20
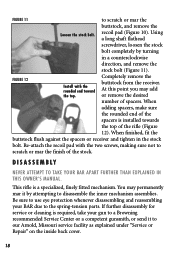
... buttstock, and remove the Loosen the stock bolt. FIGURE 12 Install with the two screws, making sure not to disassemble the inner mechanism assemblies. Be sure to use eye protection whenever disassembling and reassembling your gun to our Arnold, Missouri service facility as explained under "Service or Repair" on the inside back cover. 18 Re-attach the recoil pad with the rounded end toward the...
... buttstock, and remove the Loosen the stock bolt. FIGURE 12 Install with the two screws, making sure not to disassemble the inner mechanism assemblies. Be sure to use eye protection whenever disassembling and reassembling your gun to our Arnold, Missouri service facility as explained under "Service or Repair" on the inside back cover. 18 Re-attach the recoil pad with the rounded end toward the...
Owners Manual
Page 21
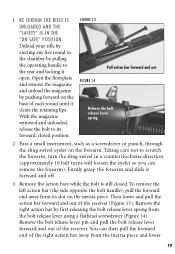
... you can then pull the forward end of each round until it forward and off. 3 Remove the action bars while the bolt is still closed position. To remove the left action bar (the side opposite the bolt handle), pull the forward end away from the bolt release lever using a flathead screwdriver (Figure 14). 1 BE CERTAIN THE RIFLE IS UNLOADED AND THE "SAFETY" IS IN...
... you can then pull the forward end of each round until it forward and off. 3 Remove the action bars while the bolt is still closed position. To remove the left action bar (the side opposite the bolt handle), pull the forward end away from the bolt release lever using a flathead screwdriver (Figure 14). 1 BE CERTAIN THE RIFLE IS UNLOADED AND THE "SAFETY" IS IN...
Owners Manual
Page 22
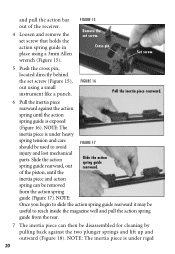
... cleaning by pulling back against the two plunger springs and lift up and outward (Figure 18). of the receiver. 4 Loosen and remove the set screw that holds the action spring guide in place using a small instrument like a punch. NOTE: Once you begin to reach inside the magazine well and pull the action spring guide from the action spring guide (Figure 17). and pull the action bar...
... cleaning by pulling back against the two plunger springs and lift up and outward (Figure 18). of the receiver. 4 Loosen and remove the set screw that holds the action spring guide in place using a small instrument like a punch. NOTE: Once you begin to reach inside the magazine well and pull the action spring guide from the action spring guide (Figure 17). and pull the action bar...
Owners Manual
Page 23
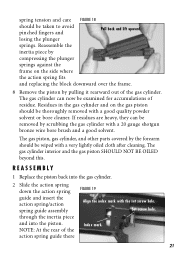
... spring fits and replacing the block downward over the frame. 8 Remove the piston by pulling it rearward out of the action spring guide there FIGURE 19 Align the index mark with a 20 gauge shotgun ...Replace the piston back into the gas cylinder. 2 Slide the action spring down the action spring guide and insert the action spring/action spring guide assembly through the inertia piece and into the piston. Reassemble the inertia piece by compressing the plunger springs against the frame on the gas piston should be thoroughly removed with a very lightly oiled cloth after cleaning. Set...
... spring fits and replacing the block downward over the frame. 8 Remove the piston by pulling it rearward out of the action spring guide there FIGURE 19 Align the index mark with a 20 gauge shotgun ...Replace the piston back into the gas cylinder. 2 Slide the action spring down the action spring guide and insert the action spring/action spring guide assembly through the inertia piece and into the piston. Reassemble the inertia piece by compressing the plunger springs against the frame on the gas piston should be thoroughly removed with a very lightly oiled cloth after cleaning. Set...

Owners Manual
Page 25
... unload your BAR, it should be exercised to ensure that the cleaning rod or handle does not strike the crown of each round until it can usually be removed by pulling the operating handle to lock the action open . If the magazine is experienced while using a patch...the bolt and manually push the bolt release lever up to the rear and lock it clears the retaining lips. 2 Pull the bolt fully rearward with the hole in its forward position. The following procedure should be periodically inspected and cleaned. Lock the bolt release spring onto the bolt release lever. 6 Replace the...
... unload your BAR, it should be exercised to ensure that the cleaning rod or handle does not strike the crown of each round until it can usually be removed by pulling the operating handle to lock the action open . If the magazine is experienced while using a patch...the bolt and manually push the bolt release lever up to the rear and lock it clears the retaining lips. 2 Pull the bolt fully rearward with the hole in its forward position. The following procedure should be periodically inspected and cleaned. Lock the bolt release spring onto the bolt release lever. 6 Replace the...
Owners Manual
Page 26
... is best done with the trigger group removed, see "Removing the Trigger Group"on page 14, and with an oiled cloth, making sure to wipe gun clean of the receiver and the bolt should periodically be wiped off , the brush should become heavy, it can apply a quality wood or furniture polish to the stock and forearm. To prevent brass...
... is best done with the trigger group removed, see "Removing the Trigger Group"on page 14, and with an oiled cloth, making sure to wipe gun clean of the receiver and the bolt should periodically be wiped off , the brush should become heavy, it can apply a quality wood or furniture polish to the stock and forearm. To prevent brass...


