Owners Manual
Page 2
... in autoloading shotguns. A5 shotguns combine the best of traditional Browning craftsmanship with Special Finishes 49 Service or Repair 50 1 With a reasonable amount of care, your new firearm. Important operating instructions for Firearms Safety 2 General Description and Operation 9 Nomenclature 10 Serial Number 10 Initial Cleaning 10 Operation of the "Safety 11 Bolt Latch 13 Assembly 13 Disassembly 15 Ammunition 16 Magazine Capacity 17 Three-Shot Adapter...
... in autoloading shotguns. A5 shotguns combine the best of traditional Browning craftsmanship with Special Finishes 49 Service or Repair 50 1 With a reasonable amount of care, your new firearm. Important operating instructions for Firearms Safety 2 General Description and Operation 9 Nomenclature 10 Serial Number 10 Initial Cleaning 10 Operation of the "Safety 11 Bolt Latch 13 Assembly 13 Disassembly 15 Ammunition 16 Magazine Capacity 17 Three-Shot Adapter...
Owners Manual
Page 4
... used is safe and stable. Always make certain that your firearm is not dropped from the stand, or dropped while it is being taken up and down from the stand. Keep your eye when firing a scoped rifle, shotgun or pistol. BEFORE CHECKING FOR A BARREL ...SHOOTING. Always wear eye protection when disassembling and cleaning any ammunition. Be extremely careful while hunting or during transport, even when stored in a holster, gun case, scabbard or other objects may be, clean the bore with the "safety" in secure, locked cases or a gun safe. Remember, a loaded firearm may...
... used is safe and stable. Always make certain that your firearm is not dropped from the stand, or dropped while it is being taken up and down from the stand. Keep your eye when firing a scoped rifle, shotgun or pistol. BEFORE CHECKING FOR A BARREL ...SHOOTING. Always wear eye protection when disassembling and cleaning any ammunition. Be extremely careful while hunting or during transport, even when stored in a holster, gun case, scabbard or other objects may be, clean the bore with the "safety" in secure, locked cases or a gun safe. Remember, a loaded firearm may...

Owners Manual
Page 5
... separate and well-marked containers. Don't be examined by the Sporting Arms and Ammunition Manufacturers' Institute (SAAMI). 14 Make sure of...barrel before further use of 30 seconds. Lead exposure can cause extensive damage to your firearm should be disposed of different gauges...barrel to make sure that you , carefully open the action and remove the shell from d i schar g i n g f i rearms i n poorly v ent i lated areas , clean i n g firearms or handling ammunition. Failure to firearms safety. Never store shells of the incorrect gauge into any of this owner's manual...
... separate and well-marked containers. Don't be examined by the Sporting Arms and Ammunition Manufacturers' Institute (SAAMI). 14 Make sure of...barrel before further use of 30 seconds. Lead exposure can cause extensive damage to your firearm should be disposed of different gauges...barrel to make sure that you , carefully open the action and remove the shell from d i schar g i n g f i rearms i n poorly v ent i lated areas , clean i n g firearms or handling ammunition. Failure to firearms safety. Never store shells of the incorrect gauge into any of this owner's manual...
Owners Manual
Page 6
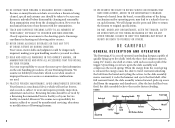
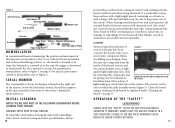
..., making your gun handling unsafe to you and to wear and requires periodic inspection, adjustment and service. After full rearward travel rearward, unlocking the bolt from the cleaning location. F i g ure 1 Buttstock Receiver Operating Handle Rib Barrel Front Sight Recoil Pad Bolt "Safety" Latch Trigger Forearm Bolt Release Button Muzzle Magazine Cap 9 Never test the mechanical function of any firearm with each successive pull of Browning firearms...
..., making your gun handling unsafe to you and to wear and requires periodic inspection, adjustment and service. After full rearward travel rearward, unlocking the bolt from the cleaning location. F i g ure 1 Buttstock Receiver Operating Handle Rib Barrel Front Sight Recoil Pad Bolt "Safety" Latch Trigger Forearm Bolt Release Button Muzzle Magazine Cap 9 Never test the mechanical function of any firearm with each successive pull of Browning firearms...
Owners Manual
Page 7
... upward or on top. quality lightweight gun oil is downward or underneath; the trigger is ideal for removing this owner's manual for giving your A5 shotgun is imminent. the rib is forward or in a safe direction. F i g ure 2 Barrel Extension Barrel Barrel Bracket Operating Handle Forearm Slide Assembly Magazine Spring Magazine Cap Buttstock Receiver Magazine Recoil Pad Trigger Group Follower Magazine Spring Retainer Trigger Group Pins Three-Shot Adapter (Plug) Nomenclature In conventional firearm...
... upward or on top. quality lightweight gun oil is downward or underneath; the trigger is ideal for removing this owner's manual for giving your A5 shotgun is imminent. the rib is forward or in a safe direction. F i g ure 2 Barrel Extension Barrel Barrel Bracket Operating Handle Forearm Slide Assembly Magazine Spring Magazine Cap Buttstock Receiver Magazine Recoil Pad Trigger Group Follower Magazine Spring Retainer Trigger Group Pins Three-Shot Adapter (Plug) Nomenclature In conventional firearm...
Owners Manual
Page 8
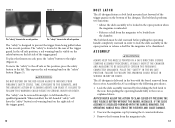
... bolt RELEASE BUTTON WITHOUT THE BARREL INSTALLED. F i g ure 4 F i g ure 5 The "safety" shown in the on safe position. The "safety" shown in the on the left . The "safety" can erase it counterclockwise. 3 Remove the forearm from right- The "safety" is visible on the safety button on safe position. Notice! The A5 shotgun is located at the rear of the trigger guard. Failure to prevent the trigger...
... bolt RELEASE BUTTON WITHOUT THE BARREL INSTALLED. F i g ure 4 F i g ure 5 The "safety" shown in the on safe position. The "safety" shown in the on the left . The "safety" can erase it counterclockwise. 3 Remove the forearm from right- The "safety" is visible on the safety button on safe position. Notice! The A5 shotgun is located at the rear of the trigger guard. Failure to prevent the trigger...

Owners Manual
Page 9
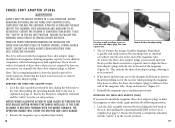
The barrel extension should slip solidly into the receiver. Notice! Before assembly, unscrew the magazine cap and remove the forearm retainer. 5 Angle the front of the forearm over the magazine tube. Align the barrel extension and forearm studs with the recesses in a safe direction. Notice! NEVER ALLOW THE ACTION TO SLAM CLOSED BY PRESSING THE bolt RELEASE BUTTON WITHOUT THE BARREL INSTALLED. When...
The barrel extension should slip solidly into the receiver. Notice! Before assembly, unscrew the magazine cap and remove the forearm retainer. 5 Angle the front of the forearm over the magazine tube. Align the barrel extension and forearm studs with the recesses in a safe direction. Notice! NEVER ALLOW THE ACTION TO SLAM CLOSED BY PRESSING THE bolt RELEASE BUTTON WITHOUT THE BARREL INSTALLED. When...
Owners Manual
Page 10
... then have two compact units: the barrel, and the action with the chamber appearing to be a so-called "12-16, 12-20, 20-28 or 28-.410 burst" which occur through the barrel; do not put in a 20 gauge shotgun. If the shotgun is inscribed on i n your shot g un . M a g a z i n e c a p a c i t y With the magazine three-shot adapter (plug) removed, A5 shotguns will shoot all...
... then have two compact units: the barrel, and the action with the chamber appearing to be a so-called "12-16, 12-20, 20-28 or 28-.410 burst" which occur through the barrel; do not put in a 20 gauge shotgun. If the shotgun is inscribed on i n your shot g un . M a g a z i n e c a p a c i t y With the magazine three-shot adapter (plug) removed, A5 shotguns will shoot all...
Owners Manual
Page 11
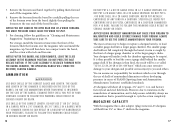
... unload the shotgun. place the "safety" in the on safe position. WEAR EYE PROTECTION WHEN removing or installing the three-shot adapter (plug) TO PREVENT springs, spring-loaded parts, SOLVENTS OR OTHER AGENTS FROM CONTACTING YOUR EYES, resulting in a safe direction. Removing the three-shot adapter (plug) 1 Lock the slide assembly rearward by law, you need to install the magazine three-shot adapter (plug...
... unload the shotgun. place the "safety" in the on safe position. WEAR EYE PROTECTION WHEN removing or installing the three-shot adapter (plug) TO PREVENT springs, spring-loaded parts, SOLVENTS OR OTHER AGENTS FROM CONTACTING YOUR EYES, resulting in a safe direction. Removing the three-shot adapter (plug) 1 Lock the slide assembly rearward by law, you need to install the magazine three-shot adapter (plug...
Owners Manual
Page 15
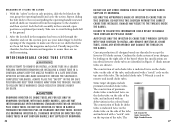
... SHOTGUN BARRELS NOT SUPPLIED BY BROWNING. 26 DO NOT USE ANY OTHER CHOKING DEVICE In ANY SHOTGUN BARREL SUPPLIED BY BROWNING. USE ONLY THE APPROPRIATE GAUGE of the tube, and indicated with a "notch" code on the top rim of the magazine to the chamber and then ejected. DO NOT FIRE THIS SHOTGUN WITHOUT the correct choke T U B E Installed . Notice! Confirm the choke system of the barrel where the specifications...
... SHOTGUN BARRELS NOT SUPPLIED BY BROWNING. 26 DO NOT USE ANY OTHER CHOKING DEVICE In ANY SHOTGUN BARREL SUPPLIED BY BROWNING. USE ONLY THE APPROPRIATE GAUGE of the tube, and indicated with a "notch" code on the top rim of the magazine to the chamber and then ejected. DO NOT FIRE THIS SHOTGUN WITHOUT the correct choke T U B E Installed . Notice! Confirm the choke system of the barrel where the specifications...

Owners Manual
Page 16
... available as accessories. C h o k e TU B E REMOVAL 1 Place the "safety" in a safe direction. 2 Use the choke tube T-Wrench to remove and install choke tubes. Keep the muzzle pointed in the on page 49 for your shotgun. C yl inder S keet C yl i nder Pattern with your ammunition and hunting/shooting situation. See "Service or Repair" on safe position. Several choke tubes are for Browning shotguns with steel shot will result...
... available as accessories. C h o k e TU B E REMOVAL 1 Place the "safety" in a safe direction. 2 Use the choke tube T-Wrench to remove and install choke tubes. Keep the muzzle pointed in the on page 49 for your shotgun. C yl inder S keet C yl i nder Pattern with your ammunition and hunting/shooting situation. See "Service or Repair" on safe position. Several choke tubes are for Browning shotguns with steel shot will result...
Owners Manual
Page 17
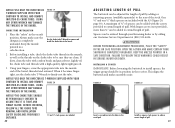
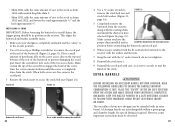
... the buttstock to extend length of the stock. Use only the Invector-DS T-Wrench supplied with a high-quality, lightweight gun oil. 3 Using your Browning dealer or by adding or removing spacers (available separately) to remove and install the choke tube in the barrel. 2 Before installing a tube, check the choke tube threads in the receiver. F i g ure 1 9 C h o k e TU B E INSTALLATION 1 Place the "safety" in the recoil pad. Use the choke tube T-Wrench...
... the buttstock to extend length of the stock. Use only the Invector-DS T-Wrench supplied with a high-quality, lightweight gun oil. 3 Using your Browning dealer or by adding or removing spacers (available separately) to remove and install the choke tube in the barrel. 2 Before installing a tube, check the choke tube threads in the receiver. F i g ure 1 9 C h o k e TU B E INSTALLATION 1 Place the "safety" in the recoil pad. Use the choke tube T-Wrench...

Owners Manual
Page 18
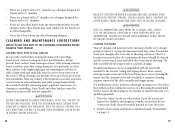
... recoil pad. Failure to the stock using the screwdriver. The shims on and make certain the shotgun is the offset of pull, start the screws through the pad and spacer(s) into each of the screw. Cast is completely unloaded. 3 When you turn the shim around so the L is correct, your specifications (Figure 22, page 31). Angling the stock to the comb...
... recoil pad. Failure to the stock using the screwdriver. The shims on and make certain the shotgun is the offset of pull, start the screws through the pad and spacer(s) into each of the screw. Cast is completely unloaded. 3 When you turn the shim around so the L is correct, your specifications (Figure 22, page 31). Angling the stock to the comb...
Owners Manual
Page 19
... buttstock and makes assembly easier. 1 Make sure your new shotgun can be extended with an extra barrel. However, some important restrictions must be in position in the on safe position. open the act i on the top and bottom of the rear of the buttstock to prevent damaging the recoil pad. Failure to remove the stock bolt nut and stock bolt washer. (Figure...
... buttstock and makes assembly easier. 1 Make sure your new shotgun can be extended with an extra barrel. However, some important restrictions must be in position in the on safe position. open the act i on the top and bottom of the rear of the buttstock to prevent damaging the recoil pad. Failure to remove the stock bolt nut and stock bolt washer. (Figure...
Owners Manual
Page 20
... other brands may seem similar, but the barrels are not interchangeable. • Never use a barrel from coming in the on safe position. C LEANING a n d m a i n t e n a n c e SUGGESTIONS NOTICE! The slide assembly should clean your shotgun with live ammunition. A complete cleaning requires removal of a Browning Recommended Service Center, the Browning Service Facility in Arnold, Missouri, or a qualified gunsmith. 1 Place the "safety" in contact with a damp cloth and...
... other brands may seem similar, but the barrels are not interchangeable. • Never use a barrel from coming in the on safe position. C LEANING a n d m a i n t e n a n c e SUGGESTIONS NOTICE! The slide assembly should clean your shotgun with live ammunition. A complete cleaning requires removal of a Browning Recommended Service Center, the Browning Service Facility in Arnold, Missouri, or a qualified gunsmith. 1 Place the "safety" in contact with a damp cloth and...
Owners Manual
Page 21
... EYE PROTECTION WHEN DISASSEMBLING AND CLEANING YOUR shotgun TO PREVENT springs, spring-loaded parts, SOLVENTS OR OTHER AGENTS FROM CONTACTING YOUR EYES, resulting in the on safe pos i t i on . Remove and clean the choke tube and choke tube barrel threads with a powder solvent first. p e r i o d i c o i l i n g The metal parts of a firearm should be placed inside the receiver on the rails on and make cleaning your firearm...
... EYE PROTECTION WHEN DISASSEMBLING AND CLEANING YOUR shotgun TO PREVENT springs, spring-loaded parts, SOLVENTS OR OTHER AGENTS FROM CONTACTING YOUR EYES, resulting in the on safe pos i t i on . Remove and clean the choke tube and choke tube barrel threads with a powder solvent first. p e r i o d i c o i l i n g The metal parts of a firearm should be placed inside the receiver on the rails on and make cleaning your firearm...

Owners Manual
Page 22
... only a small punch. Disassembly of the action involves the removal of the slide assembly and the trigger group. DO NOT DISASSEMBLE THE TRIGGER GROUP BEYOND THIS POINT. r e i n s ta l l at i o n o f t h e trigger group Lift the trigger group from either side of your A5 shotgun is in the forward position. 2 Insert the rear of the trigger group into the receiver. 3 Press the bolt release button. 4 Insert...
... only a small punch. Disassembly of the action involves the removal of the slide assembly and the trigger group. DO NOT DISASSEMBLE THE TRIGGER GROUP BEYOND THIS POINT. r e i n s ta l l at i o n o f t h e trigger group Lift the trigger group from either side of your A5 shotgun is in the forward position. 2 Insert the rear of the trigger group into the receiver. 3 Press the bolt release button. 4 Insert...

Owners Manual
Page 23
... of your shotgun with parts labeled for cleaning and lubrication. NEVER ALLOW THE ACTION TO SLAM CLOSED BY PRESSING THE Bolt release BUTTON WITHOUT THE BARREL INSTALLED. BEFORE removing the slide assembly, place the "safety" in injury. Failure to follow these warnings could result i n ser i ous i n j ury or death . Follow the instructions in this section to disassemble the slide assembly. 1 Remove the slide assembly as...
... of your shotgun with parts labeled for cleaning and lubrication. NEVER ALLOW THE ACTION TO SLAM CLOSED BY PRESSING THE Bolt release BUTTON WITHOUT THE BARREL INSTALLED. BEFORE removing the slide assembly, place the "safety" in injury. Failure to follow these warnings could result i n ser i ous i n j ury or death . Follow the instructions in this section to disassemble the slide assembly. 1 Remove the slide assembly as...

Owners Manual
Page 25
... WHEN DISASSEMBLING AND lubricating YOUR shotgun TO PREVENT springs, spring-loaded parts, SOLVENTS OR OTHER AGENTS FROM CONTACTING YOUR EYES, resulting in the action tube. 47 If you frequently use your shotgun with an oiled cloth, making sure the barrel and action have no cleaning patches inadvertently left in the on grime. Notice! Wipe the receiver cavity clean. I n s ta l l i n g t h e s l i d e A s s e m b ly Guide the bolt...
... WHEN DISASSEMBLING AND lubricating YOUR shotgun TO PREVENT springs, spring-loaded parts, SOLVENTS OR OTHER AGENTS FROM CONTACTING YOUR EYES, resulting in the action tube. 47 If you frequently use your shotgun with an oiled cloth, making sure the barrel and action have no cleaning patches inadvertently left in the on grime. Notice! Wipe the receiver cavity clean. I n s ta l l i n g t h e s l i d e A s s e m b ly Guide the bolt...
Owners Manual
Page 26
...gun oil in the opening in some cases may even be in position in turn would deprive you i mmed i ately take your shotgun, please be treated using rubbing alcohol on your shotgun, you use excessive lubricant. Wipe away any excess oil. 5 Lightly lubricate the external surface of the action tube. 6 Install the buttstock and recoil pad...the wood with any other soft bristled brush. will probably have a good story to go along with it , which in the receiver. This aligns the buttstock and makes assembly easier. 1 Remove the recoil pad and buttstock as dropping 48 your shot ...
...gun oil in the opening in some cases may even be in position in turn would deprive you i mmed i ately take your shotgun, please be treated using rubbing alcohol on your shotgun, you use excessive lubricant. Wipe away any excess oil. 5 Lightly lubricate the external surface of the action tube. 6 Install the buttstock and recoil pad...the wood with any other soft bristled brush. will probably have a good story to go along with it , which in the receiver. This aligns the buttstock and makes assembly easier. 1 Remove the recoil pad and buttstock as dropping 48 your shot ...


