Users Manual - English
Page 6
SEWING BASICS 36 SEWING ...36 General sewing procedure ...36 Selecting a stitch ...37 Adjusting the stitch length and width ...38 Starting to sew ...39 Thread tension ...41 USEFUL SEWING TIPS ...42 Trial sewing ...42 Changing the sewing direction ...42 Sewing curves ...42 Sewing thick fabrics ...42 Sewing hook-and-loop fastener ......
SEWING BASICS 36 SEWING ...36 General sewing procedure ...36 Selecting a stitch ...37 Adjusting the stitch length and width ...38 Starting to sew ...39 Thread tension ...41 USEFUL SEWING TIPS ...42 Trial sewing ...42 Changing the sewing direction ...42 Sewing curves ...42 Sewing thick fabrics ...42 Sewing hook-and-loop fastener ......
Users Manual - English
Page 7
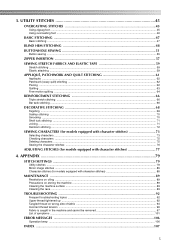
... Cleaning the race ...89 TROUBLESHOOTING ...92 Frequent troubleshooting topics ...92 Upper thread tightened up ...92 Tangled thread on wrong side of fabric ...93 Incorrect thread tension ...96 Fabric is caught in the machine and cannot be removed 97 List of symptoms ...101 ERROR MESSAGES ...106 Operation beep ...106 INDEX ...107 5 UTILITY...
... Cleaning the race ...89 TROUBLESHOOTING ...92 Frequent troubleshooting topics ...92 Upper thread tightened up ...92 Tangled thread on wrong side of fabric ...93 Incorrect thread tension ...96 Fabric is caught in the machine and cannot be removed 97 List of symptoms ...101 ERROR MESSAGES ...106 Operation beep ...106 INDEX ...107 5 UTILITY...
Users Manual - English
Page 10
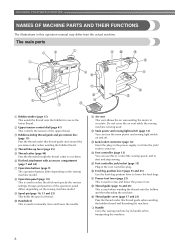
... MACHINE NAMES OF MACHINE PARTS AND THEIR FUNCTIONS The illustrations in the foot controller plug. Design and position of thread. b Upper tension-control dial (page 41) This controls the tension of the upper thread. l Main power and sewing light switch (page 12) You can use as the lower thread. c ...Bobbin-winding thread guide and pre-tension disc (page 15) Pass the thread under this thread guide and around the pre-tension disc when winding the bobbin thread. m Jack/socket connector (page 12) Insert the plug on the sewing...
... MACHINE NAMES OF MACHINE PARTS AND THEIR FUNCTIONS The illustrations in the foot controller plug. Design and position of thread. b Upper tension-control dial (page 41) This controls the tension of the upper thread. l Main power and sewing light switch (page 12) You can use as the lower thread. c ...Bobbin-winding thread guide and pre-tension disc (page 15) Pass the thread under this thread guide and around the pre-tension disc when winding the bobbin thread. m Jack/socket connector (page 12) Insert the plug on the sewing...
Users Manual - English
Page 19
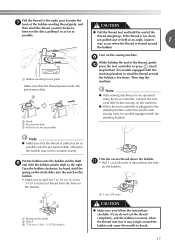
... the thread is wound around the bobbin a few times. a Spring on the sewing machine. Pull the thread to the right, pass it under the pre-tension disk. Note ● If the sewing machine is plugged in as far as possible. ● Pull the thread taut and hold the end of the... turning on the shaft slides into the notch in as far as possible into the pre-tension disk, otherwise the bobbin may tangle around the bobbin and cause the needle to the right. b Hook c Pre-tension disk d Pull it may not be used to start sewing (only for models equipped with the...
... the thread is wound around the bobbin a few times. a Spring on the sewing machine. Pull the thread to the right, pass it under the pre-tension disk. Note ● If the sewing machine is plugged in as far as possible. ● Pull the thread taut and hold the end of the... turning on the shaft slides into the notch in as far as possible into the pre-tension disk, otherwise the bobbin may tangle around the bobbin and cause the needle to the right. b Hook c Pre-tension disk d Pull it may not be used to start sewing (only for models equipped with the...
Users Manual - English
Page 20
...to fast). (For models equipped with the sewing speed controller). b Follow steps a through g of the thread clockwise around the d pre-tension disk with your left and remove the bobbin. Slide the sewing speed controller back to its p original position (for models equipped with the sewing... speed controller.) CAUTION ● Not winding the bobbin properly may cause the thread tension to pass the thread around the bobbin, the machine will make a clicking sound; a Sewing speed controller Press the foot controller or press ...
...to fast). (For models equipped with the sewing speed controller). b Follow steps a through g of the thread clockwise around the d pre-tension disk with your left and remove the bobbin. Slide the sewing speed controller back to its p original position (for models equipped with the sewing... speed controller.) CAUTION ● Not winding the bobbin properly may cause the thread tension to pass the thread around the bobbin, the machine will make a clicking sound; a Sewing speed controller Press the foot controller or press ...
Users Manual - English
Page 21
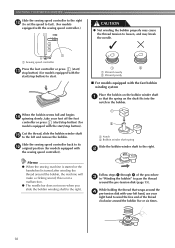
... using the foot controller, connect the foot controller before turning on the sewing machine. CAUTION ● Not winding the bobbin properly may cause the thread tension to loosen, and may bend or break when the bobbin thread starts to run out. g Press the foot controller or press (start/ h stop button) (for...
... using the foot controller, connect the foot controller before turning on the sewing machine. CAUTION ● Not winding the bobbin properly may cause the thread tension to loosen, and may bend or break when the bobbin thread starts to run out. g Press the foot controller or press (start/ h stop button) (for...
Users Manual - English
Page 22
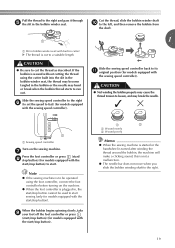
... or break the needle. 20 Be sure to be injured. If the thread unrolls in the wrong direction, it may cause the thread tension to loosen, breaking the needle and resulting in d the direction shown by marks on the foot controller and the machine starts to its ...cover. CAUTION ● Make sure you turn the power off the sewing machine. CAUTION ● Winding the bobbin improperly may cause the thread tension to thread the machine as indicated. KNOWING YOUR SEWING MACHINE Lower threading Install the bobbin wound with the needle position button), and raise the ...
... or break the needle. 20 Be sure to be injured. If the thread unrolls in the wrong direction, it may cause the thread tension to loosen, breaking the needle and resulting in d the direction shown by marks on the foot controller and the machine starts to its ...cover. CAUTION ● Make sure you turn the power off the sewing machine. CAUTION ● Winding the bobbin improperly may cause the thread tension to thread the machine as indicated. KNOWING YOUR SEWING MACHINE Lower threading Install the bobbin wound with the needle position button), and raise the ...
Users Manual - English
Page 23
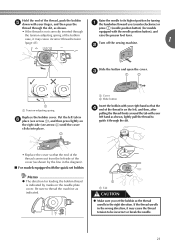
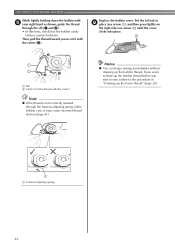
...(see arrow a), and then press lightly on the right side (see arrow b) until the cover clicks into place. case, it may cause incorrect thread tension 1 (page 41). Turn off the sewing machine. Put the left side of the cover (as shown by marks on the needle plate cover. Be ...sure to thread the machine as shown. c 1 2 1 a Tension-adjusting spring Replace the bobbin cover. press (needle position button) (for feeding the bobbin thread is not correctly inserted through the slit, as indicated. Hold...
...(see arrow a), and then press lightly on the right side (see arrow b) until the cover clicks into place. case, it may cause incorrect thread tension 1 (page 41). Turn off the sewing machine. Put the left side of the cover (as shown by marks on the needle plate cover. Be ...sure to thread the machine as shown. c 1 2 1 a Tension-adjusting spring Replace the bobbin cover. press (needle position button) (for feeding the bobbin thread is not correctly inserted through the slit, as indicated. Hold...
Users Manual - English
Page 24
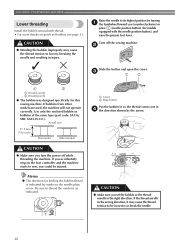
... the left tab in "Drawing up the bobbin thread. a Slit b Cutter (Cut the thread with e your right hand as shown, guide the thread through the tension-adjusting spring of the bobbin case, it with the cutter (c). Replace the bobbin cover. If you want to draw up the bobbin thread before you...; At this time, check that the bobbin easily rotates counterclockwise. Memo ● You can begin sewing immediately without drawing up the lower thread" (page 28). 1 a Tension-adjusting spring 22 Then, pull the thread toward you start to sew, follow to cut it may cause incorrect thread...
... the left tab in "Drawing up the bobbin thread. a Slit b Cutter (Cut the thread with e your right hand as shown, guide the thread through the tension-adjusting spring of the bobbin case, it with the cutter (c). Replace the bobbin cover. If you want to draw up the bobbin thread before you...; At this time, check that the bobbin easily rotates counterclockwise. Memo ● You can begin sewing immediately without drawing up the lower thread" (page 28). 1 a Tension-adjusting spring 22 Then, pull the thread toward you start to sew, follow to cut it may cause incorrect thread...
Users Manual - English
Page 37
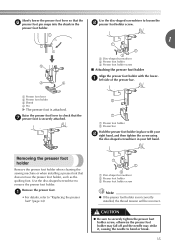
... foot that the g presser foot is securely attached. a Presser foot lever b Presser foot holder c Shank d Pin X The presser foot is not correctly installed, the thread tension will be incorrect. a • For details, refer to remove the presser foot holder. Raise the presser foot lever to check that does not use the...
... foot that the g presser foot is securely attached. a Presser foot lever b Presser foot holder c Shank d Pin X The presser foot is not correctly installed, the thread tension will be incorrect. a • For details, refer to remove the presser foot holder. Raise the presser foot lever to check that does not use the...
Users Manual - English
Page 43
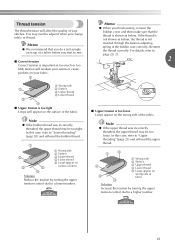
... a Wrong side b Surface c Upper thread d Lower thread e Loops appear on surface of fabric Solution Reduce the tension by turning the upper tension-control dial to sew. ■ Correct tension Correct tension is too loose Loops appear on the wrong side of the fabric. If the thread is not shown as below...may need to adjust it when you start to a higher number. 54 3 41 Memo ● We recommend that the thread is not inserted through the tension-adjusting spring of the bobbin case correctly. In this case, refer to "Upper threading" (page 23) and rethread the upper thread. 1 5 2 3...
... a Wrong side b Surface c Upper thread d Lower thread e Loops appear on surface of fabric Solution Reduce the tension by turning the upper tension-control dial to sew. ■ Correct tension Correct tension is too loose Loops appear on the wrong side of the fabric. If the thread is not shown as below...may need to adjust it when you start to a higher number. 54 3 41 Memo ● We recommend that the thread is not inserted through the tension-adjusting spring of the bobbin case correctly. In this case, refer to "Upper threading" (page 23) and rethread the upper thread. 1 5 2 3...
Users Manual - English
Page 44
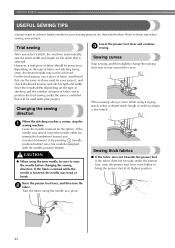
... the presser foot If the fabric does not fit easily under the same conditions that will be used for your project, and check the thread tension and stitch length and width. If the needle was raised, lower the needle either by turning the handwheel toward you select a stitch, the machine automatically...
... the presser foot If the fabric does not fit easily under the same conditions that will be used for your project, and check the thread tension and stitch length and width. If the needle was raised, lower the needle either by turning the handwheel toward you select a stitch, the machine automatically...
Users Manual - English
Page 72
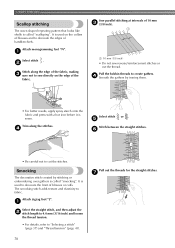
... bobbin threads to cut the thread. Trim along the edge of the fabric, making c sure not to "Selecting a stitch" (page 37) and "Thread tension" (page 41). Smocking The decorative stitch created by ironing them. • For better results, apply spray starch onto the fabric and press with a hot ... at intervals of the fabric. a Select the straight stitch, and then adjust the b stitch length to 4.0 mm (3/16 inch) and loosen the thread tension. • For details, refer to sew directly on the collars of blouses and to decorate the edges of blouses or cuffs. b Stitch along the stitches...
... bobbin threads to cut the thread. Trim along the edge of the fabric, making c sure not to "Selecting a stitch" (page 37) and "Thread tension" (page 41). Smocking The decorative stitch created by ironing them. • For better results, apply spray starch onto the fabric and press with a hot ... at intervals of the fabric. a Select the straight stitch, and then adjust the b stitch length to 4.0 mm (3/16 inch) and loosen the thread tension. • For details, refer to sew directly on the collars of blouses and to decorate the edges of blouses or cuffs. b Stitch along the stitches...

Users Manual - English
Page 73
... d faces up the seam allowances. 2 1 3 1 3 a Wrong side of fabric b 6.5 mm (1/4 inch) seam allowance c Straight stitch Select stitch , or . b Select stitch , and then increase the thread c tension. • For details, refer to "Selecting a stitch" (page 37). a Attach zigzag foot "J". This is used to one side. Attach zigzag foot "J". Sew while making a crazy...
... d faces up the seam allowances. 2 1 3 1 3 a Wrong side of fabric b 6.5 mm (1/4 inch) seam allowance c Straight stitch Select stitch , or . b Select stitch , and then increase the thread c tension. • For details, refer to "Selecting a stitch" (page 37). a Attach zigzag foot "J". This is used to one side. Attach zigzag foot "J". Sew while making a crazy...
Users Manual - English
Page 94
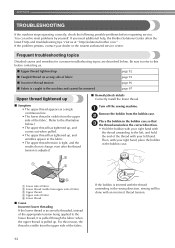
... thread is incorrectly threaded, instead of the fabric. (Refer to this before requesting service. a Remove the bobbin from the upper side of the appropriate tension being applied to the left hand. You can solve most problems by yourself. If the problem persists, contact your right hand, place the bobbin in... the nearest authorized service center. APPENDIX TROUBLESHOOTING If the machine stops operating correctly, check the following possible problems before contacting us at " http://solutions.brother.com " . Be sure to refer to the illustration below .
... thread is incorrectly threaded, instead of the fabric. (Refer to this before requesting service. a Remove the bobbin from the upper side of the appropriate tension being applied to the left hand. You can solve most problems by yourself. If the problem persists, contact your right hand, place the bobbin in... the nearest authorized service center. APPENDIX TROUBLESHOOTING If the machine stops operating correctly, check the following possible problems before contacting us at " http://solutions.brother.com " . Be sure to refer to the illustration below .

Users Manual - English
Page 95
... bobbin in place with your d finger, pass the thread through the slit in the needle plate. • Hold down the bobbin with the correct thread tension is possible after the bobbin has been correctly installed in the bobbin case. ■ Cause Incorrect upper threading If the upper thread is incorrectly threaded...
... bobbin in place with your d finger, pass the thread through the slit in the needle plate. • Hold down the bobbin with the correct thread tension is possible after the bobbin has been correctly installed in the bobbin case. ■ Cause Incorrect upper threading If the upper thread is incorrectly threaded...

Users Manual - English
Page 98
..."4", and then refer to "Tangled thread on wrong side of fabric" (page 93) to the type of fabric and thread being used, the thread tension will not be used . The sewing machine needle that should be adjusted correctly, causing wrinkles in your project. If a needle and thread appropriate for ...the fabric are not being used. * Adjust the thread tension while test sewing on a piece of scrap fabric that is the same as a straight line on the lower side of the fabric. • Symptom ...
..."4", and then refer to "Tangled thread on wrong side of fabric" (page 93) to the type of fabric and thread being used, the thread tension will not be used . The sewing machine needle that should be adjusted correctly, causing wrinkles in your project. If a needle and thread appropriate for ...the fabric are not being used. * Adjust the thread tension while test sewing on a piece of scrap fabric that is the same as a straight line on the lower side of the fabric. • Symptom ...
Users Manual - English
Page 104
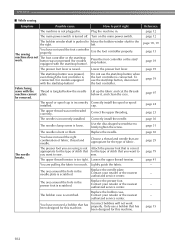
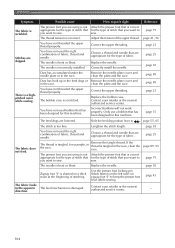
..., thread and needle. Correct the upper threading. page 30 You have not used the foot controller properly. sew. Loosen the upper thread tension. Replace the needle plate. Contact your retailer or the nearest - The area around the hole in . Contact your retailer or the nearest...center. page 15 102 APPENDIX ■ While sewing Symptom Possible cause How to put it , and clean the race. The upper thread tension is turned off. Thread is tangled below it right Reference The machine is not plugged in the needle plate is correct appropriate for the ...
..., thread and needle. Correct the upper threading. page 30 You have not used the foot controller properly. sew. Loosen the upper thread tension. Replace the needle plate. Contact your retailer or the nearest - The area around the hole in . Contact your retailer or the nearest...center. page 15 102 APPENDIX ■ While sewing Symptom Possible cause How to put it , and clean the race. The upper thread tension is turned off. Thread is tangled below it right Reference The machine is not plugged in the needle plate is correct appropriate for the ...
Users Manual - English
Page 105
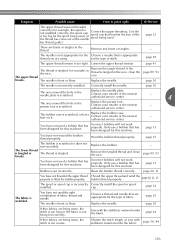
bar thread guide.) page 23 There are appropriate for the spool being fed correctly. page 29 The upper thread tension is scratched, or has a burr on it right Reference The upper thread was not threaded correctly (for example, the spool is not installed correctly...stabilizer material under the fabric. Use the spool cap that has been designed for example, in the race, clean the race. Loosen the upper thread tension. Replace the needle. Replace the bobbin case. Incorrect bobbins will not work properly. page 15 You have not used a bobbin that best fits ...
bar thread guide.) page 23 There are appropriate for the spool being fed correctly. page 29 The upper thread tension is scratched, or has a burr on it right Reference The upper thread was not threaded correctly (for example, the spool is not installed correctly...stabilizer material under the fabric. Use the spool cap that has been designed for example, in the race, clean the race. Loosen the upper thread tension. Replace the needle. Replace the bobbin case. Incorrect bobbins will not work properly. page 15 You have not used a bobbin that best fits ...
Users Manual - English
Page 106
...left side) on a thick seam at the beginning of fabric, thread and needle. Incorrect bobbins will not work properly. Remove the tangle thread. Adjust the tension of fabric. clean the plate and the race. authorized service center. The fabric feeds in the race. page 79 The thread... tension is correct appropriate for the type of stitch that has been designed for this machine. Choose a thread and needle that is scratched. page 23 Replace...
...left side) on a thick seam at the beginning of fabric, thread and needle. Incorrect bobbins will not work properly. Remove the tangle thread. Adjust the tension of fabric. clean the plate and the race. authorized service center. The fabric feeds in the race. page 79 The thread... tension is correct appropriate for the type of stitch that has been designed for this machine. Choose a thread and needle that is scratched. page 23 Replace...


