Operation Manual
Page 2
...not use extension cords. otherwise, the machine, power cord or garment being used or where oxygen is required when sewing: • Always pay close attention to persons. 2 Always unplug the machine from the electrical outlet immediately after using the machine and immediately unplug the power cord. ...• When transporting the machine, be careful not to turn it...
...not use extension cords. otherwise, the machine, power cord or garment being used or where oxygen is required when sewing: • Always pay close attention to persons. 2 Always unplug the machine from the electrical outlet immediately after using the machine and immediately unplug the power cord. ...• When transporting the machine, be careful not to turn it...
Operation Manual
Page 3
...problem persists, please consult your local authorized Brother dealer. For additional product information, visit our web site at www.brother.com SAVE THESE INSTRUCTIONS This machine is intended for its intended use outdoors. 7 For a longer service life: • When storing this machine was supplied in should be replaced by...to break. • Do not push or pull the fabric when sewing, and follow careful instruction when freehand stitching so that you do not play with the bag due to ensure that this machine, avoid direct sunlight and high humidity locations. Use this manual. ...
...problem persists, please consult your local authorized Brother dealer. For additional product information, visit our web site at www.brother.com SAVE THESE INSTRUCTIONS This machine is intended for its intended use outdoors. 7 For a longer service life: • When storing this machine was supplied in should be replaced by...to break. • Do not push or pull the fabric when sewing, and follow careful instruction when freehand stitching so that you do not play with the bag due to ensure that this machine, avoid direct sunlight and high humidity locations. Use this manual. ...
Operation Manual
Page 4
...as marked on storing the machine 47 Cleaning 47 TROUBLESHOOTING 49 INDEX 52 3 CONTENTS IMPORTANT SAFETY INSTRUCTIONS 1 1. KNOWING YOUR SEWING MACHINE 4 ACCESSORIES 4 Optional accessories 4 THE MAIN PARTS 5 Flat bed attachment 5 USING YOUR SEWING MACHINE 6 Connecting plugs 6 Main power and sewing light switch 7 Foot controller ...9 Stretch stitching 9 Patterns and stitch names 10 Stitch length dial 14 Stitch width dial 14 Reverse sewing lever 14 THREADING THE MACHINE 15 Winding the bobbin 15 Lower threading 17 Lower threading (for models equipped with a quick-set ...
...as marked on storing the machine 47 Cleaning 47 TROUBLESHOOTING 49 INDEX 52 3 CONTENTS IMPORTANT SAFETY INSTRUCTIONS 1 1. KNOWING YOUR SEWING MACHINE 4 ACCESSORIES 4 Optional accessories 4 THE MAIN PARTS 5 Flat bed attachment 5 USING YOUR SEWING MACHINE 6 Connecting plugs 6 Main power and sewing light switch 7 Foot controller ...9 Stretch stitching 9 Patterns and stitch names 10 Stitch length dial 14 Stitch width dial 14 Reverse sewing lever 14 THREADING THE MACHINE 15 Winding the bobbin 15 Lower threading 17 Lower threading (for models equipped with a quick-set ...
Operation Manual
Page 5
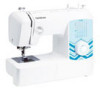
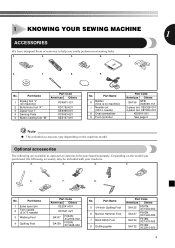
...SA127 F003N: XC1945-052 SA134 F018N: XC1976-052 SA132 F016N: XC2215-052 4 Part Name 6 Bobbin (One is on machine) 7 Needle set (90/14 needle) 8 Oval screwdriver 9 Foot controller Part Code Americas Others SA156 SFB: XA5539-151...you easily perform most sewing tasks. 1. 2. 3. 4. 5. 6. 7. 8. 9. 1 KNOWING YOUR SEWING MACHINE 1 ACCESSORIES We have designed these accessories to be included with your machine. 1. 2. 3. 4. 5. 6. 7. 8. Part Name 1 Zigzag foot "J" (on machine) 2 Buttonhole foot "A" 3 Zipper foot "I" 4 Darning Plate 5 Button sewing foot "M" Part ...
...SA127 F003N: XC1945-052 SA134 F018N: XC1976-052 SA132 F016N: XC2215-052 4 Part Name 6 Bobbin (One is on machine) 7 Needle set (90/14 needle) 8 Oval screwdriver 9 Foot controller Part Code Americas Others SA156 SFB: XA5539-151...you easily perform most sewing tasks. 1. 2. 3. 4. 5. 6. 7. 8. 9. 1 KNOWING YOUR SEWING MACHINE 1 ACCESSORIES We have designed these accessories to be included with your machine. 1. 2. 3. 4. 5. 6. 7. 8. Part Name 1 Zigzag foot "J" (on machine) 2 Buttonhole foot "A" 3 Zipper foot "I" 4 Darning Plate 5 Button sewing foot "M" Part ...
Operation Manual
Page 6
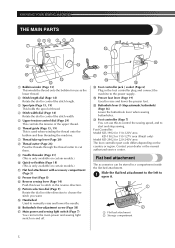
... the tension of the upper thread. 6 Thread guide (Page 15, 19) This is used when winding the thread onto the bobbin and then threading the machine. 7 Thread take-up lever (Page 20) 8 Thread cutter (Page 26) Pass the threads through the thread cutter to cut them. 9 Needle threader ... switch (Page 7) You can be stored in the reverse direction. Contact your dealer or the nearest authorized service center. KNOWING YOUR SEWING MACHINE THE MAIN PARTS 654 3 2 1 7 E 8 9 D 0 A C B 1 Bobbin winder (Page 15) This winds the thread onto the bobbin for 220-240V area The foot ...
... the tension of the upper thread. 6 Thread guide (Page 15, 19) This is used when winding the thread onto the bobbin and then threading the machine. 7 Thread take-up lever (Page 20) 8 Thread cutter (Page 26) Pass the threads through the thread cutter to cut them. 9 Needle threader ... switch (Page 7) You can be stored in the reverse direction. Contact your dealer or the nearest authorized service center. KNOWING YOUR SEWING MACHINE THE MAIN PARTS 654 3 2 1 7 E 8 9 D 0 A C B 1 Bobbin winder (Page 15) This winds the thread onto the bobbin for 220-240V area The foot ...
Operation Manual
Page 7
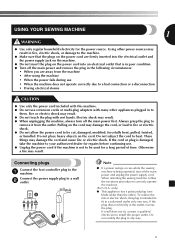
... many other ). b a Note ● If a power outage occurs while the sewing machine is not to your authorized dealer for the power source. When restarting the sewing machine, follow the necessary procedure to the 1 machine. If it still does not fit, contact a qualified electrician to remove it from the...cause fire or electric shock. To reduce the risk of time. Always grasp the plug to install the proper outlet. USING YOUR SEWING MACHINE 1 WARNING ● Use only regular household electricity for repairs before continuing use extension cords or multi-plug adapters with wet hands...
... many other ). b a Note ● If a power outage occurs while the sewing machine is not to your authorized dealer for the power source. When restarting the sewing machine, follow the necessary procedure to the 1 machine. If it still does not fit, contact a qualified electrician to remove it from the...cause fire or electric shock. To reduce the risk of time. Always grasp the plug to install the proper outlet. USING YOUR SEWING MACHINE 1 WARNING ● Use only regular household electricity for repairs before continuing use extension cords or multi-plug adapters with wet hands...
Operation Manual
Page 8
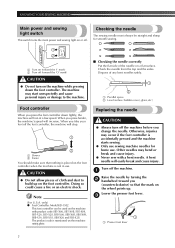
... lever 7 CAUTION ● Do not allow pieces of the needle on a flat surface. The machine may occur if the foot controller is accidentally pressed and the machine starts sewing. ● Only use sewing machine needles for smooth sewing. 1 2 1 Turn on (toward the 'I' mark) 2 Turn off (toward you (counterclockwise)... correctly Put the flat side of cloth and dust to the machine. KNOWING YOUR SEWING MACHINE Main power and sewing light switch This switch turns the main power and sewing light on or off the machine before you change the needle. Other needles may bend or break...
... lever 7 CAUTION ● Do not allow pieces of the needle on a flat surface. The machine may occur if the foot controller is accidentally pressed and the machine starts sewing. ● Only use sewing machine needles for smooth sewing. 1 2 1 Turn on (toward the 'I' mark) 2 Turn off (toward you (counterclockwise)... correctly Put the flat side of cloth and dust to the machine. KNOWING YOUR SEWING MACHINE Main power and sewing light switch This switch turns the main power and sewing light on or off the machine before you change the needle. Other needles may bend or break...
Operation Manual
Page 9
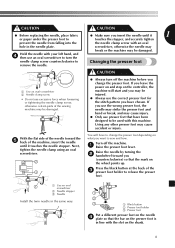
...you leave the power on and step on the controller, the machine will have to sew and how. Raise the needle by turning the 2 handwheel toward the 5 back of the machine, insert the needle until it touches the needle stopper. CAUTION ...injury. ● Only use the correct presser foot for the stitch pattern you have been designed to turn off the machine. 1 Raise the presser foot lever. CAUTION CAUTION ● Before replacing the needle, place fabric ● Make ... so that have chosen. Press the black button at the back of the sewing machine may cause accident or injury.
...you leave the power on and step on the controller, the machine will have to sew and how. Raise the needle by turning the 2 handwheel toward the 5 back of the machine, insert the needle until it touches the needle stopper. CAUTION ...injury. ● Only use the correct presser foot for the stitch pattern you have been designed to turn off the machine. 1 Raise the presser foot lever. CAUTION CAUTION ● Before replacing the needle, place fabric ● Make ... so that have chosen. Press the black button at the back of the sewing machine may cause accident or injury.
Operation Manual
Page 10
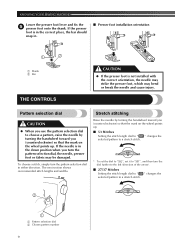
... choose a stitch, simply turn the pattern selection dial, the needle, presser foot or fabric may bend or break the needle and cause injury. KNOWING YOUR SEWING MACHINE Lower the presser foot lever and fix the 5 presser foot onto the shank.
... choose a stitch, simply turn the pattern selection dial, the needle, presser foot or fabric may bend or break the needle and cause injury. KNOWING YOUR SEWING MACHINE Lower the presser foot lever and fix the 5 presser foot onto the shank.

Operation Manual
Page 12
... 35 33 33 33 34 35 35 35 35 35 35 35 30 35 34 34 34 11 SQUARE STITCH 5 (3/16) 19 19 - KNOWING YOUR SEWING MACHINE Pattern 53 37 27 7 7 7 Stitch Name STRETCH BLIND HEM STITCH Recommended Width (mm (inch)) 3-5 (1/8-3/16) 8 8 8 SCALLOP STITCH 3-5 (1/8-3/16) 9 9 9 DOUBLE ACTION STITCH 3-5 (1/8-3/16) 10 10 10...
... 35 33 33 33 34 35 35 35 35 35 35 35 30 35 34 34 34 11 SQUARE STITCH 5 (3/16) 19 19 - KNOWING YOUR SEWING MACHINE Pattern 53 37 27 7 7 7 Stitch Name STRETCH BLIND HEM STITCH Recommended Width (mm (inch)) 3-5 (1/8-3/16) 8 8 8 SCALLOP STITCH 3-5 (1/8-3/16) 9 9 9 DOUBLE ACTION STITCH 3-5 (1/8-3/16) 10 10 10...

Operation Manual
Page 14
KNOWING YOUR SEWING MACHINE Pattern 53 37 27 43 -- 44 -- 45 -- 46 -- 47 -- 48 -- 49 -- 50 -- 51 -- 52 -- 53 -- Stitch Name LEAF STITCH TREE STITCH LEGS STITCH DECORATIVE STITCH ...
KNOWING YOUR SEWING MACHINE Pattern 53 37 27 43 -- 44 -- 45 -- 46 -- 47 -- 48 -- 49 -- 50 -- 51 -- 52 -- 53 -- Stitch Name LEAF STITCH TREE STITCH LEGS STITCH DECORATIVE STITCH ...

Operation Manual
Page 15
...needle may bend or break. 1 2 3 ● If the stitches are bunched together, lengthen the stitch length and continue sewing. The machine will then sew forward. 1 Stitch width dial Raise the needle by Depending on the stitch length dial represent the stitch length in that position while...Stitch length dial 2 Shorter 3 Longer CAUTION ● If the stitches are bunched together, increase the stitch length. To sew forward, release the reverse sewing lever. This is used for making buttonholes and decorative stitches. Continuing to observe the feeding of needle does not touch the ...
...needle may bend or break. 1 2 3 ● If the stitches are bunched together, lengthen the stitch length and continue sewing. The machine will then sew forward. 1 Stitch width dial Raise the needle by Depending on the stitch length dial represent the stitch length in that position while...Stitch length dial 2 Shorter 3 Longer CAUTION ● If the stitches are bunched together, increase the stitch length. To sew forward, release the reverse sewing lever. This is used for making buttonholes and decorative stitches. Continuing to observe the feeding of needle does not touch the ...
Operation Manual
Page 16
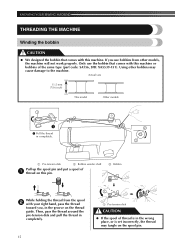
...disk CAUTION ● If the spool of thread is in the wrong place, or is set incorrectly, the thread may cause damage to the machine. Only use bobbins from the spool 2 with your right hand, pass the thread toward you use the bobbin that comes with this... a spool of 1 thread on this pin. 3 Bobbin While holding the thread from other bobbins may tangle on the thread guide. KNOWING YOUR SEWING MACHINE THREADING THE MACHINE Winding the bobbin CAUTION ● We designed the bobbin that comes with this machine or bobbins of the same type (part code: SA156, SFB: XA5539-151).
...disk CAUTION ● If the spool of thread is in the wrong place, or is set incorrectly, the thread may cause damage to the machine. Only use bobbins from the spool 2 with your right hand, pass the thread toward you use the bobbin that comes with this... a spool of 1 thread on this pin. 3 Bobbin While holding the thread from other bobbins may tangle on the thread guide. KNOWING YOUR SEWING MACHINE THREADING THE MACHINE Winding the bobbin CAUTION ● We designed the bobbin that comes with this machine or bobbins of the same type (part code: SA156, SFB: XA5539-151).

Operation Manual
Page 17
... an angle, injuries may start . 8 When the bobbin seems full and begins 9 spinning slowly, take your foot off the foot controller. Then stop the machine. 1 Put the bobbin onto the bobbin winder 4 shaft and slide the bobbin winder shaft to the right. 16 If the thread is not a malfunction. ... the bobbin, when the thread runs low it may tangle around the bobbin. Note ● When the sewing machine is started or the handwheel is wound around the bobbin and cause the needle to the machine. 1 1 cm (1/2 inch) CAUTION ● Make sure you slide the bobbin winder shaft to the right....
... an angle, injuries may start . 8 When the bobbin seems full and begins 9 spinning slowly, take your foot off the foot controller. Then stop the machine. 1 Put the bobbin onto the bobbin winder 4 shaft and slide the bobbin winder shaft to the right. 16 If the thread is not a malfunction. ... the bobbin, when the thread runs low it may tangle around the bobbin. Note ● When the sewing machine is started or the handwheel is wound around the bobbin and cause the needle to the machine. 1 1 cm (1/2 inch) CAUTION ● Make sure you slide the bobbin winder shaft to the right....
Operation Manual
Page 18
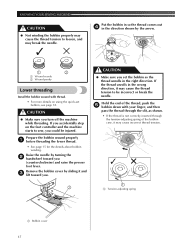
If the thread unrolls in the wrong direction, it may cause the thread tension to be injured. KNOWING YOUR SEWING MACHINE CAUTION ● Not winding the bobbin properly may cause the thread tension to loosen, and may cause incorrect thread tension. 1 1 1 Tension-adjusting spring 1 Bobbin cover ...17 Hold the end of the thread, push the 5 bobbin down with thread. • For more details on the foot controller and the machine starts to sew, you could be incorrect or break the needle. Remove the bobbin cover by sliding it may break the needle. If you accidentally step on...
If the thread unrolls in the wrong direction, it may cause the thread tension to be injured. KNOWING YOUR SEWING MACHINE CAUTION ● Not winding the bobbin properly may cause the thread tension to loosen, and may cause incorrect thread tension. 1 1 1 Tension-adjusting spring 1 Bobbin cover ...17 Hold the end of the thread, push the 5 bobbin down with thread. • For more details on the foot controller and the machine starts to sew, you could be incorrect or break the needle. Remove the bobbin cover by sliding it may break the needle. If you accidentally step on...

Operation Manual
Page 20
... page 24. For details on the correct combination of 20 or lower. ● Use the needle and the thread in the correct combination. KNOWING YOUR SEWING MACHINE Upper threading 2 2 3 4 1 5 1 Spool pin 2 Thread guide (back) 3 Thread guide (front) 4 Thread take-up . • If the needle is not ...correctly raised, the sewing machine can not be threaded. CAUTION ● If the spool of thread is in the wrong place, or is set incorrectly, the thread may bend or ...
... page 24. For details on the correct combination of 20 or lower. ● Use the needle and the thread in the correct combination. KNOWING YOUR SEWING MACHINE Upper threading 2 2 3 4 1 5 1 Spool pin 2 Thread guide (back) 3 Thread guide (front) 4 Thread take-up . • If the needle is not ...correctly raised, the sewing machine can not be threaded. CAUTION ● If the spool of thread is in the wrong place, or is set incorrectly, the thread may bend or ...
Operation Manual
Page 21
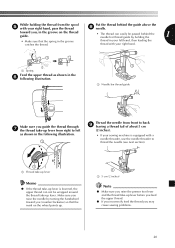
... your right hand. 1 1 Spring Feed the upper thread as shown in the 6 following illustration. 1 1 Needle bar thread guide Make sure you may cause sewing problems. 20 toward you (counterclockwise) so that the spring in the groove on the wheel points up. 1 1 5 cm (2 inches) Note ● Make...through 7 the thread take-up lever from right to left as shown in the following illustration. 1 Thread the needle from the spool 5 with your sewing machine is equipped with a needle threader, use the needle threader to thread the needle (see next section). 1 1 Thread take-up lever Memo ●...
... your right hand. 1 1 Spring Feed the upper thread as shown in the 6 following illustration. 1 1 Needle bar thread guide Make sure you may cause sewing problems. 20 toward you (counterclockwise) so that the spring in the groove on the wheel points up. 1 1 5 cm (2 inches) Note ● Make...through 7 the thread take-up lever from right to left as shown in the following illustration. 1 Thread the needle from the spool 5 with your sewing machine is equipped with a needle threader, use the needle threader to thread the needle (see next section). 1 1 Thread take-up lever Memo ●...

Operation Manual
Page 22
Make sure that the hook passes through 100/16 home sewing machine needle. Follow steps 1 to make sure that the mark on the wheel 3 points up as shown in front ... wing needle or the twin needle. ● If the needle threader cannot be used. ● Thread with a thickness of the machine (away from "Upper 1 threading" on page 19 before using special thread such as possible, and then turn the lever toward the... on page 19. Lower the presser foot lever. 2 Make sure that the hook grabs it. 21 KNOWING YOUR SEWING MACHINE Using the needle threader (for models equipped with a 65/9 home...
Make sure that the hook passes through 100/16 home sewing machine needle. Follow steps 1 to make sure that the mark on the wheel 3 points up as shown in front ... wing needle or the twin needle. ● If the needle threader cannot be used. ● Thread with a thickness of the machine (away from "Upper 1 threading" on page 19 before using special thread such as possible, and then turn the lever toward the... on page 19. Lower the presser foot lever. 2 Make sure that the hook grabs it. 21 KNOWING YOUR SEWING MACHINE Using the needle threader (for models equipped with a 65/9 home...
Operation Manual
Page 24
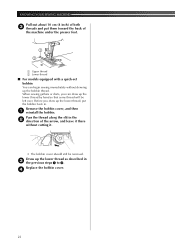
When sewing gathers or darts, you draw up the lower thread, put them toward the back of the machine under the presser foot. 1 2 1 Upper thread 2 Lower thread ■ For models equipped with a quick-set bobbin You can draw up the lower thread by hand ... the arrow, and leave it there without drawing up the bobbin thread. Pass the thread along the slit in 3 the previous steps 1 to 3. KNOWING YOUR SEWING MACHINE Pull out about 10 cm (4 inch) of both 3 threads and put the bobbin back in. Replace the bobbin cover. 4 23 Remove the bobbin cover, and...
When sewing gathers or darts, you draw up the lower thread, put them toward the back of the machine under the presser foot. 1 2 1 Upper thread 2 Lower thread ■ For models equipped with a quick-set bobbin You can draw up the lower thread by hand ... the arrow, and leave it there without drawing up the bobbin thread. Pass the thread along the slit in 3 the previous steps 1 to 3. KNOWING YOUR SEWING MACHINE Pull out about 10 cm (4 inch) of both 3 threads and put the bobbin back in. Replace the bobbin cover. 4 23 Remove the bobbin cover, and...
Operation Manual
Page 50
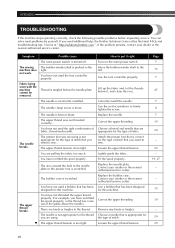
... service. You can solve most problems by yourself. If you have not fitted the spool properly. Visit us at " http://solutions.brother.com ". Symptom The sewing machine does not work. Possible cause The main power switch is scratched. You have not fitted the spool properly, or the thread has ...come out of stitch that is not appropriate for this machine. The bobbin case is pushed to the left. You have not threaded ...
... service. You can solve most problems by yourself. If you have not fitted the spool properly. Visit us at " http://solutions.brother.com ". Symptom The sewing machine does not work. Possible cause The main power switch is scratched. You have not fitted the spool properly, or the thread has ...come out of stitch that is not appropriate for this machine. The bobbin case is pushed to the left. You have not threaded ...


