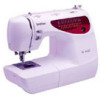

Accessory Catalog
Page 4
... clamp screw with just right pressure. 1. SA161 All Brother home-use sewing machines www.brother.com Screw on either left ). 2. Sew. Use these utility presser feet and accessories to add a professional finish to your sewing projects. Position the presser foot over the long feed dogs...zipper/piping, avoiding the non-flat parts of zipper/piping, and presses the fabric with a screwdriver. 5. Requires Low Shank Adapter for ULT series, PC-6500, PC-8200 and PC-8500 sewing machines. Adjustable Zipper & Piping Foot Brother General Sewing Accessories 06 Adjustable Zipper & Piping ...
... clamp screw with just right pressure. 1. SA161 All Brother home-use sewing machines www.brother.com Screw on either left ). 2. Sew. Use these utility presser feet and accessories to add a professional finish to your sewing projects. Position the presser foot over the long feed dogs...zipper/piping, avoiding the non-flat parts of zipper/piping, and presses the fabric with a screwdriver. 5. Requires Low Shank Adapter for ULT series, PC-6500, PC-8200 and PC-8500 sewing machines. Adjustable Zipper & Piping Foot Brother General Sewing Accessories 06 Adjustable Zipper & Piping ...

Accessory Catalog
Page 6
...Project Book (See page 53 for details.) www.brother.com SA164 ABCDEFJKMN SA149 GHILOP SA114 ABCDEFGHJKLMNO SA122 IP Travel Jewelr y Portfolio Innov-is rolling around the curled part of the fabric. Raise the needle and the presser foot. 4. Sew along the guide. Raise the needle and the ...and very lightweight fabrics. 1. Hold the fabric from the edge and sew 2-3 stitches. 3. Slowly sew 2-3 stitches, making sure the fabric is exactly against the edge of the fabric. Overlock Foot For vertical bobbin machines only. Position the edge of the fabric behind the needle and lower...
...Project Book (See page 53 for details.) www.brother.com SA164 ABCDEFJKMN SA149 GHILOP SA114 ABCDEFGHJKLMNO SA122 IP Travel Jewelr y Portfolio Innov-is rolling around the curled part of the fabric. Raise the needle and the presser foot. 4. Sew along the guide. Raise the needle and the ...and very lightweight fabrics. 1. Hold the fabric from the edge and sew 2-3 stitches. 3. Slowly sew 2-3 stitches, making sure the fabric is exactly against the edge of the fabric. Overlock Foot For vertical bobbin machines only. Position the edge of the fabric behind the needle and lower...
Users Manual - English
Page 6
... direct sunlight and high humidity locations. Do not use or store the machine near a space heater, iron, halogen lamp, or other moving parts. 2. For repair or adjustment In the event a malfunction occurs or adjustment is required, first follow the troubleshooting table ...the presser feet, needle, or other parts • A power failure occurs during use extension cords. Remember to inspect and adjust the machine yourself. Do not store anything on the needle while sewing. Do not use • Maintaining the machine • Leaving the machine unattended. 3. Use only neutral soaps or...
... direct sunlight and high humidity locations. Do not use or store the machine near a space heater, iron, halogen lamp, or other moving parts. 2. For repair or adjustment In the event a malfunction occurs or adjustment is required, first follow the troubleshooting table ...the presser feet, needle, or other parts • A power failure occurs during use extension cords. Remember to inspect and adjust the machine yourself. Do not store anything on the needle while sewing. Do not use • Maintaining the machine • Leaving the machine unattended. 3. Use only neutral soaps or...

Users Manual - English
Page 9
TABLE OF CONTENTS KNOWING YOUR SEWING MACHINE PRINCIPAL PARTS 1 ACCESSORIES 3 Optional Accessories 3 OPERATING YOUR SEWING MACHINE 5 Connecting Plugs 5 Main Power/Sewing Light Switch 7 Foot Controller 8 Checking the Needle 9 Replacing the Needle 9 Changing the Presser Foot 11 Flat Bed ...Quilting Foot 73 MAINTENANCE Changing the Light Bulb 75 Cleaning 77 Performance Check List 79 Repacking the Machine 85 INDEX STRAIGHT AND ZIGZAG STITCHING PLEASE READ BEFORE SEWING 41 Straight Stitching 42 Zigzag Stitching 45 BUILT-IN STITCHES Blind Hem Stitching 46 Shell Tuck Stitching...
TABLE OF CONTENTS KNOWING YOUR SEWING MACHINE PRINCIPAL PARTS 1 ACCESSORIES 3 Optional Accessories 3 OPERATING YOUR SEWING MACHINE 5 Connecting Plugs 5 Main Power/Sewing Light Switch 7 Foot Controller 8 Checking the Needle 9 Replacing the Needle 9 Changing the Presser Foot 11 Flat Bed ...Quilting Foot 73 MAINTENANCE Changing the Light Bulb 75 Cleaning 77 Performance Check List 79 Repacking the Machine 85 INDEX STRAIGHT AND ZIGZAG STITCHING PLEASE READ BEFORE SEWING 41 Straight Stitching 42 Zigzag Stitching 45 BUILT-IN STITCHES Blind Hem Stitching 46 Shell Tuck Stitching...

Users Manual - English
Page 12
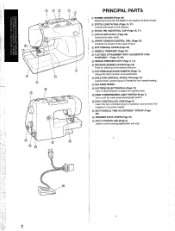
...select the desired stitch. MENT (Page 12, 25) 9 ZIGZAG PRESSER FOOT (Page 3, 11) : REVERSE SEWING LEVER (Page 24) Push for operation and connect the machine to the power supply. C BALANCE WHEEL D PATTERN SELECTION DIAL (Page 13) Turn in the reverse direction. ... 8 FLAT BED ATTACHMENT WITH ACCESSORY COMPART- E MAIN POWER/SEWING LIGHT SWITCH (Page 7) Turn on/off the main power/sewing light switch. KNOWING YOUR SEWING MACHINE CONNAITRE SA MACHINE A COUDRE CONOZCA SU MÁQUINA DE COSER 5 43 2 1 6 7 A 8 : 9 B C PRINCIPAL PARTS 1 BOBBIN WINDER (Page 26) Winds the thread onto the...
...select the desired stitch. MENT (Page 12, 25) 9 ZIGZAG PRESSER FOOT (Page 3, 11) : REVERSE SEWING LEVER (Page 24) Push for operation and connect the machine to the power supply. C BALANCE WHEEL D PATTERN SELECTION DIAL (Page 13) Turn in the reverse direction. ... 8 FLAT BED ATTACHMENT WITH ACCESSORY COMPART- E MAIN POWER/SEWING LIGHT SWITCH (Page 7) Turn on/off the main power/sewing light switch. KNOWING YOUR SEWING MACHINE CONNAITRE SA MACHINE A COUDRE CONOZCA SU MÁQUINA DE COSER 5 43 2 1 6 7 A 8 : 9 B C PRINCIPAL PARTS 1 BOBBIN WINDER (Page 26) Winds the thread onto the...

Users Manual - English
Page 14
The above accessories are stored in the flat bed attachment. KNOWING YOUR SEWING MACHINE CONNAITRE SA MACHINE A COUDRE CONOZCA SU MÁQUINA DE COSER 1 X59370-051 2 ...Australia, New Zealand) (110/220V Dual Ara) NOTE (For U.S.A. These accessories have been designed to help complete most sewing tasks. 1 SA107 XA8319-002 2 SA129 X81021-002 3 SA125 X80980-002 3 Optional Accessories 1 Walking Foot SA107 (... pc.) B Seam Ripper (1 pc.) C Darning Plate (1pc.) D Hard Case (1 pc.) (Model XR-46) Parts Code for Zigzag Presser Foot: X51953-051 Parts Code for Model XL-6562, XL-6452, XR46.
The above accessories are stored in the flat bed attachment. KNOWING YOUR SEWING MACHINE CONNAITRE SA MACHINE A COUDRE CONOZCA SU MÁQUINA DE COSER 1 X59370-051 2 ...Australia, New Zealand) (110/220V Dual Ara) NOTE (For U.S.A. These accessories have been designed to help complete most sewing tasks. 1 SA107 XA8319-002 2 SA129 X81021-002 3 SA125 X80980-002 3 Optional Accessories 1 Walking Foot SA107 (... pc.) B Seam Ripper (1 pc.) C Darning Plate (1pc.) D Hard Case (1 pc.) (Model XR-46) Parts Code for Zigzag Presser Foot: X51953-051 Parts Code for Model XL-6562, XL-6452, XR46.
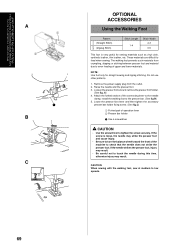
Users Manual - English
Page 80
... Do not use other patterns. 1. If the screw is very useful for straight sewing and zigzag stitching. If the needle strikes the presser foot, injury may result. CAUTION When sewing with the walking foot, sew at medium to touch the needle during this time, otherwise injury may result. &#... foot lever and then tighten the accessory presser bar holder fixing screw. (See fig.C) 1 Forked part of the machine to the presser bar. (See fig B) 5. NOTE: Use foot only for sewing materials such as vinyl cloth, synthetic leather, thin leather, etc. Attach the forked section of upper...
... Do not use other patterns. 1. If the screw is very useful for straight sewing and zigzag stitching. If the needle strikes the presser foot, injury may result. CAUTION When sewing with the walking foot, sew at medium to touch the needle during this time, otherwise injury may result. &#... foot lever and then tighten the accessory presser bar holder fixing screw. (See fig.C) 1 Forked part of the machine to the presser bar. (See fig B) 5. NOTE: Use foot only for sewing materials such as vinyl cloth, synthetic leather, thin leather, etc. Attach the forked section of upper...
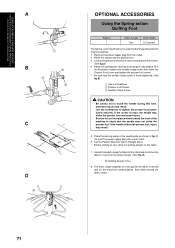
Users Manual - English
Page 82
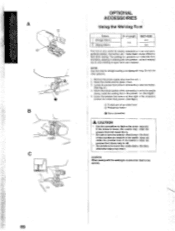
....A) 4. D) B Quilting design (Line) 8. Attach the quilting foot, making sure that part indicated by A in fig. Place the darning plate on the fabric. 7. C. Loosen the presser foot screw to sew over the drawn design. (See fig. Set the Pattern Selection Dial to Straight Stitch. ...OPTIONAL ACCESSORIES Using the Spring-action Quilting Foot Pattern Stitch Length Any Stitch Width 2.5 (center) The Spring -action Quilting Foot is moved and on the machine's sewing speed. If the screw is loose, the needle may strike the presser foot and cause injury. • Be sure to turn the balance wheel ...
....A) 4. D) B Quilting design (Line) 8. Attach the quilting foot, making sure that part indicated by A in fig. Place the darning plate on the fabric. 7. C. Loosen the presser foot screw to sew over the drawn design. (See fig. Set the Pattern Selection Dial to Straight Stitch. ...OPTIONAL ACCESSORIES Using the Spring-action Quilting Foot Pattern Stitch Length Any Stitch Width 2.5 (center) The Spring -action Quilting Foot is moved and on the machine's sewing speed. If the screw is loose, the needle may strike the presser foot and cause injury. • Be sure to turn the balance wheel ...
Users Manual - English
Page 97
...arm Style 25 G Gathering 63 H Hole for Vertical Spool Pin 37 L Lightning Stitch 51 Link Stitch 52 Lower Threading 29 M Main Power/Sewing Light Switch 7 Monogramming 67 Page N Needle Inspection 9 Replacement 9 Needle Threader 33 O Overedge Stitching 53 P Parallelogram Stitch 51 Patchwork 52 ...13 Pattern Selection Dial 13 Performance Check List 79 Presser Foot Lever 31 Principal parts 1 R Race 77 Rampart Stitch 49 Repacking the Machine 85 Reverse Sewing Lever 24 S Scallop Stitch 50 Sewing Ligh Light Bulb Replacement 75 Switch 7 Shell Tuck Stitch 47 Shuttle 77 Spool...
...arm Style 25 G Gathering 63 H Hole for Vertical Spool Pin 37 L Lightning Stitch 51 Link Stitch 52 Lower Threading 29 M Main Power/Sewing Light Switch 7 Monogramming 67 Page N Needle Inspection 9 Replacement 9 Needle Threader 33 O Overedge Stitching 53 P Parallelogram Stitch 51 Patchwork 52 ...13 Pattern Selection Dial 13 Performance Check List 79 Presser Foot Lever 31 Principal parts 1 R Race 77 Rampart Stitch 49 Repacking the Machine 85 Reverse Sewing Lever 24 S Scallop Stitch 50 Sewing Ligh Light Bulb Replacement 75 Switch 7 Shell Tuck Stitch 47 Shuttle 77 Spool...

User Manual - French
Page 7
...7! 33 Cleaning 7. 35 Performance Check List 7! 36 Repacking the Machine 8! , Thread Tension 38 FABRIC/THREAD/NEEDLE COMBINATIONS 39 INDEX STRAIGHT AND ZIGZAG STITCHING PLEASE READ BEFORE SEWING 41 Straight Stitching 42 Zigzag Stitching 45 BUILT-IN STITCHES Blind Hem...Patchwork 52 Overedge Stitching 53 Feather Stitching 54 Triple Zigzag Stretch Stitching 54 71 TABLE OF CONTENTS KNOWING YOUR SEWING MACHINE BUTTONHOLE AND BUTTON SEWING PRINCIPAL PARTS 1 Making a Buttonhole (For 1-step BH Type) 51 ACCESSORIES 3 Odd-shaped buttons that Optional Accessories 3...
...7! 33 Cleaning 7. 35 Performance Check List 7! 36 Repacking the Machine 8! , Thread Tension 38 FABRIC/THREAD/NEEDLE COMBINATIONS 39 INDEX STRAIGHT AND ZIGZAG STITCHING PLEASE READ BEFORE SEWING 41 Straight Stitching 42 Zigzag Stitching 45 BUILT-IN STITCHES Blind Hem...Patchwork 52 Overedge Stitching 53 Feather Stitching 54 Triple Zigzag Stretch Stitching 54 71 TABLE OF CONTENTS KNOWING YOUR SEWING MACHINE BUTTONHOLE AND BUTTON SEWING PRINCIPAL PARTS 1 Making a Buttonhole (For 1-step BH Type) 51 ACCESSORIES 3 Odd-shaped buttons that Optional Accessories 3...
User Manual - French
Page 10
... FLAT BED ATTACHMENT WITH ACCESSORY COM- MAIN POWER/SEWING LIGHT SWITCH (Page 7) Turn on/off the main power/sewing light switch. FOOT CONTROLLER JACK (Page 5) Insert the foot controller plug for operation and connect the machine to control sewing speed/start and stop. 0 (3) © ...1 C) SPOOL PIN AND SPOOL CAP (Page 26, 31) (1) STITCH WIDTH DIAL (Page 23) Controls the stitch width. n zi p >r, O_< - -Y1)O - c to Cnm Y > > 0 z m 5 4 3 2 I I 8 9 PRINCIPAL PARTS (D BOBBIN WINDER (Page...
... FLAT BED ATTACHMENT WITH ACCESSORY COM- MAIN POWER/SEWING LIGHT SWITCH (Page 7) Turn on/off the main power/sewing light switch. FOOT CONTROLLER JACK (Page 5) Insert the foot controller plug for operation and connect the machine to control sewing speed/start and stop. 0 (3) © ...1 C) SPOOL PIN AND SPOOL CAP (Page 26, 31) (1) STITCH WIDTH DIAL (Page 23) Controls the stitch width. n zi p >r, O_< - -Y1)O - c to Cnm Y > > 0 z m 5 4 3 2 I I 8 9 PRINCIPAL PARTS (D BOBBIN WINDER (Page...
User Manual - French
Page 45
...&chic, ascgicrese de a :al- See page 23 for twin needle sev ring, whir b allows you to sew with the twin needle, be sure the Stitch Width Dial is in central titre I 'aiguille jumelee Ccue machine 5 noodle a did concuc pour pouvoir dire ulilisde avec one valour sop& Deuce a 3 car sinon l'aiguille ...You can use zigzag presser foot only. When using the twin needle, be set so that the needle is not set above 3 since this r nachine (part code X57521-001). Para los elms modelos de puntaclas, cli 110 select ir puedr ester ajusiacio entre 0 y .3. The needle could break and cause injury...
...&chic, ascgicrese de a :al- See page 23 for twin needle sev ring, whir b allows you to sew with the twin needle, be sure the Stitch Width Dial is in central titre I 'aiguille jumelee Ccue machine 5 noodle a did concuc pour pouvoir dire ulilisde avec one valour sop& Deuce a 3 car sinon l'aiguille ...You can use zigzag presser foot only. When using the twin needle, be set so that the needle is not set above 3 since this r nachine (part code X57521-001). Para los elms modelos de puntaclas, cli 110 select ir puedr ester ajusiacio entre 0 y .3. The needle could break and cause injury...
User Manual - French
Page 78
...sew at h materials from the outlo t. 2. Loosen the presser foot screw to low speeds. 69 Lower the presser foot lever aid then tightth the accessory presser bar holder fixing screw. (See fig.0 ) O Forked part of the connecting It ver to the needle clamp, install the walking foot to even feeding of the machine...slipping or sticking between presser clot and material due to the presser 'ar. (See fig 8 ) 5. If the screw is very useful for straight sewing al id zigzag stl4 hing. The walking fool prevents at me Hum to remove the p, esser foot holder. (See fig. A ifs I° ...
...sew at h materials from the outlo t. 2. Loosen the presser foot screw to low speeds. 69 Lower the presser foot lever aid then tightth the accessory presser bar holder fixing screw. (See fig.0 ) O Forked part of the connecting It ver to the needle clamp, install the walking foot to even feeding of the machine...slipping or sticking between presser clot and material due to the presser 'ar. (See fig 8 ) 5. If the screw is very useful for straight sewing al id zigzag stl4 hing. The walking fool prevents at me Hum to remove the p, esser foot holder. (See fig. A ifs I° ...
User Manual - French
Page 95
... Replacement Needle Threader Overedge Stitching Parallelogram Stitch Patchwork Pattern Indication Window Pattern Selection Dial Performance Check List Presser Foot Lever Principal parts Race Rampart Stitch Repacking the Machine Reverse Sewing Lever Scallop Stitch Sewing Light Light Bulb Replacement Switch Shell Tuck Stitch Shuttle Spool Pin and Spool Cap Springaction Quilting Foot Square Stitch Stitch...
... Replacement Needle Threader Overedge Stitching Parallelogram Stitch Patchwork Pattern Indication Window Pattern Selection Dial Performance Check List Presser Foot Lever Principal parts Race Rampart Stitch Repacking the Machine Reverse Sewing Lever Scallop Stitch Sewing Light Light Bulb Replacement Switch Shell Tuck Stitch Shuttle Spool Pin and Spool Cap Springaction Quilting Foot Square Stitch Stitch...


