
Users Manual - English
Page 2
...stitching. It may deflect the needle, causing it off ), and then remove the plug from the accumulation of burns, fire, electric shock, or injury to break. 12. Switch the machine to the "{" position to turn it to break. 14. Always unplug the machine from all instructions.... 7. The wrong plate can cause the needle to persons: 1. SAVE THESE INSTRUCTIONS This machine is not intended for its intended use by or near children. 2. Never drop or insert any object into water. This sewing machine is intended for examination, repair, or electrical or mechanical adjustment. 4. DANGER -...
...stitching. It may deflect the needle, causing it off ), and then remove the plug from the accumulation of burns, fire, electric shock, or injury to break. 12. Switch the machine to the "{" position to turn it to break. 14. Always unplug the machine from all instructions.... 7. The wrong plate can cause the needle to persons: 1. SAVE THESE INSTRUCTIONS This machine is not intended for its intended use by or near children. 2. Never drop or insert any object into water. This sewing machine is intended for examination, repair, or electrical or mechanical adjustment. 4. DANGER -...

Users Manual - English
Page 4
... INSTRUCTIONS 1 CONNECTING PLUGS AND MAIN POWER/SEWING LIGHT SWITCH 2 CONTENTS ...3 PRINCIPAL PARTS ...4 ACCESSORIES ...5 USING YOUR SEWING MACHINE 6 Connecting Plugs ...6 Main Power/Sewing Light Switch ...7 Foot Controller ...7 Inserting the Needle ...7 Checking the Needle ...8 Changing the Presser Foot ...8 Converting to Free-arm Style ...9 Steadying the Machine ...9 THE CONTROLS ...10 Pattern Selection Dial ...10 Recommended Widths and Lengths for Stitches...
... INSTRUCTIONS 1 CONNECTING PLUGS AND MAIN POWER/SEWING LIGHT SWITCH 2 CONTENTS ...3 PRINCIPAL PARTS ...4 ACCESSORIES ...5 USING YOUR SEWING MACHINE 6 Connecting Plugs ...6 Main Power/Sewing Light Switch ...7 Foot Controller ...7 Inserting the Needle ...7 Checking the Needle ...8 Changing the Presser Foot ...8 Converting to Free-arm Style ...9 Steadying the Machine ...9 THE CONTROLS ...10 Pattern Selection Dial ...10 Recommended Widths and Lengths for Stitches...

Users Manual - English
Page 12
... TREE STITCH 3-5 (1/8-3/16) 21 LEGS STITCH 3-5 (1/8-3/16) Recommended Length [mm (inch)] -1.5 (1/64-1/16) 1-4 (1/16-3/16) -4 (1/64-3/16) -2 (1/64-1/16) -3 (1/64-1/8) -2.5 (1/64-3/32) -1.5 (1/64-1/16) -1.5 (1/64-1/16) -3 (1/64-1/8) -3 (1/64-1/8) -3 (1/64-1/8) Fixed 2.5 (3/32) Fixed 2.5 (3/32) Fixed 2.5 (3/32) Fixed 2.5 (3/32) Fixed 2.5 (3/32) Fixed 2.5 (3/32) Fixed 2.5 (3/32) Fixed 2.5 (3/32) Fixed 2.5 (3/32) Fixed 2.5 (3/32) Page in Instructions 30...
... TREE STITCH 3-5 (1/8-3/16) 21 LEGS STITCH 3-5 (1/8-3/16) Recommended Length [mm (inch)] -1.5 (1/64-1/16) 1-4 (1/16-3/16) -4 (1/64-3/16) -2 (1/64-1/16) -3 (1/64-1/8) -2.5 (1/64-3/32) -1.5 (1/64-1/16) -1.5 (1/64-1/16) -3 (1/64-1/8) -3 (1/64-1/8) -3 (1/64-1/8) Fixed 2.5 (3/32) Fixed 2.5 (3/32) Fixed 2.5 (3/32) Fixed 2.5 (3/32) Fixed 2.5 (3/32) Fixed 2.5 (3/32) Fixed 2.5 (3/32) Fixed 2.5 (3/32) Fixed 2.5 (3/32) Fixed 2.5 (3/32) Page in Instructions 30...
Users Manual - English
Page 13
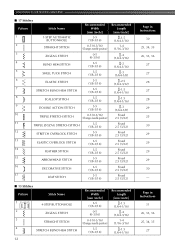
KNOWING YOUR SEWING MACHINE ■ 17 Stitches Pattern 1 Stitch Name 1-STEP AUTOMATIC BUTTONHOLE Recommended Width [mm (inch)] 3-5 (1/8-3/16) 2 STRAIGHT STITCH 0-5 (0-3/16) (Changes needle position) 3 ZIGZAG STITCH 0-5 (0-3/16) 4 BLIND HEM STITCH 3-5 (1/8-3/16) 5 SHELL TUCK STITCH 3-5 (1/8-3/16) 6 ELASTIC STITCH 3-5 (1/8-3/16) 7 STRETCH BLIND HEM STITCH 3-5 (1/8-3/16) 8 SCALLOP STITCH 3-5 (1/8-3/16) 9 DOUBLE ACTION STITCH 3-5 (1/8-3/16) 10 TRIPLE STRETCH STITCH 0-5 (0-3/16) (Changes needle position) 11 TRIPLE ZIGZAG STRETCH STITCH 3-5 (1/8-3/16) 12...
KNOWING YOUR SEWING MACHINE ■ 17 Stitches Pattern 1 Stitch Name 1-STEP AUTOMATIC BUTTONHOLE Recommended Width [mm (inch)] 3-5 (1/8-3/16) 2 STRAIGHT STITCH 0-5 (0-3/16) (Changes needle position) 3 ZIGZAG STITCH 0-5 (0-3/16) 4 BLIND HEM STITCH 3-5 (1/8-3/16) 5 SHELL TUCK STITCH 3-5 (1/8-3/16) 6 ELASTIC STITCH 3-5 (1/8-3/16) 7 STRETCH BLIND HEM STITCH 3-5 (1/8-3/16) 8 SCALLOP STITCH 3-5 (1/8-3/16) 9 DOUBLE ACTION STITCH 3-5 (1/8-3/16) 10 TRIPLE STRETCH STITCH 0-5 (0-3/16) (Changes needle position) 11 TRIPLE ZIGZAG STRETCH STITCH 3-5 (1/8-3/16) 12...

Users Manual - English
Page 17
... bobbin and cause the needle to break. If you follow the instructions carefully. Lower Threading CAUTION ● Setting the bobbin improperly may break the needle. 1 2 1 Wound evenly 2 Wound poorly 1 2 1 Wound evenly 2 Wound poorly ● The bobbin was designed specifically for this sewing machine. CAUTION ● Setting the bobbin improperly may cause the thread...
... bobbin and cause the needle to break. If you follow the instructions carefully. Lower Threading CAUTION ● Setting the bobbin improperly may break the needle. 1 2 1 Wound evenly 2 Wound poorly 1 2 1 Wound evenly 2 Wound poorly ● The bobbin was designed specifically for this sewing machine. CAUTION ● Setting the bobbin improperly may cause the thread...

Users Manual - English
Page 23
... lower thread tension has been adjusted at the factory for general use the needle threader to check the thread tension before starting your stitches. Instead, the thread tension must be adjusted adequately with the upper tension control dial. However, do not pass the thread through... KNOWING YOUR SEWING MACHINE ■ Twin Needle Threading You should thread each needle separately. Locks will affect the quality of the fabric. You may damage the machine. Lower tension is needed. If the result is too tight. Threading the Right Needle 1 Follow the same instructions for more than...
... lower thread tension has been adjusted at the factory for general use the needle threader to check the thread tension before starting your stitches. Instead, the thread tension must be adjusted adequately with the upper tension control dial. However, do not pass the thread through... KNOWING YOUR SEWING MACHINE ■ Twin Needle Threading You should thread each needle separately. Locks will affect the quality of the fabric. You may damage the machine. Lower tension is needed. If the result is too tight. Threading the Right Needle 1 Follow the same instructions for more than...

