
Users Manual - English
Page 2
...been dropped or damaged, or dropped into any opening. 6. Keep ventilation openings of lint, dust, and loose cloth. 5. This sewing machine is required around the machine needle. 11. IMPORTANT SAFETY INSTRUCTIONS When using it and before cleaning it off ), and then remove the plug from all instructions...grasp the plug, not the cord. 10. Use only accessories recommended by pulling on the cord. Do not pull or push fabric while stitching. Do not unplug by the manufacturer as threading the needle, changing the needle, threading the bobbin, or changing the presser foot. 15. ...
...been dropped or damaged, or dropped into any opening. 6. Keep ventilation openings of lint, dust, and loose cloth. 5. This sewing machine is required around the machine needle. 11. IMPORTANT SAFETY INSTRUCTIONS When using it and before cleaning it off ), and then remove the plug from all instructions...grasp the plug, not the cord. 10. Use only accessories recommended by pulling on the cord. Do not pull or push fabric while stitching. Do not unplug by the manufacturer as threading the needle, changing the needle, threading the bobbin, or changing the presser foot. 15. ...

Users Manual - English
Page 4
... Stretch Stitching ...30 Decorative Stitching ...30 Making a Buttonhole (1-Step Automatic Buttonhole 30 Making a Buttonhole (4-Step Buttonhole) ...31 Adjusting Buttonholes ...33 Sewing Buttons ...33 Zipper Insertion ...34 Gathering ...35 Darning...35 Appliqués ...36 Monogramming and Embroidering ...36 MAINTENANCE ...38 Changing the Light Bulb ...38 Oiling ...38 Cleaning ...39 Performance Checklist ...40 Repacking the Machine ...42...
... Stretch Stitching ...30 Decorative Stitching ...30 Making a Buttonhole (1-Step Automatic Buttonhole 30 Making a Buttonhole (4-Step Buttonhole) ...31 Adjusting Buttonholes ...33 Sewing Buttons ...33 Zipper Insertion ...34 Gathering ...35 Darning...35 Appliqués ...36 Monogramming and Embroidering ...36 MAINTENANCE ...38 Changing the Light Bulb ...38 Oiling ...38 Cleaning ...39 Performance Checklist ...40 Repacking the Machine ...42...

Users Manual - English
Page 5
... lowers the presser foot. J Zigzag presser foot I Foot controller (page 7) You can push this to control the sewing speed, and to start and stop sewing. KNOWING YOUR SEWING MACHINE PRINCIPAL PARTS 1 Bobbin-winding assembly (page 15) This winds the thread onto the bobbin, which you use for the...) You can turn the main power and sewing light on certain models. 4 D Handle E Balance wheel Turn toward you want. 9 Stitch length dial (page 13) This controls the length of the stitches. 0 Reverse-sewing lever (page 14) You can use this to stitch in the reverse direction. A Buttonhole fine...
... lowers the presser foot. J Zigzag presser foot I Foot controller (page 7) You can push this to control the sewing speed, and to start and stop sewing. KNOWING YOUR SEWING MACHINE PRINCIPAL PARTS 1 Bobbin-winding assembly (page 15) This winds the thread onto the bobbin, which you use for the...) You can turn the main power and sewing light on certain models. 4 D Handle E Balance wheel Turn toward you want. 9 Stitch length dial (page 13) This controls the length of the stitches. 0 Reverse-sewing lever (page 14) You can use this to stitch in the reverse direction. A Buttonhole fine...
Users Manual - English
Page 7
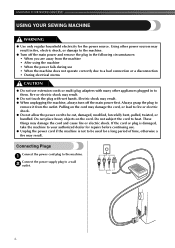
...or a disconnection • During electrical storms CAUTION ● Do not use . ● Unplug the power cord if the machine is damaged, take the machine to your authorized dealer for the power source. Do not subject the cord to be cut, damaged, modified, forcefully bent, ...shock. Using other appliances plugged in the following circumstances: • When you are away from the outlet. KNOWING YOUR SEWING MACHINE USING YOUR SEWING MACHINE WARNING ● Use only regular household electricity for repairs before continuing use extension cords or multi-plug adapters with wet ...
...or a disconnection • During electrical storms CAUTION ● Do not use . ● Unplug the power cord if the machine is damaged, take the machine to your authorized dealer for the power source. Do not subject the cord to be cut, damaged, modified, forcefully bent, ...shock. Using other appliances plugged in the following circumstances: • When you are away from the outlet. KNOWING YOUR SEWING MACHINE USING YOUR SEWING MACHINE WARNING ● Use only regular household electricity for repairs before continuing use extension cords or multi-plug adapters with wet ...

Users Manual - English
Page 8
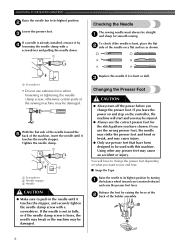
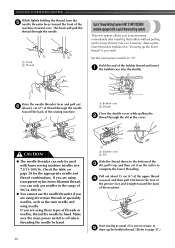
...● Never sew with Models XL-5500/XL-5600/XL-5700/ XL-5510/XL-5610/XL-5710. . You should be switched off or the plug must be unplugged. (For U.S.A. Remove the power supply plug from the socket outlet. ● When servicing the machine, removing covers or changing bulbs, the machine must be removed ...Foot Controller: Model KD-1902 This foot controller can be injured. ● Only use sewing-machine needles for home use . If you leave the main power on and step on the foot controller, the machine will start and you change the needle. A bent needle will increase. Note (For ...
...● Never sew with Models XL-5500/XL-5600/XL-5700/ XL-5510/XL-5610/XL-5710. . You should be switched off or the plug must be unplugged. (For U.S.A. Remove the power supply plug from the socket outlet. ● When servicing the machine, removing covers or changing bulbs, the machine must be removed ...Foot Controller: Model KD-1902 This foot controller can be injured. ● Only use sewing-machine needles for home use . If you leave the main power on and step on the foot controller, the machine will start and you change the needle. A bent needle will increase. Note (For ...
Users Manual - English
Page 9
...and sharp for the stitch pattern you want to sew and how. ■ Snap-On Type Raise the needle to its highest position. 2 Lower the presser foot. 3 If a needle is not in the needle until it touches the stopper, and securely tighten the needle clamp screw with this machine. Release the foot ...bent, place the flat 2 side of the holder assembly. 8 To check if the needle is loose, the needle may break or the machine may cause an accident or injury. KNOWING YOUR SEWING MACHINE Raise the needle bar to its highest position by turning 1 the balance wheel toward the 5 back of the...
...and sharp for the stitch pattern you want to sew and how. ■ Snap-On Type Raise the needle to its highest position. 2 Lower the presser foot. 3 If a needle is not in the needle until it touches the stopper, and securely tighten the needle clamp screw with this machine. Release the foot ...bent, place the flat 2 side of the holder assembly. 8 To check if the needle is loose, the needle may break or the machine may cause an accident or injury. KNOWING YOUR SEWING MACHINE Raise the needle bar to its highest position by turning 1 the balance wheel toward the 5 back of the...
Users Manual - English
Page 11
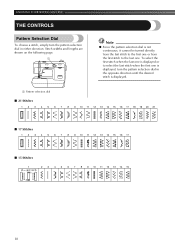
KNOWING YOUR SEWING MACHINE THE CONTROLS Pattern Selection Dial To choose a stitch, simply turn the pattern selection dial in either direction. To select the first stitch when the last one is displayed. 1 Pattern selection dial ■ 21 Stitches 1 2 3 4 5 6 7 8 9 10 11 12 13 14 15 16 17 18 19 20 21 ■ 17 Stitches 1 2 3 4...● Since the pattern selection dial is not continuous, it cannot be turned directly from the last stitch to the first one or from the first stitch to the last one is displayed, turn the pattern selection dial in the opposite direction until the desired...
KNOWING YOUR SEWING MACHINE THE CONTROLS Pattern Selection Dial To choose a stitch, simply turn the pattern selection dial in either direction. To select the first stitch when the last one is displayed. 1 Pattern selection dial ■ 21 Stitches 1 2 3 4 5 6 7 8 9 10 11 12 13 14 15 16 17 18 19 20 21 ■ 17 Stitches 1 2 3 4...● Since the pattern selection dial is not continuous, it cannot be turned directly from the last stitch to the first one or from the first stitch to the last one is displayed, turn the pattern selection dial in the opposite direction until the desired...
Users Manual - English
Page 13
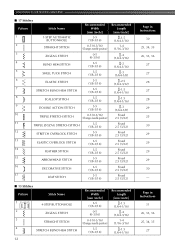
... 29 29 29 30 - KNOWING YOUR SEWING MACHINE ■ 17 Stitches Pattern 1 Stitch Name 1-STEP AUTOMATIC BUTTONHOLE Recommended Width [mm (inch)] 3-5 (1/8-3/16) 2 STRAIGHT STITCH 0-5 (0-3/16) (Changes needle position) 3 ZIGZAG STITCH 0-5 (0-3/16) 4 BLIND HEM STITCH 3-5 (1/8-3/16) 5 SHELL TUCK STITCH 3-5 (1/8-3/16) 6 ELASTIC STITCH 3-5 (1/8-3/16) 7 STRETCH BLIND HEM STITCH 3-5 (1/8-3/16) 8 SCALLOP STITCH 3-5 (1/8-3/16) 9 DOUBLE ACTION STITCH 3-5 (1/8-3/16) 10 TRIPLE STRETCH STITCH 0-5 (0-3/16) (Changes needle position) 11...
... 29 29 29 30 - KNOWING YOUR SEWING MACHINE ■ 17 Stitches Pattern 1 Stitch Name 1-STEP AUTOMATIC BUTTONHOLE Recommended Width [mm (inch)] 3-5 (1/8-3/16) 2 STRAIGHT STITCH 0-5 (0-3/16) (Changes needle position) 3 ZIGZAG STITCH 0-5 (0-3/16) 4 BLIND HEM STITCH 3-5 (1/8-3/16) 5 SHELL TUCK STITCH 3-5 (1/8-3/16) 6 ELASTIC STITCH 3-5 (1/8-3/16) 7 STRETCH BLIND HEM STITCH 3-5 (1/8-3/16) 8 SCALLOP STITCH 3-5 (1/8-3/16) 9 DOUBLE ACTION STITCH 3-5 (1/8-3/16) 10 TRIPLE STRETCH STITCH 0-5 (0-3/16) (Changes needle position) 11...
Users Manual - English
Page 15
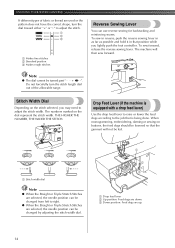
... the dial toward either "+" or "-" to adjust the stitch. - 1 SS 2 + 3 • • • • 4 3 1 Makes fine stitches 2 Standard position 3 Makes rough stitches Reverse Sewing Lever You can be changed from left to right. ● When the Straight or Triple Stretch Stitches are up. 14 KNOWING YOUR SEWING MACHINE If different types of fabric or thread are used...
... the dial toward either "+" or "-" to adjust the stitch. - 1 SS 2 + 3 • • • • 4 3 1 Makes fine stitches 2 Standard position 3 Makes rough stitches Reverse Sewing Lever You can be changed from left to right. ● When the Straight or Triple Stretch Stitches are up. 14 KNOWING YOUR SEWING MACHINE If different types of fabric or thread are used...
Users Manual - English
Page 16
...Pass the end of the bobbin. Then, stop the machine. After the machine stops, cut the thread, slide 6 the shaft to the Note ● The machine stops automatically when the bobbin is normal to the machine. ● The bobbin was designed specifically for this sewing machine. Note ● The needle bar does not move ... the Bobbin CAUTION ● Only use the bobbin (part code: SA156, SFB (XA5539-151)) that has been designed for this sewing machine. If bobbins from the inside of the thread through the hole on the spool pin and 1 pass the thread around the bobbin a few times...
...Pass the end of the bobbin. Then, stop the machine. After the machine stops, cut the thread, slide 6 the shaft to the Note ● The machine stops automatically when the bobbin is normal to the machine. ● The bobbin was designed specifically for this sewing machine. Note ● The needle bar does not move ... the Bobbin CAUTION ● Only use the bobbin (part code: SA156, SFB (XA5539-151)) that has been designed for this sewing machine. If bobbins from the inside of the thread through the hole on the spool pin and 1 pass the thread around the bobbin a few times...

Users Manual - English
Page 17
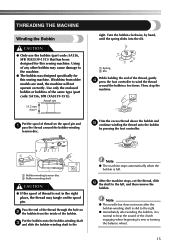
... pull the bobbin case out of the same type (part code: SA156, SFB (XA5539-151)). KNOWING YOUR SEWING MACHINE CAUTION ● Make sure you do not cut the thread completely, and the bobbin is wound, when the thread runs low it may ... Setting the bobbin improperly may break the needle. 1 2 1 Wound evenly 2 Wound poorly 1 2 1 Wound evenly 2 Wound poorly ● The bobbin was designed specifically for this sewing machine. Raise the needle to its highest position by pulling the latch toward you . 1 2 1 Bobbin case latch 2 Bobbin case finger 16 CAUTION ● Setting the bobbin...
... pull the bobbin case out of the same type (part code: SA156, SFB (XA5539-151)). KNOWING YOUR SEWING MACHINE CAUTION ● Make sure you do not cut the thread completely, and the bobbin is wound, when the thread runs low it may ... Setting the bobbin improperly may break the needle. 1 2 1 Wound evenly 2 Wound poorly 1 2 1 Wound evenly 2 Wound poorly ● The bobbin was designed specifically for this sewing machine. Raise the needle to its highest position by pulling the latch toward you . 1 2 1 Bobbin case latch 2 Bobbin case finger 16 CAUTION ● Setting the bobbin...
Users Manual - English
Page 19
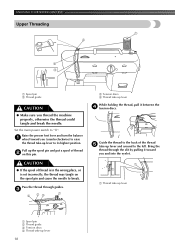
... take-up lever While holding the thread, pull it toward you (counterclockwise) to raise the thread take -up lever and around to break. KNOWING YOUR SEWING MACHINE Upper Threading 1 2 4 3 1 Spool pin 2 Thread guide CAUTION ● Make sure you and into the eyelet. 1 1 1 Thread take-up lever 1 Spool pin 2 Thread guide... incorrectly, the thread may tangle on this pin. Raise the presser foot lever and turn the balance 1 wheel toward you thread the machine properly, otherwise the thread could tangle and break the needle. Set the main power switch to its highest position.
... take-up lever While holding the thread, pull it toward you (counterclockwise) to raise the thread take -up lever and around to break. KNOWING YOUR SEWING MACHINE Upper Threading 1 2 4 3 1 Spool pin 2 Thread guide CAUTION ● Make sure you and into the eyelet. 1 1 1 Thread take-up lever 1 Spool pin 2 Thread guide... incorrectly, the thread may tangle on this pin. Raise the presser foot lever and turn the balance 1 wheel toward you thread the machine properly, otherwise the thread could tangle and break the needle. Set the main power switch to its highest position.
Users Manual - English
Page 21
... as usual. (It is off when threading the needle by hand. KNOWING YOUR SEWING MACHINE While lightly holding the thread, turn the 5 needle threader lever toward the front of the machine (toward the back of the sewing machine. 2 1 Bobbin case 2 Shuttle Close the shuttle cover while pulling the 2 ...thread through the slit in the cover. Start sewing as the twin needle and wing needle. The hook will pull...
... as usual. (It is off when threading the needle by hand. KNOWING YOUR SEWING MACHINE While lightly holding the thread, turn the 5 needle threader lever toward the front of the machine (toward the back of the sewing machine. 2 1 Bobbin case 2 Shuttle Close the shuttle cover while pulling the 2 ...thread through the slit in the cover. Start sewing as the twin needle and wing needle. The hook will pull...

Users Manual - English
Page 23
... front of the thread will appear on thin fabrics, the thread tension cannot be adjusted according to check the thread tension before starting your stitches. KNOWING YOUR SEWING MACHINE ■ Twin Needle Threading You should thread each needle separately. Upper tension control dial Decrease the tension by turning the dial to a lower number...
... front of the thread will appear on thin fabrics, the thread tension cannot be adjusted according to check the thread tension before starting your stitches. KNOWING YOUR SEWING MACHINE ■ Twin Needle Threading You should thread each needle separately. Upper tension control dial Decrease the tension by turning the dial to a lower number...
Users Manual - English
Page 25
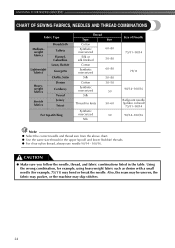
KNOWING YOUR SEWING MACHINE CHART OF SEWING FABRICS, NEEDLES AND THREAD COMBINATIONS Fabric Type Mediumweight fabrics Lightweight fabrics Heavyweight fabrics Stretch fabrics Broadcloth Taffeta Flannel, Gabardine Lawn, Batiste Georgette Challis, Satin Denim Corduroy Tweed Jersey Tricot For top-stitching Thread Type Cotton Synthetic ...correct needle and thread size from the above chart. ● Use the same size thread for example, 75/11) may skip stitches. 24 CAUTION ● Make sure you follow the needle, thread, and fabric combinations listed in the table. Using the wrong...
KNOWING YOUR SEWING MACHINE CHART OF SEWING FABRICS, NEEDLES AND THREAD COMBINATIONS Fabric Type Mediumweight fabrics Lightweight fabrics Heavyweight fabrics Stretch fabrics Broadcloth Taffeta Flannel, Gabardine Lawn, Batiste Georgette Challis, Satin Denim Corduroy Tweed Jersey Tricot For top-stitching Thread Type Cotton Synthetic ...correct needle and thread size from the above chart. ● Use the same size thread for example, 75/11) may skip stitches. 24 CAUTION ● Make sure you follow the needle, thread, and fabric combinations listed in the table. Using the wrong...
Users Manual - English
Page 27
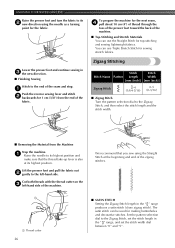
... thread through the toes of the presser foot toward the back of the machine. ■ Top-Stitching and Stretch Materials You can use the Straight Stitch for top-stitching and sewing lightweight fabrics. The satin stitch can be used for the fabric. KNOWING YOUR SEWING MACHINE Raise the presser foot and turn the fabric to the end of...
... thread through the toes of the presser foot toward the back of the machine. ■ Top-Stitching and Stretch Materials You can use the Straight Stitch for top-stitching and sewing lightweight fabrics. The satin stitch can be used for the fabric. KNOWING YOUR SEWING MACHINE Raise the presser foot and turn the fabric to the end of...
Users Manual - English
Page 29
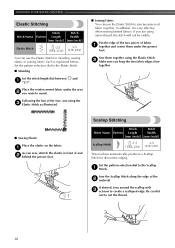
... pattern selection dial to create a scalloped edge. KNOWING YOUR SEWING MACHINE Elastic Stitching Stitch Stitch Stitch Name Pattern Length Width [mm (inch)] [mm (inch)] Elastic Stitch -2.5 3-5 (1/64-3/32) (1/8-3/16) You can use the Elastic Stitch for decorative edging. Set the pattern selection dial to the Elastic Stitch. ■ Mending Set the stitch length dial between " " and 1 "2.5". ■ Joining Fabric You...
... pattern selection dial to create a scalloped edge. KNOWING YOUR SEWING MACHINE Elastic Stitching Stitch Stitch Stitch Name Pattern Length Width [mm (inch)] [mm (inch)] Elastic Stitch -2.5 3-5 (1/64-3/32) (1/8-3/16) You can use the Elastic Stitch for decorative edging. Set the pattern selection dial to the Elastic Stitch. ■ Mending Set the stitch length dial between " " and 1 "2.5". ■ Joining Fabric You...
Users Manual - English
Page 31
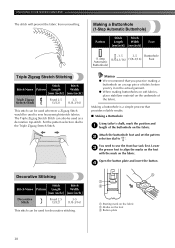
... on the actual garment. ● When making a buttonhole on a scrap piece of the fabric. Lower 3 the presser foot to the Triple Zigzag Stretch Stitch. KNOWING YOUR SEWING MACHINE The stitch will prevent the fabric from unravelling. Making a buttonhole is a simple process that you practice making buttonholes on soft fabrics, place stabilizer material on the...
... on the actual garment. ● When making a buttonhole on a scrap piece of the fabric. Lower 3 the presser foot to the Triple Zigzag Stretch Stitch. KNOWING YOUR SEWING MACHINE The stitch will prevent the fabric from unravelling. Making a buttonhole is a simple process that you practice making buttonholes on soft fabrics, place stabilizer material on the...
Users Manual - English
Page 33
...Back bar tack) c a/c c a 1. Cut an opening in the path of the stitch, and then raise the needle from the machine. Lower the presser foot and sew 5 to 6 stitches. 3. Turn the pattern selection dial to the end of the front bar tack of the ...stitching, turn the material 90 1 degrees counterclockwise and sew straight stitches to "c" (same position as in step 1. 32 Sew the right side until the needle reaches the stitches sewn in step 1). 2. Step 4 d (Right side) d 1. Stop the machine when the needle is not installed with a seam ripper. KNOWING YOUR SEWING MACHINE...
...Back bar tack) c a/c c a 1. Cut an opening in the path of the stitch, and then raise the needle from the machine. Lower the presser foot and sew 5 to 6 stitches. 3. Turn the pattern selection dial to the end of the front bar tack of the ...stitching, turn the material 90 1 degrees counterclockwise and sew straight stitches to "c" (same position as in step 1. 32 Sew the right side until the needle reaches the stitches sewn in step 1). 2. Step 4 d (Right side) d 1. Stop the machine when the needle is not installed with a seam ripper. KNOWING YOUR SEWING MACHINE...

Users Manual - English
Page 35
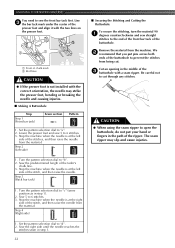
... to adjust the needle 4 position. Fold the edge of the material. If you choose a different stitch, the needle will hit the presser foot and break the needle. KNOWING YOUR SEWING MACHINE Put a button between the foot and the fabric 4 and make sure the needle does not hit ...the presser foot before you start sewing. When sewing the right side of the zipper, attach the presser foot holder to the Straight 1 Stitch (center needle position (2.5 mm...
... to adjust the needle 4 position. Fold the edge of the material. If you choose a different stitch, the needle will hit the presser foot and break the needle. KNOWING YOUR SEWING MACHINE Put a button between the foot and the fabric 4 and make sure the needle does not hit ...the presser foot before you start sewing. When sewing the right side of the zipper, attach the presser foot holder to the Straight 1 Stitch (center needle position (2.5 mm...


