
Users Manual - English
Page 2
... reduce the risk of lint, dust, and loose cloth. 5. The machine should always be taken: Read all moving parts. Close attention is necessary when the machine is intended for examination, repair, or electrical or mechanical adjustment. 4. Never operate this machine if it has a damaged cord or plug, if it is not... injury to break. 12. Never drop or insert any other user servicing adjustments mentioned in . Do not pull or push fabric while stitching. This sewing machine is not working properly, if it off ), and then remove the plug from the electrical outlet immediately after using this...
... reduce the risk of lint, dust, and loose cloth. 5. The machine should always be taken: Read all moving parts. Close attention is necessary when the machine is intended for examination, repair, or electrical or mechanical adjustment. 4. Never operate this machine if it has a damaged cord or plug, if it is not... injury to break. 12. Never drop or insert any other user servicing adjustments mentioned in . Do not pull or push fabric while stitching. This sewing machine is not working properly, if it off ), and then remove the plug from the electrical outlet immediately after using this...

Users Manual - English
Page 4
.../SEWING LIGHT SWITCH 2 CONTENTS ...3 PRINCIPAL PARTS ...4 ACCESSORIES ...5 USING YOUR SEWING MACHINE 6 Connecting Plugs ...6 Main Power/Sewing Light Switch ...7 Foot Controller ...7 Inserting the Needle ...7 Checking the Needle ...8 Changing the Presser Foot ...8 Converting to Free-arm Style ...9 Steadying the Machine ...9 THE CONTROLS ...10 Pattern Selection Dial ...10 Recommended Widths and Lengths for Stitches 11 Stitch Length Dial ...13 Stretch Stitching ...13 Stitch...
.../SEWING LIGHT SWITCH 2 CONTENTS ...3 PRINCIPAL PARTS ...4 ACCESSORIES ...5 USING YOUR SEWING MACHINE 6 Connecting Plugs ...6 Main Power/Sewing Light Switch ...7 Foot Controller ...7 Inserting the Needle ...7 Checking the Needle ...8 Changing the Presser Foot ...8 Converting to Free-arm Style ...9 Steadying the Machine ...9 THE CONTROLS ...10 Pattern Selection Dial ...10 Recommended Widths and Lengths for Stitches 11 Stitch Length Dial ...13 Stretch Stitching ...13 Stitch...

Users Manual - English
Page 5
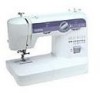
...turn this in either direction to choose the stitch you (counterclockwise) to raise and lower the needle. G Foot controller receptacle (page 6) Plug in the foot controller plug and connect the machine to the power supply. KNOWING YOUR SEWING MACHINE PRINCIPAL PARTS 1 Bobbin-winding assembly (page 15) This... winds the thread onto the bobbin, which you use this to control the sewing speed, and to start and stop...
...turn this in either direction to choose the stitch you (counterclockwise) to raise and lower the needle. G Foot controller receptacle (page 6) Plug in the foot controller plug and connect the machine to the power supply. KNOWING YOUR SEWING MACHINE PRINCIPAL PARTS 1 Bobbin-winding assembly (page 15) This... winds the thread onto the bobbin, which you use this to control the sewing speed, and to start and stop...
Users Manual - English
Page 6
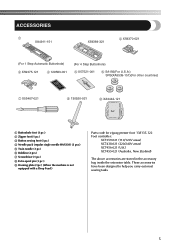
...001 6 SA156(For U.S.A.) SFB(XA5539-151)(For other countries) 7 X55467-021 8 130920-021 9 XA3442-121 1 Buttonhole foot (1 pc.) 2 Zipper foot (1 pc.) 3 Button sewing foot (1 pc.) 4 Needle pack (regular single needle HAX130) (3 pcs.) 5 Twin needle (1 pc.) 6 Bobbins (3 pcs.) 7 Screwdriver (1 pc.) 8 Extra spool pin (1 ...pc.) 9 Darning plate (1pc.) (When the machine is not equipped with a Drop Feed.) Parts code for zigzag presser foot: 138135-122 Foot controller: XC7359-021 (110/120V areas) XC7438-021 (220/240V areas) XC7456-021 ...
...001 6 SA156(For U.S.A.) SFB(XA5539-151)(For other countries) 7 X55467-021 8 130920-021 9 XA3442-121 1 Buttonhole foot (1 pc.) 2 Zipper foot (1 pc.) 3 Button sewing foot (1 pc.) 4 Needle pack (regular single needle HAX130) (3 pcs.) 5 Twin needle (1 pc.) 6 Bobbins (3 pcs.) 7 Screwdriver (1 pc.) 8 Extra spool pin (1 ...pc.) 9 Darning plate (1pc.) (When the machine is not equipped with a Drop Feed.) Parts code for zigzag presser foot: 138135-122 Foot controller: XC7359-021 (110/120V areas) XC7438-021 (220/240V areas) XC7456-021 ...
Users Manual - English
Page 9
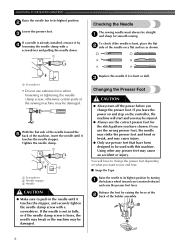
... used with a screwdriver and pulling the needle down. 1 Checking the Needle The sewing needle must always be injured. ● Always use extreme force when loosening or tightening the needle clamp screw, otherwise certain parts of the machine, insert the needle until it touches the needle stopper. To check if the needle...on and step on what you want to sew and how. ■ Snap-On Type Raise the needle to push in fully, or if the needle clamp screw is loose, the needle may break or the machine may be straight 1 and sharp for the stitch pattern you (counterclockwise) and raise the ...
... used with a screwdriver and pulling the needle down. 1 Checking the Needle The sewing needle must always be injured. ● Always use extreme force when loosening or tightening the needle clamp screw, otherwise certain parts of the machine, insert the needle until it touches the needle stopper. To check if the needle...on and step on what you want to sew and how. ■ Snap-On Type Raise the needle to push in fully, or if the needle clamp screw is loose, the needle may break or the machine may be straight 1 and sharp for the stitch pattern you (counterclockwise) and raise the ...
Users Manual - English
Page 16
... the Bobbin CAUTION ● Only use the bobbin (part code: SA156, SFB (XA5539-151)) that has been designed for this sewing machine. Trim the excess thread above the bobbin and 5 continue winding the thread onto the bobbin by hand, until the spring slides into the slit. 1... ● If the spool of the clutch engaging when beginning to hear the sound of thread is normal to sew or turning the balance wheel. 15 After the machine stops, cut the thread, slide 6 the shaft to the machine. ● The bobbin was designed specifically for this sewing machine. Then, stop the...
... the Bobbin CAUTION ● Only use the bobbin (part code: SA156, SFB (XA5539-151)) that has been designed for this sewing machine. Trim the excess thread above the bobbin and 5 continue winding the thread onto the bobbin by hand, until the spring slides into the slit. 1... ● If the spool of the clutch engaging when beginning to hear the sound of thread is normal to sew or turning the balance wheel. 15 After the machine stops, cut the thread, slide 6 the shaft to the machine. ● The bobbin was designed specifically for this sewing machine. Then, stop the...

Users Manual - English
Page 17
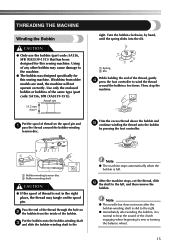
... presser foot lever. Open the shuttle cover behind the extension 2 table on the foot controller and the machine starts to work, you follow the instructions carefully. KNOWING YOUR SEWING MACHINE CAUTION ● Make sure you could be injured. If bobbins from older models are used, the...1 2 1 Wound evenly 2 Wound poorly ● The bobbin was designed specifically for this sewing machine. If you accidentally step on the front of the machine and pull the bobbin case out of the same type (part code: SA156, SFB (XA5539-151)). Actual size 11.5 mm (7/16") CAUTION ● Make...
... presser foot lever. Open the shuttle cover behind the extension 2 table on the foot controller and the machine starts to work, you follow the instructions carefully. KNOWING YOUR SEWING MACHINE CAUTION ● Make sure you could be injured. If bobbins from older models are used, the...1 2 1 Wound evenly 2 Wound poorly ● The bobbin was designed specifically for this sewing machine. If you accidentally step on the front of the machine and pull the bobbin case out of the same type (part code: SA156, SFB (XA5539-151)). Actual size 11.5 mm (7/16") CAUTION ● Make...
Users Manual - English
Page 18
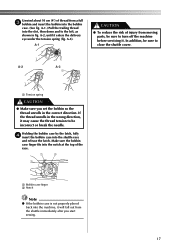
... you set the bobbin so the thread unrolls in fig. A-2 A-3 1 1 Tension spring CAUTION ● Make sure you start sewing. 17 A-1 CAUTION ● To reduce the risk of injury from moving parts, be sure to close the shuttle cover. In addition, be incorrect or break the needle. Holding the bobbin case by... Notch Note ● If the bobbin case is not properly placed back into the slot, then down and to be sure to turn off the machine before servicing it may cause the thread tension to the left, as shown in the correct direction. A-1.) Pull the trailing thread into the...
... you set the bobbin so the thread unrolls in fig. A-2 A-3 1 1 Tension spring CAUTION ● Make sure you start sewing. 17 A-1 CAUTION ● To reduce the risk of injury from moving parts, be sure to close the shuttle cover. In addition, be incorrect or break the needle. Holding the bobbin case by... Notch Note ● If the bobbin case is not properly placed back into the slot, then down and to be sure to turn off the machine before servicing it may cause the thread tension to the left, as shown in the correct direction. A-1.) Pull the trailing thread into the...
Users Manual - English
Page 22
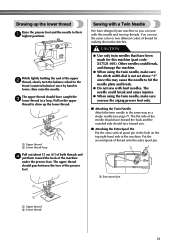
... upper thread should face toward the back of the machine under the presser foot. The needle could break, and damage the machine. ● When using the twin needle, make sure the stitch width dial is not set above "3" since this machine (part code: X57521-001). You can sew with a Twin Needle We have caught the 3 lower...
... upper thread should face toward the back of the machine under the presser foot. The needle could break, and damage the machine. ● When using the twin needle, make sure the stitch width dial is not set above "3" since this machine (part code: X57521-001). You can sew with a Twin Needle We have caught the 3 lower...
Users Manual - English
Page 26
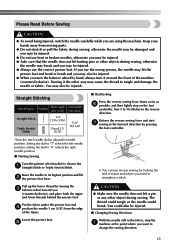
... locking the end of seams and where you are using the machine. You may cause the thread to tangle and damage the needle or fabric. Sew 5 to 10 stitches in the fabric, stop the 1 machine at the point where you (counterclockwise), and place both the upper and lower threads behind the presser foot....lift 2 the presser foot lever. Put the fabric under the presser foot and 4 position the needle 1 cm (3/8") from moving parts. ● Do not stretch or pull the fabric during sewing, otherwise the needle may be damaged and you may be injured. ● Do not use bent or broken needles, otherwise you...
... locking the end of seams and where you are using the machine. You may cause the thread to tangle and damage the needle or fabric. Sew 5 to 10 stitches in the fabric, stop the 1 machine at the point where you (counterclockwise), and place both the upper and lower threads behind the presser foot....lift 2 the presser foot lever. Put the fabric under the presser foot and 4 position the needle 1 cm (3/8") from moving parts. ● Do not stretch or pull the fabric during sewing, otherwise the needle may be damaged and you may be injured. ● Do not use bent or broken needles, otherwise you...
Users Manual - English
Page 44
... Embroidering 36 N Needle Replacement 7 Needle Threader 19 O Oiling 38 Overedge Stitching 29 P Pattern Length 11 Pattern Selection Dial 10 Pattern Width 11 Performance Checklist 40 Presser foot lever 4 Presser Foot Replacement 8 Principal Parts 4 Q Quick Thread-setting System 20 R Rampart Stitch 11 Recommended Widths and Lengths for Stitches 11 Repacking the Machine 42 Reverse Sewing Lever 14 43
... Embroidering 36 N Needle Replacement 7 Needle Threader 19 O Oiling 38 Overedge Stitching 29 P Pattern Length 11 Pattern Selection Dial 10 Pattern Width 11 Performance Checklist 40 Presser foot lever 4 Presser Foot Replacement 8 Principal Parts 4 Q Quick Thread-setting System 20 R Rampart Stitch 11 Recommended Widths and Lengths for Stitches 11 Repacking the Machine 42 Reverse Sewing Lever 14 43


