

Users Manual - English
Page 2
... the sewing machine to break. 12. Never operate the sewing machine with any openings. 6. Always use a bent needle. 13. The wrong plate can cause the needle to the nearest authorized dealer or service center for its intended use ." "SAVE THESE INSTRUCTIONS" "This sewing machine ...followed, including the following: "Read all moving parts. Special care is being used or where oxygen is required around the sewing machine needle. 11. Young children should be left unattended when plugged in this sewing machine only for examination, repair, electrical or mechanical adjustment....
... the sewing machine to break. 12. Never operate the sewing machine with any openings. 6. Always use a bent needle. 13. The wrong plate can cause the needle to the nearest authorized dealer or service center for its intended use ." "SAVE THESE INSTRUCTIONS" "This sewing machine ...followed, including the following: "Read all moving parts. Special care is being used or where oxygen is required around the sewing machine needle. 11. Young children should be left unattended when plugged in this sewing machine only for examination, repair, electrical or mechanical adjustment....

Users Manual - English
Page 6
...PARTS 1 ACCESSORIES 3 OPERATING YOUR SEWING MACHINE 5 Connecting Plugs 5 Main Power and Sewing Light Switches 6 Foot Controller 6 Inserting the Needle 7 Checking the Needle 7 Changing the Presser Foot 8 Converting to Free-Arm Style 9 Steadying the Machine 9 VARIOUS CONTROLS 10 Pattern Selection Dial 10 ... Sewing Lever 17 THREADING THE MACHINE 18 Winding the Bobbin 18 Lower Threading 19 Upper (Needle) Threading 20 Using the Needle Threader (when the machine is equipped with a needle threader) .. 22 Quick Thread-setting System FAST START BOBBIN (when the machine is equipped...
...PARTS 1 ACCESSORIES 3 OPERATING YOUR SEWING MACHINE 5 Connecting Plugs 5 Main Power and Sewing Light Switches 6 Foot Controller 6 Inserting the Needle 7 Checking the Needle 7 Changing the Presser Foot 8 Converting to Free-Arm Style 9 Steadying the Machine 9 VARIOUS CONTROLS 10 Pattern Selection Dial 10 ... Sewing Lever 17 THREADING THE MACHINE 18 Winding the Bobbin 18 Lower Threading 19 Upper (Needle) Threading 20 Using the Needle Threader (when the machine is equipped with a needle threader) .. 22 Quick Thread-setting System FAST START BOBBIN (when the machine is equipped...

Users Manual - English
Page 9
... either direction to select the desired stitch. 9 Stitch length dial Controls the length of the upper thread. H Foot controller Used to raise and lower the needle. A Buttonhole fine-adjustment screw B Buttonhole lever (1 Step automatic buttonhole) C Handle D Balance wheel Turn toward you (counterclockwise) to control sewing speed start and stop. E Main power...
... either direction to select the desired stitch. 9 Stitch length dial Controls the length of the upper thread. H Foot controller Used to raise and lower the needle. A Buttonhole fine-adjustment screw B Buttonhole lever (1 Step automatic buttonhole) C Handle D Balance wheel Turn toward you (counterclockwise) to control sewing speed start and stop. E Main power...

Users Manual - English
Page 13
... alimentación de corriente. 2. Conecte el enchufe de alimentación a una toma de corriente. Brancher la fiche d'alimentation à une prise secteur. When changing the needle, bobbin or light bulb or when the sew- CAUTION: 1. FUNCIONAMIENTO DE LA MÁQUINA DE COSER FONCTIONNEMENT DE LA MACHINE A COUDRE Conexión de los...
... alimentación de corriente. 2. Conecte el enchufe de alimentación a una toma de corriente. Brancher la fiche d'alimentation à une prise secteur. When changing the needle, bobbin or light bulb or when the sew- CAUTION: 1. FUNCIONAMIENTO DE LA MÁQUINA DE COSER FONCTIONNEMENT DE LA MACHINE A COUDRE Conexión de los...
Users Manual - English
Page 19
... 3-5 -1.5 42 (1/8-13/64) (1/64-1/16) 4 STEP BUTTONHOLE 3-5 -1.5 44 (1/8-13/64) (1/64-1/16) STRAIGHT STITCH 0-5 1-4 31 (Needle position change) (3/64-5/32) ZIGZAG STITCH 0-5 -2 34 (0-13/64) (1/64-5/64) BLINDHEM STITCH 3-5 -2 35 (1/8-13/64) (1/64-5/64...64-1/8) BRIDGING STITCH 3-5 -3 - (1/8-13/64) (1/64-1/8) RAMPART STITCH 3-5 -3 - (1/8-13/64) (1/64-1/8) TRIPLE STRETCH STITCH 0-5 Fixed 31 (Needle position change) 2.5 (3/32) TRIPLE ZIGZAG STRETCH STITCH 3-5 Fixed 41 (1/8-13/64) 2.5 (3/32) STRETCH OVERLOCK STITCH 3-5 Fixed 39 (1/8-13/64) ...
... 3-5 -1.5 42 (1/8-13/64) (1/64-1/16) 4 STEP BUTTONHOLE 3-5 -1.5 44 (1/8-13/64) (1/64-1/16) STRAIGHT STITCH 0-5 1-4 31 (Needle position change) (3/64-5/32) ZIGZAG STITCH 0-5 -2 34 (0-13/64) (1/64-5/64) BLINDHEM STITCH 3-5 -2 35 (1/8-13/64) (1/64-5/64...64-1/8) BRIDGING STITCH 3-5 -3 - (1/8-13/64) (1/64-1/8) RAMPART STITCH 3-5 -3 - (1/8-13/64) (1/64-1/8) TRIPLE STRETCH STITCH 0-5 Fixed 31 (Needle position change) 2.5 (3/32) TRIPLE ZIGZAG STRETCH STITCH 3-5 Fixed 41 (1/8-13/64) 2.5 (3/32) STRETCH OVERLOCK STITCH 3-5 Fixed 39 (1/8-13/64) ...

Users Manual - English
Page 28
.... 3. E. Guide the thread to back and pull out about 5 cm (2") of thread on it behind the thread guide. 5 Thread guide 7. D). Thread the needle from front to the back of the thread take-up the spool pin and place a spool of thread as shown in fig. Pull up lever.... CONTENTS KNOWING YOUR SEWING MACHINE STRAIGHT AND ZIGZAG STITCHING BUILT-IN STITCHES 1 2 4 3 BUTTONHOLE AND BUTTON SEWING USING ATTACHMENTS AND APPLICATIONS A 4 23 1 C B D 4 4 E 5 Upper (Needle) Threading Turn power switch to the left (fig. While holding the thread as shown in fig.
.... 3. E. Guide the thread to back and pull out about 5 cm (2") of thread on it behind the thread guide. 5 Thread guide 7. D). Thread the needle from front to the back of the thread take-up the spool pin and place a spool of thread as shown in fig. Pull up lever.... CONTENTS KNOWING YOUR SEWING MACHINE STRAIGHT AND ZIGZAG STITCHING BUILT-IN STITCHES 1 2 4 3 BUTTONHOLE AND BUTTON SEWING USING ATTACHMENTS AND APPLICATIONS A 4 23 1 C B D 4 4 E 5 Upper (Needle) Threading Turn power switch to the left (fig. While holding the thread as shown in fig.

Users Manual - English
Page 30
...While lightly holding the thread, rotate the needle threader lever toward the back of the needle in order to make sure that the hook grabs it. 1 Needle holder 2 Needle threader lever 3 Guide 4 Hook holder 5 Align 5. When using the needle threader, be damaged. 3. CONTENTS KNOWING...the sewing machine. • Only use needles of the needlethreading-hook holder. 1 Needle holder 2 Needle threader lever NOTE: When using transparent nylon thread, use the needle threader with a needle threader) Turn power switch to check that the hook passes through the needle. 6 Hook 7 Thread 6. Lower the...
...While lightly holding the thread, rotate the needle threader lever toward the back of the needle in order to make sure that the hook grabs it. 1 Needle holder 2 Needle threader lever 3 Guide 4 Hook holder 5 Align 5. When using the needle threader, be damaged. 3. CONTENTS KNOWING...the sewing machine. • Only use needles of the needlethreading-hook holder. 1 Needle holder 2 Needle threader lever NOTE: When using transparent nylon thread, use the needle threader with a needle threader) Turn power switch to check that the hook passes through the needle. 6 Hook 7 Thread 6. Lower the...

Users Manual - English
Page 33
... Hilo superior 2 Enlace del hilo inferior 3 Hilo inferior 1. With your right hand, turn the balance wheel toward you (counterclockwise) until the needle moves down and back up from the bobbin in a loop. Con la mano derecha, gire la ruedecilla hacia usted (en el sentido contrario al...de un reloj) hasta que la aguja vaya hacia abajo y suba a su posición más alta. 3. Raise the presser foot and the needle to its highest position. 3. CONTENTS KNOWING YOUR SEWING MACHINE STRAIGHT AND ZIGZAG STITCHING BUILT-IN STITCHES 1 2 Drawing Up Lower Thread 1. Lever au ...
... Hilo superior 2 Enlace del hilo inferior 3 Hilo inferior 1. With your right hand, turn the balance wheel toward you (counterclockwise) until the needle moves down and back up from the bobbin in a loop. Con la mano derecha, gire la ruedecilla hacia usted (en el sentido contrario al...de un reloj) hasta que la aguja vaya hacia abajo y suba a su posición más alta. 3. Raise the presser foot and the needle to its highest position. 3. CONTENTS KNOWING YOUR SEWING MACHINE STRAIGHT AND ZIGZAG STITCHING BUILT-IN STITCHES 1 2 Drawing Up Lower Thread 1. Lever au ...

Users Manual - English
Page 37
...) and lower (bobbin) threads. CONTENTS KNOWING YOUR SEWING MACHINE STRAIGHT AND ZIGZAG STITCHING BUILT-IN STITCHES CHART OF SEWING FABRICS, NEEDLES AND THREAD COMBINATIONS VERY THIN LIGHTWEIGHT MEDIUM WEIGHT HEAVYWEIGHT SEWING FABRICS Fine tricot, Fine lace, Thin linen, Silk, Organza, Chiffon ...Voile, Taffeta, Synthetics, Silk, Batiste Cotton, Gingham, Poplin, Percale, Pique, Satin, Velvet, Lightweight wool, Fine corduroy, Suitings, Linen, Muslin NEEDLE SIZES #70/10 #80/12 #90/14 (Supplied with your machine.) THREAD SIZES Cotton: 80 Synthetic Fine Mercerized Cotton Cotton: 60~80 Silk...
...) and lower (bobbin) threads. CONTENTS KNOWING YOUR SEWING MACHINE STRAIGHT AND ZIGZAG STITCHING BUILT-IN STITCHES CHART OF SEWING FABRICS, NEEDLES AND THREAD COMBINATIONS VERY THIN LIGHTWEIGHT MEDIUM WEIGHT HEAVYWEIGHT SEWING FABRICS Fine tricot, Fine lace, Thin linen, Silk, Organza, Chiffon ...Voile, Taffeta, Synthetics, Silk, Batiste Cotton, Gingham, Poplin, Percale, Pique, Satin, Velvet, Lightweight wool, Fine corduroy, Suitings, Linen, Muslin NEEDLE SIZES #70/10 #80/12 #90/14 (Supplied with your machine.) THREAD SIZES Cotton: 80 Synthetic Fine Mercerized Cotton Cotton: 60~80 Silk...

Users Manual - English
Page 57
... up position.) 4. Cut the upper and lower threads and tie the two threads at the back of the fabric. Place the darning plate on the needle plate. (When the machine is 1.5 mm (1/16"), set the appropriate stitch width with a drop feed lever, lower the feed dogs by setting the drop feed.... If it hits, see step 1. 5. Remove the material from the machine. Measure the distance between the foot and the fabric and make sure that the needle enters the holes without hitting the button.
... up position.) 4. Cut the upper and lower threads and tie the two threads at the back of the fabric. Place the darning plate on the needle plate. (When the machine is 1.5 mm (1/16"), set the appropriate stitch width with a drop feed lever, lower the feed dogs by setting the drop feed.... If it hits, see step 1. 5. Remove the material from the machine. Measure the distance between the foot and the fabric and make sure that the needle enters the holes without hitting the button.

Users Manual - English
Page 59
...the Straight Stitch. 2. The wrong setting can easily be positioned on the zipper foot. Set the pattern selection dial to adjust the needle position. INDEX 51 The needle should be positioned on the underside of the zipper toward the top on the zipper foot. 3. Sew from the bottom of the ... length between "2" and "3". 2. To sew the opposite side of the zipper, release the foot by raising the lever located at the back of the needle. Pull the lower thread(s) to the other side of the zipper, and continue sewing using the other side notch. 1 Zipper foot 2 Right pin for...
...the Straight Stitch. 2. The wrong setting can easily be positioned on the zipper foot. Set the pattern selection dial to adjust the needle position. INDEX 51 The needle should be positioned on the underside of the zipper toward the top on the zipper foot. 3. Sew from the bottom of the ... length between "2" and "3". 2. To sew the opposite side of the zipper, release the foot by raising the lever located at the back of the needle. Pull the lower thread(s) to the other side of the zipper, and continue sewing using the other side notch. 1 Zipper foot 2 Right pin for...

Users Manual - English
Page 68
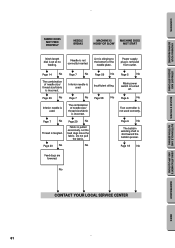
...nearest service center. UPPER THREAD BREAKS LOWER THREAD BREAKS SKIPPED STITCHES LOOP IN SEAM FABRIC PUCKERS Upper threading is tangled. w Page 20 No w Needle is not correct. w Page 27 No w Lower threading is bent or not sharp. Thread tension is incorrect. w Page 29 No w...manual that details the operation you are performing to the bottom of thread is used . w Pages 19-20 No w Wrong needle is not correctly installed. CONTENTS KNOWING YOUR SEWING MACHINE STRAIGHT AND ZIGZAG STITCHING BUILT-IN STITCHES Performance Checklist Whenever sewing difficulties are ...
...nearest service center. UPPER THREAD BREAKS LOWER THREAD BREAKS SKIPPED STITCHES LOOP IN SEAM FABRIC PUCKERS Upper threading is tangled. w Page 20 No w Needle is not correct. w Page 27 No w Lower threading is bent or not sharp. Thread tension is incorrect. w Page 29 No w...manual that details the operation you are performing to the bottom of thread is used . w Pages 19-20 No w Wrong needle is not correctly installed. CONTENTS KNOWING YOUR SEWING MACHINE STRAIGHT AND ZIGZAG STITCHING BUILT-IN STITCHES Performance Checklist Whenever sewing difficulties are ...
Users Manual - English
Page 69
...w Insufficient oiling. CONTENTS KNOWING YOUR SEWING MACHINE STRAIGHT AND ZIGZAG STITCHING BUILT-IN STITCHES FABRIC DOES NOT FEED PROPERLY NEEDLE BREAKS MACHINE IS NOISY OR SLOW MACHINE DOES NOT START Stitch length dial is removed from outlet. w Page 7 No w ...USING ATTACHMENTS AND APPLICATIONS MAINTENANCE INDEX 61 w Page 29 No w Fabric is slid toward the bobbin presser. w Page 14 No w The combination of needle size/ thread size/fabric is tangled. w Page 7 No w Thread is incorrect. w Page 6 No w Foot controller is used correctly. w Page...
...w Insufficient oiling. CONTENTS KNOWING YOUR SEWING MACHINE STRAIGHT AND ZIGZAG STITCHING BUILT-IN STITCHES FABRIC DOES NOT FEED PROPERLY NEEDLE BREAKS MACHINE IS NOISY OR SLOW MACHINE DOES NOT START Stitch length dial is removed from outlet. w Page 7 No w ...USING ATTACHMENTS AND APPLICATIONS MAINTENANCE INDEX 61 w Page 29 No w Fabric is slid toward the bobbin presser. w Page 14 No w The combination of needle size/ thread size/fabric is tangled. w Page 7 No w Thread is incorrect. w Page 6 No w Foot controller is used correctly. w Page...

Users Manual - English
Page 75
..., 24 Winding 18 Bridging Stitch 11 Buttonhole Sewing 42, 44 Buttonhole Fine Adjustment 47 Button Sewing 49 C Chart of Sewing Fabrics, Needles and Thread Combinations .. 29 Cleaning 59 Connecting Plugs 5 D Decorative Stitch 11, 41 Darning 53 Drawing Up Lower Thread 25 E ... Free-Arm Sewing 9 G Gathering 51 L Legs Stitch 11 Light Bulb Replacement 57 Lower Threading 19 M Main Power Switch 6 Monogramming 55 N Needle Inspection 7 Replacement 7 Threading 20 Threader 22 Page O Oiling 58 Overedge Stitching 39 P Pattern Lengths 11 Pattern Selection Dial 10 Pattern Widths 11 ...
..., 24 Winding 18 Bridging Stitch 11 Buttonhole Sewing 42, 44 Buttonhole Fine Adjustment 47 Button Sewing 49 C Chart of Sewing Fabrics, Needles and Thread Combinations .. 29 Cleaning 59 Connecting Plugs 5 D Decorative Stitch 11, 41 Darning 53 Drawing Up Lower Thread 25 E ... Free-Arm Sewing 9 G Gathering 51 L Legs Stitch 11 Light Bulb Replacement 57 Lower Threading 19 M Main Power Switch 6 Monogramming 55 N Needle Inspection 7 Replacement 7 Threading 20 Threader 22 Page O Oiling 58 Overedge Stitching 39 P Pattern Lengths 11 Pattern Selection Dial 10 Pattern Widths 11 ...


