

Users Manual - English
Page 2
... only for use as a toy. turer as threading the needle, changing the needle, threading the bobbin, or changing the presser foot. 15. Keep the ventilation openings of the sewing machine and foot controller free from outlet. 9. It may deflect the needle causing it has been dropped or damaged, or dropped into any...
... only for use as a toy. turer as threading the needle, changing the needle, threading the bobbin, or changing the presser foot. 15. Keep the ventilation openings of the sewing machine and foot controller free from outlet. 9. It may deflect the needle causing it has been dropped or damaged, or dropped into any...

Users Manual - English
Page 6
... STITCHES KNOWING YOUR SEWING MACHINE PRINCIPAL PARTS 1 ACCESSORIES 3 OPERATING YOUR SEWING MACHINE 5 Connecting Plugs 5 Main Power and Sewing Light Switches 6 Foot Controller 6 Inserting the Needle 7 Checking the Needle 7 Changing the Presser Foot 8 Converting to Free-Arm Style 9 Steadying the Machine 9 VARIOUS CONTROLS 10 Pattern Selection Dial 10 RECOMMENDED WIDTHS AND LENGTHS FOR...
... STITCHES KNOWING YOUR SEWING MACHINE PRINCIPAL PARTS 1 ACCESSORIES 3 OPERATING YOUR SEWING MACHINE 5 Connecting Plugs 5 Main Power and Sewing Light Switches 6 Foot Controller 6 Inserting the Needle 7 Checking the Needle 7 Changing the Presser Foot 8 Converting to Free-Arm Style 9 Steadying the Machine 9 VARIOUS CONTROLS 10 Pattern Selection Dial 10 RECOMMENDED WIDTHS AND LENGTHS FOR...

Users Manual - English
Page 9
...USING ATTACHMENTS AND APPLICATIONS MAINTENANCE INDEX 1 G Presser foot lever Raises and lowers the presser foot. E Main power/sewing light switch Turns the main power and sewing light on and off. F Foot controller receptacle Insert the foot controller plug for stitching in the reverse direction.... automatic buttonhole) C Handle D Balance wheel Turn toward you (counterclockwise) to control sewing speed start and stop. H Foot controller Used to raise and lower the needle. CONTENTS KNOWING YOUR SEWING MACHINE STRAIGHT AND ZIGZAG STITCHING BUILT-IN STITCHES PRINCIPAL...
...USING ATTACHMENTS AND APPLICATIONS MAINTENANCE INDEX 1 G Presser foot lever Raises and lowers the presser foot. E Main power/sewing light switch Turns the main power and sewing light on and off. F Foot controller receptacle Insert the foot controller plug for stitching in the reverse direction.... automatic buttonhole) C Handle D Balance wheel Turn toward you (counterclockwise) to control sewing speed start and stop. H Foot controller Used to raise and lower the needle. CONTENTS KNOWING YOUR SEWING MACHINE STRAIGHT AND ZIGZAG STITCHING BUILT-IN STITCHES PRINCIPAL...
Users Manual - English
Page 14
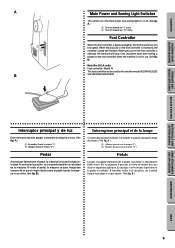
...; ne rien placer sur la pédale lorsque la machine n'est pas utilisée. (Voir fig. When the pressure on the foot controller is not in use. (See fig. Interruptor principal y de luz Interrupteur principal et de la lampe Este interruptor permite apagar y... la marca "O") Cet interrupteur permet d'allumer et d'éteindre la machine ainsi que la lampe de couture. (Voir fig. When pressure on the foot controller is depressed lightly, the machine will increase. CONTENTS KNOWING YOUR SEWING MACHINE STRAIGHT AND ZIGZAG STITCHING BUILT-IN STITCHES A 1 2 B Main Power...
...; ne rien placer sur la pédale lorsque la machine n'est pas utilisée. (Voir fig. When the pressure on the foot controller is not in use. (See fig. Interruptor principal y de luz Interrupteur principal et de la lampe Este interruptor permite apagar y... la marca "O") Cet interrupteur permet d'allumer et d'éteindre la machine ainsi que la lampe de couture. (Voir fig. When pressure on the foot controller is depressed lightly, the machine will increase. CONTENTS KNOWING YOUR SEWING MACHINE STRAIGHT AND ZIGZAG STITCHING BUILT-IN STITCHES A 1 2 B Main Power...

Users Manual - English
Page 28
... A 4 23 1 C B D 4 4 E 5 Upper (Needle) Threading Turn power switch to back and pull out about 5 cm (2") of thread on it to its highest position. 2. Raise the presser foot lever and turn the balance wheel toward you (counterclockwise) to raise the thread take -up lever 4. D). NOTE: Incorrectly feeding the thread may cause it . 3.
... A 4 23 1 C B D 4 4 E 5 Upper (Needle) Threading Turn power switch to back and pull out about 5 cm (2") of thread on it to its highest position. 2. Raise the presser foot lever and turn the balance wheel toward you (counterclockwise) to raise the thread take -up lever 4. D). NOTE: Incorrectly feeding the thread may cause it . 3.

Users Manual - English
Page 30
... a needle threader) Turn power switch to #100. In addition, refer to the CHART OF SEWING FABRICS, NEEDLES AND THREAD COMBINATIONS to #100. Lower the presser foot lever. 2. Pull down the needle threader lever as much as possible, then rotate the lever toward you ). The hook will pull the thread through the...
... a needle threader) Turn power switch to #100. In addition, refer to the CHART OF SEWING FABRICS, NEEDLES AND THREAD COMBINATIONS to #100. Lower the presser foot lever. 2. Pull down the needle threader lever as much as possible, then rotate the lever toward you ). The hook will pull the thread through the...

Users Manual - English
Page 33
... Boucle du fil inférieur 3 Fil inférieur BUTTONHOLE AND BUTTON SEWING USING ATTACHMENTS AND APPLICATIONS MAINTENANCE INDEX 25 Raise the presser foot and the needle to its highest position. 3. With your right hand, turn the balance wheel toward you and the lower thread will come up... pied-de-biche et l'aiguille. 2. The upper thread should pass between the toes of the machine straight behind the presser foot. Pull the upper thread toward the back of the presser foot. 1 Upper thread 2 Lower thread loop 3 Lower thread 1 3 Para sacar el hilo de la canilla Remontée ...
... Boucle du fil inférieur 3 Fil inférieur BUTTONHOLE AND BUTTON SEWING USING ATTACHMENTS AND APPLICATIONS MAINTENANCE INDEX 25 Raise the presser foot and the needle to its highest position. 3. With your right hand, turn the balance wheel toward you and the lower thread will come up... pied-de-biche et l'aiguille. 2. The upper thread should pass between the toes of the machine straight behind the presser foot. Pull the upper thread toward the back of the presser foot. 1 Upper thread 2 Lower thread loop 3 Lower thread 1 3 Para sacar el hilo de la canilla Remontée ...

Users Manual - English
Page 50
... 3 2 4 1 E PUSH Making a Buttonhole (1 Step Automatic Buttonhole) 4 Pattern Stitch Length Stitch Width Foot (1 Step Automatic -1.5 Buttonhole) Fixed 5 Buttonhole Foot NOTE: 1. Lower the presser foot aligning the marks on the foot with the marks on stretch fabric, place a gimp thread under the buttonhole stitching. 1. A. (The front ... 3. Stop the machine when the buttonhole is done in the order shown in fig. Lower the presser foot and start the machine. 7. PUSH BUTTONHOLE AND BUTTON SEWING USING ATTACHMENTS AND APPLICATIONS MAINTENANCE INDEX 42 Buttonhole ...
... 3 2 4 1 E PUSH Making a Buttonhole (1 Step Automatic Buttonhole) 4 Pattern Stitch Length Stitch Width Foot (1 Step Automatic -1.5 Buttonhole) Fixed 5 Buttonhole Foot NOTE: 1. Lower the presser foot aligning the marks on the foot with the marks on stretch fabric, place a gimp thread under the buttonhole stitching. 1. A. (The front ... 3. Stop the machine when the buttonhole is done in the order shown in fig. Lower the presser foot and start the machine. 7. PUSH BUTTONHOLE AND BUTTON SEWING USING ATTACHMENTS AND APPLICATIONS MAINTENANCE INDEX 42 Buttonhole ...

Users Manual - English
Page 57
...the stitch width dial. Cut the upper and lower threads and tie the two threads at the back of the fabric. Attach the button sewing foot. 3. BUTTONHOLE AND BUTTON SEWING USING ATTACHMENTS AND APPLICATIONS MAINTENANCE INDEX 49 Place the darning plate on the needle plate. (When the machine is... 2. CONTENTS KNOWING YOUR SEWING MACHINE STRAIGHT AND ZIGZAG STITCHING BUILT-IN STITCHES Button Sewing Pattern (Zigzag Stitch) Stitch Length Stitch Width Any Foot Button Sewing Foot 1. Measure the distance between the holes and set the stitch width to the up position.) 4.
...the stitch width dial. Cut the upper and lower threads and tie the two threads at the back of the fabric. Attach the button sewing foot. 3. BUTTONHOLE AND BUTTON SEWING USING ATTACHMENTS AND APPLICATIONS MAINTENANCE INDEX 49 Place the darning plate on the needle plate. (When the machine is... 2. CONTENTS KNOWING YOUR SEWING MACHINE STRAIGHT AND ZIGZAG STITCHING BUILT-IN STITCHES Button Sewing Pattern (Zigzag Stitch) Stitch Length Stitch Width Any Foot Button Sewing Foot 1. Measure the distance between the holes and set the stitch width to the up position.) 4.

Users Manual - English
Page 59
...Set the pattern selection dial to gather the material. The needle should be positioned on the zipper foot. 3. Pull the lower thread(s) to the Straight Stitch. 2. Lower the presser foot lever and attach the presser foot holder to the other side of the zipper, and continue sewing using the other side notch....into the notch on both sides. To sew the opposite side of the zipper, release the foot by raising the lever located at the back of the presser foot, move the zipper foot to either the left side of the material. 3. BUTTONHOLE AND BUTTON SEWING USING ATTACHMENTS AND ...
...Set the pattern selection dial to gather the material. The needle should be positioned on the zipper foot. 3. Pull the lower thread(s) to the Straight Stitch. 2. Lower the presser foot lever and attach the presser foot holder to the other side of the zipper, and continue sewing using the other side notch....into the notch on both sides. To sew the opposite side of the zipper, release the foot by raising the lever located at the back of the presser foot, move the zipper foot to either the left side of the material. 3. BUTTONHOLE AND BUTTON SEWING USING ATTACHMENTS AND ...
Users Manual - English
Page 69
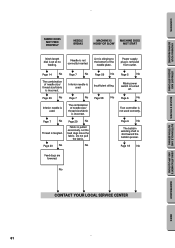
... No w Fabric is incorrect. Needle is turned off. w Page 58 No w Page 5 No w Main power switch is not correctly inserted. Lint is used. w Page 6 No w Foot controller is set at no feeding. w Page 29 No w Inferior needle is clinging to the bottom of needle size/ thread size/fabric is pulled excessively...
... No w Fabric is incorrect. Needle is turned off. w Page 58 No w Page 5 No w Main power switch is not correctly inserted. Lint is used. w Page 6 No w Foot controller is set at no feeding. w Page 29 No w Inferior needle is clinging to the bottom of needle size/ thread size/fabric is pulled excessively...

Users Manual - English
Page 75
... Up Lower Thread 25 E Elastic Stitching 37 Elastic Overlock 39 Embroidering 55 F Feed Dog Cleaning 59 Lever 17 Finishing a Seam 32-33 Foot Controller Connecting 5 Operating 6 Free-Arm Sewing 9 G Gathering 51 L Legs Stitch 11 Light Bulb Replacement 57 Lower Threading 19 M Main ... 22 Page O Oiling 58 Overedge Stitching 39 P Pattern Lengths 11 Pattern Selection Dial 10 Pattern Widths 11 Performance Checklist 60-61 Presser Foot Replacement 8 Principal Parts 1 Q Quick Thread-setting System 24 R Repacking 66 Reverse Sewing Lever 17 S Scallop Stitching 38 Sewing Direction...
... Up Lower Thread 25 E Elastic Stitching 37 Elastic Overlock 39 Embroidering 55 F Feed Dog Cleaning 59 Lever 17 Finishing a Seam 32-33 Foot Controller Connecting 5 Operating 6 Free-Arm Sewing 9 G Gathering 51 L Legs Stitch 11 Light Bulb Replacement 57 Lower Threading 19 M Main ... 22 Page O Oiling 58 Overedge Stitching 39 P Pattern Lengths 11 Pattern Selection Dial 10 Pattern Widths 11 Performance Checklist 60-61 Presser Foot Replacement 8 Principal Parts 1 Q Quick Thread-setting System 24 R Repacking 66 Reverse Sewing Lever 17 S Scallop Stitching 38 Sewing Direction...


