
Users Manual - English
Page 6
...IN STITCHES KNOWING YOUR SEWING MACHINE PRINCIPAL PARTS 1 ACCESSORIES 3 OPERATING YOUR SEWING MACHINE 5 Connecting Plugs 5 Main Power and Sewing Light Switches 6 Foot Controller 6 Inserting the Needle 7 Checking the Needle 7 Changing the Presser Foot 8 Converting to Free-Arm Style 9 Steadying the Machine 9 VARIOUS CONTROLS ... Thread-setting System FAST START BOBBIN (when the machine is equipped with a quick thread-setting system 24 Drawing Up Lower Thread 25 Twin-Needle Sewing 26 Thread Tension 27 CHART OF SEWING FABRICS, NEEDLES AND THREAD COMBINATIONS 29 STRAIGHT AND ZIGZAG...
...IN STITCHES KNOWING YOUR SEWING MACHINE PRINCIPAL PARTS 1 ACCESSORIES 3 OPERATING YOUR SEWING MACHINE 5 Connecting Plugs 5 Main Power and Sewing Light Switches 6 Foot Controller 6 Inserting the Needle 7 Checking the Needle 7 Changing the Presser Foot 8 Converting to Free-Arm Style 9 Steadying the Machine 9 VARIOUS CONTROLS ... Thread-setting System FAST START BOBBIN (when the machine is equipped with a quick thread-setting system 24 Drawing Up Lower Thread 25 Twin-Needle Sewing 26 Thread Tension 27 CHART OF SEWING FABRICS, NEEDLES AND THREAD COMBINATIONS 29 STRAIGHT AND ZIGZAG...

Users Manual - English
Page 9
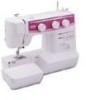
...D Balance wheel Turn toward you (counterclockwise) to control sewing speed start and stop. F Foot controller receptacle Insert the foot controller plug for the lower thread. 2 Spool pin A Holds the spool of thread. 3 Bobbin winding tension disc and thread guide 5 9 4 Thread take-up ...8 5 Thread cutter 7 6 Upper tension control dial Controls the tension of the stitches. 0 Reverse sewing lever Push for stitching in the reverse direction. H Foot controller Used to raise and lower the needle. CONTENTS KNOWING YOUR SEWING MACHINE STRAIGHT AND ZIGZAG STITCHING BUILT-IN STITCHES...
...D Balance wheel Turn toward you (counterclockwise) to control sewing speed start and stop. F Foot controller receptacle Insert the foot controller plug for the lower thread. 2 Spool pin A Holds the spool of thread. 3 Bobbin winding tension disc and thread guide 5 9 4 Thread take-up ...8 5 Thread cutter 7 6 Upper tension control dial Controls the tension of the stitches. 0 Reverse sewing lever Push for stitching in the reverse direction. H Foot controller Used to raise and lower the needle. CONTENTS KNOWING YOUR SEWING MACHINE STRAIGHT AND ZIGZAG STITCHING BUILT-IN STITCHES...

Users Manual - English
Page 28
... to its highest position. 2. Bring the thread through guides. (See fig. E. Bring the thread down and pass it between the tension discs. 5. Thread the needle from front to back and pull out about 5 cm (2") of the thread take-up lever to the...lever 4. Pass the thread through the slit by pulling it toward you and into the eyelet. 6. D). CONTENTS KNOWING YOUR SEWING MACHINE STRAIGHT AND ZIGZAG STITCHING BUILT-IN STITCHES 1 2 4 3 BUTTONHOLE AND BUTTON SEWING USING ATTACHMENTS AND APPLICATIONS A 4 23 1 C B D 4 4 E 5 Upper (Needle) Threading Turn power switch ...
... to its highest position. 2. Bring the thread through guides. (See fig. E. Bring the thread down and pass it between the tension discs. 5. Thread the needle from front to back and pull out about 5 cm (2") of the thread take-up lever to the...lever 4. Pass the thread through the slit by pulling it toward you and into the eyelet. 6. D). CONTENTS KNOWING YOUR SEWING MACHINE STRAIGHT AND ZIGZAG STITCHING BUILT-IN STITCHES 1 2 4 3 BUTTONHOLE AND BUTTON SEWING USING ATTACHMENTS AND APPLICATIONS A 4 23 1 C B D 4 4 E 5 Upper (Needle) Threading Turn power switch ...

Users Manual - English
Page 35
... be made on the surface of your next project. Decrease the thread tension by turning the dial to a lower number. CONTENTS KNOWING YOUR SEWING MACHINE STRAIGHT AND ZIGZAG STITCHING BUILT-IN STITCHES A 2 1 2 1 B 2 1 2 1 A-1 654 B-1 654 C 2 1 2 1 Thread Tension Thread tension will weaken your seams or cause puckers in your project. NOTE: It is important since too much...
... be made on the surface of your next project. Decrease the thread tension by turning the dial to a lower number. CONTENTS KNOWING YOUR SEWING MACHINE STRAIGHT AND ZIGZAG STITCHING BUILT-IN STITCHES A 2 1 2 1 B 2 1 2 1 A-1 654 B-1 654 C 2 1 2 1 Thread Tension Thread tension will weaken your seams or cause puckers in your project. NOTE: It is important since too much...

Users Manual - English
Page 59
... the bottom of the zipper toward the top on the underside of the zipper Check for best results. (See fig. INDEX 51 CONTENTS KNOWING YOUR SEWING MACHINE STRAIGHT AND ZIGZAG STITCHING BUILT-IN STITCHES A 1 2 3 B Zipper Inserting Pattern (Straight Stitch) Stitch Length 2-3 Stitch Width 2.5 (Center needle position) Foot Zipper Foot... stitches. 4. For the XL5130, XR32, XL5232, XR34, XL5340 and XR42, use the stitch width dial to the Straight Stitch. Loosen the tension of the needle. Pull the lower thread(s) to about "2") so that the lower thread lies on both sides.
... the bottom of the zipper toward the top on the underside of the zipper Check for best results. (See fig. INDEX 51 CONTENTS KNOWING YOUR SEWING MACHINE STRAIGHT AND ZIGZAG STITCHING BUILT-IN STITCHES A 1 2 3 B Zipper Inserting Pattern (Straight Stitch) Stitch Length 2-3 Stitch Width 2.5 (Center needle position) Foot Zipper Foot... stitches. 4. For the XL5130, XR32, XL5232, XR34, XL5340 and XR42, use the stitch width dial to the Straight Stitch. Loosen the tension of the needle. Pull the lower thread(s) to about "2") so that the lower thread lies on both sides.

Users Manual - English
Page 68
... correct. If you to improve the operation. CONTENTS KNOWING YOUR SEWING MACHINE STRAIGHT AND ZIGZAG STITCHING BUILT-IN STITCHES Performance Checklist Whenever sewing difficulties are encountered, review the section in the shuttle hook. w Page 29 No w w Page 19 No w Bobbin is incorrect. Thread tension is not threaded properly in this instruction manual that details...
... correct. If you to improve the operation. CONTENTS KNOWING YOUR SEWING MACHINE STRAIGHT AND ZIGZAG STITCHING BUILT-IN STITCHES Performance Checklist Whenever sewing difficulties are encountered, review the section in the shuttle hook. w Page 29 No w w Page 19 No w Bobbin is incorrect. Thread tension is not threaded properly in this instruction manual that details...

Users Manual - English
Page 75
... Stitching 37 Elastic Overlock 39 Embroidering 55 F Feed Dog Cleaning 59 Lever 17 Finishing a Seam 32-33 Foot Controller Connecting 5 Operating 6 Free-Arm Sewing 9 G Gathering 51 L Legs Stitch 11 Light Bulb Replacement 57 Lower Threading 19 M Main Power Switch 6 Monogramming 55 N Needle Inspection ...Spool Installing 20 Steadying the Machine 9 Stitch Length Dial 14 Straight Stitching 31 Stretch Blindhem Stitching 35 Stretch Material Sewing 33 Stretch Overlock 39 Stretch Stitching 15 T Threading Bobbin 19, 24 Needle 20, 22 Thread Tension 27 Topstitching 33 Tree Stitch...
... Stitching 37 Elastic Overlock 39 Embroidering 55 F Feed Dog Cleaning 59 Lever 17 Finishing a Seam 32-33 Foot Controller Connecting 5 Operating 6 Free-Arm Sewing 9 G Gathering 51 L Legs Stitch 11 Light Bulb Replacement 57 Lower Threading 19 M Main Power Switch 6 Monogramming 55 N Needle Inspection ...Spool Installing 20 Steadying the Machine 9 Stitch Length Dial 14 Straight Stitching 31 Stretch Blindhem Stitching 35 Stretch Material Sewing 33 Stretch Overlock 39 Stretch Stitching 15 T Threading Bobbin 19, 24 Needle 20, 22 Thread Tension 27 Topstitching 33 Tree Stitch...


