
Users Manual - English
Page 2
...To reduce the risk of the air openings blocked. Use this instruction manual. 16. Keep the ventilation openings of the sewing machine and foot controller free from all instructions before using." Do not use the proper needle plate. Do not pull or push the fabric while ...sewing machine if it has a damaged cord or plug, if it to the nearest authorized dealer or service center for its intended use this manual. Always use a bent needle. 13. DANGER - It may deflect the needle causing it is used as threading the needle, changing the needle, threading the bobbin...
...To reduce the risk of the air openings blocked. Use this instruction manual. 16. Keep the ventilation openings of the sewing machine and foot controller free from all instructions before using." Do not use the proper needle plate. Do not pull or push the fabric while ...sewing machine if it has a damaged cord or plug, if it to the nearest authorized dealer or service center for its intended use this manual. Always use a bent needle. 13. DANGER - It may deflect the needle causing it is used as threading the needle, changing the needle, threading the bobbin...

Users Manual - English
Page 6
... Needle 7 Changing the Presser Foot 8 Converting to Free-Arm Style 9 Steadying the Machine 9 VARIOUS CONTROLS 10 Pattern Selection Dial 10 RECOMMENDED WIDTHS AND LENGTHS FOR STITCHES 11 Stitch Length Dial 14 Stretch Stitching 15 Stitch Width Dial 16 Reverse Sewing Lever 17 THREADING THE MACHINE 18 Winding the Bobbin 18 Lower Threading 19 Upper (Needle) Threading...
... Needle 7 Changing the Presser Foot 8 Converting to Free-Arm Style 9 Steadying the Machine 9 VARIOUS CONTROLS 10 Pattern Selection Dial 10 RECOMMENDED WIDTHS AND LENGTHS FOR STITCHES 11 Stitch Length Dial 14 Stretch Stitching 15 Stitch Width Dial 16 Reverse Sewing Lever 17 THREADING THE MACHINE 18 Winding the Bobbin 18 Lower Threading 19 Upper (Needle) Threading...

Users Manual - English
Page 9
... Push for operation. G Presser foot lever Raises and lowers the presser foot. CONTENTS KNOWING YOUR SEWING MACHINE STRAIGHT AND ZIGZAG STITCHING BUILT-IN STITCHES PRINCIPAL PARTS 34 62 1 1 Bobbin winding assembly Winds the thread onto the bobbin to control sewing speed start and stop. A Buttonhole fine-adjustment screw B Buttonhole lever (1 Step automatic buttonhole) C Handle D Balance...
... Push for operation. G Presser foot lever Raises and lowers the presser foot. CONTENTS KNOWING YOUR SEWING MACHINE STRAIGHT AND ZIGZAG STITCHING BUILT-IN STITCHES PRINCIPAL PARTS 34 62 1 1 Bobbin winding assembly Winds the thread onto the bobbin to control sewing speed start and stop. A Buttonhole fine-adjustment screw B Buttonhole lever (1 Step automatic buttonhole) C Handle D Balance...

Users Manual - English
Page 13
...243;n, se encuentra situado entre el pedal y el enchufe destinado a la alimentación de corriente. 2. ATENCIÓN: 1. ing machine is recommended that the power supply plug be disconnected from the wall socket to install the proper outlet. If it is not in... KNOWING YOUR SEWING MACHINE STRAIGHT AND ZIGZAG STITCHING BUILT-IN STITCHES OPERATING YOUR SEWING MACHINE Connecting Plugs 1. Connect the power supply plug into the machine. 2. only This appliance has a polarized plug (one way. When changing the needle, bobbin or light bulb or when the sew- PRÉ...
...243;n, se encuentra situado entre el pedal y el enchufe destinado a la alimentación de corriente. 2. ATENCIÓN: 1. ing machine is recommended that the power supply plug be disconnected from the wall socket to install the proper outlet. If it is not in... KNOWING YOUR SEWING MACHINE STRAIGHT AND ZIGZAG STITCHING BUILT-IN STITCHES OPERATING YOUR SEWING MACHINE Connecting Plugs 1. Connect the power supply plug into the machine. 2. only This appliance has a polarized plug (one way. When changing the needle, bobbin or light bulb or when the sew- PRÉ...

Users Manual - English
Page 33
... thread will come up again to their highest positions. 2. Pull out about 15 cm (6") of the machine straight behind the presser foot. Con la mano derecha, gire la ruedecilla hacia usted (en el sentido ... highest position. 3. Pull the upper thread toward you (counterclockwise) until the needle moves down and back up from the bobbin in a loop. Avec la main gauche, tenir l'extrémité du fil supérieur. Levante el... une boucle de plus en plus large. 4. CONTENTS KNOWING YOUR SEWING MACHINE STRAIGHT AND ZIGZAG STITCHING BUILT-IN STITCHES 1 2 Drawing Up Lower Thread 1.
... thread will come up again to their highest positions. 2. Pull out about 15 cm (6") of the machine straight behind the presser foot. Con la mano derecha, gire la ruedecilla hacia usted (en el sentido ... highest position. 3. Pull the upper thread toward you (counterclockwise) until the needle moves down and back up from the bobbin in a loop. Avec la main gauche, tenir l'extrémité du fil supérieur. Levante el... une boucle de plus en plus large. 4. CONTENTS KNOWING YOUR SEWING MACHINE STRAIGHT AND ZIGZAG STITCHING BUILT-IN STITCHES 1 2 Drawing Up Lower Thread 1.

Users Manual - English
Page 35
CONTENTS KNOWING YOUR SEWING MACHINE STRAIGHT AND ZIGZAG STITCHING BUILT-IN STITCHES A 2 1 2 1 B 2 1 2 1 A-1 654 B-1 654 C 2 1 2 1 Thread Tension Thread tension will weaken your seams or cause puckers in your fabric. 1 Reverse 2 Surface BUTTONHOLE AND BUTTON SEWING USING ATTACHMENTS AND APPLICATIONS MAINTENANCE INDEX...Decrease the thread tension by turning the screw with the upper tension control dial. C-1 Bobbin Increase the tension in a clockwise direction. For most sewing applications, no adjustment is "5". The basic thread tension setting is needed. It may ...
CONTENTS KNOWING YOUR SEWING MACHINE STRAIGHT AND ZIGZAG STITCHING BUILT-IN STITCHES A 2 1 2 1 B 2 1 2 1 A-1 654 B-1 654 C 2 1 2 1 Thread Tension Thread tension will weaken your seams or cause puckers in your fabric. 1 Reverse 2 Surface BUTTONHOLE AND BUTTON SEWING USING ATTACHMENTS AND APPLICATIONS MAINTENANCE INDEX...Decrease the thread tension by turning the screw with the upper tension control dial. C-1 Bobbin Increase the tension in a clockwise direction. For most sewing applications, no adjustment is "5". The basic thread tension setting is needed. It may ...

Users Manual - English
Page 37
... (spool) and lower (bobbin) threads. Utilice el mismo tamaño de hilo para los hilos superior (carrete) e inferior (canilla). 29 INDEX CONTENTS KNOWING YOUR SEWING MACHINE STRAIGHT AND ZIGZAG STITCHING BUILT-IN STITCHES CHART OF SEWING FABRICS, NEEDLES AND THREAD... COMBINATIONS VERY THIN LIGHTWEIGHT MEDIUM WEIGHT HEAVYWEIGHT SEWING FABRICS Fine tricot, Fine lace, Thin linen, Silk, Organza, ...
... (spool) and lower (bobbin) threads. Utilice el mismo tamaño de hilo para los hilos superior (carrete) e inferior (canilla). 29 INDEX CONTENTS KNOWING YOUR SEWING MACHINE STRAIGHT AND ZIGZAG STITCHING BUILT-IN STITCHES CHART OF SEWING FABRICS, NEEDLES AND THREAD... COMBINATIONS VERY THIN LIGHTWEIGHT MEDIUM WEIGHT HEAVYWEIGHT SEWING FABRICS Fine tricot, Fine lace, Thin linen, Silk, Organza, ...
Users Manual - English
Page 43
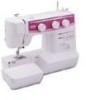
...inférieur (canette) doivent être de la même couleur que le tissu. 2. Both the upper (spool) and lower (bobbin) threads should be the same color as in fig. Then, fold the edge of pants, so that the stitch does not show. A) ...le de point sur "ourlet invisible de lingerie" ou sur "point élastique invisible" et régler la longueur du point. 4. CONTENTS KNOWING YOUR SEWING MACHINE STRAIGHT AND ZIGZAG STITCHING BUILT-IN STITCHES A B C D Blindhem Stitching Pattern (Blindhem Stitch) (Stretch Blindhem Stitch) Stitch Length -2 -1.5 Stitch Width Fixed 5...
...inférieur (canette) doivent être de la même couleur que le tissu. 2. Both the upper (spool) and lower (bobbin) threads should be the same color as in fig. Then, fold the edge of pants, so that the stitch does not show. A) ...le de point sur "ourlet invisible de lingerie" ou sur "point élastique invisible" et régler la longueur du point. 4. CONTENTS KNOWING YOUR SEWING MACHINE STRAIGHT AND ZIGZAG STITCHING BUILT-IN STITCHES A B C D Blindhem Stitching Pattern (Blindhem Stitch) (Stretch Blindhem Stitch) Stitch Length -2 -1.5 Stitch Width Fixed 5...

Users Manual - English
Page 68
Lower thread is not threaded properly in this instruction manual that details the operation you are correctly using the machine. w Page 29 No w w Page 19 No w Bobbin is tangled. w Page 7 No w Inferior needle is incorrect. Thread tension is used . w Page 7 No... Needle is too tight. w Page 27 No w Lower threading is tangled. CONTENTS KNOWING YOUR SEWING MACHINE STRAIGHT AND ZIGZAG STITCHING BUILT-IN STITCHES Performance Checklist Whenever sewing difficulties are encountered, review the section in the shuttle hook. w Page 20 No w Upper ...
Lower thread is not threaded properly in this instruction manual that details the operation you are correctly using the machine. w Page 29 No w w Page 19 No w Bobbin is tangled. w Page 7 No w Inferior needle is incorrect. Thread tension is used . w Page 7 No... Needle is too tight. w Page 27 No w Lower threading is tangled. CONTENTS KNOWING YOUR SEWING MACHINE STRAIGHT AND ZIGZAG STITCHING BUILT-IN STITCHES Performance Checklist Whenever sewing difficulties are encountered, review the section in the shuttle hook. w Page 20 No w Upper ...
Users Manual - English
Page 69
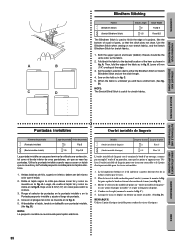
CONTENTS KNOWING YOUR SEWING MACHINE STRAIGHT AND ZIGZAG STITCHING BUILT-IN STITCHES FABRIC DOES NOT FEED PROPERLY NEEDLE BREAKS MACHINE IS NOISY OR SLOW MACHINE DOES NOT START Stitch length dial is used. w Page 7 No w The combination of needle size/ thread size/fabric is incorrect. w Page 14... inserted. Let the feed dogs move the fabric. Needle is turned off. w Page 6 No w Foot controller is slid toward the bobbin presser. w Page 6 No w The bobbin winding shaft is not used . No w Page 59 No w Insufficient oiling. Lint is incorrect.
CONTENTS KNOWING YOUR SEWING MACHINE STRAIGHT AND ZIGZAG STITCHING BUILT-IN STITCHES FABRIC DOES NOT FEED PROPERLY NEEDLE BREAKS MACHINE IS NOISY OR SLOW MACHINE DOES NOT START Stitch length dial is used. w Page 7 No w The combination of needle size/ thread size/fabric is incorrect. w Page 14... inserted. Let the feed dogs move the fabric. Needle is turned off. w Page 6 No w Foot controller is slid toward the bobbin presser. w Page 6 No w The bobbin winding shaft is not used . No w Page 59 No w Insufficient oiling. Lint is incorrect.

Users Manual - English
Page 75
... KNOWING YOUR SEWING MACHINE STRAIGHT AND ZIGZAG STITCHING BUILT-IN STITCHES Page A Accessories 3 Appliques 54 B Blindhem Stitching 35 Bobbin Threading 19, 24 Winding 18 Bridging Stitch 11 Buttonhole Sewing 42, 44 Buttonhole Fine Adjustment 47 Button Sewing 49 C Chart of Sewing Fabrics, Needles... Elastic Overlock 39 Embroidering 55 F Feed Dog Cleaning 59 Lever 17 Finishing a Seam 32-33 Foot Controller Connecting 5 Operating 6 Free-Arm Sewing 9 G Gathering 51 L Legs Stitch 11 Light Bulb Replacement 57 Lower Threading 19 M Main Power Switch 6 Monogramming 55 N ...
... KNOWING YOUR SEWING MACHINE STRAIGHT AND ZIGZAG STITCHING BUILT-IN STITCHES Page A Accessories 3 Appliques 54 B Blindhem Stitching 35 Bobbin Threading 19, 24 Winding 18 Bridging Stitch 11 Buttonhole Sewing 42, 44 Buttonhole Fine Adjustment 47 Button Sewing 49 C Chart of Sewing Fabrics, Needles... Elastic Overlock 39 Embroidering 55 F Feed Dog Cleaning 59 Lever 17 Finishing a Seam 32-33 Foot Controller Connecting 5 Operating 6 Free-Arm Sewing 9 G Gathering 51 L Legs Stitch 11 Light Bulb Replacement 57 Lower Threading 19 M Main Power Switch 6 Monogramming 55 N ...


