Users Manual - English
Page 2
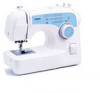
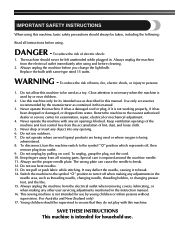
... the needle, causing it off , then remove plug from outlet. 9. Young children should be taken, including the following: Read all moving parts. SAVE THESE INSTRUCTIONS This machine is not working properly, if it has been dropped or damaged, or dropped into any adjustments in the needle...of lint, dust, and loose cloth. 5. IMPORTANT SAFETY INSTRUCTIONS When using this manual. 3. Do not unplug by or near children. 2. DANGER - Replace the bulb with this machine if it has a damaged cord or plug, if it is intended for examination, repair, electrical or mechanical adjustment. 4. Do...
... the needle, causing it off , then remove plug from outlet. 9. Young children should be taken, including the following: Read all moving parts. SAVE THESE INSTRUCTIONS This machine is not working properly, if it has been dropped or damaged, or dropped into any adjustments in the needle...of lint, dust, and loose cloth. 5. IMPORTANT SAFETY INSTRUCTIONS When using this manual. 3. Do not unplug by or near children. 2. DANGER - Replace the bulb with this machine if it has a damaged cord or plug, if it is intended for examination, repair, electrical or mechanical adjustment. 4. Do...
Users Manual - English
Page 4
... use or store the machine near a heater, iron, halogen lamp or other moving parts. 2. Plug the machine directly into the wall. Do not store this manual before you replace or fit presser feet, the needle, or any other parts to make sure you have to unpack and repack the machine. Do not drop... to clean the case. UNPACKING/REPACKING INSTRUCTIONS Keep the carton and packing materials. For additional product information and updates, visit our web site at www.brother.com. If the problem is still there, consult your machine a longer life 1.
... use or store the machine near a heater, iron, halogen lamp or other moving parts. 2. Plug the machine directly into the wall. Do not store this manual before you replace or fit presser feet, the needle, or any other parts to make sure you have to unpack and repack the machine. Do not drop... to clean the case. UNPACKING/REPACKING INSTRUCTIONS Keep the carton and packing materials. For additional product information and updates, visit our web site at www.brother.com. If the problem is still there, consult your machine a longer life 1.
Users Manual - English
Page 5
... Making a Buttonhole ...34 Adjusting Buttonholes ...35 Sewing Buttons ...36 3 KNOWING YOUR SEWING MACHINE 5 THE MAIN PARTS ...5 ACCESSORIES ...6 Optional Accessories ...6 USING YOUR SEWING MACHINE 7 Connecting Plugs ...7 Main Power and Sewing Light Switch ...8 Foot Controller ...8 Checking the Needle ...8 Replacing the Needle ...8 Changing the Presser Foot ...9 Flat Bed Attachment ...10 Using a Free-arm Style ...10...
... Making a Buttonhole ...34 Adjusting Buttonholes ...35 Sewing Buttons ...36 3 KNOWING YOUR SEWING MACHINE 5 THE MAIN PARTS ...5 ACCESSORIES ...6 Optional Accessories ...6 USING YOUR SEWING MACHINE 7 Connecting Plugs ...7 Main Power and Sewing Light Switch ...8 Foot Controller ...8 Checking the Needle ...8 Replacing the Needle ...8 Changing the Presser Foot ...9 Flat Bed Attachment ...10 Using a Free-arm Style ...10...
Users Manual - English
Page 21
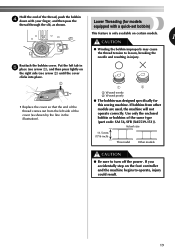
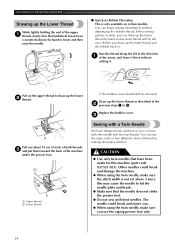
... could result. 19 If bobbins from the left side of the cover (as shown. Use only the enclosed bobbin or bobbins of the same type (part code: SA156, SFB (XA5539-151)). Reattach the bobbin cover. Lower Threading (for models equipped with your finger, and then pass the thread through the slit.... Put the left tab in 5 place (see arrow 1), and then press lightly on the right side (see arrow 2) until the cover clicks into place. 2 1 • Replace the cover so that the end of the thread comes out from other models are used, the machine will not operate correctly. If you accidentally...
... could result. 19 If bobbins from the left side of the cover (as shown. Use only the enclosed bobbin or bobbins of the same type (part code: SA156, SFB (XA5539-151)). Reattach the bobbin cover. Lower Threading (for models equipped with your finger, and then pass the thread through the slit.... Put the left tab in 5 place (see arrow 1), and then press lightly on the right side (see arrow 2) until the cover clicks into place. 2 1 • Replace the cover so that the end of the thread comes out from other models are used, the machine will not operate correctly. If you accidentally...
Users Manual - English
Page 26
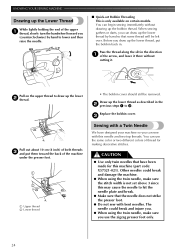
Pull on certain models. Replace the bobbin cover. 3 Sewing with a Twin Needle We have been made for making decorative stitches. Other needles could break and injure you. ● When using ... the bobbin thread. CAUTION ● Use only twin needles that the needle does not strike the presser foot. ● Do not sew with this machine (part code: X57521-021).
Pull on certain models. Replace the bobbin cover. 3 Sewing with a Twin Needle We have been made for making decorative stitches. Other needles could break and injure you. ● When using ... the bobbin thread. CAUTION ● Use only twin needles that the needle does not strike the presser foot. ● Do not sew with this machine (part code: X57521-021).

Users Manual - English
Page 51
... 38 H Handwheel 21 L Light bulb changing 44 Light switch 8 Lower threading 18 , quick-set bobbin 19 24 M Main parts 5 Main power 8 Maintenance 44 Monogramming 39 N Needle checking 8 combinations with fabric and thread 26 replacing 8 Needle threader 22 O Overedge stitching 31 P Patchworking 31 Pattern selection dial 11 Patterns 12 Presser foot changing 9 Q Quick...
... 38 H Handwheel 21 L Light bulb changing 44 Light switch 8 Lower threading 18 , quick-set bobbin 19 24 M Main parts 5 Main power 8 Maintenance 44 Monogramming 39 N Needle checking 8 combinations with fabric and thread 26 replacing 8 Needle threader 22 O Overedge stitching 31 P Patchworking 31 Pattern selection dial 11 Patterns 12 Presser foot changing 9 Q Quick...
Owner's Manual (Español) - Spanish
Page 2
...is not intended for its intended use the proper needle plate. The machine should always be taken, including the following: Read all moving parts. Always unplug the machine from the electrical outlet immediately after using . Always unplug the machine before cleaning. 2. Close attention is necessary when... any opening. 6. The wrong plate can cause the needle to the symbol "{" position which represents off when making any air openings blocked. Replace the bulb with this machine only for use bent needles. 13. To reduce the risk of burns, fire, electric shock, or injury to...
...is not intended for its intended use the proper needle plate. The machine should always be taken, including the following: Read all moving parts. Always unplug the machine from the electrical outlet immediately after using . Always unplug the machine before cleaning. 2. Close attention is necessary when... any opening. 6. The wrong plate can cause the needle to the symbol "{" position which represents off when making any air openings blocked. Replace the bulb with this machine only for use bent needles. 13. To reduce the risk of burns, fire, electric shock, or injury to...
Owner's Manual (Español) - Spanish
Page 4
...to be repaired. For additional product information and updates, visit our web site at www.brother.com. You may have stopped using the machine • If you are replacing or removing the needle or any other part • If there is still there, consult your machine a longer life 1. Make ... the diagram below to be repaired. The contents of this manual and specifications of this packing material if you replace or fit presser feet, the needle, or any other parts to clean the case. To use extension cords. Always consult this manual before you need to take -up ...
...to be repaired. For additional product information and updates, visit our web site at www.brother.com. You may have stopped using the machine • If you are replacing or removing the needle or any other part • If there is still there, consult your machine a longer life 1. Make ... the diagram below to be repaired. The contents of this manual and specifications of this packing material if you replace or fit presser feet, the needle, or any other parts to clean the case. To use extension cords. Always consult this manual before you need to take -up ...
Owner's Manual (Español) - Spanish
Page 5
... ...32 Triple Zigzag Stretch Stitching ...32 Decorative Stitching ...33 4. KNOWING YOUR SEWING MACHINE 5 THE MAIN PARTS ...5 ACCESSORIES ...6 Optional Accessories ...6 USING YOUR SEWING MACHINE 7 Connecting Plugs ...7 Main Power and Sewing Light Switch ...8 Foot Controller ...8 Checking the Needle ...8 Replacing the Needle ...8 Changing the Presser Foot ...9 Flat Bed Attachment ...10 Using a Free-arm Style ...10...
... ...32 Triple Zigzag Stretch Stitching ...32 Decorative Stitching ...33 4. KNOWING YOUR SEWING MACHINE 5 THE MAIN PARTS ...5 ACCESSORIES ...6 Optional Accessories ...6 USING YOUR SEWING MACHINE 7 Connecting Plugs ...7 Main Power and Sewing Light Switch ...8 Foot Controller ...8 Checking the Needle ...8 Replacing the Needle ...8 Changing the Presser Foot ...9 Flat Bed Attachment ...10 Using a Free-arm Style ...10...

Owner's Manual (Español) - Spanish
Page 21
...) This model Other models CAUTION ● Be sure to operate, injury could result. 19 Use only the enclosed bobbin or bobbins of the same type (part code: SA156, SFB (XA5539-151)). If bobbins from the left tab in 5 place (see arrow 1), and then press lightly on the right side (see arrow... 2) until the cover clicks into place. 2 1 • Replace the cover so that the end of the thread comes out from other models are used, the machine will not operate correctly. Hold the end...
...) This model Other models CAUTION ● Be sure to operate, injury could result. 19 Use only the enclosed bobbin or bobbins of the same type (part code: SA156, SFB (XA5539-151)). If bobbins from the left tab in 5 place (see arrow 1), and then press lightly on the right side (see arrow... 2) until the cover clicks into place. 2 1 • Replace the cover so that the end of the thread comes out from other models are used, the machine will not operate correctly. Hold the end...
Owner's Manual (Español) - Spanish
Page 26
... the thread along the slit in the direction 1 of the upper 1 thread, slowly turn the handwheel toward the back of thread for this machine (part code: X57521-021). Replace the bobbin cover. 3 Sewing with a Twin Needle We have been made for making decorative stitches. You can draw up the lower thread by...
... the thread along the slit in the direction 1 of the upper 1 thread, slowly turn the handwheel toward the back of thread for this machine (part code: X57521-021). Replace the bobbin cover. 3 Sewing with a Twin Needle We have been made for making decorative stitches. You can draw up the lower thread by...
Owner's Manual (Español) - Spanish
Page 51
... 38 H Handwheel 21 L Light bulb changing 44 Light switch 8 Lower threading 18 , quick-set bobbin 19 24 M Main parts 5 Main power 8 Maintenance 44 Monogramming 39 N Needle checking 8 combinations with fabric and thread 26 replacing 8 Needle threader 22 O Overedge stitching 31 P Patchworking 31 Pattern selection dial 11 Patterns 12 Presser foot changing 9 Q Quick...
... 38 H Handwheel 21 L Light bulb changing 44 Light switch 8 Lower threading 18 , quick-set bobbin 19 24 M Main parts 5 Main power 8 Maintenance 44 Monogramming 39 N Needle checking 8 combinations with fabric and thread 26 replacing 8 Needle threader 22 O Overedge stitching 31 P Patchworking 31 Pattern selection dial 11 Patterns 12 Presser foot changing 9 Q Quick...

