
Users Manual - English
Page 2
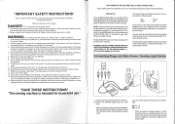
... "O" position which is marked with bared flexible cords is hazardous if engaged in a live socket outlet. The wrong plate can cause the needle to the nearest authorized dealer or service center for examination, repair, electrical or mechanical adjustment. 4. It may not correspond with the coloured ... fitted with this equipment, it should be cut off the switch for household use a fuse approved by the manufacturer as threading the needle, changing the needle, threading the bobbin, or changing the presser foot. 15. If your plug, proceed as follows: The wire which is coloured blue...
... "O" position which is marked with bared flexible cords is hazardous if engaged in a live socket outlet. The wrong plate can cause the needle to the nearest authorized dealer or service center for examination, repair, electrical or mechanical adjustment. 4. It may not correspond with the coloured ... fitted with this equipment, it should be cut off the switch for household use a fuse approved by the manufacturer as threading the needle, changing the needle, threading the bobbin, or changing the presser foot. 15. If your plug, proceed as follows: The wire which is coloured blue...
Users Manual - English
Page 6
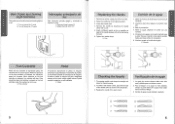
...Baje elprensatelas. 4. When the pressure on (toward the "I ") Apagar (hacia la marca "0") (5) O „-J Replacing the Needle 1. O X Remove the needle by loosening the needle clamp with its highest position: 3. Lower the presser foot. 4. Retire la aguja, aflojando el tornillo con una moneda. 5. ...su posicion mas alta. 3. Hay que meterla lo mas adentro posible hasta que toque arriba con elpasador. 6. To check if the needle is depressed lightly, the machine will increase. Alaumentarla presion, se incrementa tambien la velocidad de la maquina. Vuelva a apretar el ...
...Baje elprensatelas. 4. When the pressure on (toward the "I ") Apagar (hacia la marca "0") (5) O „-J Replacing the Needle 1. O X Remove the needle by loosening the needle clamp with its highest position: 3. Lower the presser foot. 4. Retire la aguja, aflojando el tornillo con una moneda. 5. ...su posicion mas alta. 3. Hay que meterla lo mas adentro posible hasta que toque arriba con elpasador. 6. To check if the needle is depressed lightly, the machine will increase. Alaumentarla presion, se incrementa tambien la velocidad de la maquina. Vuelva a apretar el ...
Users Manual - English
Page 10
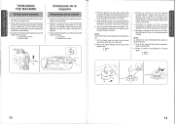
... pare la maquina. 6. Vuelva a colocar el conmutador en la marca aguja. ® Muelle ® Ranura 4 3 13 14 Change the Clutch Release Switch from the needle mark to wind the thread around the bobbin a few times. Place a spool of thread onto the horizontal spool pin and firmly hold it with a spool... firmemente con un tope para que no de vueltas. Place the bobbin onto the bobbin winder shaft and slide the bobbin winder shaft to the needle mark. ® Spring ® Slit 4. NOTA: La maquina se para automaticamente cuando la canilla esta Ilena. 7. Corte el hilo, empuje el eje hacia ...
... pare la maquina. 6. Vuelva a colocar el conmutador en la marca aguja. ® Muelle ® Ranura 4 3 13 14 Change the Clutch Release Switch from the needle mark to wind the thread around the bobbin a few times. Place a spool of thread onto the horizontal spool pin and firmly hold it with a spool... firmemente con un tope para que no de vueltas. Place the bobbin onto the bobbin winder shaft and slide the bobbin winder shaft to the needle mark. ® Spring ® Slit 4. NOTA: La maquina se para automaticamente cuando la canilla esta Ilena. 7. Corte el hilo, empuje el eje hacia ...
Users Manual - English
Page 12
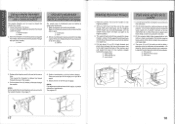
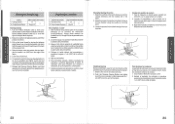
... C) 1 C, 3 C, 17 18 Lowerthe threader slightly and position the thread under the hook which passes through the needle. See page 21. 3. With your right hand, turn the balance wheel toward you (counterclockwise) until the needle moves down and back up from the bobbin in a loop. Bajar la palanca de la pata prensatelas.... With your left hand, hold the end of the needle. 0) Hook Uso del enhebrador (Cuando la maquina esta provista de un enhebrador de aguja) Se puede usar el enhebrador para en hebrar ...
... C) 1 C, 3 C, 17 18 Lowerthe threader slightly and position the thread under the hook which passes through the needle. See page 21. 3. With your right hand, turn the balance wheel toward you (counterclockwise) until the needle moves down and back up from the bobbin in a loop. Bajar la palanca de la pata prensatelas.... With your left hand, hold the end of the needle. 0) Hook Uso del enhebrador (Cuando la maquina esta provista de un enhebrador de aguja) Se puede usar el enhebrador para en hebrar ...
Users Manual - English
Page 14
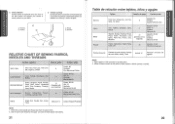
Select the correct needle and thread size from the above chart. 2. Use the same size thread for the upper and lower threads (spool and bobbin). 21 rellacilon erf-dre '... o demasiado fuerte va a debilitar sus costuras o fruncir el tejido. 111 A O O ci) rn mz (4) Reverse (5) Surface C 4 O O (4) Reyes (5) Derecho 5 p airmyrr o pnbuvvyi a FA :=1NFL 1,S AND) Tun SEWING FABRICS NEEDLE SIZES THREAD SIZES VERY THIN Fine Tricot, Fine Lace, Thin Linen, Silk, Organza, Chiffon LIGHTWEIGHT Voile, Taffeta, Synthetics, Silk, Batiste MEDIUM WEIGHT Cotton, Gingham, Poplin...
Select the correct needle and thread size from the above chart. 2. Use the same size thread for the upper and lower threads (spool and bobbin). 21 rellacilon erf-dre '... o demasiado fuerte va a debilitar sus costuras o fruncir el tejido. 111 A O O ci) rn mz (4) Reverse (5) Surface C 4 O O (4) Reyes (5) Derecho 5 p airmyrr o pnbuvvyi a FA :=1NFL 1,S AND) Tun SEWING FABRICS NEEDLE SIZES THREAD SIZES VERY THIN Fine Tricot, Fine Lace, Thin Linen, Silk, Organza, Chiffon LIGHTWEIGHT Voile, Taffeta, Synthetics, Silk, Batiste MEDIUM WEIGHT Cotton, Gingham, Poplin...
Users Manual - English
Page 15
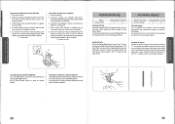
...15 (Triple Stretch Stitch) Stitch Length Stitch Width 1-4 5 Fixed 2.5 Starting Sewing 1. Turn the Pattern Selection Dial to its new direction using the needle as possible and lightly touch the foot controller. Set the Pattern Selection Dial to stitch backwards for 1 cm (3/8") from the edge of Straight Stitch .... 7. Raise the presser foot and turn the fabric to line up the lower thread by applying pressure to change directions with the needle still in the new direction. Lower the presser foot and start sewing in the forward direction by turning the balance wheel toward you...
...15 (Triple Stretch Stitch) Stitch Length Stitch Width 1-4 5 Fixed 2.5 Starting Sewing 1. Turn the Pattern Selection Dial to its new direction using the needle as possible and lightly touch the foot controller. Set the Pattern Selection Dial to stitch backwards for 1 cm (3/8") from the edge of Straight Stitch .... 7. Raise the presser foot and turn the fabric to line up the lower thread by applying pressure to change directions with the needle still in the new direction. Lower the presser foot and start sewing in the forward direction by turning the balance wheel toward you...
Users Manual - English
Page 16
... presser foot toward the back of the presser foot bar. 5. The Satin Stitch can be used for top stitching and sewing lightweight fabrics. Raise the needle to the left side. 4. Luego, seleccione ellargo y el ancho de la puntada. Se recomienda coser conpuntada recta alprincipio y al final de unas puntadas zigzag. La...
... presser foot toward the back of the presser foot bar. 5. The Satin Stitch can be used for top stitching and sewing lightweight fabrics. Raise the needle to the left side. 4. Luego, seleccione ellargo y el ancho de la puntada. Se recomienda coser conpuntada recta alprincipio y al final de unas puntadas zigzag. La...
Users Manual - English
Page 31
...Lengths Pattern Selection Dial Pattern Widths Performance Checklist Principal Parts Page 9, 11 8 9 48 1 R Relative Chart of Sewing Fabrics, Needles and Threads 21 Repacking 53 Reverse Sewing Button 12 S Scallop Stitch 31 Sewing Light Switch 5 Light Bulb Replacement 45 Shell Tuck ...Dial 11 Straight Stitch 23 Stretch Blind Stitch 27 *ti 0 rcn) x T Thread Tension Triple Stretch Stitch Triple Zigzag Stretch Stitch Troubleshooting Twin Needle Sewing U Upper Tension Control Dial Upper Threading 20 23 34 49, 51 19 20 16 W Winding the Bobbin 13 Z Zigzag Stitch 26 Zipper...
...Lengths Pattern Selection Dial Pattern Widths Performance Checklist Principal Parts Page 9, 11 8 9 48 1 R Relative Chart of Sewing Fabrics, Needles and Threads 21 Repacking 53 Reverse Sewing Button 12 S Scallop Stitch 31 Sewing Light Switch 5 Light Bulb Replacement 45 Shell Tuck ...Dial 11 Straight Stitch 23 Stretch Blind Stitch 27 *ti 0 rcn) x T Thread Tension Triple Stretch Stitch Triple Zigzag Stretch Stitch Troubleshooting Twin Needle Sewing U Upper Tension Control Dial Upper Threading 20 23 34 49, 51 19 20 16 W Winding the Bobbin 13 Z Zigzag Stitch 26 Zipper...


