
Users Manual - English
Page 2
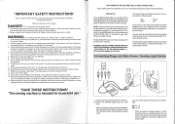
...connected to persons: 1. The wire which is coloured brown must be disconnected from the supply by the manufacturer as threading the needle, changing the needle, threading the bobbin, or changing the presser foot. 15. Never operate the sewing machine with a 3 pin non-rewireable ...to the off or the plug must be left unattended when plugged in the plug. Always unplug before using." Always use a bent needle. 13. "IMPORTANT SAFETY INSTRUCTIONS" When using the sewing machine, basic safety precautions should always be followed, including the following: "Read...
...connected to persons: 1. The wire which is coloured brown must be disconnected from the supply by the manufacturer as threading the needle, changing the needle, threading the bobbin, or changing the presser foot. 15. Never operate the sewing machine with a 3 pin non-rewireable ...to the off or the plug must be left unattended when plugged in the plug. Always unplug before using." Always use a bent needle. 13. "IMPORTANT SAFETY INSTRUCTIONS" When using the sewing machine, basic safety precautions should always be followed, including the following: "Read...
Users Manual - English
Page 6
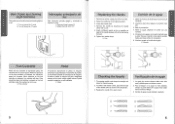
... de la aguja 1. cp Moneda KN • -35.3 Foot Controller When the foot controller is bent, place the flat side of the needle down as possible up against the needle stopper with a coin. 5. Alaumentarla presion, se incrementa tambien la velocidad de la maquina. fl • A JNIM • NCI .N.O . ,WITS , 1 0 1...parte plana de la aguja hacia abajo como muestra el dibujo. 3. Retire la aguja, aflojando el tornillo con una moneda. 5. Replace the needle if it is released, the machine will run at a low speed. La aguja de costura siempre debe estar bien recta y afilada para ...
... de la aguja 1. cp Moneda KN • -35.3 Foot Controller When the foot controller is bent, place the flat side of the needle down as possible up against the needle stopper with a coin. 5. Alaumentarla presion, se incrementa tambien la velocidad de la maquina. fl • A JNIM • NCI .N.O . ,WITS , 1 0 1...parte plana de la aguja hacia abajo como muestra el dibujo. 3. Retire la aguja, aflojando el tornillo con una moneda. 5. Replace the needle if it is released, the machine will run at a low speed. La aguja de costura siempre debe estar bien recta y afilada para ...
Users Manual - English
Page 10
... the horizontal spool pin and firmly hold it with a spool holder so that the spool of the thread, gently depress the foot controller to the needle mark. ® Spring ® Slit 4. Pase elextremo delhiloporelorificio de la canilla a partir del nterior. Turn the bobbin clockwise, by depressing the foot ... thread through the hole on the machine. 3. Cut the thread, push the shaft to the left and remove the full bobbin from the needle mark to the right. Coloque un carrete de hilo en el eje horizontal previsto y mantengalo firmemente con un tope para que no de vueltas...
... the horizontal spool pin and firmly hold it with a spool holder so that the spool of the thread, gently depress the foot controller to the needle mark. ® Spring ® Slit 4. Pase elextremo delhiloporelorificio de la canilla a partir del nterior. Turn the bobbin clockwise, by depressing the foot ... thread through the hole on the machine. 3. Cut the thread, push the shaft to the left and remove the full bobbin from the needle mark to the right. Coloque un carrete de hilo en el eje horizontal previsto y mantengalo firmemente con un tope para que no de vueltas...
Users Manual - English
Page 12
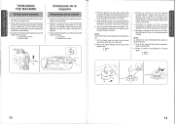
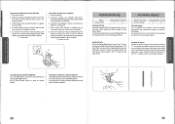
.... . • ONIM•N)I i t • - Sacar unos 5 cm de hilo por la aguja. Raise the presser foot and the needle to thread the needle more easily. 1. Con la mano izquierda, sujete el extremo del hilo superior. El hilo superior debe haber enganchado el hilo inferior y hacer una... y el hilo al mismo tiempo. NOTA: Conalgunas combinaciones dehilo-aguja, nopuede utilizarse el enhebrador. Pull out about 5 cm (2 inches) of the needle. 0) Hook Uso del enhebrador (Cuando la maquina esta provista de un enhebrador de aguja) Se puede usar el enhebrador para en hebrar la aguja mas...
.... . • ONIM•N)I i t • - Sacar unos 5 cm de hilo por la aguja. Raise the presser foot and the needle to thread the needle more easily. 1. Con la mano izquierda, sujete el extremo del hilo superior. El hilo superior debe haber enganchado el hilo inferior y hacer una... y el hilo al mismo tiempo. NOTA: Conalgunas combinaciones dehilo-aguja, nopuede utilizarse el enhebrador. Pull out about 5 cm (2 inches) of the needle. 0) Hook Uso del enhebrador (Cuando la maquina esta provista de un enhebrador de aguja) Se puede usar el enhebrador para en hebrar la aguja mas...
Users Manual - English
Page 14
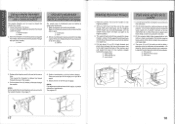
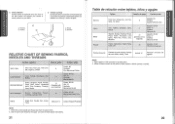
... Hilo Mercerla gruesa. Utilice el mismo tamano de hilo para los hilos superior e inferior (carrete y canilla). 22 Select the correct needle and thread size from the above chart. 2. d. Elija la aguja y el hilo correctos en la tabla arriba. 2. Velo, ... O O ci) rn mz (4) Reverse (5) Surface C 4 O O (4) Reyes (5) Derecho 5 p airmyrr o pnbuvvyi a FA :=1NFL 1,S AND) Tun SEWING FABRICS NEEDLE SIZES THREAD SIZES VERY THIN Fine Tricot, Fine Lace, Thin Linen, Silk, Organza, Chiffon LIGHTWEIGHT Voile, Taffeta, Synthetics, Silk, Batiste MEDIUM WEIGHT Cotton, Gingham, Poplin...
... Hilo Mercerla gruesa. Utilice el mismo tamano de hilo para los hilos superior e inferior (carrete y canilla). 22 Select the correct needle and thread size from the above chart. 2. d. Elija la aguja y el hilo correctos en la tabla arriba. 2. Velo, ... O O ci) rn mz (4) Reverse (5) Surface C 4 O O (4) Reyes (5) Derecho 5 p airmyrr o pnbuvvyi a FA :=1NFL 1,S AND) Tun SEWING FABRICS NEEDLE SIZES THREAD SIZES VERY THIN Fine Tricot, Fine Lace, Thin Linen, Silk, Organza, Chiffon LIGHTWEIGHT Voile, Taffeta, Synthetics, Silk, Batiste MEDIUM WEIGHT Cotton, Gingham, Poplin...
Users Manual - English
Page 15
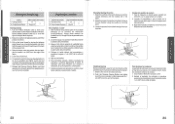
... El retroceso sirve para finalizar una costura o reforzarla, tal como aparece a continuaci6n. 7. Stitch to its new direction using the needle as possible and lightly touch the foot controller. Set the Pattern Selection Dial to the foot controller. Release the Reverse Sewing Button and... adelante, presionando el pedal. Finishing Sewing Reverse stitching is needed . 7. Place the fabric under the presser foot and position the needle 1 cm (3/8") from the end of seams and where reinforcement is used to show your desired stitch on the Pattern Indication Window....
... El retroceso sirve para finalizar una costura o reforzarla, tal como aparece a continuaci6n. 7. Stitch to its new direction using the needle as possible and lightly touch the foot controller. Set the Pattern Selection Dial to the foot controller. Release the Reverse Sewing Button and... adelante, presionando el pedal. Finishing Sewing Reverse stitching is needed . 7. Place the fabric under the presser foot and position the needle 1 cm (3/8") from the end of seams and where reinforcement is used to show your desired stitch on the Pattern Indication Window....
Users Manual - English
Page 16
... RECTAS Y ZIGZAG Removing the Material from the Machine 1. Luego, ponga el largo de puntada en la zona "F" y ajuste el ancho de puntada deseado. Raise the needle to its highest position and make sure that the thread take-up lever is recommended to the left side. 4. Luego, seleccione ellargo y el ancho de...
... RECTAS Y ZIGZAG Removing the Material from the Machine 1. Luego, ponga el largo de puntada en la zona "F" y ajuste el ancho de puntada deseado. Raise the needle to its highest position and make sure that the thread take-up lever is recommended to the left side. 4. Luego, seleccione ellargo y el ancho de...
Users Manual - English
Page 31
...Lengths Pattern Selection Dial Pattern Widths Performance Checklist Principal Parts Page 9, 11 8 9 48 1 R Relative Chart of Sewing Fabrics, Needles and Threads 21 Repacking 53 Reverse Sewing Button 12 S Scallop Stitch 31 Sewing Light Switch 5 Light Bulb Replacement 45 Shell Tuck ...Dial 11 Straight Stitch 23 Stretch Blind Stitch 27 *ti 0 rcn) x T Thread Tension Triple Stretch Stitch Triple Zigzag Stretch Stitch Troubleshooting Twin Needle Sewing U Upper Tension Control Dial Upper Threading 20 23 34 49, 51 19 20 16 W Winding the Bobbin 13 Z Zigzag Stitch 26 Zipper...
...Lengths Pattern Selection Dial Pattern Widths Performance Checklist Principal Parts Page 9, 11 8 9 48 1 R Relative Chart of Sewing Fabrics, Needles and Threads 21 Repacking 53 Reverse Sewing Button 12 S Scallop Stitch 31 Sewing Light Switch 5 Light Bulb Replacement 45 Shell Tuck ...Dial 11 Straight Stitch 23 Stretch Blind Stitch 27 *ti 0 rcn) x T Thread Tension Triple Stretch Stitch Triple Zigzag Stretch Stitch Troubleshooting Twin Needle Sewing U Upper Tension Control Dial Upper Threading 20 23 34 49, 51 19 20 16 W Winding the Bobbin 13 Z Zigzag Stitch 26 Zipper...


