

Users Manual - English
Page 2
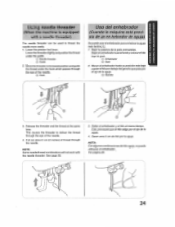
... away from all instructions before using.' Do not use this machine outdoors. 7. The sewing machine should always be left unattended when plugged in the needle area, such as a toy. Do not use a bent needle. 13. To unplug, grasp the plug and pull, not the cord. 10. The wrong plate can cause the... it with any other user service adjustments mentioned in this sewing machine only for its intended use the proper needle plate. When replacing the bulb in models without LCD displays with one rated 15 watts. Never operate this manual. 3. To disconnect, turn the main switch ...
... away from all instructions before using.' Do not use this machine outdoors. 7. The sewing machine should always be left unattended when plugged in the needle area, such as a toy. Do not use a bent needle. 13. To unplug, grasp the plug and pull, not the cord. 10. The wrong plate can cause the... it with any other user service adjustments mentioned in this sewing machine only for its intended use the proper needle plate. When replacing the bulb in models without LCD displays with one rated 15 watts. Never operate this manual. 3. To disconnect, turn the main switch ...

Users Manual - English
Page 4
... CONTENTS KNOWING YOUR SEWING MACHINE Principal parts 1 Accessories 3 OPERATING YOUR SEWING MACHINE 4 Connecting Plugs 4 Main Power and Sewing Light Switches ....5 Foot Controller 5 Replacing the Needle 6 Checking the Needle 6 Changing the Presser Foot 7 Converting to Free-arm Style 7 VARIOUS CONTROLS 8 Pattern Selection Dial 8 Electronic Display (1 Line LCD) 11 Electronic Display (4 Line LCD) 12...
... CONTENTS KNOWING YOUR SEWING MACHINE Principal parts 1 Accessories 3 OPERATING YOUR SEWING MACHINE 4 Connecting Plugs 4 Main Power and Sewing Light Switches ....5 Foot Controller 5 Replacing the Needle 6 Checking the Needle 6 Changing the Presser Foot 7 Converting to Free-arm Style 7 VARIOUS CONTROLS 8 Pattern Selection Dial 8 Electronic Display (1 Line LCD) 11 Electronic Display (4 Line LCD) 12...
Users Manual - English
Page 11
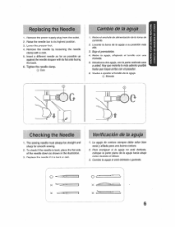
...de corn onto. 2. introduzca otra aguja, con la parte redonda cars a usted. Moneda Checking the Needle 1. The sewing needle must always be straight and sharp for smooth sewing. 2. To check if the needle is bent or dull. Para averiguar si la aguja no ....ry supuly plug Irani the outlet 2. ...La aguja do costura srempre debe ester bien recta y alilada Para una buena costura. 2. Replace the needle if it is bent, place the flat side of the needle down as possible up against the needle stopper with a coin. 5. Verification de la aguja 1. coloque la parte plans de la aguja hacks...
...de corn onto. 2. introduzca otra aguja, con la parte redonda cars a usted. Moneda Checking the Needle 1. The sewing needle must always be straight and sharp for smooth sewing. 2. To check if the needle is bent or dull. Para averiguar si la aguja no ....ry supuly plug Irani the outlet 2. ...La aguja do costura srempre debe ester bien recta y alilada Para una buena costura. 2. Replace the needle if it is bent, place the flat side of the needle down as possible up against the needle stopper with a coin. 5. Verification de la aguja 1. coloque la parte plans de la aguja hacks...

Users Manual - English
Page 14
... 11 12 13 14 15 16 17 18 19 20 21 STITCH NAME PRESET WIDTH [mm(inch)] 1-STEP AUTOMATIC BUTTONHOLE STRAIGHT STITCH (Left needle position) STRAIGHT STITCH (Center needle position) ZIGZAG STITCH ZIGZAG STITCH ZIGZAG STITCH BLIND HEM STITCH SHELL TUCK STITCH ELASTIC STITCH STRETCH BLIND STITCH DOUBLE ACTION STITCH SCALLOP STITCH...
... 11 12 13 14 15 16 17 18 19 20 21 STITCH NAME PRESET WIDTH [mm(inch)] 1-STEP AUTOMATIC BUTTONHOLE STRAIGHT STITCH (Left needle position) STRAIGHT STITCH (Center needle position) ZIGZAG STITCH ZIGZAG STITCH ZIGZAG STITCH BLIND HEM STITCH SHELL TUCK STITCH ELASTIC STITCH STRETCH BLIND STITCH DOUBLE ACTION STITCH SCALLOP STITCH...
Users Manual - English
Page 18
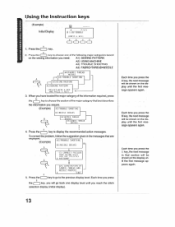
... of the major category that best describes the information you need: Al) SEWING PATTERN A2) USING MACHINE A3) TROUBLE SHOOTING A4) FABRIC•THREAD•NEEDLE r , A4 )I :BUTTONHOLE (PRESS / KLYI 0000 4 1. Each time you press the (-) key, you reach the stitch selection display (initial display). ...Press the key to choose one display level until you will be shown on the sewing information you require. (Example) A3/TROUBLE SHOUTING DI/NEEDLE BREAKS B2HIPPER B MAKS B3)LCWER THREAD BREAKS • 4. Each time you press the A key, the next message will be shown ...
... of the major category that best describes the information you need: Al) SEWING PATTERN A2) USING MACHINE A3) TROUBLE SHOOTING A4) FABRIC•THREAD•NEEDLE r , A4 )I :BUTTONHOLE (PRESS / KLYI 0000 4 1. Each time you press the (-) key, you reach the stitch selection display (initial display). ...Press the key to choose one display level until you will be shown on the sewing information you require. (Example) A3/TROUBLE SHOUTING DI/NEEDLE BREAKS B2HIPPER B MAKS B3)LCWER THREAD BREAKS • 4. Each time you press the A key, the next message will be shown ...

Users Manual - English
Page 20
THE REAR A2IUSING MACHINE DC PULL NU UP NW toem THREAT, Al)TIOXIBLE strourna. BE/CHANGING NEEDLE ANTEOUBLE SHOOTING 116)FABRIC DOES NUE' FEKI 15 ai)sx I TROUFB4I SHOOTINN libI WWIIC PUCKERS IsUlT01•101.11 MIER WILL. LOWER mar. HOW ... WMIN svmm A2I USINO MACHINE /1.11/Ni LNG MN AT I PPE!) sr rinitzs A4 / FABRIC •IIIREAD• NEIO1LE 041KNIT FARRI C AI PLACE FABRIC. NEEDLE BNHEAVY FABRIC MOWER BUTECINIIDIZ LEVER AND PRESS LIOIrrue ITMARDS I /ATM/ BUTEN:MOLE POOPIA) A21USING MACHINE B2)REPLACING BOHRI N Al) TROUBLE SIER711NG R21UPPER TIIRPAD BREAKS AA1FABII...
THE REAR A2IUSING MACHINE DC PULL NU UP NW toem THREAT, Al)TIOXIBLE strourna. BE/CHANGING NEEDLE ANTEOUBLE SHOOTING 116)FABRIC DOES NUE' FEKI 15 ai)sx I TROUFB4I SHOOTINN libI WWIIC PUCKERS IsUlT01•101.11 MIER WILL. LOWER mar. HOW ... WMIN svmm A2I USINO MACHINE /1.11/Ni LNG MN AT I PPE!) sr rinitzs A4 / FABRIC •IIIREAD• NEIO1LE 041KNIT FARRI C AI PLACE FABRIC. NEEDLE BNHEAVY FABRIC MOWER BUTECINIIDIZ LEVER AND PRESS LIOIrrue ITMARDS I /ATM/ BUTEN:MOLE POOPIA) A21USING MACHINE B2)REPLACING BOHRI N Al) TROUBLE SIER711NG R21UPPER TIIRPAD BREAKS AA1FABII...

Users Manual - English
Page 25
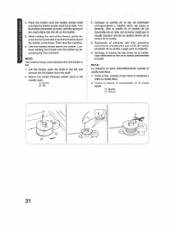
.... 3. THREADING THE MACHINE Winding the bobbin 1 . Combo el contnutador bobtna-aguia de la mama aguja a la marca candla. 2. Change the Clutch Release Switch horn the needle mark to canals LZIJ X Cs) C8 N 1c0c Oagi 0 0z cih o 3 Ci 0 20
.... 3. THREADING THE MACHINE Winding the bobbin 1 . Combo el contnutador bobtna-aguia de la mama aguja a la marca candla. 2. Change the Clutch Release Switch horn the needle mark to canals LZIJ X Cs) C8 N 1c0c Oagi 0 0z cih o 3 Ci 0 20
Users Manual - English
Page 26
... Clutch Release Switch back to wind the thread around the bobbin a few times. Vuelva a colocar of the thread, gently depress the foot controller to the needle mark. ® Spring (0 Slit 4. 4. Trim the excess thread above the bobbin. Gire la canilla en el sentido de las manecillas de un reloj, conla mano...
... Clutch Release Switch back to wind the thread around the bobbin a few times. Vuelva a colocar of the thread, gently depress the foot controller to the needle mark. ® Spring (0 Slit 4. 4. Trim the excess thread above the bobbin. Gire la canilla en el sentido de las manecillas de un reloj, conla mano...
Users Manual - English
Page 28
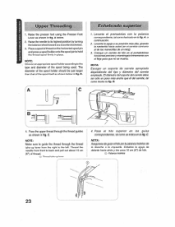
... spoolpintohold the thread spool firmly in fig. A. C. Enhebre la aguja de detente hacia atlas y tire unos 15 cm (r) de hilo. (i) Patents wahilos 23 Thread the needle from the right to back and pull out about 15 cm (6") of thread. (1) Thread take•tep lever 4. C. Raise the... needle to guide the thread through the thread guides as shown below . 2. B. NOTA: Escoger un soporte de carrete apropiado dependiendo del tipo y diametro del carrete empleado. ...
... spoolpintohold the thread spool firmly in fig. A. C. Enhebre la aguja de detente hacia atlas y tire unos 15 cm (r) de hilo. (i) Patents wahilos 23 Thread the needle from the right to back and pull out about 15 cm (6") of thread. (1) Thread take•tep lever 4. C. Raise the... needle to guide the thread through the thread guides as shown below . 2. B. NOTA: Escoger un soporte de carrete apropiado dependiendo del tipo y diametro del carrete empleado. ...
Users Manual - English
Page 29
...28. 3. Softer el enhobrador y elhilo mismo tiempo. Using needle threader (When the machine is equipped with the needle threader. Lower thethreader slightlyandpositionthe thread under the hook which passes through the eye of the needle. 4. Beier la palanca de la pate prensatelas. &jarenenhebradorsuavemento... utirtzarse el enhebrador.. Esto provocarA que el hilo salga por el ojo de la aguja. 4. NOTE: Some needle/thread combinations will not work with a needle threader) The needle threader can be used to ils lowest position and guide the thread under the guide. I I ; 24
...28. 3. Softer el enhobrador y elhilo mismo tiempo. Using needle threader (When the machine is equipped with the needle threader. Lower thethreader slightlyandpositionthe thread under the hook which passes through the eye of the needle. 4. Beier la palanca de la pate prensatelas. &jarenenhebradorsuavemento... utirtzarse el enhebrador.. Esto provocarA que el hilo salga por el ojo de la aguja. 4. NOTE: Some needle/thread combinations will not work with a needle threader) The needle threader can be used to ils lowest position and guide the thread under the guide. I I ; 24

Users Manual - English
Page 30
N o b 0 to "C C O tn • 0 • Z 2.
N o b 0 to "C C O tn • 0 • Z 2.

Users Manual - English
Page 33
...una tensioninsuliciente o demasiado!aerie va a debilitar sus animas o *omit el tejido. Gingham, Poplin, Percale, Pique, Satin. Select the correct needle and thread size from the above chart. 2. Suitings, Linen, Muslin 9 11 14 (Supplied with your fabric. Use the same size thread...and lower threads (spool and bobbin). 28 cr,) Reverse (0 Surface 4 0 Reyes WDerecho 5 RELATIVE CHART OF SEWING FABRICS, NEEDLES AND THREADS SEWING FABRICS NEEDLE SIZES THREAD SIZES VERY THIN LIGHTWEIGHT MEDIUM WEIGHT Fine Tricot, Fine Lace, Thin Linen, Silk, Organza, Chiffon Voile, Taffeta, ...
...una tensioninsuliciente o demasiado!aerie va a debilitar sus animas o *omit el tejido. Gingham, Poplin, Percale, Pique, Satin. Select the correct needle and thread size from the above chart. 2. Suitings, Linen, Muslin 9 11 14 (Supplied with your fabric. Use the same size thread...and lower threads (spool and bobbin). 28 cr,) Reverse (0 Surface 4 0 Reyes WDerecho 5 RELATIVE CHART OF SEWING FABRICS, NEEDLES AND THREADS SEWING FABRICS NEEDLE SIZES THREAD SIZES VERY THIN LIGHTWEIGHT MEDIUM WEIGHT Fine Tricot, Fine Lace, Thin Linen, Silk, Organza, Chiffon Voile, Taffeta, ...

Users Manual - English
Page 35
... a tondo elpulsador de retroceso y presione ligeramente el pedal. Svelte elpulsador de retroceso y vuelva a corer hacia adelante. Raise the needle to show your desired stitch on the Pattern Indication Window. To backtack, push the Reverse Sewing Button in the forward direction by ...la aguja a supastel&mas alta ylevante la palanca delprensatelas. 3. Baje elpronsatelas. 6. Place the fabric under the presser foot and position the needle 1 cm (3/8") from the edge of the presser foot. 4. Gire elselector depuntadas pare vet puntada deseada en la ventana de indication correspondiente....
... a tondo elpulsador de retroceso y presione ligeramente el pedal. Svelte elpulsador de retroceso y vuelva a corer hacia adelante. Raise the needle to show your desired stitch on the Pattern Indication Window. To backtack, push the Reverse Sewing Button in the forward direction by ...la aguja a supastel&mas alta ylevante la palanca delprensatelas. 3. Baje elpronsatelas. 6. Place the fabric under the presser foot and position the needle 1 cm (3/8") from the edge of the presser foot. 4. Gire elselector depuntadas pare vet puntada deseada en la ventana de indication correspondiente....
Users Manual - English
Page 36
... to the end of the fabric. Push the Reverse Sowing Button and lightly touch the foot controller to change directions with the needle still in the fabric. 2. Apriete el pulsador de retroceso y presione suavamcntcclpedalpare calornatio°Erashaste 1cm (3/8, de la mil/a del...1. x Ch Z n N N te) 0 -c N LNG C) C) Finishing Sewing Reverse stitching is needed. 1. Stitch to line up its new direction using the needle as a turning point. 3. Para terminar las costuras La punlada de retroceso seusaPara Irabarloshilos al final de una costura o en cualquier punto donde sea necesario reforzar...
... to the end of the fabric. Push the Reverse Sowing Button and lightly touch the foot controller to change directions with the needle still in the fabric. 2. Apriete el pulsador de retroceso y presione suavamcntcclpedalpare calornatio°Erashaste 1cm (3/8, de la mil/a del...1. x Ch Z n N N te) 0 -c N LNG C) C) Finishing Sewing Reverse stitching is needed. 1. Stitch to line up its new direction using the needle as a turning point. 3. Para terminar las costuras La punlada de retroceso seusaPara Irabarloshilos al final de una costura o en cualquier punto donde sea necesario reforzar...
Users Manual - English
Page 44
.... CO Primer poseur*, de la aguja. Finish by tying knots on the reverse side at the beginning and the end of the seams. CO First needle drop Puntada Fagoting Mimosa do cosor, quite los hilvanos y elpope!. Cosa a to 15. 3. Doble las minas de las dospiezas de tejidopars eldobladillo e hilvanelas a unpapel lino...
.... CO Primer poseur*, de la aguja. Finish by tying knots on the reverse side at the beginning and the end of the seams. CO First needle drop Puntada Fagoting Mimosa do cosor, quite los hilvanos y elpope!. Cosa a to 15. 3. Doble las minas de las dospiezas de tejidopars eldobladillo e hilvanelas a unpapel lino...

Users Manual - English
Page 53
... 0 derecha de la pate de cremalleras. 5. O Pala de trarnalloras (2) Ejederechopato coserlaparteizquiorda de la cremallera • EjoizquicMoparecoserlapanederecha do punladas en 3. Lower the needle into the notch located either the left or right side of the zipper foot. 5. B. 6. Vaasa fig. See fig. Ajuste el largo de puntada entre...6. Lower the presser foot lever and fix either on the left or right pin of the zipper foot onto the shank. 3. The needle should be positioned to the right or left side of the zipper (J) Left pin for sewing the right side of the zipper A ...
... 0 derecha de la pate de cremalleras. 5. O Pala de trarnalloras (2) Ejederechopato coserlaparteizquiorda de la cremallera • EjoizquicMoparecoserlapanederecha do punladas en 3. Lower the needle into the notch located either the left or right side of the zipper foot. 5. B. 6. Vaasa fig. See fig. Ajuste el largo de puntada entre...6. Lower the presser foot lever and fix either on the left or right pin of the zipper foot onto the shank. 3. The needle should be positioned to the right or left side of the zipper (J) Left pin for sewing the right side of the zipper A ...
Users Manual - English
Page 54
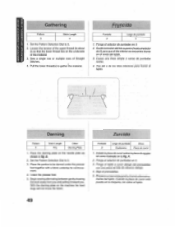
... not move the fabric. Place the portion to gather the material. Baja °Iprensatelas. 5. Sueltela tensiondelhilosuperior(hastealrededor do zurcir 1. With the darning plate on the needle plate as shown in fig. Set the Pattern Selection Dial to 3. 2. Gathering I Pattern Stitch Length 4 1. Ponga el selector do zurcirsobrelaplace deagujas tat como ilustrado en...
... not move the fabric. Place the portion to gather the material. Baja °Iprensatelas. 5. Sueltela tensiondelhilosuperior(hastealrededor do zurcir 1. With the darning plate on the needle plate as shown in fig. Set the Pattern Selection Dial to 3. 2. Gathering I Pattern Stitch Length 4 1. Ponga el selector do zurcirsobrelaplace deagujas tat como ilustrado en...
Users Manual - English
Page 56
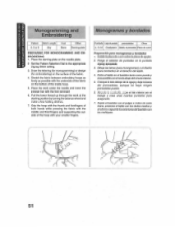
...for monogramming) or design (for embroidering) on the bottom of the fabric. 4. Pull the lower thread up through the work under the needle and lower the presser bar with the foot removed. 6. Ponga el selector de puntadas en la punlada 7i.gmg apropiada 3. Sujete elbastidor con...the work at the startingposition by turning thebalance wheeland make a few holding stitches. 7. Instatelaplace dezurcirsobrelaplacedeagujas. 2. Place the darning plate on the needle plate. 2. Grip the hoop with the thumb and forefingers of both hands while pressing the fabric with the middle and third fingers and ...
...for monogramming) or design (for embroidering) on the bottom of the fabric. 4. Pull the lower thread up through the work under the needle and lower the presser bar with the foot removed. 6. Ponga el selector de puntadas en la punlada 7i.gmg apropiada 3. Sujete elbastidor con...the work at the startingposition by turning thebalance wheeland make a few holding stitches. 7. Instatelaplace dezurcirsobrelaplacedeagujas. 2. Place the darning plate on the needle plate. 2. Grip the hoop with the thumb and forefingers of both hands while pressing the fabric with the middle and third fingers and ...
Users Manual - English
Page 60
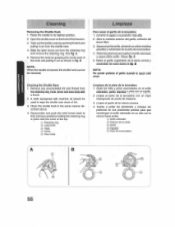
...; scribed above. 4. Clean the shuttle hook in place with a brush. 2. A. 5. Cleaning Removing the Shuttle Hook 1. Open the shuttlecover onthe frontof the freearm. 3. NOTE: When the needle is lowered, the shuttle hook cannot he rnmoved Cleaning the Shuttle Race 1. Slide the latch levers out from the retainingring,hook, driverandrace body with the... el anillo retenedor, garlic), impulsory piste con un cepillo. 2. Limpie el polvo de la lanzadera con un trapo impregnado de aceite de maquina. 3. Raise the needle to aguja esto abajo.
...; scribed above. 4. Clean the shuttle hook in place with a brush. 2. A. 5. Cleaning Removing the Shuttle Hook 1. Open the shuttlecover onthe frontof the freearm. 3. NOTE: When the needle is lowered, the shuttle hook cannot he rnmoved Cleaning the Shuttle Race 1. Slide the latch levers out from the retainingring,hook, driverandrace body with the... el anillo retenedor, garlic), impulsory piste con un cepillo. 2. Limpie el polvo de la lanzadera con un trapo impregnado de aceite de maquina. 3. Raise the needle to aguja esto abajo.
Users Manual - English
Page 62
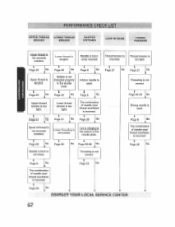
...is too tight. 4 Page 27 Page 22 No Lower thread tension is not correctly installed. Page 28 No Spool of needle size/ thread size/fabric is not correct. Needle is not threaded properly in the shuttle hook. Lower thread is tangled. 4 Page 25 Bobbin is incorrectly inserted. Page ...6 No The combine ion of thread is too tight. Threading is incorrect. Page 20 Page 22 No Page 55-56 No Page 28 Needle is not correctly installed. PERFORMANCE CHECK LIST UPPER THREAD LOWER THREAD BREAKS BREAKS SKIPPED STITCHES LOOP IN SEAM FABRIC PUCKERS r:Harff:I:NKIRM E C ...
...is too tight. 4 Page 27 Page 22 No Lower thread tension is not correctly installed. Page 28 No Spool of needle size/ thread size/fabric is not correct. Needle is not threaded properly in the shuttle hook. Lower thread is tangled. 4 Page 25 Bobbin is incorrectly inserted. Page ...6 No The combine ion of thread is too tight. Threading is incorrect. Page 20 Page 22 No Page 55-56 No Page 28 Needle is not correctly installed. PERFORMANCE CHECK LIST UPPER THREAD LOWER THREAD BREAKS BREAKS SKIPPED STITCHES LOOP IN SEAM FABRIC PUCKERS r:Harff:I:NKIRM E C ...


