
Users Manual - English
Page 10
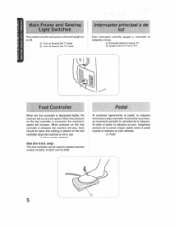
...the machine will run at a low speed. Care should be used for sewing machine models X13025, XL3027 and XL3030. Al softer el pedal, la maquina se para. only): This toot controller can be taken that nothing is not in use. (i) Foot controller: Model N Note (For U.S.A. Asegdrese ...siempre de no poner ningOn objeto sobre elpedal cuando la maquina no este ulilizada. 0 Pedal 5 o Turn on the foot controller when the machine is placed on (toward the 1" mark) (2) Turn off (toward the...
...the machine will run at a low speed. Care should be used for sewing machine models X13025, XL3027 and XL3030. Al softer el pedal, la maquina se para. only): This toot controller can be taken that nothing is not in use. (i) Foot controller: Model N Note (For U.S.A. Asegdrese ...siempre de no poner ningOn objeto sobre elpedal cuando la maquina no este ulilizada. 0 Pedal 5 o Turn on the foot controller when the machine is placed on (toward the 1" mark) (2) Turn off (toward the...
Users Manual - English
Page 16
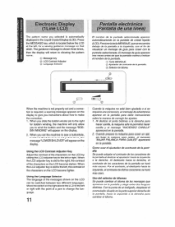
... messages shown on the LCD can be switched between two different languages. Al deslizar el ports bobinas a la derecha pare hater canilla, la maquina sac le {maniere hater canilla y el mensaje "HACiENDO CANILL4' apareceni en la pintails. 2. Como userelajustador de contraste de la pantalla Sepuede ...si se requiemuna correction, unmensaje deadvenencia aparece en la pantalla pare darte instructions sobre la manors de corregir los ajustes. 1. Cuando prepare la maquina pars coser un ojal, sin bajar la potence pare elates. Par el contrail°, at the left or right. Press the MESSAGE key,...
... messages shown on the LCD can be switched between two different languages. Al deslizar el ports bobinas a la derecha pare hater canilla, la maquina sac le {maniere hater canilla y el mensaje "HACiENDO CANILL4' apareceni en la pintails. 2. Como userelajustador de contraste de la pantalla Sepuede ...si se requiemuna correction, unmensaje deadvenencia aparece en la pantalla pare darte instructions sobre la manors de corregir los ajustes. 1. Cuando prepare la maquina pars coser un ojal, sin bajar la potence pare elates. Par el contrail°, at the left or right. Press the MESSAGE key,...
Users Manual - English
Page 22
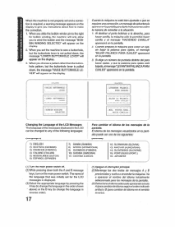
... reverse order). 17 (1)Apague elintemptorprincipal. (2)Mantenga las dos tedas de mensajes A y B presionadasy vuelva a encenderlamaquina. Cuando la maquina no este bien ajustada o que se requiemuna correction, unmensajedeadvertencia apareceenlapantallaparedadeinstructionssabre la manera de remediar a la situation. 1. Al deslizar el... porta bobinas a la derecha, pare hater canilia, la maquina solo le permeate hater candle y el mensaje HACIENDO CANILLA's aparecere en la pantalla. 2. MD. !VIZI% PARA •...
... reverse order). 17 (1)Apague elintemptorprincipal. (2)Mantenga las dos tedas de mensajes A y B presionadasy vuelva a encenderlamaquina. Cuando la maquina no este bien ajustada o que se requiemuna correction, unmensajedeadvertencia apareceenlapantallaparedadeinstructionssabre la manera de remediar a la situation. 1. Al deslizar el... porta bobinas a la derecha, pare hater canilia, la maquina solo le permeate hater candle y el mensaje HACIENDO CANILLA's aparecere en la pantalla. 2. MD. !VIZI% PARA •...

Users Manual - English
Page 25
... el eje horizontal prevista y mantengalo &memento con un tope pars que no de vueltas. Pase elextremodelhilopore!arificio dela canilla a panic do puntos malteds en la maquina. 3. THREADING THE MACHINE Winding the bobbin 1 . Pass theendof thethread through the thread guide as shown following the dolled line on the bobbin from the inside...
... el eje horizontal prevista y mantengalo &memento con un tope pars que no de vueltas. Pase elextremodelhilopore!arificio dela canilla a panic do puntos malteds en la maquina. 3. THREADING THE MACHINE Winding the bobbin 1 . Pass theendof thethread through the thread guide as shown following the dolled line on the bobbin from the inside...
Users Manual - English
Page 26
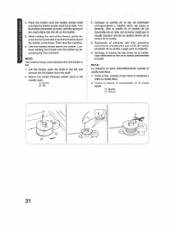
... slides into the slit on the bobbin. 5. Return the Clutch Release Switch back to wind the thread around the bobbin a few times. Luego pare la maquina. 6. Vuelva a colocar of the thread, gently depress the foot controller to the needle mark. ® Spring (0 Slit 4. NOTE: The machine stops... automatically when thebobbinis full. 7. Slga boblnando el hiro en la canilla presionando el pedal. NOTA: La maquina se pare automat/camerae wand° la candle eSte Ilena. 7. Gire la canilla en el sentido de las manecillas de un reloj, conla mano, haste...
... slides into the slit on the bobbin. 5. Return the Clutch Release Switch back to wind the thread around the bobbin a few times. Luego pare la maquina. 6. Vuelva a colocar of the thread, gently depress the foot controller to the needle mark. ® Spring (0 Slit 4. NOTE: The machine stops... automatically when thebobbinis full. 7. Slga boblnando el hiro en la canilla presionando el pedal. NOTA: La maquina se pare automat/camerae wand° la candle eSte Ilena. 7. Gire la canilla en el sentido de las manecillas de un reloj, conla mano, haste...
Users Manual - English
Page 29
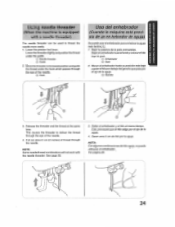
... ycolocarelhilo bate la yuia. Enhebrador (g) Gala 2. Pull out about 5 cm (2 inches) of thread through the eye of the needle. (a) Hook Uso del enhebrador (Cuando la maquina esta provista de un en hebrador de aguja) Sepuedeuser&enhebradorpara enhebrarla aguja mas lacilmente. 1. NOTA: Con algunas combinacionesdehilo-aguja, nopuede utirtzarse el enhebrador.. Vet pagina...
... ycolocarelhilo bate la yuia. Enhebrador (g) Gala 2. Pull out about 5 cm (2 inches) of thread through the eye of the needle. (a) Hook Uso del enhebrador (Cuando la maquina esta provista de un en hebrador de aguja) Sepuedeuser&enhebradorpara enhebrarla aguja mas lacilmente. 1. NOTA: Con algunas combinacionesdehilo-aguja, nopuede utirtzarse el enhebrador.. Vet pagina...
Users Manual - English
Page 36
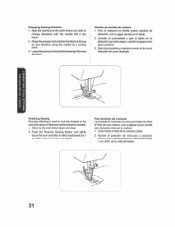
... retroceso y presione suavamcntcclpedalpare calornatio°Erashaste 1cm (3/8, de la mil/a del tejido. 31 Stitch to the end of the fabric. Changing Sewing Direction 1. Pare la maquina en donde quiera cambiar de direction, con la aguja picada en el tejido. 2.
... retroceso y presione suavamcntcclpedalpare calornatio°Erashaste 1cm (3/8, de la mil/a del tejido. 31 Stitch to the end of the fabric. Changing Sewing Direction 1. Pare la maquina en donde quiera cambiar de direction, con la aguja picada en el tejido. 2.
Users Manual - English
Page 58
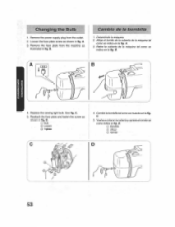
Remove the lace plate from the outlet. 2. C. 5. Alloje el tornillo de la cubierta de la maquina tal como se indica en la fig. Retire la cubierta de la maquina tat como se indica en Pa lig. too l B fl 4. See fig. C. 5. Loosen the lace ...plate screw as Illustrated in fig. Cambio de la bombilla 1. B. amblela bombilla tatcomosemuestia enla fig. Desenchule la maquina. 2. D. 0 Gambill° ® AtIojar ® Aprotar D I 53 A. 3. reA- D. 0 Bulb CO Loosen ((.0 Tighten 4. Replace the sewing light bulb. ...
Remove the lace plate from the outlet. 2. C. 5. Alloje el tornillo de la cubierta de la maquina tal como se indica en la fig. Retire la cubierta de la maquina tat como se indica en Pa lig. too l B fl 4. See fig. C. 5. Loosen the lace ...plate screw as Illustrated in fig. Cambio de la bombilla 1. B. amblela bombilla tatcomosemuestia enla fig. Desenchule la maquina. 2. D. 0 Gambill° ® AtIojar ® Aprotar D I 53 A. 3. reA- D. 0 Bulb CO Loosen ((.0 Tighten 4. Replace the sewing light bulb. ...
Users Manual - English
Page 59
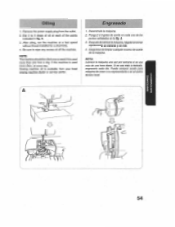
...available from the outlet. 2. Sewing machine oil is used more often, oil every day. AsegOrese de limpiarcualquierexceso de aceite de la maquina. SI se usa mas a menudo, engrasarla cada dia. After oiling, run the machine at each of the points indicated in... time. 4. Engrasado I. Despuesdelubricarlamaculae,litigate funcionar rapidamente un instante y sin hilo. 4. CrRA fflfl] Oiling 1. A. 3. A. 3. Puede comprar aceite pare maquina de cosera surepresentante oen elcentro teem° local. 0 ID 54 Put 2 to wipe any excess oil off the machine. Remove the power supply plug...
...available from the outlet. 2. Sewing machine oil is used more often, oil every day. AsegOrese de limpiarcualquierexceso de aceite de la maquina. SI se usa mas a menudo, engrasarla cada dia. After oiling, run the machine at each of the points indicated in... time. 4. Engrasado I. Despuesdelubricarlamaculae,litigate funcionar rapidamente un instante y sin hilo. 4. CrRA fflfl] Oiling 1. A. 3. A. 3. Puede comprar aceite pare maquina de cosera surepresentante oen elcentro teem° local. 0 ID 54 Put 2 to wipe any excess oil off the machine. Remove the power supply plug...
Users Manual - English
Page 60
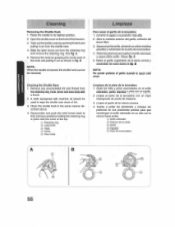
..., driverandrace body with the notch at the top. ()) Retaining ring (2) Latch lever 0; Limpie el polvo de la lanzadera con un trapo impregnado de aceite de maquina. 3. Cleaning Removing the Shuttle Hook 1. Take out thebobbincaseby openingits latchand pulling it out as shown in fig. A cloth dampened with machine oil should be used...
..., driverandrace body with the notch at the top. ()) Retaining ring (2) Latch lever 0; Limpie el polvo de la lanzadera con un trapo impregnado de aceite de maquina. 3. Cleaning Removing the Shuttle Hook 1. Take out thebobbincaseby openingits latchand pulling it out as shown in fig. A cloth dampened with machine oil should be used...


