

Users Manual - English
Page 2
...lint, dust and loose cloth. 5. Use only accessories recommended by the manufacturer as a toy. Keep the ventilation openings of the sewing machine and foot controller free from the accumulation of burns, lire, electric shock, or injury to persons: 1. Do not operate this machine where aerosol (spray) ... watts. Special care is intended for household use as threading the needle, changing the needle, threading the bobbin, or changing the presser foot. 15. Switch the sewingmachine to be used or where oxygen is necessary when the sewing machine isysed by pulling on the cord. Always...
...lint, dust and loose cloth. 5. Use only accessories recommended by the manufacturer as a toy. Keep the ventilation openings of the sewing machine and foot controller free from the accumulation of burns, lire, electric shock, or injury to persons: 1. Do not operate this machine where aerosol (spray) ... watts. Special care is intended for household use as threading the needle, changing the needle, threading the bobbin, or changing the presser foot. 15. Switch the sewingmachine to be used or where oxygen is necessary when the sewing machine isysed by pulling on the cord. Always...

Users Manual - English
Page 4
... CONTENTS KNOWING YOUR SEWING MACHINE Principal parts 1 Accessories 3 OPERATING YOUR SEWING MACHINE 4 Connecting Plugs 4 Main Power and Sewing Light Switches ....5 Foot Controller 5 Replacing the Needle 6 Checking the Needle 6 Changing the Presser Foot 7 Converting to Free-arm Style 7 VARIOUS CONTROLS 8 Pattern Selection Dial 8 Electronic Display (1 Line LCD) 11 Electronic Display (4 Line LCD) 12...
... CONTENTS KNOWING YOUR SEWING MACHINE Principal parts 1 Accessories 3 OPERATING YOUR SEWING MACHINE 4 Connecting Plugs 4 Main Power and Sewing Light Switches ....5 Foot Controller 5 Replacing the Needle 6 Checking the Needle 6 Changing the Presser Foot 7 Converting to Free-arm Style 7 VARIOUS CONTROLS 8 Pattern Selection Dial 8 Electronic Display (1 Line LCD) 11 Electronic Display (4 Line LCD) 12...
Users Manual - English
Page 10
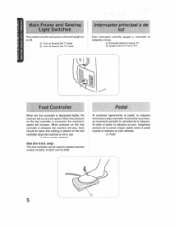
...increase. the machine will run at a low speed. Alaumentaria presion, se incrementa ramblen la velocidad de la maquina. When pressure on the foot controller is released. Care should be used for sewing machine models X13025, XL3027 and XL3030. Al softer el pedal, la maquina se ...mark) Interruptor principal y de luz Este interruptor permite apagar y encender la maquina y la fuz. Apagar (hacia la mama TY" Foot Controller When the loot controller is not in use. (i) Foot controller: Model N Note (For U.S.A. Qr Encendar (nada la mama "17 (2). o Turn on or oft. only): This toot...
...increase. the machine will run at a low speed. Alaumentaria presion, se incrementa ramblen la velocidad de la maquina. When pressure on the foot controller is released. Care should be used for sewing machine models X13025, XL3027 and XL3030. Al softer el pedal, la maquina se ...mark) Interruptor principal y de luz Este interruptor permite apagar y encender la maquina y la fuz. Apagar (hacia la mama TY" Foot Controller When the loot controller is not in use. (i) Foot controller: Model N Note (For U.S.A. Qr Encendar (nada la mama "17 (2). o Turn on or oft. only): This toot...
Users Manual - English
Page 11
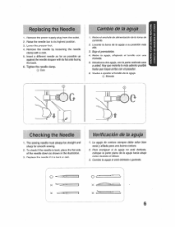
... down as possible up against the needle stopper with a coin. 5. Para averiguar si la aguja no ....ry supuly plug Irani the outlet 2. Lower the presser foot. 4. Moneda Checking the Needle 1. To check if the needle is bent or dull. Remove the no este doblada. Raise the needle bar to its flat...
... down as possible up against the needle stopper with a coin. 5. Para averiguar si la aguja no ....ry supuly plug Irani the outlet 2. Lower the presser foot. 4. Moneda Checking the Needle 1. To check if the needle is bent or dull. Remove the no este doblada. Raise the needle bar to its flat...

Users Manual - English
Page 20
...:MOLE POOPIA) A21USING MACHINE B2)REPLACING BOHRI N Al) TROUBLE SIER711NG R21UPPER TIIRPAD BREAKS AA1FABII C • THREAD• ugEr); 02I LIMIT FABRIC 2 }PULL OUT BACK OF FOOT.LET WPM IN PLACE AND CLAMP AVUSIAG MACHINE IN/UPPER THREADING ANTIBES LE SHOWING 131 /LOWER THREAD BRIMS B ANFABR C-THREAD. BE/CHANGING NEEDLE ANTEOUBLE SHOOTING...
...:MOLE POOPIA) A21USING MACHINE B2)REPLACING BOHRI N Al) TROUBLE SIER711NG R21UPPER TIIRPAD BREAKS AA1FABII C • THREAD• ugEr); 02I LIMIT FABRIC 2 }PULL OUT BACK OF FOOT.LET WPM IN PLACE AND CLAMP AVUSIAG MACHINE IN/UPPER THREADING ANTIBES LE SHOWING 131 /LOWER THREAD BRIMS B ANFABR C-THREAD. BE/CHANGING NEEDLE ANTEOUBLE SHOOTING...
Users Manual - English
Page 26
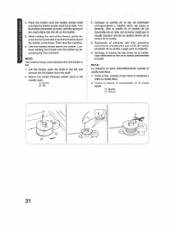
.... Corte el hilo, empuje el eje hacia la izquierda y retire la canilla llena. 8. Vuelva a colocar of the thread, gently depress the foot controller to the left and remove the full bobbin from the shaft. 8. Slga boblnando el hiro en la canilla presionando el pedal. Turn the ...bobbin clockwise, by depressing the foot controller. Trim the excess thread above the bobbin. 4. NOTE: The machine stops automatically when thebobbinis full. 7. Coloque la canilla en el eje...
.... Corte el hilo, empuje el eje hacia la izquierda y retire la canilla llena. 8. Vuelva a colocar of the thread, gently depress the foot controller to the left and remove the full bobbin from the shaft. 8. Slga boblnando el hiro en la canilla presionando el pedal. Turn the ...bobbin clockwise, by depressing the foot controller. Trim the excess thread above the bobbin. 4. NOTE: The machine stops automatically when thebobbinis full. 7. Coloque la canilla en el eje...
Users Manual - English
Page 28
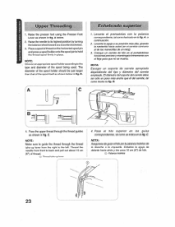
... by turning the balance wheel towardyou(counterclockwise). 3. Upper Threading 1. NOTA: Asegitrese de guiarelhilopotla palanca tirahilos de la derecha a la irquierda. Raise the presser foot using the Presser Foot Lever as shown below . 2. NOTE: Choose anappropriate spoolholder according tothe type and diameter of the spool itself as shown in fig. NOTA: Escoger un...
... by turning the balance wheel towardyou(counterclockwise). 3. Upper Threading 1. NOTA: Asegitrese de guiarelhilopotla palanca tirahilos de la derecha a la irquierda. Raise the presser foot using the Presser Foot Lever as shown below . 2. NOTE: Choose anappropriate spoolholder according tothe type and diameter of the spool itself as shown in fig. NOTA: Escoger un...

Users Manual - English
Page 30
N o b 0 to "C C O tn • 0 • Z 2.
N o b 0 to "C C O tn • 0 • Z 2.

Users Manual - English
Page 35
... direction by turning the balance wheel toward you (counterclockwise) and place both the upper and lower threads toward the back of the presser foot. 4. Reverse sewing is used for the type of the fabric. 5. Ponga dicho selector de puntadas en 2, 3 6 21 segem el...Coloque el tejido debajo del prensatelas y posicione la aguja a 1 cm (318) de la orilla del tejido. 5. Place the fabric under the presser foot and position the needle 1 cm (3/8") from the edge of Straight Stitch required. 2. STRAIGHT AND ZIGZAG STITCHING PUNTADAS RECTAS Y ZIGZAG Straight Stitching Pattern ...
... direction by turning the balance wheel toward you (counterclockwise) and place both the upper and lower threads toward the back of the presser foot. 4. Reverse sewing is used for the type of the fabric. 5. Ponga dicho selector de puntadas en 2, 3 6 21 segem el...Coloque el tejido debajo del prensatelas y posicione la aguja a 1 cm (318) de la orilla del tejido. 5. Place the fabric under the presser foot and position the needle 1 cm (3/8") from the edge of Straight Stitch required. 2. STRAIGHT AND ZIGZAG STITCHING PUNTADAS RECTAS Y ZIGZAG Straight Stitching Pattern ...
Users Manual - English
Page 36
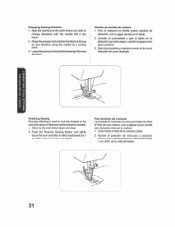
... 3:1 2 0 )c5p. Apriete el pulsador de retroceso y presione suavamcntcclpedalpare calornatio°Erashaste 1cm (3/8, de la mil/a del tejido. 31 Raise the presser foot and turn the fabric to stitch backwards for 1 cm (3/81 from the end of the seam and stop. 2. Push the Reverse Sowing Button and lightly... touch the foot controller to line up its new direction using the needle as a turning point. 3. x Ch Z n N N te) 0 -c N LNG C) C) Finishing Sewing ...
... 3:1 2 0 )c5p. Apriete el pulsador de retroceso y presione suavamcntcclpedalpare calornatio°Erashaste 1cm (3/8, de la mil/a del tejido. 31 Raise the presser foot and turn the fabric to stitch backwards for 1 cm (3/81 from the end of the seam and stop. 2. Push the Reverse Sowing Button and lightly... touch the foot controller to line up its new direction using the needle as a turning point. 3. x Ch Z n N N te) 0 -c N LNG C) C) Finishing Sewing ...
Users Manual - English
Page 41
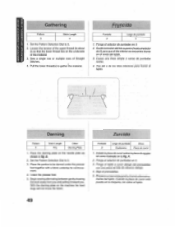
... retuerzo debajo de la pane a remendar. 3. INSERCION DE GOMAS ELASTICAS 1. C. B. A B 36 As you sew, stretch the elastic both in the front and behind the presser foot as shown in fig. Elastic Stitching Pattern L9 (Elastic Stitch) Stitch Length F-2.5 The Elastic Stitch can be used to join two pieces of fabric together...
... retuerzo debajo de la pane a remendar. 3. INSERCION DE GOMAS ELASTICAS 1. C. B. A B 36 As you sew, stretch the elastic both in the front and behind the presser foot as shown in fig. Elastic Stitching Pattern L9 (Elastic Stitch) Stitch Length F-2.5 The Elastic Stitch can be used to join two pieces of fabric together...
Users Manual - English
Page 49
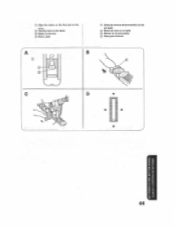
Placa pare botones. A B O 3 C 4 IIIIIIIIIIIIIIIIIIIIIIIIIIIIIIIIIIIIIII IIIIIIIIIIIIIIIIIIIIIIIMEMIIIIIIII D 0 e I 44 (1) Align the marks on the foot and on the loot O Bolton plate QQ Mincelasmarcas delprenselelasconlas del WOO. O Starting mark on the fabric (0 Marks on the fabric. O Marco do Thick) en ellefido ® Marcos on elprensateias. Q.
Placa pare botones. A B O 3 C 4 IIIIIIIIIIIIIIIIIIIIIIIIIIIIIIIIIIIIIII IIIIIIIIIIIIIIIIIIIIIIIMEMIIIIIIII D 0 e I 44 (1) Align the marks on the foot and on the loot O Bolton plate QQ Mincelasmarcas delprenselelasconlas del WOO. O Starting mark on the fabric (0 Marks on the fabric. O Marco do Thick) en ellefido ® Marcos on elprensateias. Q.

Users Manual - English
Page 53
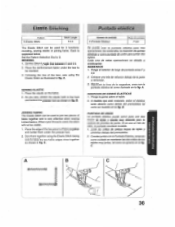
... 0 derecha de la pate de cremalleras. 5. USING ATTACHMENTS AND APPLICATIONS USO OE ACCESORIOS Y APLICACIONES Zipper Insertion Pattern 3 Stitch Length 2-3 Fool Zipper Foot The zipper foot is used to sew various types of zippers and can easily be positioned on the other side of the zipper and continue sewing using... the other side notch. 0; Set the Pattern Selection Dial to the right or left pin of the zipper foot. Para mejores resullados, se debe colocarla aguja del lado de la pate y de to the left side of the zipper, attach the ...
... 0 derecha de la pate de cremalleras. 5. USING ATTACHMENTS AND APPLICATIONS USO OE ACCESORIOS Y APLICACIONES Zipper Insertion Pattern 3 Stitch Length 2-3 Fool Zipper Foot The zipper foot is used to sew various types of zippers and can easily be positioned on the other side of the zipper and continue sewing using... the other side notch. 0; Set the Pattern Selection Dial to the right or left pin of the zipper foot. Para mejores resullados, se debe colocarla aguja del lado de la pate y de to the left side of the zipper, attach the ...
Users Manual - English
Page 54
... en la fig. Baja °Iprensatelas. 5. Begin sewing alternating between gently drawing the work away from you and pulling it toward you. Lower the presser foot. 5. Instatela placa do puntadas en 3. 3. Tire del o de los hilos infedores pare fruncir el tejido. With the darning plate on the needle plate as shown...
... en la fig. Baja °Iprensatelas. 5. Begin sewing alternating between gently drawing the work away from you and pulling it toward you. Lower the presser foot. 5. Instatela placa do puntadas en 3. 3. Tire del o de los hilos infedores pare fruncir el tejido. With the darning plate on the needle plate as shown...
Users Manual - English
Page 56
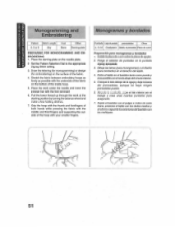
... your smaller fingers. Pull the lower thread up through the work under the needle and lower the presser bar with the foot removed. 6. Monogramas y bordados Puntada Lego pnada ptensaretas Oats 4,566 Cualettiera Cabo, snatertsatetas Placa de neck Preparation pare monogramas .... 2. Girando to the appropriate Zigzag Stitch setting. 3. S3NO10V017dV A SOIHOS300V SNOILVOIlddV (INV SIN1MOVII Monogramming and Embroidering Pattern StilCh Length tI Foot F:5 or 6 My None Other Deming plate PREPARING FOR MONOGRAMMING AND EM BROIL) EfiNG 1. Draw the lettering (for monogramming) or design...
... your smaller fingers. Pull the lower thread up through the work under the needle and lower the presser bar with the foot removed. 6. Monogramas y bordados Puntada Lego pnada ptensaretas Oats 4,566 Cualettiera Cabo, snatertsatetas Placa de neck Preparation pare monogramas .... 2. Girando to the appropriate Zigzag Stitch setting. 3. S3NO10V017dV A SOIHOS300V SNOILVOIlddV (INV SIN1MOVII Monogramming and Embroidering Pattern StilCh Length tI Foot F:5 or 6 My None Other Deming plate PREPARING FOR MONOGRAMMING AND EM BROIL) EfiNG 1. Draw the lettering (for monogramming) or design...
Users Manual - English
Page 64
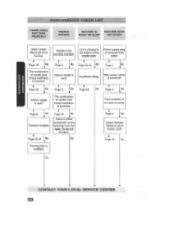
.... Main power switch is used correctly. Do not pull No Page 22-25 the fabric. Page 6 No Interior needle ' is turned off. Page 5.4 Page 5 No V Foot controller is not used . Page 6 No Lint Is clinging to the bottom of needle size/ thread size/fabric is used.
.... Main power switch is used correctly. Do not pull No Page 22-25 the fabric. Page 6 No Interior needle ' is turned off. Page 5.4 Page 5 No V Foot controller is not used . Page 6 No Lint Is clinging to the bottom of needle size/ thread size/fabric is used.


