
Users Manual - English
Page 2
... proper needle plate. Always unplug the sewing machine from all instructions before using.' "SAVE THESE INSTRUCTIONS" "This sewing machine is required around the sewing machine needle. 11. Always unplug this sewing machine only for its intended use ." Never operate the sewing machine with a bulb rated 2.4 watts; ...injury to the symbol "O" position which represents off, then remove plug from outlet. 9. Use this sewing machine from the accumulation of the sewing machine and foot controller free from the electrical outlet immediately after using and before changing the light bulb....
... proper needle plate. Always unplug the sewing machine from all instructions before using.' "SAVE THESE INSTRUCTIONS" "This sewing machine is required around the sewing machine needle. 11. Always unplug this sewing machine only for its intended use ." Never operate the sewing machine with a bulb rated 2.4 watts; ...injury to the symbol "O" position which represents off, then remove plug from outlet. 9. Use this sewing machine from the accumulation of the sewing machine and foot controller free from the electrical outlet immediately after using and before changing the light bulb....
Users Manual - English
Page 3
... BY THE EARTH SYMBOL OR COLORED GREEN OR YELLOW. When leaving the sewing machine unattended, the mainswitchof the machinemust beswitched off When servicing the sewing machine, or when removing covers or changing lamps, the machine or the electrical set must be connected to the terminal which is not ...event of this equipment, it should be disconnected from the supply by ASTA to the terminal which is hazardous it engaged in your sewing machine is filled with the coloured markings identifying the terminals in a live socket outlet. Never use a fuse approved by removing the plug...
... BY THE EARTH SYMBOL OR COLORED GREEN OR YELLOW. When leaving the sewing machine unattended, the mainswitchof the machinemust beswitched off When servicing the sewing machine, or when removing covers or changing lamps, the machine or the electrical set must be connected to the terminal which is not ...event of this equipment, it should be disconnected from the supply by ASTA to the terminal which is hazardous it engaged in your sewing machine is filled with the coloured markings identifying the terminals in a live socket outlet. Never use a fuse approved by removing the plug...

Users Manual - English
Page 4
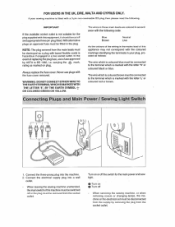
TABLE OF CONTENTS KNOWING YOUR SEWING MACHINE Principal parts 1 Accessories 3 OPERATING YOUR SEWING MACHINE 4 Connecting Plugs 4 Main Power and Sewing Light Switches ....5 Foot Controller 5 Replacing the Needle 6 Checking the Needle 6 Changing the Presser Foot 7 Converting to Free-arm Style 7 VARIOUS CONTROLS 8 Pattern Selection Dial 8 Electronic ...
TABLE OF CONTENTS KNOWING YOUR SEWING MACHINE Principal parts 1 Accessories 3 OPERATING YOUR SEWING MACHINE 4 Connecting Plugs 4 Main Power and Sewing Light Switches ....5 Foot Controller 5 Replacing the Needle 6 Checking the Needle 6 Changing the Presser Foot 7 Converting to Free-arm Style 7 VARIOUS CONTROLS 8 Pattern Selection Dial 8 Electronic ...

Users Manual - English
Page 10
Apagar (hacia la mama TY" Foot Controller When the loot controller is increased, the machine's speed will increase. Care should be used for sewing machine models X13025, XL3027 and XL3030. Al softer el pedal, la maquina se para. Qr Encendar (nada la mama "17 (2). only): This toot... controller can be taken that nothing is placed on the foot controller when the machine is released. When pressure on...
Apagar (hacia la mama TY" Foot Controller When the loot controller is increased, the machine's speed will increase. Care should be used for sewing machine models X13025, XL3027 and XL3030. Al softer el pedal, la maquina se para. Qr Encendar (nada la mama "17 (2). only): This toot... controller can be taken that nothing is placed on the foot controller when the machine is released. When pressure on...
Users Manual - English
Page 11
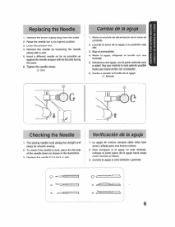
...aguja, aftojando el tomillo con una moneda, 5. introduzca otra aguja, con la parte redonda cars a usted. The sewing needle must always be straight and sharp for smooth sewing. 2. coloque la parte plans de la aguja hacks abajo como muestra el dibujo. 3. Remove the needle by loosening... si esta doblada o gastada. 0 x X I ',can XI C -1 6 Raise the needle bar to its flat side lacing the back. 6. KNOWING YOUR SEWING MACHINE CONOZCA SU MAOUINA DE COSER Replacing the Needle 1. Insert a different needle as far as shown in the illustration. 3. Hence el ()nebula de alimentation de la...
...aguja, aftojando el tomillo con una moneda, 5. introduzca otra aguja, con la parte redonda cars a usted. The sewing needle must always be straight and sharp for smooth sewing. 2. coloque la parte plans de la aguja hacks abajo como muestra el dibujo. 3. Remove the needle by loosening... si esta doblada o gastada. 0 x X I ',can XI C -1 6 Raise the needle bar to its flat side lacing the back. 6. KNOWING YOUR SEWING MACHINE CONOZCA SU MAOUINA DE COSER Replacing the Needle 1. Insert a different needle as far as shown in the illustration. 3. Hence el ()nebula de alimentation de la...
Users Manual - English
Page 16
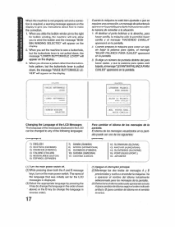
...pulled down, the message'LOVVERBHLEVER"willappear on the display. 2. When the LCD adjuster key is slid to the left , for bobbin winding, the machine will only allow you instructions about how to the left or right. Al deslizar el ports bobinas a la derecha pare hater canilla, la maquina ... que aparecen en la pantalla y elegir entre dos leagues distintas. Using the Language Selector The language of a pen to the right for a sewing guidance message on the LCD can be switched between two different languages. Move the switchon the rightabovetheLCDto theleft or right with the point of the...
...pulled down, the message'LOVVERBHLEVER"willappear on the display. 2. When the LCD adjuster key is slid to the left , for bobbin winding, the machine will only allow you instructions about how to the left or right. Al deslizar el ports bobinas a la derecha pare hater canilla, la maquina ... que aparecen en la pantalla y elegir entre dos leagues distintas. Using the Language Selector The language of a pen to the right for a sewing guidance message on the LCD can be switched between two different languages. Move the switchon the rightabovetheLCDto theleft or right with the point of the...
Users Manual - English
Page 18
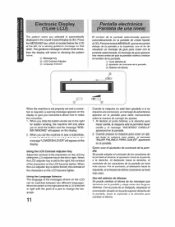
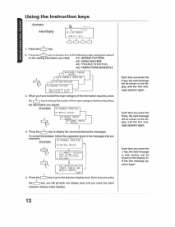
.... Each time you press the (-) key, you will be shown on the display until the first message appears again. Each time you need: Al) SEWING PATTERN A2) USING MACHINE A3) TROUBLE SHOOTING A4) FABRIC•THREAD•NEEDLE r , A4 )I :BUTTONHOLE (PRESS / KLYI 0000 4 1. Press the (-) key to the previous ..."END" 5. Press the ( ) key to display the recommended action messages. Using the Instruction keys (Example) Initial Display A F.1.5 P I 'MAIL • TietrAS NEEDLE 1- * A3)TROUBLE SHOOTING F' AfltISING MACHINE AI/SEWING PATTERN (SELECT WITH A KEY AND PRESS 1 KEY) 3.
.... Each time you press the (-) key, you will be shown on the display until the first message appears again. Each time you need: Al) SEWING PATTERN A2) USING MACHINE A3) TROUBLE SHOOTING A4) FABRIC•THREAD•NEEDLE r , A4 )I :BUTTONHOLE (PRESS / KLYI 0000 4 1. Press the (-) key to the previous ..."END" 5. Press the ( ) key to display the recommended action messages. Using the Instruction keys (Example) Initial Display A F.1.5 P I 'MAIL • TietrAS NEEDLE 1- * A3)TROUBLE SHOOTING F' AfltISING MACHINE AI/SEWING PATTERN (SELECT WITH A KEY AND PRESS 1 KEY) 3.
Users Manual - English
Page 22
When you set the machine to sew a buttonhole, but the buttonhole lever is pulled down,...the messagesdisplayedintheLCD can be changed to any of the language that was initially set for bobbin winding, the machine will only allow you instructions about how to change the language in reverse order). 17 (1)Apague elintemptorprincipal.... (2)Mantenga las dos tedas de mensajes A y B presionadasy vuelva a encenderlamaquina. When the machine is not properly set and a correction is required, a warning message appears on the display. 2. Va a aparecer ...
When you set the machine to sew a buttonhole, but the buttonhole lever is pulled down,...the messagesdisplayedintheLCD can be changed to any of the language that was initially set for bobbin winding, the machine will only allow you instructions about how to change the language in reverse order). 17 (1)Apague elintemptorprincipal.... (2)Mantenga las dos tedas de mensajes A y B presionadasy vuelva a encenderlamaquina. When the machine is not properly set and a correction is required, a warning message appears on the display. 2. Va a aparecer ...
Users Manual - English
Page 24
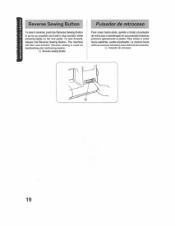
...°ymantengaloen esapositionmientras presiona ligeramente et pedal. The machine will then sew forward. Para volver a coser hacia adelante, suelte elpulsador. La costura hacia seasseusaparerematesyparareforzarlas costuras. (!) Pulsador de retraces°. 19 To sew forward, release the Reverse Sewing Button. Reverse Sewing Button To sew in reverse, push the Reverse Sewing Button in as far as possible and hold...
...°ymantengaloen esapositionmientras presiona ligeramente et pedal. The machine will then sew forward. Para volver a coser hacia adelante, suelte elpulsador. La costura hacia seasseusaparerematesyparareforzarlas costuras. (!) Pulsador de retraces°. 19 To sew forward, release the Reverse Sewing Button. Reverse Sewing Button To sew in reverse, push the Reverse Sewing Button in as far as possible and hold...
Users Manual - English
Page 33
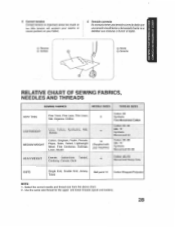
... Wrapped Polyester NOTE: 1. Suitings, Linen, Muslin 9 11 14 (Supplied with your fabric. Velvet, Lightweight Wool, Fine Corduroy. KNOWING YOUR SEWING MACHINE CONOZCA SU MAOUINA DE COSER C Correct tension Correct tension is important since too much or too little tension will weaken your seams or cause... puckers on your machine) Cotton: 80 Synthetic Fine Mercerized Cotton Cotton: 60-80 Silk: "A" Synthetic Mercerized 50 Colton: 50-60 Silk: "A" Synthetic Mercerized ...
... Wrapped Polyester NOTE: 1. Suitings, Linen, Muslin 9 11 14 (Supplied with your fabric. Velvet, Lightweight Wool, Fine Corduroy. KNOWING YOUR SEWING MACHINE CONOZCA SU MAOUINA DE COSER C Correct tension Correct tension is important since too much or too little tension will weaken your seams or cause... puckers on your machine) Cotton: 80 Synthetic Fine Mercerized Cotton Cotton: 60-80 Silk: "A" Synthetic Mercerized 50 Colton: 50-60 Silk: "A" Synthetic Mercerized ...
Users Manual - English
Page 36
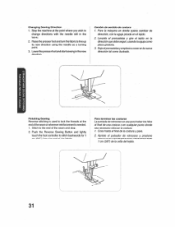
... 1. Lowerthepresserfoot andstartsewingin thenow direction. Cambio de sentido de costura 1. x Ch Z n N N te) 0 -c N LNG C) C) Finishing Sewing Reverse stitching is needed. 1. Stitch to change directions with the needle still in the fabric. 2. Stop the machine at the endof the seamor wherever reinforcement is used to lock the threads at the point where you wish to...
... 1. Lowerthepresserfoot andstartsewingin thenow direction. Cambio de sentido de costura 1. x Ch Z n N N te) 0 -c N LNG C) C) Finishing Sewing Reverse stitching is needed. 1. Stitch to change directions with the needle still in the fabric. 2. Stop the machine at the endof the seamor wherever reinforcement is used to lock the threads at the point where you wish to...
Users Manual - English
Page 54
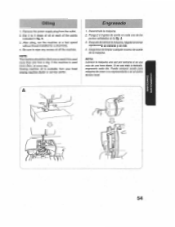
...toot together with a fabric underlay for reinforcement. 4. Loosen the tension of Straight Stitches. 4. Sew a single row or multiple rows of he upper thread (to about 2) so that the lower thread lies on the machine the feed dogs will not move the fabric. Pull the lower thread(s) to 3. 3. a... Placa do puntadas en 3. 3. A. 2. Ponga el tejido a zurcir debajo del prensatelas con una pieza de Lela de reluerzo debajo. 4. Begin sewing alternating between gently drawing the work away from you and pulling it toward you. Place the darning plate on the needle plate as shown in...
...toot together with a fabric underlay for reinforcement. 4. Loosen the tension of Straight Stitches. 4. Sew a single row or multiple rows of he upper thread (to about 2) so that the lower thread lies on the machine the feed dogs will not move the fabric. Pull the lower thread(s) to 3. 3. a... Placa do puntadas en 3. 3. A. 2. Ponga el tejido a zurcir debajo del prensatelas con una pieza de Lela de reluerzo debajo. 4. Begin sewing alternating between gently drawing the work away from you and pulling it toward you. Place the darning plate on the needle plate as shown in...
Users Manual - English
Page 58
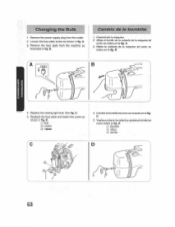
Retire la cubierta de la maquina tat como se indica en Pa lig. B. See fig. B. reA- Replace the sewing light bulb. amblela bombilla tatcomosemuestia enla fig. C. 5. A. 3. Reattach the face plate and fasten the screw as Illustrated in fig. Vuelva a colocarla cubierta yaprieteeltomillo tai como ...; Aprotar D I 53 Loosen the lace plate screw as shown In fig. D. 0 Bulb CO Loosen ((.0 Tighten 4. A. 3. Changing the Bulb 1. Remove the power supply plug from the machine as shown in fig.
Retire la cubierta de la maquina tat como se indica en Pa lig. B. See fig. B. reA- Replace the sewing light bulb. amblela bombilla tatcomosemuestia enla fig. C. 5. A. 3. Reattach the face plate and fasten the screw as Illustrated in fig. Vuelva a colocarla cubierta yaprieteeltomillo tai como ...; Aprotar D I 53 Loosen the lace plate screw as shown In fig. D. 0 Bulb CO Loosen ((.0 Tighten 4. A. 3. Changing the Bulb 1. Remove the power supply plug from the machine as shown in fig.
Users Manual - English
Page 59
...fast speed without thread installed for a short time. 4. Sewing machine oil is used more often, oil every day. lksonchule magunia. 2. NOTA: Lubricar la maquina una vez per semana si se usa mas de una hors dlaria. A. 3. NOTE: The machine should be oiled once a week if it is used more... than one hour a day. If the machine is available from the outlet. 2. Remove the power supply plug from your local sewing machine dealer or service center. Be sure to 3 drops of the points indicated in fig. Despuesdelubricarlamaculae,litigate funcionar ...
...fast speed without thread installed for a short time. 4. Sewing machine oil is used more often, oil every day. lksonchule magunia. 2. NOTA: Lubricar la maquina una vez per semana si se usa mas de una hors dlaria. A. 3. NOTE: The machine should be oiled once a week if it is used more... than one hour a day. If the machine is available from the outlet. 2. Remove the power supply plug from your local sewing machine dealer or service center. Be sure to 3 drops of the points indicated in fig. Despuesdelubricarlamaculae,litigate funcionar ...


