
Users Manual - English
Page 2
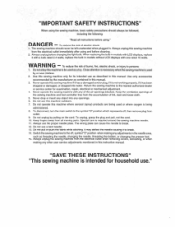
... electrical outlet immediately after using and before changing the light bulb. The wrong plate can cause the needle to be used or where oxygen is necessary when the sewing machine isysed by pulling on the cord. Always unplug the sewing machine from the electrical outlet when removing covers, lubricating, or when making any other user service adjustments mentioned in models with LCD displays, replace it with any openings. 6. To disconnect, turn...
... electrical outlet immediately after using and before changing the light bulb. The wrong plate can cause the needle to be used or where oxygen is necessary when the sewing machine isysed by pulling on the cord. Always unplug the sewing machine from the electrical outlet when removing covers, lubricating, or when making any other user service adjustments mentioned in models with LCD displays, replace it with any openings. 6. To disconnect, turn...

Users Manual - English
Page 4
... YOUR SEWING MACHINE Principal parts 1 Accessories 3 OPERATING YOUR SEWING MACHINE 4 Connecting Plugs 4 Main Power and Sewing Light Switches ....5 Foot Controller 5 Replacing the Needle 6 Checking the Needle 6 Changing the Presser Foot 7 Converting to Free-arm Style 7 VARIOUS CONTROLS 8 Pattern Selection Dial 8 Electronic Display (1 Line LCD) 11 Electronic Display (4 Line LCD) 12 Stitch Length Dial 18 Reverse Sewing Button 19 THREADING THE MACHINE 20 Winding the bobbin 20 Lower Threading 22 Upper Threading 23 Using needle threader (when the machine is...
... YOUR SEWING MACHINE Principal parts 1 Accessories 3 OPERATING YOUR SEWING MACHINE 4 Connecting Plugs 4 Main Power and Sewing Light Switches ....5 Foot Controller 5 Replacing the Needle 6 Checking the Needle 6 Changing the Presser Foot 7 Converting to Free-arm Style 7 VARIOUS CONTROLS 8 Pattern Selection Dial 8 Electronic Display (1 Line LCD) 11 Electronic Display (4 Line LCD) 12 Stitch Length Dial 18 Reverse Sewing Button 19 THREADING THE MACHINE 20 Winding the bobbin 20 Lower Threading 22 Upper Threading 23 Using needle threader (when the machine is...
Users Manual - English
Page 16
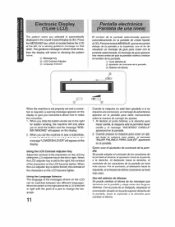
... the bobbin winder pin to the right for a sewing guidance message on that stitch. Using the Language Selector The language of the characters on. Par el contrail°, at the left, for bobbin winding, the machine will only allow you selected is required, a warning message appears on the display. Electronic Display (1Line LCD) The pattern name you to wind the bobbin and...
... the bobbin winder pin to the right for a sewing guidance message on that stitch. Using the Language Selector The language of the characters on. Par el contrail°, at the left, for bobbin winding, the machine will only allow you selected is required, a warning message appears on the display. Electronic Display (1Line LCD) The pattern name you to wind the bobbin and...
Users Manual - English
Page 18
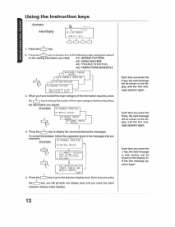
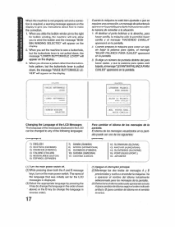
... appears again. 13 To correct the problem, follow the suggestion given in that are displayed. (Example) A31TROOBLE SHOOTING BI /NEEDLE BREAKS • IS UNRRA PRESSER 1001 BEING USED toR THE 4 PATTERN? • • -WAS Um/LUNATION or FABRIC .THREAD AND NEEDLE PROPER? Press the f) key. t t "END" 5. Each time you need: Al) SEWING PATTERN A2) USING MACHINE A3) TROUBLE SHOOTING A4) FABRIC•THREAD•NEEDLE r , A4 )I :BUTTONHOLE (PRESS / KLYI 0000 4 1.
... appears again. 13 To correct the problem, follow the suggestion given in that are displayed. (Example) A31TROOBLE SHOOTING BI /NEEDLE BREAKS • IS UNRRA PRESSER 1001 BEING USED toR THE 4 PATTERN? • • -WAS Um/LUNATION or FABRIC .THREAD AND NEEDLE PROPER? Press the f) key. t t "END" 5. Each time you need: Al) SEWING PATTERN A2) USING MACHINE A3) TROUBLE SHOOTING A4) FABRIC•THREAD•NEEDLE r , A4 )I :BUTTONHOLE (PRESS / KLYI 0000 4 1.
Users Manual - English
Page 20
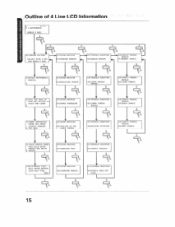
... MACHINE B2)REPLACING BOHRI N Al) TROUBLE SIER711NG R21UPPER TIIRPAD BREAKS AA1FABII C • THREAD• ugEr); 02I LIMIT FABRIC 2 }PULL OUT BACK OF FOOT.LET WPM IN PLACE AND CLAMP AVUSIAG MACHINE IN/UPPER THREADING ANTIBES LE SHOWING 131 /LOWER THREAD BRIMS B ANFABR C-THREAD. Outline of 4 Line LCD Information I I :BUITOFIN31.4I (PRESS I KEY) AIISEWIIIO PATTERN (svurr WITH A KEY Amo PRESS 4 KEY) 4 A.21UnI NC HACHDIP DI/WINDING BOBBIN rrnoume...
... MACHINE B2)REPLACING BOHRI N Al) TROUBLE SIER711NG R21UPPER TIIRPAD BREAKS AA1FABII C • THREAD• ugEr); 02I LIMIT FABRIC 2 }PULL OUT BACK OF FOOT.LET WPM IN PLACE AND CLAMP AVUSIAG MACHINE IN/UPPER THREADING ANTIBES LE SHOWING 131 /LOWER THREAD BRIMS B ANFABR C-THREAD. Outline of 4 Line LCD Information I I :BUITOFIN31.4I (PRESS I KEY) AIISEWIIIO PATTERN (svurr WITH A KEY Amo PRESS 4 KEY) 4 A.21UnI NC HACHDIP DI/WINDING BOBBIN rrnoume...
Users Manual - English
Page 22
... la maquina para coser un opt sin bajar la palanca pare ojales, el mensaje "BAJAR PALANCA PARA OJALES" aparecera en la pentane. 3. When the machine is not properly set for bobbin winding, the machine will only allow you set the machine to sew a buttonhole, but the buttonhole lever is pulled down , the message 'LOWER BUTTONHOLE LEVER" will appear on the display to give you instructions about how to make the...
... la maquina para coser un opt sin bajar la palanca pare ojales, el mensaje "BAJAR PALANCA PARA OJALES" aparecera en la pentane. 3. When the machine is not properly set for bobbin winding, the machine will only allow you set the machine to sew a buttonhole, but the buttonhole lever is pulled down , the message 'LOWER BUTTONHOLE LEVER" will appear on the display to give you instructions about how to make the...
Users Manual - English
Page 23
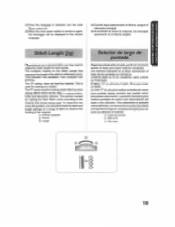
... STITCH. Para determiner la position exacta delboten,convieneprimeroproberlapuntada ylosajustesdelargoenunpedazodo tejidopare ver como se alimenta el material. 0) Largo depuntada 0) Mils coda (4; To determine the exact dial position, you may need to adjust the stitch length for making buttonholes and decorative stitches. Sirve para coser tin bortin. Stitch Length Dial Depending on you' selected stitch, you should first test the stitch and length settings on a button. The numbers marked on again, the messages will be used for sewing...
... STITCH. Para determiner la position exacta delboten,convieneprimeroproberlapuntada ylosajustesdelargoenunpedazodo tejidopare ver como se alimenta el material. 0) Largo depuntada 0) Mils coda (4; To determine the exact dial position, you may need to adjust the stitch length for making buttonholes and decorative stitches. Sirve para coser tin bortin. Stitch Length Dial Depending on you' selected stitch, you should first test the stitch and length settings on a button. The numbers marked on again, the messages will be used for sewing...
Users Manual - English
Page 26
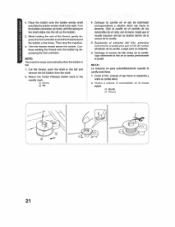
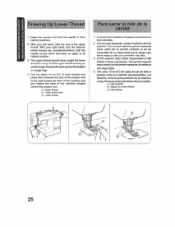
... depressing the foot controller. Deshaga el exceso de hilo arriba de la canilla. NOTA: La maquina se pare automat/camerae wand° la candle eSte Ilena. 7. Trim the excess thread above the bobbin. Coloque la canilla en el eje de bobinado correspondiente y deslice dicho eje hacia la derecha. Continue winding the thread onto the bobbin by hand, until the spring on...
... depressing the foot controller. Deshaga el exceso de hilo arriba de la canilla. NOTA: La maquina se pare automat/camerae wand° la candle eSte Ilena. 7. Trim the excess thread above the bobbin. Coloque la canilla en el eje de bobinado correspondiente y deslice dicho eje hacia la derecha. Continue winding the thread onto the bobbin by hand, until the spring on...
Users Manual - English
Page 28
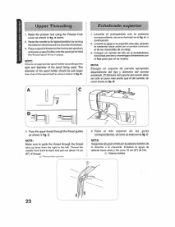
... que el del carrete, tal como ilustra la fig. Pa se el hilo superior on las guias correspondienies. Upper Threading 1. Place a spoolof threadon the horizontalspoolpin andpressa spoof holder ontothe spoolpintohold the thread spool firmly in fig. Raise the presser foot using the Presser Foot Lever as shown in fig. NOTE: Choose anappropriate spoolholder according tothe type and diameter of the spool itself as shown below...
... que el del carrete, tal como ilustra la fig. Pa se el hilo superior on las guias correspondienies. Upper Threading 1. Place a spoolof threadon the horizontalspoolpin andpressa spoof holder ontothe spoolpintohold the thread spool firmly in fig. Raise the presser foot using the Presser Foot Lever as shown in fig. NOTE: Choose anappropriate spoolholder according tothe type and diameter of the spool itself as shown below...
Users Manual - English
Page 30
N o b 0 to "C C O tn • 0 • Z 2.
N o b 0 to "C C O tn • 0 • Z 2.
Users Manual - English
Page 33
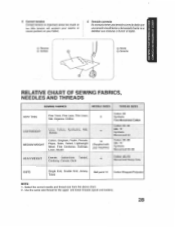
... dadoque una tensioninsuliciente o demasiado!aerie va a debilitar sus animas o *omit el tejido. Jersey, Tricot Ball point 14 Cotton Wrapped Polyester NOTE: 1. Gingham, Poplin, Percale, Pique, Satin. Use the same size thread for the upper and lower threads (spool and bobbin). 28 KNOWING YOUR SEWING MACHINE CONOZCA SU MAOUINA DE COSER C Correct tension Correct tension is important since too much or too little tension will weaken your seams...
... dadoque una tensioninsuliciente o demasiado!aerie va a debilitar sus animas o *omit el tejido. Jersey, Tricot Ball point 14 Cotton Wrapped Polyester NOTE: 1. Gingham, Poplin, Percale, Pique, Satin. Use the same size thread for the upper and lower threads (spool and bobbin). 28 KNOWING YOUR SEWING MACHINE CONOZCA SU MAOUINA DE COSER C Correct tension Correct tension is important since too much or too little tension will weaken your seams...
Users Manual - English
Page 35
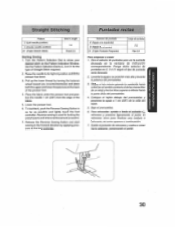
... desired stitch on the Pattern Indication Window. To backtack, push the Reverse Sewing Button in the forward direction by turning the balance wheel toward you (counterclockwise) and place both the upper and lower threads toward the back of the fabric. 5. Release the Reverse Sewing Button and start sewing in as far as possible and lightly touch the foot controller. STRAIGHT AND ZIGZAG STITCHING PUNTADAS RECTAS Y ZIGZAG Straight Stitching Pattern 2 (Left needle position) 3 (Center needle position) 21 (Triple Stretch Stitch) Side/I I englli 1-4 Fixed 2.5 Starting Sewing 1.
... desired stitch on the Pattern Indication Window. To backtack, push the Reverse Sewing Button in the forward direction by turning the balance wheel toward you (counterclockwise) and place both the upper and lower threads toward the back of the fabric. 5. Release the Reverse Sewing Button and start sewing in as far as possible and lightly touch the foot controller. STRAIGHT AND ZIGZAG STITCHING PUNTADAS RECTAS Y ZIGZAG Straight Stitching Pattern 2 (Left needle position) 3 (Center needle position) 21 (Triple Stretch Stitch) Side/I I englli 1-4 Fixed 2.5 Starting Sewing 1.
Users Manual - English
Page 36
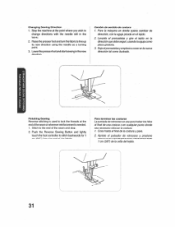
... costuras La punlada de retroceso seusaPara Irabarloshilos al final de una costura o en cualquier punto donde sea necesario reforzar la costura. 1. Pare la maquina en donde quiera cambiar de direction, con la aguja picada en el tejido. 2. Raise the presser foot and turn the fabric to change directions with the needle still in the fabric. 2. x Ch Z n N N te) 0 -c N LNG C) C) Finishing Sewing Reverse stitching is needed. 1.
... costuras La punlada de retroceso seusaPara Irabarloshilos al final de una costura o en cualquier punto donde sea necesario reforzar la costura. 1. Pare la maquina en donde quiera cambiar de direction, con la aguja picada en el tejido. 2. Raise the presser foot and turn the fabric to change directions with the needle still in the fabric. 2. x Ch Z n N N te) 0 -c N LNG C) C) Finishing Sewing Reverse stitching is needed. 1.
Users Manual - English
Page 41
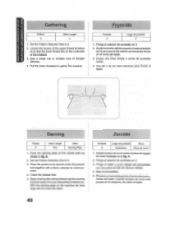
... you sew, stretch the elastic both in the front and behind the presser foot as shown in fig. When nylon thread is very effective when sewing knitted fabrics. C. A. C. SEWING ELASTIC 1. Puntada elastica Nornero de puntada 9 (Puntada Elaslica) Largo do tejido y centrelas debajo delprensatelas. 2. INSERCION DE GOMAS ELASTICAS 1. Set the Pattern Selection Dial to be mended. 3: Following the line of fabric together and is used, the stitch...
... you sew, stretch the elastic both in the front and behind the presser foot as shown in fig. When nylon thread is very effective when sewing knitted fabrics. C. A. C. SEWING ELASTIC 1. Puntada elastica Nornero de puntada 9 (Puntada Elaslica) Largo do tejido y centrelas debajo delprensatelas. 2. INSERCION DE GOMAS ELASTICAS 1. Set the Pattern Selection Dial to be mended. 3: Following the line of fabric together and is used, the stitch...

Users Manual - English
Page 53
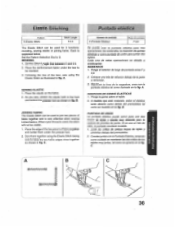
... button located at the back of the presser foot, install the zipper toot on both sides. Ajuste el largo de puntada entre 2 y 3. 2. Baje la palanca delprensatelas y coloque el eje izquierdo o derecho de la pate de cremalleras en la ante. USING ATTACHMENTS AND APPLICATIONS USO OE ACCESORIOS Y APLICACIONES Zipper Insertion Pattern 3 Stitch Length 2-3 Fool Zipper Foot The zipper foot is used to sew various types of zippers and can easily be positioned...
... button located at the back of the presser foot, install the zipper toot on both sides. Ajuste el largo de puntada entre 2 y 3. 2. Baje la palanca delprensatelas y coloque el eje izquierdo o derecho de la pate de cremalleras en la ante. USING ATTACHMENTS AND APPLICATIONS USO OE ACCESORIOS Y APLICACIONES Zipper Insertion Pattern 3 Stitch Length 2-3 Fool Zipper Foot The zipper foot is used to sew various types of zippers and can easily be positioned...
Users Manual - English
Page 54
... tension of he upper thread (to about 2) so that the lower thread lies on the machine the feed dogs will not move the fabric. a Cuesa una lino simple o varies de puntadas rectas. 4. Darning Pattern 3 Stitch Length Any Other Darning Plato 1. Lower the presser foot. 5. Zurcido Punlada 3 Largo de puntada Okos Cualquiera Placa do zurcirsobrelaplace deagujas tat como ilustrado en la fig. Instatela placa do zurcir 1. Set the Pattern Selection Dial to be darned...
... tension of he upper thread (to about 2) so that the lower thread lies on the machine the feed dogs will not move the fabric. a Cuesa una lino simple o varies de puntadas rectas. 4. Darning Pattern 3 Stitch Length Any Other Darning Plato 1. Lower the presser foot. 5. Zurcido Punlada 3 Largo de puntada Okos Cualquiera Placa do zurcirsobrelaplace deagujas tat como ilustrado en la fig. Instatela placa do zurcir 1. Set the Pattern Selection Dial to be darned...
Users Manual - English
Page 56
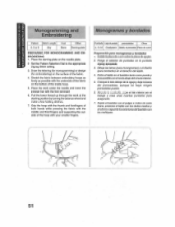
... the needle and lower the presser bar with the middle and third fingers and supporting the outside of the inside hoop. 5. Place the work at the startingposition by turning thebalance wheeland make a few holding stitches. 7. Coloquela Lela debajo de la aguja ybajela bans del prensatelas, aunque no hays ningtin prensatetas puesto. 6. Draw the lettering (for monogramming) or design (for embroidering) on the needle plate...
... the needle and lower the presser bar with the middle and third fingers and supporting the outside of the inside hoop. 5. Place the work at the startingposition by turning thebalance wheeland make a few holding stitches. 7. Coloquela Lela debajo de la aguja ybajela bans del prensatelas, aunque no hays ningtin prensatetas puesto. 6. Draw the lettering (for monogramming) or design (for embroidering) on the needle plate...
Users Manual - English
Page 59
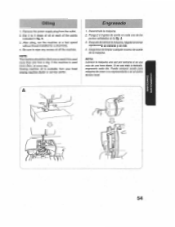
... per semana si se usa mas de una hors dlaria. lksonchule magunia. 2. AsegOrese de limpiarcualquierexceso de aceite de la maquina. Be sure to 3 drops of oil at a fast speed without thread installed for a short time. 4. Sewing machine oil is used more than one hour a day. Engrasado I. Despuesdelubricarlamaculae,litigate funcionar rapidamente un instante y sin hilo. 4. A. 3. A. 3. SI se usa mas a menudo, engrasarla cada dia. Puede...
... per semana si se usa mas de una hors dlaria. lksonchule magunia. 2. AsegOrese de limpiarcualquierexceso de aceite de la maquina. Be sure to 3 drops of oil at a fast speed without thread installed for a short time. 4. Sewing machine oil is used more than one hour a day. Engrasado I. Despuesdelubricarlamaculae,litigate funcionar rapidamente un instante y sin hilo. 4. A. 3. A. 3. SI se usa mas a menudo, engrasarla cada dia. Puede...

Users Manual - English
Page 60
... the needle is lowered, the shuttle hook cannot he rnmoved Cleaning the Shuttle Race 1. Limpie el gadio de la misma manera. 4. Take out thebobbincaseby openingits latchand pulling it out as shown in fig. A. 5. Remove any accumulated lint and thread from the retainingring,hook, driverandrace body with the notch at the top. ()) Retaining ring (2) Latch lever 0; A cloth dampened with machine oil should be used...
... the needle is lowered, the shuttle hook cannot he rnmoved Cleaning the Shuttle Race 1. Limpie el gadio de la misma manera. 4. Take out thebobbincaseby openingits latchand pulling it out as shown in fig. A. 5. Remove any accumulated lint and thread from the retainingring,hook, driverandrace body with the notch at the top. ()) Retaining ring (2) Latch lever 0; A cloth dampened with machine oil should be used...
Users Manual - English
Page 64
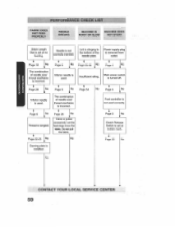
... the bottom of needle size/ thread size/fabric is incorrect Insufficient oiling. feed dogs move the fabric. Page 4 z n21 R-II Fri m0z O The combination of needle size/ thread Size/fabric IN° is not correctly inserted. IN° page 16 Needle is incorrect. No Page 5 No Clutch Release Switch is set at bobbin mark. PERFORMANCE CHECK LIST FABRIC DOES NOT FEED PROPERLY NEEDLE BREAKS MACHINE IS MACHINE DOES NOISY OR SLOW NOT START Stitch Length Dial is set at no...
... the bottom of needle size/ thread size/fabric is incorrect Insufficient oiling. feed dogs move the fabric. Page 4 z n21 R-II Fri m0z O The combination of needle size/ thread Size/fabric IN° is not correctly inserted. IN° page 16 Needle is incorrect. No Page 5 No Clutch Release Switch is set at bobbin mark. PERFORMANCE CHECK LIST FABRIC DOES NOT FEED PROPERLY NEEDLE BREAKS MACHINE IS MACHINE DOES NOISY OR SLOW NOT START Stitch Length Dial is set at no...


