

Users Manual - English
Page 5
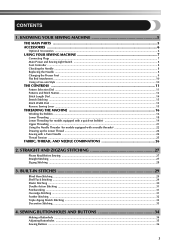
... Width Dial ...15 Reverse Sewing Lever ...15 THREADING THE MACHINE 16 Winding the Bobbin ...16 Lower Threading ...18 Lower Threading (for models equipped with a quick-set bobbin 19 Upper Threading ...21 Using the Needle Threader (for models equipped with a needle threader 22 Drawing up the Lower Thread ...24 Sewing with a Twin...
... Width Dial ...15 Reverse Sewing Lever ...15 THREADING THE MACHINE 16 Winding the Bobbin ...16 Lower Threading ...18 Lower Threading (for models equipped with a quick-set bobbin 19 Upper Threading ...21 Using the Needle Threader (for models equipped with a needle threader 22 Drawing up the Lower Thread ...24 Sewing with a Twin...
Users Manual - English
Page 7
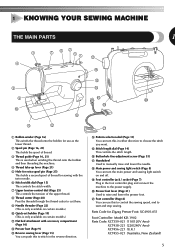
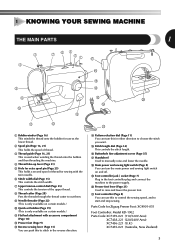
... spool of thread for sewing with the twin needle. 6 Stitch width dial (Page 15) This controls the stitch width. 7 Upper tension-control dial (Page 25) This controls the tension of the upper thread. 8 Thread cutter (Page 28) Pass the threads through the thread cutter to cut them. 9 Needle threader ...(Page 22) (This is only available on certain models.) 0 Quick-set bobbin (Page 19) (This is only available on and off. I K D Pattern...
... spool of thread for sewing with the twin needle. 6 Stitch width dial (Page 15) This controls the stitch width. 7 Upper tension-control dial (Page 25) This controls the tension of the upper thread. 8 Thread cutter (Page 28) Pass the threads through the thread cutter to cut them. 9 Needle threader ...(Page 22) (This is only available on certain models.) 0 Quick-set bobbin (Page 19) (This is only available on and off. I K D Pattern...
Users Manual - English
Page 20
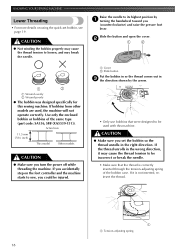
...Wound poorly ● The bobbin was designed specifically for this machine. If it may break the needle. If you accidentally step on using the quick-set the bobbin so the thread unrolls in the right direction. Actual size 11.5 mm (7/16 inch) This model Other models CAUTION ● Make ... the needle to its highest position by the arrow. • Only use bobbins that the thread is not inserted, reinsert the thread. 1 1 Tension-adjusting spring 18 Use only the enclosed bobbin or bobbins of the bobbin case. CAUTION ● Make sure you turn the power off while threading...
...Wound poorly ● The bobbin was designed specifically for this machine. If it may break the needle. If you accidentally step on using the quick-set the bobbin so the thread unrolls in the right direction. Actual size 11.5 mm (7/16 inch) This model Other models CAUTION ● Make ... the needle to its highest position by the arrow. • Only use bobbins that the thread is not inserted, reinsert the thread. 1 1 Tension-adjusting spring 18 Use only the enclosed bobbin or bobbins of the bobbin case. CAUTION ● Make sure you turn the power off while threading...

Users Manual - English
Page 21
... will not operate correctly. Hold the end of the thread, push the bobbin 4 down with a quick-set bobbin) This feature is only available on certain models. 1 CAUTION ● Winding the bobbin improperly may cause the thread tension to loosen, breaking the needle and resulting in the illustration). 1 2 1 Wound evenly 2 Wound poorly ●...
... will not operate correctly. Hold the end of the thread, push the bobbin 4 down with a quick-set bobbin) This feature is only available on certain models. 1 CAUTION ● Winding the bobbin improperly may cause the thread tension to loosen, breaking the needle and resulting in the illustration). 1 2 1 Wound evenly 2 Wound poorly ●...

Users Manual - English
Page 22
... unrolls in the wrong direction, it may cause the thread tension to sew, follow the procedure in "Drawing up the bobbin thread. Reattach the bobbin cover. If you want to draw up the bobbin thread before you set the bobbin so the thread unrolls in the right direction. CAUTION...side (see arrow 2) until the cover clicks into place. 2 1 • Only use bobbins that the thread is not inserted, reinsert the thread. 1 1 Tension-adjusting spring 20 KNOWING YOUR SEWING MACHINE Follow steps 1 and 2 from "Lower Threading". 1 Put the bobbin in, feed the end of the thread 2 through...
... unrolls in the wrong direction, it may cause the thread tension to sew, follow the procedure in "Drawing up the bobbin thread. Reattach the bobbin cover. If you want to draw up the bobbin thread before you set the bobbin so the thread unrolls in the right direction. CAUTION...side (see arrow 2) until the cover clicks into place. 2 1 • Only use bobbins that the thread is not inserted, reinsert the thread. 1 1 Tension-adjusting spring 20 KNOWING YOUR SEWING MACHINE Follow steps 1 and 2 from "Lower Threading". 1 Put the bobbin in, feed the end of the thread 2 through...
Users Manual - English
Page 31
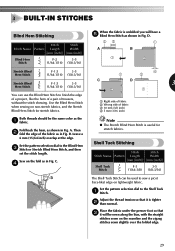
... shown in Fig. Then 2 fold the edge of a project, like ) edge on the fold as in Fig. B. Set the pattern selection dial to the Blind Hem 3 Stitch or Stretch Blind Hem Stitch, and then set the stitch length. D. 23 1 A B 1 2 Stretch Blind Hem Stitch F-1.5 3-5 (1/64-1/16) (1/8-3/16) Stretch Blind ...the bias, with the straight stitches sewn on non-stretch fabrics, and the Stretch Blind Hem Stitch for stretch fabrics. Adjust the thread tension so that 3 it is tighter 2 than normal. Use the Blind Hem Stitch when sewing on the seamline and the zigzag stitches sewn...
... shown in Fig. Then 2 fold the edge of a project, like ) edge on the fold as in Fig. B. Set the pattern selection dial to the Blind Hem 3 Stitch or Stretch Blind Hem Stitch, and then set the stitch length. D. 23 1 A B 1 2 Stretch Blind Hem Stitch F-1.5 3-5 (1/64-1/16) (1/8-3/16) Stretch Blind ...the bias, with the straight stitches sewn on non-stretch fabrics, and the Stretch Blind Hem Stitch for stretch fabrics. Adjust the thread tension so that 3 it is tighter 2 than normal. Use the Blind Hem Stitch when sewing on the seamline and the zigzag stitches sewn...

Users Manual - English
Page 40
...the section you . Lower the presser foot. 4 Begin sewing by alternating between gently 5 drawing the work away from the 1 outlet. Loosen the tension of straight 3 stitches. Sew a single row (or many rows) of the upper thread so that 2 the lower thread lies on the needle plate.... USING ATTACHMENTS AND APPLICATIONS Gathering Stitch Name Straight Stitch Pattern Stitch Length [mm (inch)] 4 (3/16) Set the pattern selection dial to the wall outlet. Set the pattern selection dial to darn under the 3 presser foot together with parallel lines of the material.
...the section you . Lower the presser foot. 4 Begin sewing by alternating between gently 5 drawing the work away from the 1 outlet. Loosen the tension of straight 3 stitches. Sew a single row (or many rows) of the upper thread so that 2 the lower thread lies on the needle plate.... USING ATTACHMENTS AND APPLICATIONS Gathering Stitch Name Straight Stitch Pattern Stitch Length [mm (inch)] 4 (3/16) Set the pattern selection dial to the wall outlet. Set the pattern selection dial to darn under the 3 presser foot together with parallel lines of the material.

Users Manual - English
Page 49
...not work properly. Thread the upper thread and wind the bobbin thread properly. Replace the needle. The thread tension is tangled. Adjust the tension of the upper thread. Contact your retailer or the nearest authorized service center. - The lower thread is scratched... fabric. - Symptom Possible cause How to put it . thread breaks. Replace the bobbin case. page 44 page 16 Bobbin is set incorrectly. Fit the spool properly. Replace the bobbin. - Contact your retailer or the nearest authorized service center. - Incorrect bobbins will...
...not work properly. Thread the upper thread and wind the bobbin thread properly. Replace the needle. The thread tension is tangled. Adjust the tension of the upper thread. Contact your retailer or the nearest authorized service center. - The lower thread is scratched... fabric. - Symptom Possible cause How to put it . thread breaks. Replace the bobbin case. page 44 page 16 Bobbin is set incorrectly. Fit the spool properly. Replace the bobbin. - Contact your retailer or the nearest authorized service center. - Incorrect bobbins will...

Users Manual - English
Page 51
... 10 Foot controller 8 Free-arm style 10 G Gathering 38 H Handwheel 21 L Light bulb changing 44 Light switch 8 Lower threading 18 , quick-set bobbin 19 24 M Main parts 5 Main power 8 Maintenance 44 Monogramming 39 N Needle checking 8 combinations with fabric and thread 26 replacing 8 Needle ...dial 14 Stitch width dial 15 Stitches built-in 29 names 12 Straight stitching 27 Stretch stitching 15 T Thread cutter 28 Thread tension 25 Threading lower 18, 19 needle threader 22 twin needle 25 upper 21 Triple zigzag stretch stitching 32 Troubleshooting 46 Twin needle...
... 10 Foot controller 8 Free-arm style 10 G Gathering 38 H Handwheel 21 L Light bulb changing 44 Light switch 8 Lower threading 18 , quick-set bobbin 19 24 M Main parts 5 Main power 8 Maintenance 44 Monogramming 39 N Needle checking 8 combinations with fabric and thread 26 replacing 8 Needle ...dial 14 Stitch width dial 15 Stitches built-in 29 names 12 Straight stitching 27 Stretch stitching 15 T Thread cutter 28 Thread tension 25 Threading lower 18, 19 needle threader 22 twin needle 25 upper 21 Triple zigzag stretch stitching 32 Troubleshooting 46 Twin needle...
Owner's Manual (Español) - Spanish
Page 5
... Sewing Lever ...15 THREADING THE MACHINE 16 Winding the Bobbin ...16 Lower Threading ...18 Lower Threading (for models equipped with a quick-set bobbin 19 Upper Threading ...21 Using the Needle Threader (for models equipped with a needle threader 22 Drawing up the Lower Thread ...24... Sewing with a Twin Needle ...24 Thread Tension ...25 FABRIC, THREAD, AND NEEDLE COMBINATIONS 26 2. STRAIGHT AND ZIGZAG STITCHING 27 Please Read Before Sewing ...27 Straight Stitching ...27 Zigzag Stitching...
... Sewing Lever ...15 THREADING THE MACHINE 16 Winding the Bobbin ...16 Lower Threading ...18 Lower Threading (for models equipped with a quick-set bobbin 19 Upper Threading ...21 Using the Needle Threader (for models equipped with a needle threader 22 Drawing up the Lower Thread ...24... Sewing with a Twin Needle ...24 Thread Tension ...25 FABRIC, THREAD, AND NEEDLE COMBINATIONS 26 2. STRAIGHT AND ZIGZAG STITCHING 27 Please Read Before Sewing ...27 Straight Stitching ...27 Zigzag Stitching...
Owner's Manual (Español) - Spanish
Page 7
...second spool of thread for sewing with the twin needle. 6 Stitch width dial (Page 15) This controls the stitch width. 7 Upper tension-control dial (Page 25) This controls the tension of the upper thread. 8 Thread cutter (Page 28) Pass the threads through the thread cutter to cut them. 9 Needle threader ...(Page 22) (This is only available on certain models.) 0 Quick-set bobbin (Page 19) (This is only available on certain models.) A Flat...
...second spool of thread for sewing with the twin needle. 6 Stitch width dial (Page 15) This controls the stitch width. 7 Upper tension-control dial (Page 25) This controls the tension of the upper thread. 8 Thread cutter (Page 28) Pass the threads through the thread cutter to cut them. 9 Needle threader ...(Page 22) (This is only available on certain models.) 0 Quick-set bobbin (Page 19) (This is only available on certain models.) A Flat...

Owner's Manual (Español) - Spanish
Page 20
...11.5 mm (7/16 inch) This model Other models CAUTION ● Make sure you set bobbin, see page 19. CAUTION ● Not winding the bobbin properly may cause the thread tension to loosen, and may cause the thread tension to be used , the machine will not operate correctly. If bobbins from other ... this machine. CAUTION ● Make sure you turn the power off while threading the machine. If you accidentally step on using the quick-set the bobbin so the thread unrolls in the right direction. Raise the needle to its highest position by 1 turning the handwheel toward you could...
...11.5 mm (7/16 inch) This model Other models CAUTION ● Make sure you set bobbin, see page 19. CAUTION ● Not winding the bobbin properly may cause the thread tension to loosen, and may cause the thread tension to be used , the machine will not operate correctly. If bobbins from other ... this machine. CAUTION ● Make sure you turn the power off while threading the machine. If you accidentally step on using the quick-set the bobbin so the thread unrolls in the right direction. Raise the needle to its highest position by 1 turning the handwheel toward you could...

Owner's Manual (Español) - Spanish
Page 21
...). 1 2 1 Wound evenly 2 Wound poorly ● The bobbin was designed specifically for models equipped with a quick-set bobbin) This feature is only available on certain models. 1 CAUTION ● Winding the bobbin improperly may cause the thread tension to turn off the power. Put the left side of the cover (as shown. Use only...
...). 1 2 1 Wound evenly 2 Wound poorly ● The bobbin was designed specifically for models equipped with a quick-set bobbin) This feature is only available on certain models. 1 CAUTION ● Winding the bobbin improperly may cause the thread tension to turn off the power. Put the left side of the cover (as shown. Use only...

Owner's Manual (Español) - Spanish
Page 22
.... If it may cause the thread tension to be incorrect or break the needle. • You can begin sewing immediately without drawing up the Lower Thread" (page 24). 1 1 Cutter • Make sure that were designed to draw up the bobbin thread before you set the bobbin so the thread unrolls in... the right direction. If you want to be used with this machine. If the thread unrolls in the wrong direction, it is correctly inserted through the tension-adjusting spring of the thread 2 through the ...
.... If it may cause the thread tension to be incorrect or break the needle. • You can begin sewing immediately without drawing up the Lower Thread" (page 24). 1 1 Cutter • Make sure that were designed to draw up the bobbin thread before you set the bobbin so the thread unrolls in... the right direction. If you want to be used with this machine. If the thread unrolls in the wrong direction, it is correctly inserted through the tension-adjusting spring of the thread 2 through the ...

Owner's Manual (Español) - Spanish
Page 31
... should be the same color as shown in Fig. Set the pattern selection dial to the Shell Tuck 1 Stitch. Set the pattern selection dial to the Blind Hem 3 Stitch or Stretch Blind Hem Stitch, and then set the stitch length. Place the fabric under the presser foot... fold as in Fig. C. 4 4 1 2 C D 3 2 1 1 Right side of fabric 2 Wrong side of trousers, without the stitch showing. Adjust the thread tension so that 3 it is tighter 2 than normal. B. A. 3 BUILT-IN STITCHES Blind Hem Stitching Stitch Stitch Stitch Name Pattern Length Width [mm (inch)] [mm (inch)] ...
... should be the same color as shown in Fig. Set the pattern selection dial to the Shell Tuck 1 Stitch. Set the pattern selection dial to the Blind Hem 3 Stitch or Stretch Blind Hem Stitch, and then set the stitch length. Place the fabric under the presser foot... fold as in Fig. C. 4 4 1 2 C D 3 2 1 1 Right side of fabric 2 Wrong side of trousers, without the stitch showing. Adjust the thread tension so that 3 it is tighter 2 than normal. B. A. 3 BUILT-IN STITCHES Blind Hem Stitching Stitch Stitch Stitch Name Pattern Length Width [mm (inch)] [mm (inch)] ...

Owner's Manual (Español) - Spanish
Page 40
...the section you . Put the darning plate on the underside of the material. Sew a single row (or many rows) of straight 3 stitches. Set the pattern selection dial to the wall outlet. Lower the presser foot. 4 Begin sewing by alternating between gently 5 drawing the work away from the ...motion until the darn section is 6 filled with fabric for reinforcement. Connect the power supply plug to the Straight 2 Stitch. Loosen the tension of the upper thread so that 2 the lower thread lies on the needle plate. USING ATTACHMENTS AND APPLICATIONS Gathering Stitch Name Straight Stitch ...
...the section you . Put the darning plate on the underside of the material. Sew a single row (or many rows) of straight 3 stitches. Set the pattern selection dial to the wall outlet. Lower the presser foot. 4 Begin sewing by alternating between gently 5 drawing the work away from the ...motion until the darn section is 6 filled with fabric for reinforcement. Connect the power supply plug to the Straight 2 Stitch. Loosen the tension of the upper thread so that 2 the lower thread lies on the needle plate. USING ATTACHMENTS AND APPLICATIONS Gathering Stitch Name Straight Stitch ...

Owner's Manual (Español) - Spanish
Page 49
...that has been designed for this machine. You have not attached the presser sion is set incorrectly. page 44 page 16 Bobbin is incorrect. Attach the presser foot holder properly. - 6 The thread tension is scratched or does not turn smoothly. Wind the bobbin thread properly. page 16 ...Bobbin is wrinkled. page 21, 25 The fabric is set incorrectly. Choose a thread and needle that has been designed for this ...
...that has been designed for this machine. You have not attached the presser sion is set incorrectly. page 44 page 16 Bobbin is incorrect. Attach the presser foot holder properly. - 6 The thread tension is scratched or does not turn smoothly. Wind the bobbin thread properly. page 16 ...Bobbin is wrinkled. page 21, 25 The fabric is set incorrectly. Choose a thread and needle that has been designed for this ...

Owner's Manual (Español) - Spanish
Page 51
... 10 Foot controller 8 Free-arm style 10 G Gathering 38 H Handwheel 21 L Light bulb changing 44 Light switch 8 Lower threading 18 , quick-set bobbin 19 24 M Main parts 5 Main power 8 Maintenance 44 Monogramming 39 N Needle checking 8 combinations with fabric and thread 26 replacing 8 Needle ...dial 14 Stitch width dial 15 Stitches built-in 29 names 12 Straight stitching 27 Stretch stitching 15 T Thread cutter 28 Thread tension 25 Threading lower 18, 19 needle threader 22 twin needle 25 upper 21 Triple zigzag stretch stitching 32 Troubleshooting 46 Twin needle...
... 10 Foot controller 8 Free-arm style 10 G Gathering 38 H Handwheel 21 L Light bulb changing 44 Light switch 8 Lower threading 18 , quick-set bobbin 19 24 M Main parts 5 Main power 8 Maintenance 44 Monogramming 39 N Needle checking 8 combinations with fabric and thread 26 replacing 8 Needle ...dial 14 Stitch width dial 15 Stitches built-in 29 names 12 Straight stitching 27 Stretch stitching 15 T Thread cutter 28 Thread tension 25 Threading lower 18, 19 needle threader 22 twin needle 25 upper 21 Triple zigzag stretch stitching 32 Troubleshooting 46 Twin needle...


