

Users Manual - English
Page 1
1 KNOWING YOUR SEWING MACHINE 2 STRAIGHT AND ZIGZAG STITCHING 3 BUILT-IN STITCHES 4 SEWING BUTTONHOLES AND BUTTONS 5 USING ATTACHMENTS AND APPLICATIONS 6 APPENDIX Operation Manual
1 KNOWING YOUR SEWING MACHINE 2 STRAIGHT AND ZIGZAG STITCHING 3 BUILT-IN STITCHES 4 SEWING BUTTONHOLES AND BUTTONS 5 USING ATTACHMENTS AND APPLICATIONS 6 APPENDIX Operation Manual

Users Manual - English
Page 2
...they do not play with this manual. Use this manual. 3. Use only accessories recommended by or near children. 2. Never operate the machine with same type rated 15 watts. Do not operate where aerosol (spray) products are being administered. 8. Do not unplug by young ... any adjustments in this machine only for use as threading needle, changing needle, threading bobbin, or changing presser foot, and the like. 15. Always unplug the machine from all instructions before you change the light bulb. This sewing machine is required around the machine needle. 11. Young children...
...they do not play with this manual. Use this manual. 3. Use only accessories recommended by or near children. 2. Never operate the machine with same type rated 15 watts. Do not operate where aerosol (spray) products are being administered. 8. Do not unplug by young ... any adjustments in this machine only for use as threading needle, changing needle, threading bobbin, or changing presser foot, and the like. 15. Always unplug the machine from all instructions before you change the light bulb. This sewing machine is required around the machine needle. 11. Young children...

Users Manual - English
Page 5
... Buttonholes ...35 Sewing Buttons ...36 3 STRAIGHT AND ZIGZAG STITCHING 27 Please Read Before Sewing ...27 Straight Stitching ...27 Zigzag Stitching ...28 3. CONTENTS 1. KNOWING YOUR SEWING MACHINE 5 THE MAIN PARTS ...5 ACCESSORIES ...6 Optional Accessories ...6 USING YOUR SEWING MACHINE 7 Connecting Plugs ...7 Main Power and Sewing Light Switch ...and Stitch Names ...12 Stitch Length Dial ...14 Stretch Stitching ...15 Stitch Width Dial ...15 Reverse Sewing Lever ...15 THREADING THE MACHINE 16 Winding the Bobbin ...16 Lower Threading ...18 Lower Threading (for models equipped with a quick...
... Buttonholes ...35 Sewing Buttons ...36 3 STRAIGHT AND ZIGZAG STITCHING 27 Please Read Before Sewing ...27 Straight Stitching ...27 Zigzag Stitching ...28 3. CONTENTS 1. KNOWING YOUR SEWING MACHINE 5 THE MAIN PARTS ...5 ACCESSORIES ...6 Optional Accessories ...6 USING YOUR SEWING MACHINE 7 Connecting Plugs ...7 Main Power and Sewing Light Switch ...and Stitch Names ...12 Stitch Length Dial ...14 Stretch Stitching ...15 Stitch Width Dial ...15 Reverse Sewing Lever ...15 THREADING THE MACHINE 16 Winding the Bobbin ...16 Lower Threading ...18 Lower Threading (for models equipped with a quick...
Users Manual - English
Page 7
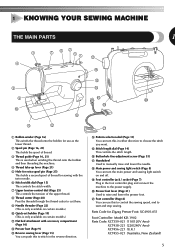
... the presser foot. E Stitch length dial (Page 14) This controls the stitch length. F Buttonhole fine-adjustment screw (Page 35) G Handwheel Used to start and stop sewing. 1 KNOWING YOUR SEWING MACHINE THE MAIN PARTS 1 3 4 7 62 51 G F 8 9 0 C A B 1 Bobbin winder (Page 16) This winds the thread onto the bobbin for use this to control the...
... the presser foot. E Stitch length dial (Page 14) This controls the stitch length. F Buttonhole fine-adjustment screw (Page 35) G Handwheel Used to start and stop sewing. 1 KNOWING YOUR SEWING MACHINE THE MAIN PARTS 1 3 4 7 62 51 G F 8 9 0 C A B 1 Bobbin winder (Page 16) This winds the thread onto the bobbin for use this to control the...

Users Manual - English
Page 8
... SA129 F005N: XC1948-002 SA125 F001N: XC1944-002 6 Part Name 1 Walking Foot 2 Quilting Foot 3 1/4-inch Quilting Foot Part Code U.S.A. No. No. Optional Accessories 1. 2. 3. KNOWING YOUR SEWING MACHINE ACCESSORIES The following accessories are stored in the flat bed attachment. We have designed these accessories to help you be able to carry out most...
... SA129 F005N: XC1948-002 SA125 F001N: XC1944-002 6 Part Name 1 Walking Foot 2 Quilting Foot 3 1/4-inch Quilting Foot Part Code U.S.A. No. No. Optional Accessories 1. 2. 3. KNOWING YOUR SEWING MACHINE ACCESSORIES The following accessories are stored in the flat bed attachment. We have designed these accessories to help you be able to carry out most...

Users Manual - English
Page 9
... main power first. If it from the wall outlet. ● When servicing the machine, or when removing covers or changing bulbs, the machine must be unplugged. (For U.S.A. Pulling on the cord. Connect the power supply plug to the 1 machine. USING YOUR SEWING MACHINE WARNING 1 ● Use only regular household electricity for repairs before continuing use...
... main power first. If it from the wall outlet. ● When servicing the machine, or when removing covers or changing bulbs, the machine must be unplugged. (For U.S.A. Pulling on the cord. Connect the power supply plug to the 1 machine. USING YOUR SEWING MACHINE WARNING 1 ● Use only regular household electricity for repairs before continuing use...

Users Manual - English
Page 10
... run at a low speed. Other needles may be injured. ● Only use . KNOWING YOUR SEWING MACHINE Main Power and Sewing Light Switch This switch turns the main power and sewing light on a flat surface. 2 Check the needle from the outlet. 1 Raise the needle to ...Note (For U.S.A. Lower the presser foot lever. 3 1 1 Presser foot lever Checking the Needle The sewing needle must always be used for home use sewing machine needles for Model XL-3500, XL-2600, XL-3510, XL-2610, XL-3520, XL-2620. 8 1 2 1 Parallel space 2 Level surface (bobbin cover, glass, etc.) Replacing the Needle...
... run at a low speed. Other needles may be injured. ● Only use . KNOWING YOUR SEWING MACHINE Main Power and Sewing Light Switch This switch turns the main power and sewing light on a flat surface. 2 Check the needle from the outlet. 1 Raise the needle to ...Note (For U.S.A. Lower the presser foot lever. 3 1 1 Presser foot lever Checking the Needle The sewing needle must always be used for home use sewing machine needles for Model XL-3500, XL-2600, XL-3510, XL-2610, XL-3520, XL-2620. 8 1 2 1 Parallel space 2 Level surface (bobbin cover, glass, etc.) Replacing the Needle...

Users Manual - English
Page 11
... securely tighten the needle clamp screw with a 1 screwdriver. Release the foot by 1 turning the handwheel toward the 5 back of the sewing machine may be used with this machine. Hold the needle with your left hand, and then 4 use a screwdriver to turn off the power before you change the presser foot... depending on what you want to sew and how. ■ Snap-on the controller, the machine will have to be injured. ● Always use the correct presser foot for the stitch pattern you have been designed...
... securely tighten the needle clamp screw with a 1 screwdriver. Release the foot by 1 turning the handwheel toward the 5 back of the sewing machine may be used with this machine. Hold the needle with your left hand, and then 4 use a screwdriver to turn off the power before you change the presser foot... depending on what you want to sew and how. ■ Snap-on the controller, the machine will have to be injured. ● Always use the correct presser foot for the stitch pattern you have been designed...

Users Manual - English
Page 12
... strike the presser foot, which may fall out and be lost or damaged. To change your machine to 1 open it . CAUTION ● If the presser foot is not installed with the ...slot on the presser foot is in . If the presser foot is convenient for sewing tubular and hard-to 1 release it . 1 1 1 Shank ■ Presser Foot Installation Orientation 2 1 Flat bed... to the left to the free-arm style, lift out the flat bed attachment. KNOWING YOUR SEWING MACHINE Put a different presser foot on the needle plate 3 so that the bar on the shank....
... strike the presser foot, which may fall out and be lost or damaged. To change your machine to 1 open it . CAUTION ● If the presser foot is not installed with the ...slot on the presser foot is in . If the presser foot is convenient for sewing tubular and hard-to 1 release it . 1 1 1 Shank ■ Presser Foot Installation Orientation 2 1 Flat bed... to the left to the free-arm style, lift out the flat bed attachment. KNOWING YOUR SEWING MACHINE Put a different presser foot on the needle plate 3 so that the bar on the shank....

Users Manual - English
Page 14
KNOWING YOUR SEWING MACHINE Patterns and Stitch Names Pattern 35 Stitches 25 Stitches Stitch Name Recommended Width (mm (inch)) Recommended Length (mm (inch)) Instruction Manual Page 4-STEP AUTOMATIC BUTTONHOLE ...
KNOWING YOUR SEWING MACHINE Patterns and Stitch Names Pattern 35 Stitches 25 Stitches Stitch Name Recommended Width (mm (inch)) Recommended Length (mm (inch)) Instruction Manual Page 4-STEP AUTOMATIC BUTTONHOLE ...

Users Manual - English
Page 16
...stitch length for making the satin stitch varies according to observe the feeding of fabric to the material and thread being used when sewing a button. This is used . To determine the exact dial position, first test the stitch and length settings on the ...a satin stitch (close zigzag stitch), which is not fed. With the "0" setting, material is used for best results. KNOWING YOUR SEWING MACHINE Pattern 35 Stitches 25 Stitches Stitch Name COMB STITCH COMB STITCH DECORATIVE STITCH FAGOTING STITCH DECORATIVE STITCH DECORATIVE HEM STITCH DECORATIVE STITCH Recommended Width ...
...stitch length for making the satin stitch varies according to observe the feeding of fabric to the material and thread being used when sewing a button. This is used . To determine the exact dial position, first test the stitch and length settings on the ...a satin stitch (close zigzag stitch), which is not fed. With the "0" setting, material is used for best results. KNOWING YOUR SEWING MACHINE Pattern 35 Stitches 25 Stitches Stitch Name COMB STITCH COMB STITCH DECORATIVE STITCH FAGOTING STITCH DECORATIVE STITCH DECORATIVE HEM STITCH DECORATIVE STITCH Recommended Width ...

Users Manual - English
Page 18
... bobbin onto the bobbin winder shaft 3 and slide the bobbin winder shaft to the machine. ● We designed the bobbin that have been designed for this sewing machine. Only use the bobbin that comes with this machine or bobbins of the same type (part code: SA156, SFB (XA5539-151)). Actual...spring on the spool pin. Using other models, the machine will not work properly. CAUTION ● If the spool of thread is not in the right place, the thread may cause damage to the right. KNOWING YOUR SEWING MACHINE THREADING THE MACHINE Winding the Bobbin CAUTION ● Only use bobbins (...
... bobbin onto the bobbin winder shaft 3 and slide the bobbin winder shaft to the machine. ● We designed the bobbin that have been designed for this sewing machine. Only use the bobbin that comes with this machine or bobbins of the same type (part code: SA156, SFB (XA5539-151)). Actual...spring on the spool pin. Using other models, the machine will not work properly. CAUTION ● If the spool of thread is not in the right place, the thread may cause damage to the right. KNOWING YOUR SEWING MACHINE THREADING THE MACHINE Winding the Bobbin CAUTION ● Only use bobbins (...
Users Manual - English
Page 20
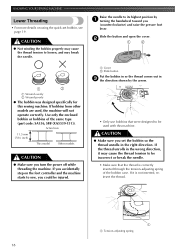
CAUTION ● Make sure you set bobbin, see page 19. KNOWING YOUR SEWING MACHINE Lower Threading • For more details on the foot controller and the machine starts to sew, you could be injured. 1 Cover 2 Slide button Put the bobbin in so the thread comes out in 3 the direction shown by...bobbin or bobbins of the bobbin case. If bobbins from other models are used with this sewing machine. If you turn the power off while threading the machine. Raise the needle to be used , the machine will not operate correctly. Actual size 11.5 mm (7/16 inch) This model Other models ...
CAUTION ● Make sure you set bobbin, see page 19. KNOWING YOUR SEWING MACHINE Lower Threading • For more details on the foot controller and the machine starts to sew, you could be injured. 1 Cover 2 Slide button Put the bobbin in so the thread comes out in 3 the direction shown by...bobbin or bobbins of the bobbin case. If bobbins from other models are used with this sewing machine. If you turn the power off while threading the machine. Raise the needle to be used , the machine will not operate correctly. Actual size 11.5 mm (7/16 inch) This model Other models ...

Users Manual - English
Page 21
... the cover clicks into place. 2 1 • Replace the cover so that the end of the thread comes out from other models are used, the machine will not operate correctly. Actual size 11.5 mm (7/16 inch) This model Other models CAUTION ● Be sure to operate, injury could result. 19...through the slit, as shown by the line in the illustration). 1 2 1 Wound evenly 2 Wound poorly ● The bobbin was designed specifically for this sewing machine. If bobbins from the left side of the cover (as shown. Reattach the bobbin cover. If you accidentally step on the foot controller and the...
... the cover clicks into place. 2 1 • Replace the cover so that the end of the thread comes out from other models are used, the machine will not operate correctly. Actual size 11.5 mm (7/16 inch) This model Other models CAUTION ● Be sure to operate, injury could result. 19...through the slit, as shown by the line in the illustration). 1 2 1 Wound evenly 2 Wound poorly ● The bobbin was designed specifically for this sewing machine. If bobbins from the left side of the cover (as shown. Reattach the bobbin cover. If you accidentally step on the foot controller and the...

Users Manual - English
Page 22
KNOWING YOUR SEWING MACHINE Follow steps 1 and 2 from "Lower Threading". 1 Put the bobbin in, feed the end of the bobbin case. If the thread unrolls in the wrong direction, it may cause the thread tension to be incorrect or break the needle. • You can begin sewing immediately without drawing up the ... you start to cut it is correctly inserted through the tension-adjusting spring of the thread 2 through the slit, and then pull the thread to sew, follow the procedure in "Drawing up the bobbin thread before you set the bobbin so the thread unrolls in 3 place (see arrow 1), and...
KNOWING YOUR SEWING MACHINE Follow steps 1 and 2 from "Lower Threading". 1 Put the bobbin in, feed the end of the bobbin case. If the thread unrolls in the wrong direction, it may cause the thread tension to be incorrect or break the needle. • You can begin sewing immediately without drawing up the ... you start to cut it is correctly inserted through the tension-adjusting spring of the thread 2 through the slit, and then pull the thread to sew, follow the procedure in "Drawing up the bobbin thread before you set the bobbin so the thread unrolls in 3 place (see arrow 1), and...

Users Manual - English
Page 23
... the needle to its highest position by 2 turning the handwheel toward you (counterclockwise) so that the mark on the wheel points up before threading the sewing machine. Pull up the spool pin and put a spool of thread is in the 4 illustration above. Upper Threading 1 1 Spool pin 2 Thread guide (back) 3 Thread ..., and then the front one. Be sure to break. Feed the upper thread as shown in the wrong place, or is not correctly raised, the sewing machine can not be threaded. Pass the thread through the 5 thread take-up lever from right to left. 1 1 1 Thread take -up lever 5 Mark on...
... the needle to its highest position by 2 turning the handwheel toward you (counterclockwise) so that the mark on the wheel points up before threading the sewing machine. Pull up the spool pin and put a spool of thread is in the 4 illustration above. Upper Threading 1 1 Spool pin 2 Thread guide (back) 3 Thread ..., and then the front one. Be sure to break. Feed the upper thread as shown in the wrong place, or is not correctly raised, the sewing machine can not be threaded. Pass the thread through the 5 thread take-up lever from right to left. 1 1 1 Thread take -up lever 5 Mark on...

Users Manual - English
Page 24
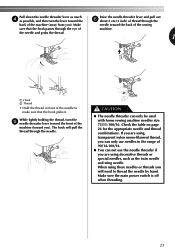
... ● When you use the needle threader, make sure the needle holder is in your left hand, then feeding the thread with your sewing machine is equipped with a needle threader) This feature is only available on certain models. Make sure you raise the presser foot lever and the ... before you feed the upper thread. ● If you incorrectly feed the thread you may be wrapped around the thread take-up lever. KNOWING YOUR SEWING MACHINE Put the thread behind the guide above the 6 needle. • The thread can not be damaged. 1 1 5 cm (2 inch) While lowering the needle threader ...
... ● When you use the needle threader, make sure the needle holder is in your left hand, then feeding the thread with your sewing machine is equipped with a needle threader) This feature is only available on certain models. Make sure you raise the presser foot lever and the ... before you feed the upper thread. ● If you incorrectly feed the thread you may be wrapped around the thread take-up lever. KNOWING YOUR SEWING MACHINE Put the thread behind the guide above the 6 needle. • The thread can not be damaged. 1 1 5 cm (2 inch) While lowering the needle threader ...
Users Manual - English
Page 25
... lever and pull out 6 about 5 cm (2 inch) of thread through the back of the machine (toward the back of the sewing sure that the hook grabs it. If you are using transparent nylon mono-filament thread, you can...or special needles, such as possible, and then turn the 5 needle threader lever toward the front of the machine (away from you). Make sure the main power switch is off when threading. 23 Check the table on page...of 90/14-100/16. ● You can only be used with home sewing machine needles size 75/11-100/16. Make needle toward you will pull the thread through the eye of...
... lever and pull out 6 about 5 cm (2 inch) of thread through the back of the machine (toward the back of the sewing sure that the hook grabs it. If you are using transparent nylon mono-filament thread, you can...or special needles, such as possible, and then turn the 5 needle threader lever toward the front of the machine (away from you). Make sure the main power switch is off when threading. 23 Check the table on page...of 90/14-100/16. ● You can only be used with home sewing machine needles size 75/11-100/16. Make needle toward you will pull the thread through the eye of...

Users Manual - English
Page 26
... (counterclockwise) by hand so that some thread will be removed. KNOWING YOUR SEWING MACHINE Drawing up the Lower Thread While lightly holding the end of the upper 1 thread, slowly turn the handwheel toward the back of the machine under the presser foot. 1 2 1 Upper thread 2 Lower thread •... Pull on certain models. Draw up the lower 2 thread. Replace the bobbin cover. 3 Sewing with a Twin Needle We have been made for making decorative stitches. The needle could break and damage the machine. ● When using the twin needle, make sure you . ● When using the ...
... (counterclockwise) by hand so that some thread will be removed. KNOWING YOUR SEWING MACHINE Drawing up the Lower Thread While lightly holding the end of the upper 1 thread, slowly turn the handwheel toward the back of the machine under the presser foot. 1 2 1 Upper thread 2 Lower thread •... Pull on certain models. Draw up the lower 2 thread. Replace the bobbin cover. 3 Sewing with a Twin Needle We have been made for making decorative stitches. The needle could break and damage the machine. ● When using the twin needle, make sure you . ● When using the ...

Users Manual - English
Page 28
The wrong combination may bend or break the needle. KNOWING YOUR SEWING MACHINE FABRIC, THREAD, AND NEEDLE COMBINATIONS Fabric Type Medium weight fabrics Lightweight fabrics Heavyweight fabrics Stretch fabrics Broadcloth Taffeta Flannel, Gabardine Lawn, Batiste Georgette Challis, Satin ... as heavyweight fabric like denim with a small needle (65/9-75/11), may also cause the seam to be uneven, the fabric to pucker, or the machine to skip stitches. 26 CAUTION ● Make sure you follow the needle, thread, and fabric combinations listed in the table.
The wrong combination may bend or break the needle. KNOWING YOUR SEWING MACHINE FABRIC, THREAD, AND NEEDLE COMBINATIONS Fabric Type Medium weight fabrics Lightweight fabrics Heavyweight fabrics Stretch fabrics Broadcloth Taffeta Flannel, Gabardine Lawn, Batiste Georgette Challis, Satin ... as heavyweight fabric like denim with a small needle (65/9-75/11), may also cause the seam to be uneven, the fabric to pucker, or the machine to skip stitches. 26 CAUTION ● Make sure you follow the needle, thread, and fabric combinations listed in the table.


