

Users Manual - English
Page 2
The machine should never be used as threading needle, changing needle, threading bobbin, or changing presser foot, and the like. 15. Always unplug the machine before cleaning. 2. To reduce the risk of electric shock: 1. Use only accessories ...
The machine should never be used as threading needle, changing needle, threading bobbin, or changing presser foot, and the like. 15. Always unplug the machine before cleaning. 2. To reduce the risk of electric shock: 1. Use only accessories ...

Users Manual - English
Page 4
... damaged. Save this packing material if you are checking or cleaning the machine • Leaving the machine unattended 3. Do not touch the handwheel, thread take or send the machine to make sure you do not pack it properly, or do not use or store the machine near a heater, ... lamp or other moving parts. 2. Do not use the machine safely 1. For additional product information and updates, visit our web site at www.brother.com. The contents of this manual and specifications of this machine to unpack and repack the machine. PLEASE READ THESE INSTRUCTIONS BEFORE YOU USE THE...
... damaged. Save this packing material if you are checking or cleaning the machine • Leaving the machine unattended 3. Do not touch the handwheel, thread take or send the machine to make sure you do not pack it properly, or do not use or store the machine near a heater, ... lamp or other moving parts. 2. Do not use the machine safely 1. For additional product information and updates, visit our web site at www.brother.com. The contents of this manual and specifications of this machine to unpack and repack the machine. PLEASE READ THESE INSTRUCTIONS BEFORE YOU USE THE...

Users Manual - English
Page 5
...Stretch Stitching ...15 Stitch Width Dial ...15 Reverse Sewing Lever ...15 THREADING THE MACHINE 16 Winding the Bobbin ...16 Lower Threading ...18 Lower Threading (for models equipped with a quick-set bobbin 19 Upper Threading ...21 Using the Needle Threader (for models equipped with a needle ...threader 22 Drawing up the Lower Thread ...24 Sewing with a Twin Needle ...24 Thread Tension ...25 FABRIC, THREAD, AND NEEDLE COMBINATIONS 26 2. STRAIGHT AND ZIGZAG STITCHING 27 Please Read Before Sewing ...27 Straight Stitching ......
...Stretch Stitching ...15 Stitch Width Dial ...15 Reverse Sewing Lever ...15 THREADING THE MACHINE 16 Winding the Bobbin ...16 Lower Threading ...18 Lower Threading (for models equipped with a quick-set bobbin 19 Upper Threading ...21 Using the Needle Threader (for models equipped with a needle ...threader 22 Drawing up the Lower Thread ...24 Sewing with a Twin Needle ...24 Thread Tension ...25 FABRIC, THREAD, AND NEEDLE COMBINATIONS 26 2. STRAIGHT AND ZIGZAG STITCHING 27 Please Read Before Sewing ...27 Straight Stitching ......
Users Manual - English
Page 7
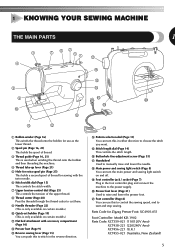
...and stop sewing. 1 KNOWING YOUR SEWING MACHINE THE MAIN PARTS 1 3 4 7 62 51 G F 8 9 0 C A B 1 Bobbin winder (Page 16) This winds the thread onto the bobbin for use this to stitch in the reverse direction. Parts Code for Zigzag Presser Foot: XC4901-051 Foot Controller: Model KD-1902... 15) This controls the stitch width. 7 Upper tension-control dial (Page 25) This controls the tension of the upper thread. 8 Thread cutter (Page 28) Pass the threads through the thread cutter to choose the stitch you want. J Presser foot lever (Page 21) Used to manually raise and lower the needle...
...and stop sewing. 1 KNOWING YOUR SEWING MACHINE THE MAIN PARTS 1 3 4 7 62 51 G F 8 9 0 C A B 1 Bobbin winder (Page 16) This winds the thread onto the bobbin for use this to stitch in the reverse direction. Parts Code for Zigzag Presser Foot: XC4901-051 Foot Controller: Model KD-1902... 15) This controls the stitch width. 7 Upper tension-control dial (Page 25) This controls the tension of the upper thread. 8 Thread cutter (Page 28) Pass the threads through the thread cutter to choose the stitch you want. J Presser foot lever (Page 21) Used to manually raise and lower the needle...

Users Manual - English
Page 16
... stitches are bunched together, lengthen the stitch length and continue sewing. The position needed for making the satin stitch varies according to the material and thread being used when sewing a button. The numbers marked on the stitch length dial represent the stitch length in millimeters (mm) (1/25 inch). The "F" range is...
... stitches are bunched together, lengthen the stitch length and continue sewing. The position needed for making the satin stitch varies according to the material and thread being used when sewing a button. The numbers marked on the stitch length dial represent the stitch length in millimeters (mm) (1/25 inch). The "F" range is...

Users Manual - English
Page 18
... bobbin. Using other models, the machine will not work properly. If you use the bobbin that comes with this sewing machine. Pass the end of thread on the spool pin. Actual size 11.5 mm (7/16 inch) This model Other models 1 2 1Pre-tension disk 2Bobbin winder shaft Put the spool of... the thread through the hole on 2 the bobbin from other bobbins may tangle on the spool pin and 1 pass the thread around the pre-tension disk. Put the bobbin onto the bobbin winder shaft 3 and slide the...
... bobbin. Using other models, the machine will not work properly. If you use the bobbin that comes with this sewing machine. Pass the end of thread on the spool pin. Actual size 11.5 mm (7/16 inch) This model Other models 1 2 1Pre-tension disk 2Bobbin winder shaft Put the spool of... the thread through the hole on 2 the bobbin from other bobbins may tangle on the spool pin and 1 pass the thread around the pre-tension disk. Put the bobbin onto the bobbin winder shaft 3 and slide the...
Users Manual - English
Page 19
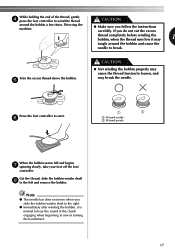
...remove the bobbin. If you do not cut the excess thread completely before winding the bobbin, when the thread runs low it is normal to hear the sound of the thread, gently 4 press the foot controller to wind the thread CAUTION around the bobbin and cause the needle to loosen... 1 2 1 Wound evenly 2 Wound poorly When the bobbin seems full and begins 7 spinning slowly, take your foot off the foot controller. Trim the excess thread above the bobbin. 5 CAUTION ● Not winding the bobbin properly may 1 tangle around the bobbin a few times. While holding the end of the clutch ...
...remove the bobbin. If you do not cut the excess thread completely before winding the bobbin, when the thread runs low it is normal to hear the sound of the thread, gently 4 press the foot controller to wind the thread CAUTION around the bobbin and cause the needle to loosen... 1 2 1 Wound evenly 2 Wound poorly When the bobbin seems full and begins 7 spinning slowly, take your foot off the foot controller. Trim the excess thread above the bobbin. 5 CAUTION ● Not winding the bobbin properly may 1 tangle around the bobbin a few times. While holding the end of the clutch ...
Users Manual - English
Page 20
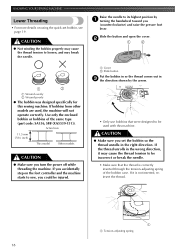
... SA156, SFB (XA5539-151)). CAUTION ● Make sure you set bobbin, see page 19. CAUTION ● Not winding the bobbin properly may cause the thread tension to be incorrect or break the needle. • Make sure that were designed to be injured. 1 Cover 2 Slide button Put the bobbin in so... the thread comes out in 3 the direction shown by 1 turning the handwheel toward you (counterclockwise) and raise the presser foot lever. Use only the enclosed bobbin or...
... SA156, SFB (XA5539-151)). CAUTION ● Make sure you set bobbin, see page 19. CAUTION ● Not winding the bobbin properly may cause the thread tension to be incorrect or break the needle. • Make sure that were designed to be injured. 1 Cover 2 Slide button Put the bobbin in so... the thread comes out in 3 the direction shown by 1 turning the handwheel toward you (counterclockwise) and raise the presser foot lever. Use only the enclosed bobbin or...

Users Manual - English
Page 21
... arrow 1), and then press lightly on the foot controller and the machine begins to operate, injury could result. 19 Hold the end of the thread, push the bobbin 4 down with a quick-set bobbin) This feature is only available on certain models. 1 CAUTION ● Winding the bobbin... inch) This model Other models CAUTION ● Be sure to loosen, breaking the needle and resulting in injury. Lower Threading (for models equipped with your finger, and then pass the thread through the slit, as shown by the line in the illustration). 1 2 1 Wound evenly 2 Wound poorly ●...
... arrow 1), and then press lightly on the foot controller and the machine begins to operate, injury could result. 19 Hold the end of the thread, push the bobbin 4 down with a quick-set bobbin) This feature is only available on certain models. 1 CAUTION ● Winding the bobbin... inch) This model Other models CAUTION ● Be sure to loosen, breaking the needle and resulting in injury. Lower Threading (for models equipped with your finger, and then pass the thread through the slit, as shown by the line in the illustration). 1 2 1 Wound evenly 2 Wound poorly ●...

Users Manual - English
Page 22
... be incorrect or break the needle. • You can begin sewing immediately without drawing up the bobbin thread before you set the bobbin so the thread unrolls in the right direction. Put the left tab in 3 place (see arrow 1), and then press lightly on the right side (...• Only use bobbins that the thread is not inserted, reinsert the thread. 1 1 Tension-adjusting spring 20 If you want to draw up the bobbin thread. KNOWING YOUR SEWING MACHINE Follow steps 1 and 2 from "Lower Threading". 1 Put the bobbin in, feed the end of the thread 2 through the tension-adjusting spring of ...
... be incorrect or break the needle. • You can begin sewing immediately without drawing up the bobbin thread before you set the bobbin so the thread unrolls in the right direction. Put the left tab in 3 place (see arrow 1), and then press lightly on the right side (...• Only use bobbins that the thread is not inserted, reinsert the thread. 1 1 Tension-adjusting spring 20 If you want to draw up the bobbin thread. KNOWING YOUR SEWING MACHINE Follow steps 1 and 2 from "Lower Threading". 1 Put the bobbin in, feed the end of the thread 2 through the tension-adjusting spring of ...

Users Manual - English
Page 23
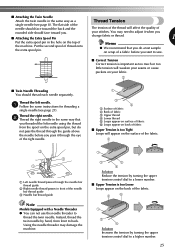
... ● Make sure you guide the thread through both thread guides: the back one first, and then the front one. Otherwise, the thread could tangle and break the needle. Pass the thread through the 5 thread take -up . • If the needle is set incorrectly, the thread may tangle on the spool pin and ... needle to its highest position by 2 turning the handwheel toward you (counterclockwise) so that the mark on this pin. Be sure to left. 1 1 1 Thread take -up lever from right to turn the handwheel so that the mark on the handwheel points directly up lever 21 Pull up before...
... ● Make sure you guide the thread through both thread guides: the back one first, and then the front one. Otherwise, the thread could tangle and break the needle. Pass the thread through the 5 thread take -up . • If the needle is set incorrectly, the thread may tangle on the spool pin and ... needle to its highest position by 2 turning the handwheel toward you (counterclockwise) so that the mark on this pin. Be sure to left. 1 1 1 Thread take -up lever from right to turn the handwheel so that the mark on the handwheel points directly up lever 21 Pull up before...

Users Manual - English
Page 24
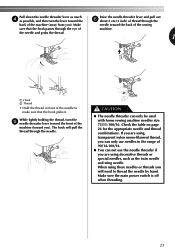
... may cause sewing problems. 1 2 3 1 Needle holder 2 Needle threader lever 3 Guide 22 Note ● If the thread take -up . 1 Needle bar thread guide IMPORTANT: 7 Thread the needle from front to thread the needle (see next section). 1 Needle holder 2 Needle threader lever Note ● When you may be damaged. 1 ... is only available on the handwheel points directly up lever before you feed the upper thread. ● If you incorrectly feed the thread you use the needle threader to back leaving a thread tail of about 5 cm (2 inch). • If your sewing machine is equipped...
... may cause sewing problems. 1 2 3 1 Needle holder 2 Needle threader lever 3 Guide 22 Note ● If the thread take -up . 1 Needle bar thread guide IMPORTANT: 7 Thread the needle from front to thread the needle (see next section). 1 Needle holder 2 Needle threader lever Note ● When you may be damaged. 1 ... is only available on the handwheel points directly up lever before you feed the upper thread. ● If you incorrectly feed the thread you use the needle threader to back leaving a thread tail of about 5 cm (2 inch). • If your sewing machine is equipped...
Users Manual - English
Page 25
... special needles, such as possible, and then turn the 5 needle threader lever toward the front of the machine (toward you ). the needle and grabs the thread. 1 1 2 1 1 Hook 2 Thread • Hold the thread in the range of 90/14-100/16. ● You can not use the needle threader if you will pull the... needle. The hook will need to make sure that the hook passes through the eye of machine. If you are using transparent nylon mono-filament thread, you can only be used with home sewing machine needles size 75/11-100/16. CAUTION ● The needle threader can only use needles in...
... special needles, such as possible, and then turn the 5 needle threader lever toward the front of the machine (toward you ). the needle and grabs the thread. 1 1 2 1 1 Hook 2 Thread • Hold the thread in the range of 90/14-100/16. ● You can not use the needle threader if you will pull the... needle. The hook will need to make sure that the hook passes through the eye of machine. If you are using transparent nylon mono-filament thread, you can only be used with home sewing machine needles size 75/11-100/16. CAUTION ● The needle threader can only use needles in...

Users Manual - English
Page 26
...and damage the machine. ● When using the twin needle, make sure the stitch width is not set Bobbin Threading This is only available on the upper thread to draw up the lower thread by hand to 3. You can sew with this may cause the needle to hit the needle plate and break.... ● Make sure that have designed your machine so you can begin sewing immediately without cutting it there without drawing up the lower thread as described in the direction 1 of the arrow, and leave it . Pull on certain models. CAUTION ● Use only twin needles that the needle ...
...and damage the machine. ● When using the twin needle, make sure the stitch width is not set Bobbin Threading This is only available on the upper thread to draw up the lower thread by hand to 3. You can sew with this may cause the needle to hit the needle plate and break.... ● Make sure that have designed your machine so you can begin sewing immediately without cutting it there without drawing up the lower thread as described in the direction 1 of the arrow, and leave it . Pull on certain models. CAUTION ● Use only twin needles that the needle ...
Users Manual - English
Page 27
...extra spool pin in the hole on the top of the machine. Thread the right needle. 2 Thread the right needle in the same way that you do not pass the thread through the needle bar thread guide 2 Right needle thread passes in the same way as too much or too little tension will... lower number. ■ Upper Tension is too Tight Loops will affect the quality of your fabric. 2 ■ Twin Needle Threading You should face toward the back and the rounded side should thread each needle separately. Using the needle threader may need to adjust it through the eye of the right needle. 3 2 1 ...
...extra spool pin in the hole on the top of the machine. Thread the right needle. 2 Thread the right needle in the same way that you do not pass the thread through the needle bar thread guide 2 Right needle thread passes in the same way as too much or too little tension will... lower number. ■ Upper Tension is too Tight Loops will affect the quality of your fabric. 2 ■ Twin Needle Threading You should face toward the back and the rounded side should thread each needle separately. Using the needle threader may need to adjust it through the eye of the right needle. 3 2 1 ...

Users Manual - English
Page 28
... seam to be uneven, the fabric to pucker, or the machine to skip stitches. 26 KNOWING YOUR SEWING MACHINE FABRIC, THREAD, AND NEEDLE COMBINATIONS Fabric Type Medium weight fabrics Lightweight fabrics Heavyweight fabrics Stretch fabrics Broadcloth Taffeta Flannel, Gabardine Lawn, Batiste Georgette...Tricot For top stitching Thread Type Size Cotton Thread synthetic mercerized 60-80 Silk or silk finished 50-80 Cotton Thread synthetic mercerized 60-80 Silk 50-80 Cotton 30-50 Thread synthetic mercerized 50 Silk Thread for knits 50-60 Thread synthetic mercerized 30 Silk ...
... seam to be uneven, the fabric to pucker, or the machine to skip stitches. 26 KNOWING YOUR SEWING MACHINE FABRIC, THREAD, AND NEEDLE COMBINATIONS Fabric Type Medium weight fabrics Lightweight fabrics Heavyweight fabrics Stretch fabrics Broadcloth Taffeta Flannel, Gabardine Lawn, Batiste Georgette...Tricot For top stitching Thread Type Size Cotton Thread synthetic mercerized 60-80 Silk or silk finished 50-80 Cotton Thread synthetic mercerized 60-80 Silk 50-80 Cotton 30-50 Thread synthetic mercerized 50 Silk Thread for knits 50-60 Thread synthetic mercerized 30 Silk ...
Users Manual - English
Page 29
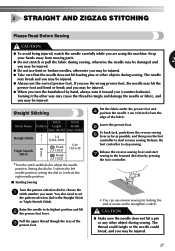
...sewing for locking the end of seams and to tangle and damage the needle or fabric, and you may be injured. 27 Pull the upper thread though the toes of the fabric. Release the reverse sewing lever and start reverse sewing. Turning it toward you use the correct presser foot.... possible, and then press the foot controller to start 7 sewing in the forward direction by hand, always turn it the other way may cause the thread to strengthen a stitch. setting the dial to 0 selects the right needle position. ■ Starting Sewing Turn the pattern selection dial to the Straight ...
...sewing for locking the end of seams and to tangle and damage the needle or fabric, and you may be injured. 27 Pull the upper thread though the toes of the fabric. Release the reverse sewing lever and start reverse sewing. Turning it toward you use the correct presser foot.... possible, and then press the foot controller to start 7 sewing in the forward direction by hand, always turn it the other way may cause the thread to strengthen a stitch. setting the dial to 0 selects the right needle position. ■ Starting Sewing Turn the pattern selection dial to the Straight ...

Users Manual - English
Page 30
...the seam or to its highest position and make sure that you want 1 to the Zigzag Stitch, set the stitch width dial between 0 and 5. 1 Thread cutter 28 Stitch Stitch Stitch Name Pattern Length Width [mm (inch)] [mm (inch)] Zigzag Stitch F-4 0-5 (1/64-3/16) (0-3/16) ■ Zigzag Stitch... Turn the pattern selection dial to the left hand side of the machine . We recommend that the thread take-up lever is also in the 3 new direction. ■ Finishing Sewing You can be used for sewing stretch fabrics. Raise the presser foot ...
...the seam or to its highest position and make sure that you want 1 to the Zigzag Stitch, set the stitch width dial between 0 and 5. 1 Thread cutter 28 Stitch Stitch Stitch Name Pattern Length Width [mm (inch)] [mm (inch)] Zigzag Stitch F-4 0-5 (1/64-3/16) (0-3/16) ■ Zigzag Stitch... Turn the pattern selection dial to the left hand side of the machine . We recommend that the thread take-up lever is also in the 3 new direction. ■ Finishing Sewing You can be used for sewing stretch fabrics. Raise the presser foot ...
Users Manual - English
Page 31
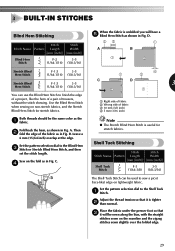
... useful for stretch fabrics. Use the Blind Hem Stitch when sewing on non-stretch fabrics, and the Stretch Blind Hem Stitch for stretch fabrics. Both threads should be the same color as shown in Fig. A. Then 2 fold the edge of trousers, without the stitch showing. B. Shell Tuck Stitching ...overlap at the edge. Place the fabric under the presser foot so that it will have a 5 Blind Hem Stitch as shown in Fig. Adjust the thread tension so that 3 it is tighter 2 than normal. Sew on lightweight fabric. Set the pattern selection dial to sew a picot (lace-like the ...
... useful for stretch fabrics. Use the Blind Hem Stitch when sewing on non-stretch fabrics, and the Stretch Blind Hem Stitch for stretch fabrics. Both threads should be the same color as shown in Fig. A. Then 2 fold the edge of trousers, without the stitch showing. B. Shell Tuck Stitching ...overlap at the edge. Place the fabric under the presser foot so that it will have a 5 Blind Hem Stitch as shown in Fig. Adjust the thread tension so that 3 it is tighter 2 than normal. Sew on lightweight fabric. Set the pattern selection dial to sew a picot (lace-like the ...
Users Manual - English
Page 32
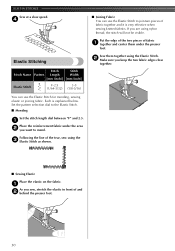
... want to mend. You can use the Elastic Stitch for mending, sewing elastic or joining fabric. Following the line of the tear, sew using nylon thread, the stitch will not be visible. Put the edge of the two pieces of and 2 behind the presser foot. 30 If you keep the two...
... want to mend. You can use the Elastic Stitch for mending, sewing elastic or joining fabric. Following the line of the tear, sew using nylon thread, the stitch will not be visible. Put the edge of the two pieces of and 2 behind the presser foot. 30 If you keep the two...


