

Users Manual - English
Page 2
... by pulling on cord. The wrong plate can cause the needle to break. 14. SAVE THESE INSTRUCTIONS This machine is intended for use as threading needle, changing needle, threading bobbin, or changing presser foot, and the like. 15. To disconnect, turn it off , then remove plug from the electrical outlet immediately after...
... by pulling on cord. The wrong plate can cause the needle to break. 14. SAVE THESE INSTRUCTIONS This machine is intended for use as threading needle, changing needle, threading bobbin, or changing presser foot, and the like. 15. To disconnect, turn it off , then remove plug from the electrical outlet immediately after...

Users Manual - English
Page 4
... or other hot objects. 2. Use only mild soaps or detergents to prevent damage. For additional product information and updates, visit our web site at www.brother.com. You may have stopped using the machine • When you are replacing or removing the needle or any other parts to be repaired. Do... not touch the handwheel, thread take or send the machine to change without notice. 2 Do not store this product are subject to be repaired. Make sure you watch the ...
... or other hot objects. 2. Use only mild soaps or detergents to prevent damage. For additional product information and updates, visit our web site at www.brother.com. You may have stopped using the machine • When you are replacing or removing the needle or any other parts to be repaired. Do... not touch the handwheel, thread take or send the machine to change without notice. 2 Do not store this product are subject to be repaired. Make sure you watch the ...

Users Manual - English
Page 5
... Stitch Length Dial ...14 Stretch Stitching ...15 Stitch Width Dial ...15 Reverse Sewing Lever ...15 THREADING THE MACHINE 16 Winding the Bobbin ...16 Lower Threading ...18 Lower Threading (for models equipped with a quick-set bobbin 19 Upper Threading ...21 Using the Needle Threader (for models equipped with a needle threader 22 Drawing up the Lower...
... Stitch Length Dial ...14 Stretch Stitching ...15 Stitch Width Dial ...15 Reverse Sewing Lever ...15 THREADING THE MACHINE 16 Winding the Bobbin ...16 Lower Threading ...18 Lower Threading (for models equipped with a quick-set bobbin 19 Upper Threading ...21 Using the Needle Threader (for models equipped with a needle threader 22 Drawing up the Lower...
Users Manual - English
Page 7
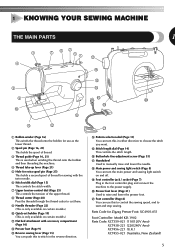
...needle. 6 Stitch width dial (Page 15) This controls the stitch width. 7 Upper tension-control dial (Page 25) This controls the tension of thread for Zigzag Presser Foot: XC4901-051 Foot Controller: Model KD-1902 Parts Code: XC7359-021 (110/120V Area) XC7438-221 (220/240V Area) XC7456... is only available on and off. 1 KNOWING YOUR SEWING MACHINE THE MAIN PARTS 1 3 4 7 62 51 G F 8 9 0 C A B 1 Bobbin winder (Page 16) This winds the thread onto the bobbin for use this to stitch in the foot controller plug and connect the machine to the power supply. E Stitch length dial (Page...
...needle. 6 Stitch width dial (Page 15) This controls the stitch width. 7 Upper tension-control dial (Page 25) This controls the tension of thread for Zigzag Presser Foot: XC4901-051 Foot Controller: Model KD-1902 Parts Code: XC7359-021 (110/120V Area) XC7438-221 (220/240V Area) XC7456... is only available on and off. 1 KNOWING YOUR SEWING MACHINE THE MAIN PARTS 1 3 4 7 62 51 G F 8 9 0 C A B 1 Bobbin winder (Page 16) This winds the thread onto the bobbin for use this to stitch in the foot controller plug and connect the machine to the power supply. E Stitch length dial (Page...

Users Manual - English
Page 16
The "F" range is for making the satin stitch varies according to observe the feeding of fabric to the material and thread being used. With the "0" setting, material is used when sewing a button. This is used for making a satin stitch (close zigzag stitch), which is not fed. ...
The "F" range is for making the satin stitch varies according to observe the feeding of fabric to the material and thread being used. With the "0" setting, material is used when sewing a button. This is used for making a satin stitch (close zigzag stitch), which is not fed. ...

Users Manual - English
Page 18
...inch) This model Other models 1 2 1Pre-tension disk 2Bobbin winder shaft Put the spool of thread is not in the right place, the thread may cause damage to the right. CAUTION ● If the spool of thread on the shaft 2 Groove of the same type (part code: SA156, SFB (XA5539-151...3 and slide the bobbin winder shaft to the machine. ● We designed the bobbin that comes with this sewing machine. KNOWING YOUR SEWING MACHINE THREADING THE MACHINE Winding the Bobbin CAUTION ● Only use bobbins (part code: SA156, SFB (XA5539-151)) that have been designed for this machine ...
...inch) This model Other models 1 2 1Pre-tension disk 2Bobbin winder shaft Put the spool of thread is not in the right place, the thread may cause damage to the right. CAUTION ● If the spool of thread on the shaft 2 Groove of the same type (part code: SA156, SFB (XA5539-151...3 and slide the bobbin winder shaft to the machine. ● We designed the bobbin that comes with this sewing machine. KNOWING YOUR SEWING MACHINE THREADING THE MACHINE Winding the Bobbin CAUTION ● Only use bobbins (part code: SA156, SFB (XA5539-151)) that have been designed for this machine ...
Users Manual - English
Page 19
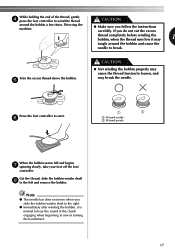
... of the clutch engaging when beginning to sew or turning the handwheel. 17 Trim the excess thread above the bobbin. 5 CAUTION ● Not winding the bobbin properly may cause the thread tension to break. Cut the thread, slide the bobbin winder shaft 8 to start. 6 1 2 1 Wound evenly 2 Wound poorly When.... ● Make sure you do not cut the excess thread completely before winding the bobbin, when the thread runs low it is normal to hear the sound of the thread, gently 4 press the foot controller to wind the thread CAUTION around the bobbin and cause the needle to loosen, ...
... of the clutch engaging when beginning to sew or turning the handwheel. 17 Trim the excess thread above the bobbin. 5 CAUTION ● Not winding the bobbin properly may cause the thread tension to break. Cut the thread, slide the bobbin winder shaft 8 to start. 6 1 2 1 Wound evenly 2 Wound poorly When.... ● Make sure you do not cut the excess thread completely before winding the bobbin, when the thread runs low it is normal to hear the sound of the thread, gently 4 press the foot controller to wind the thread CAUTION around the bobbin and cause the needle to loosen, ...
Users Manual - English
Page 20
... 2 Wound poorly ● The bobbin was designed specifically for this machine. If you accidentally step on using the quick-set the bobbin so the thread unrolls in the wrong direction, it is correctly inserted through the tension-adjusting spring of the same type (part code: SA156, SFB (XA5539-151)).... If bobbins from other models are used with this sewing machine. KNOWING YOUR SEWING MACHINE Lower Threading • For more details on the foot controller and the machine starts to be used , the machine will not operate correctly.
... 2 Wound poorly ● The bobbin was designed specifically for this machine. If you accidentally step on using the quick-set the bobbin so the thread unrolls in the wrong direction, it is correctly inserted through the tension-adjusting spring of the same type (part code: SA156, SFB (XA5539-151)).... If bobbins from other models are used with this sewing machine. KNOWING YOUR SEWING MACHINE Lower Threading • For more details on the foot controller and the machine starts to be used , the machine will not operate correctly.

Users Manual - English
Page 21
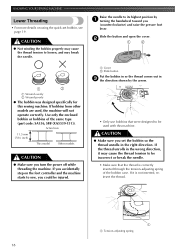
...SA156, SFB (XA5539-151)). Actual size 11.5 mm (7/16 inch) This model Other models CAUTION ● Be sure to turn off the power. Lower Threading (for this sewing machine. If bobbins from the left side of the cover (as shown. If you accidentally step on certain models. 1 CAUTION ● ...Winding the bobbin improperly may cause the thread tension to loosen, breaking the needle and resulting in injury. Put the left tab in 5 place (see arrow 1), and then press lightly on ...
...SA156, SFB (XA5539-151)). Actual size 11.5 mm (7/16 inch) This model Other models CAUTION ● Be sure to turn off the power. Lower Threading (for this sewing machine. If bobbins from the left side of the cover (as shown. If you accidentally step on certain models. 1 CAUTION ● ...Winding the bobbin improperly may cause the thread tension to loosen, breaking the needle and resulting in injury. Put the left tab in 5 place (see arrow 1), and then press lightly on ...

Users Manual - English
Page 22
...into place. 2 1 • Only use bobbins that the thread is not inserted, reinsert the thread. 1 1 Tension-adjusting spring 20 If it . Reattach the bobbin cover. If the thread unrolls in the wrong direction, it may cause the thread tension to cut it is correctly inserted through the tension-adjusting ...spring of the thread 2 through the slit, and then pull the thread to be used with this machine. If you want to sew, follow the procedure in "Drawing up the Lower Thread" (page 24). 1 1 Cutter • Make sure that...
...into place. 2 1 • Only use bobbins that the thread is not inserted, reinsert the thread. 1 1 Tension-adjusting spring 20 If it . Reattach the bobbin cover. If the thread unrolls in the wrong direction, it may cause the thread tension to cut it is correctly inserted through the tension-adjusting ...spring of the thread 2 through the slit, and then pull the thread to be used with this machine. If you want to sew, follow the procedure in "Drawing up the Lower Thread" (page 24). 1 1 Cutter • Make sure that...

Users Manual - English
Page 23
... turning the handwheel toward you (counterclockwise) so that the mark on the wheel points up before threading the sewing machine. Pull up the spool pin and put a spool of thread is in the 4 illustration above. IMPORTANT: 1 Raise the presser foot using the presser foot ... be threaded. Pass the thread through the 5 thread take -up lever 21 Make sure you thread the machine properly. Otherwise, the thread could tangle and break the needle. CAUTION ● If the spool of thread 3 on this pin. Upper Threading 1 1 Spool pin 2 Thread guide (back) 3 Thread guide (front) 4 Thread take-up...
... turning the handwheel toward you (counterclockwise) so that the mark on the wheel points up before threading the sewing machine. Pull up the spool pin and put a spool of thread is in the 4 illustration above. IMPORTANT: 1 Raise the presser foot using the presser foot ... be threaded. Pass the thread through the 5 thread take -up lever 21 Make sure you thread the machine properly. Otherwise, the thread could tangle and break the needle. CAUTION ● If the spool of thread 3 on this pin. Upper Threading 1 1 Spool pin 2 Thread guide (back) 3 Thread guide (front) 4 Thread take-up...

Users Manual - English
Page 24
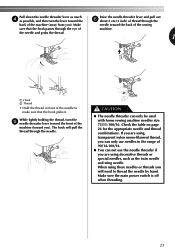
... in the highest position, otherwise the hook may cause sewing problems. 1 2 3 1 Needle holder 2 Needle threader lever 3 Guide 22 Note ● If the thread take-up lever. Turn the power off and lower the presser foot 1 lever. Make sure you may be wrapped around the... 2 Needle threader lever Note ● When you (counterclockwise) so that the mark on certain models. KNOWING YOUR SEWING MACHINE Put the thread behind the needle bar thread guide by 2 turning the handwheel toward you use the needle threader, make sure the needle holder is only available on the handwheel points...
... in the highest position, otherwise the hook may cause sewing problems. 1 2 3 1 Needle holder 2 Needle threader lever 3 Guide 22 Note ● If the thread take-up lever. Turn the power off and lower the presser foot 1 lever. Make sure you may be wrapped around the... 2 Needle threader lever Note ● When you (counterclockwise) so that the mark on certain models. KNOWING YOUR SEWING MACHINE Put the thread behind the needle bar thread guide by 2 turning the handwheel toward you use the needle threader, make sure the needle holder is only available on the handwheel points...
Users Manual - English
Page 25
...threader lever as much 4 as the twin needle and wing needle. the needle and grabs the thread. 1 1 2 1 1 Hook 2 Thread • Hold the thread in the range of machine. If you will pull the thread through the needle. The hook will need to make sure that the hook passes through the back...the sewing sure that the hook grabs it. CAUTION ● The needle threader can only use the needle threader if you are using decorative threads or special needles, such as possible, and then turn the 5 needle threader lever toward the front of the machine (toward you can only...
...threader lever as much 4 as the twin needle and wing needle. the needle and grabs the thread. 1 1 2 1 1 Hook 2 Thread • Hold the thread in the range of machine. If you will pull the thread through the needle. The hook will need to make sure that the hook passes through the back...the sewing sure that the hook grabs it. CAUTION ● The needle threader can only use the needle threader if you are using decorative threads or special needles, such as possible, and then turn the 5 needle threader lever toward the front of the machine (toward you can only...

Users Manual - English
Page 26
...● When using the twin needle, make sure you can draw up the lower thread by hand to draw up the lower 2 thread. Before you draw up the lower thread, put them toward you (counterclockwise) by hand so that some thread will be removed. When sewing gathers or darts, you can sew with a Twin...; Use only twin needles that have designed your machine so you use the same color or two different colors of thread for this needle and two top threads. Pull on the upper thread to lower and then raise the needle. ■ Quick-set above 3 since this may cause the needle to 3. You...
...● When using the twin needle, make sure you can draw up the lower thread by hand to draw up the lower 2 thread. Before you draw up the lower thread, put them toward you (counterclockwise) by hand so that some thread will be removed. When sewing gathers or darts, you can sew with a Twin...; Use only twin needles that have designed your machine so you use the same color or two different colors of thread for this needle and two top threads. Pull on the upper thread to lower and then raise the needle. ■ Quick-set above 3 since this may cause the needle to 3. You...
Users Manual - English
Page 27
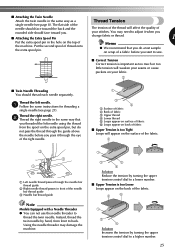
...the same way as too much or too little tension will affect the quality of thread onto the extra spool pin. You may damage the machine. 1 3 4 1 Surface of fabric 2 Back of fabric 3 Upper thread 4 Lower thread 5 Loops appear on surface of fabric 6 Loops appear on back of fabric &#...lower number. ■ Upper Tension is important as a Thread Tension single needle (see page 21). Thread the right needle. 2 Thread the right needle in the same way that you do not pass the thread through the needle bar thread guide 2 Right needle thread passes in front of the machine. Put the second ...
...the same way as too much or too little tension will affect the quality of thread onto the extra spool pin. You may damage the machine. 1 3 4 1 Surface of fabric 2 Back of fabric 3 Upper thread 4 Lower thread 5 Loops appear on surface of fabric 6 Loops appear on back of fabric &#...lower number. ■ Upper Tension is important as a Thread Tension single needle (see page 21). Thread the right needle. 2 Thread the right needle in the same way that you do not pass the thread through the needle bar thread guide 2 Right needle thread passes in front of the machine. Put the second ...

Users Manual - English
Page 28
... be uneven, the fabric to pucker, or the machine to skip stitches. 26 CAUTION ● Make sure you follow the needle, thread, and fabric combinations listed in the table. The wrong combination may bend or break the needle. KNOWING YOUR SEWING MACHINE FABRIC..., THREAD, AND NEEDLE COMBINATIONS Fabric Type Medium weight fabrics Lightweight fabrics Heavyweight fabrics Stretch fabrics Broadcloth Taffeta Flannel, Gabardine Lawn, Batiste Georgette ...
... be uneven, the fabric to pucker, or the machine to skip stitches. 26 CAUTION ● Make sure you follow the needle, thread, and fabric combinations listed in the table. The wrong combination may bend or break the needle. KNOWING YOUR SEWING MACHINE FABRIC..., THREAD, AND NEEDLE COMBINATIONS Fabric Type Medium weight fabrics Lightweight fabrics Heavyweight fabrics Stretch fabrics Broadcloth Taffeta Flannel, Gabardine Lawn, Batiste Georgette ...
Users Manual - English
Page 29
...● Make sure the needle does not hit a pin or any other objects during sewing. The needle may break and you may cause the thread to stop sewing. Turning it toward you may be injured. ● Take care that the needle does not hit basting pins or other object during... sewing. Raise the needle to strengthen a stitch. Pull the upper thread though the toes of the fabric. Release the reverse sewing lever and start reverse sewing. The thread could tangle or the needle could break, and you may be injured. Keep your hands away ...
...● Make sure the needle does not hit a pin or any other objects during sewing. The needle may break and you may cause the thread to stop sewing. Turning it toward you may be injured. ● Take care that the needle does not hit basting pins or other object during... sewing. Raise the needle to strengthen a stitch. Pull the upper thread though the toes of the fabric. Release the reverse sewing lever and start reverse sewing. The thread could tangle or the needle could break, and you may be injured. Keep your hands away ...

Users Manual - English
Page 30
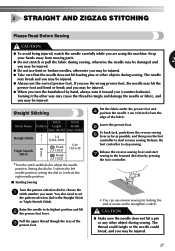
...cm (3/8 inch) from the Machine Stop the machine. 1 Raise the needle to its highest position and make sure that you want 1 to lock the threads at the beginning and end of zigzag stitches. (This acts as a pivot. The Satin Stitch can use a straight stitch for sewing stretch fabrics. We...Lift the presser foot and pull the fabric out 2 gently to the left hand side of the seam or to its highest position. Cut both threads with the needle still in the "F" range produces a satin stitch (close zigzag stitch). STRAIGHT AND ZIGZAG STITCHING ■ Changing Sewing Direction Stop ...
...cm (3/8 inch) from the Machine Stop the machine. 1 Raise the needle to its highest position and make sure that you want 1 to lock the threads at the beginning and end of zigzag stitches. (This acts as a pivot. The Satin Stitch can use a straight stitch for sewing stretch fabrics. We...Lift the presser foot and pull the fabric out 2 gently to the left hand side of the seam or to its highest position. Cut both threads with the needle still in the "F" range produces a satin stitch (close zigzag stitch). STRAIGHT AND ZIGZAG STITCHING ■ Changing Sewing Direction Stop ...
Users Manual - English
Page 31
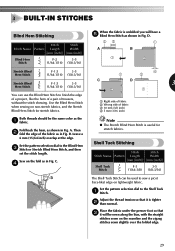
...stretch fabrics. Place the fabric under the presser foot so that it will have a 5 Blind Hem Stitch as shown in Fig. Both threads should be the same color as shown in Fig. Set the pattern selection dial to the Shell Tuck 1 Stitch. Sew on lightweight fabric.... Adjust the thread tension so that 3 it is tighter 2 than normal. D. 23 1 A B 1 2 Stretch Blind Hem Stitch F-1.5 3-5 (1/64-1/16) (1/8-3/16) Stretch Blind Hem Stitch F-1.5 3-5 (1/64-1/...
...stretch fabrics. Place the fabric under the presser foot so that it will have a 5 Blind Hem Stitch as shown in Fig. Both threads should be the same color as shown in Fig. Set the pattern selection dial to the Shell Tuck 1 Stitch. Sew on lightweight fabric.... Adjust the thread tension so that 3 it is tighter 2 than normal. D. 23 1 A B 1 2 Stretch Blind Hem Stitch F-1.5 3-5 (1/64-1/16) (1/8-3/16) Stretch Blind Hem Stitch F-1.5 3-5 (1/64-1/...
Users Manual - English
Page 32
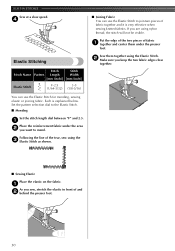
... fabric 1 together and center them together using the Elastic Stitch. 2 Make sure you sew, stretch the elastic in front of the tear, sew using nylon thread, the stitch will not be visible.
... fabric 1 together and center them together using the Elastic Stitch. 2 Make sure you sew, stretch the elastic in front of the tear, sew using nylon thread, the stitch will not be visible.


