

Users Manual - English
Page 1
1 KNOWING YOUR SEWING MACHINE 2 STRAIGHT AND ZIGZAG STITCHING 3 BUILT-IN STITCHES 4 SEWING BUTTONHOLES AND BUTTONS 5 USING ATTACHMENTS AND APPLICATIONS 6 APPENDIX Operation Manual
1 KNOWING YOUR SEWING MACHINE 2 STRAIGHT AND ZIGZAG STITCHING 3 BUILT-IN STITCHES 4 SEWING BUTTONHOLES AND BUTTONS 5 USING ATTACHMENTS AND APPLICATIONS 6 APPENDIX Operation Manual

Users Manual - English
Page 2
... the electrical outlet immediately after using . Always unplug the machine before cleaning. 2. Do not allow this machine to be used as described in the instruction manual. 16. Return the machine to the symbol "{" position which represents off when making any opening. 6. Keep ... 1. Use only accessories recommended by pulling on cord. This sewing machine is intended for examination, repair, electrical or mechanical adjustment. 4. Young children should never be left unattended while plugged in this manual. 3. To reduce the risk of burns, fire, electric shock...
... the electrical outlet immediately after using . Always unplug the machine before cleaning. 2. Do not allow this machine to be used as described in the instruction manual. 16. Return the machine to the symbol "{" position which represents off when making any opening. 6. Keep ... 1. Use only accessories recommended by pulling on cord. This sewing machine is intended for examination, repair, electrical or mechanical adjustment. 4. Young children should never be left unattended while plugged in this manual. 3. To reduce the risk of burns, fire, electric shock...

Users Manual - English
Page 4
....brother.com. Do not touch the handwheel, thread take or send this machine in direct sunlight or in the Appendix to unpack and repack the machine. Do not use the machine safely 1. Always consult this product are sewing. To repair or adjust the machine If the machine ...breaks down or needs adjustment, first follow the diagram below to inspect and adjust the machine yourself. UNPACKING/REPACKING INSTRUCTIONS Keep the carton and packing materials. The contents of this manual and specifications of this manual before...
....brother.com. Do not touch the handwheel, thread take or send this machine in direct sunlight or in the Appendix to unpack and repack the machine. Do not use the machine safely 1. Always consult this product are sewing. To repair or adjust the machine If the machine ...breaks down or needs adjustment, first follow the diagram below to inspect and adjust the machine yourself. UNPACKING/REPACKING INSTRUCTIONS Keep the carton and packing materials. The contents of this manual and specifications of this manual before...
Users Manual - English
Page 7
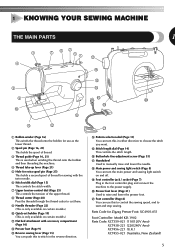
...) (This is only available on and off. Parts Code for sewing with accessory compartment (Page 10) B Presser foot (Page 9) C Reverse sewing lever (Page 15) You can use this to stitch in the foot controller plug and connect the machine to the power supply. E D H J I Foot controller...Buttonhole fine-adjustment screw (Page 35) G Handwheel Used to raise and lower the presser foot. J Presser foot lever (Page 21) Used to manually raise and lower the needle. 1 KNOWING YOUR SEWING MACHINE THE MAIN PARTS 1 3 4 7 62 51 G F 8 9 0 C A B 1 Bobbin winder (Page 16) This winds the...
...) (This is only available on and off. Parts Code for sewing with accessory compartment (Page 10) B Presser foot (Page 9) C Reverse sewing lever (Page 15) You can use this to stitch in the foot controller plug and connect the machine to the power supply. E D H J I Foot controller...Buttonhole fine-adjustment screw (Page 35) G Handwheel Used to raise and lower the presser foot. J Presser foot lever (Page 21) Used to manually raise and lower the needle. 1 KNOWING YOUR SEWING MACHINE THE MAIN PARTS 1 3 4 7 62 51 G F 8 9 0 C A B 1 Bobbin winder (Page 16) This winds the...

Users Manual - English
Page 14
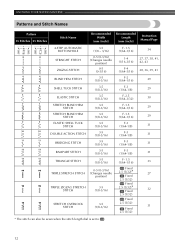
KNOWING YOUR SEWING MACHINE Patterns and Stitch Names Pattern 35 Stitches 25 Stitches Stitch Name Recommended Width (mm (inch)) Recommended Length (mm (inch)) Instruction Manual Page 4-STEP AUTOMATIC BUTTONHOLE STRAIGHT STITCH ZIGZAG STITCH BLIND HEM STITCH SHELL TUCK STITCH ELASTIC STITCH STRETCH BLIND HEM STITCH STRETCH BLIND HEM STITCH ELASTIC ...
KNOWING YOUR SEWING MACHINE Patterns and Stitch Names Pattern 35 Stitches 25 Stitches Stitch Name Recommended Width (mm (inch)) Recommended Length (mm (inch)) Instruction Manual Page 4-STEP AUTOMATIC BUTTONHOLE STRAIGHT STITCH ZIGZAG STITCH BLIND HEM STITCH SHELL TUCK STITCH ELASTIC STITCH STRETCH BLIND HEM STITCH STRETCH BLIND HEM STITCH ELASTIC ...

Users Manual - English
Page 16
...length settings on the stitch length dial represent the stitch length in millimeters (mm) (1/25 inch). KNOWING YOUR SEWING MACHINE Pattern 35 Stitches 25 Stitches Stitch Name COMB STITCH COMB STITCH DECORATIVE STITCH FAGOTING STITCH DECORATIVE STITCH DECORATIVE HEM ...3-5 (1/8-3/16) Recommended Length (mm (inch)) Fixed 2.5 (3/32) Fixed 2.5 (3/32) Fixed 2.5 (3/32) Fixed 2.5 (3/32) Fixed 2.5 (3/32) Fixed 2.5 (3/32) Fixed 2.5 (3/32) Instruction Manual Page 31 31 33 31 31 33 33 Stitch Length Dial Depending on the selected stitch, you may break and cause injury. 1 Stitch length dial...
...length settings on the stitch length dial represent the stitch length in millimeters (mm) (1/25 inch). KNOWING YOUR SEWING MACHINE Pattern 35 Stitches 25 Stitches Stitch Name COMB STITCH COMB STITCH DECORATIVE STITCH FAGOTING STITCH DECORATIVE STITCH DECORATIVE HEM ...3-5 (1/8-3/16) Recommended Length (mm (inch)) Fixed 2.5 (3/32) Fixed 2.5 (3/32) Fixed 2.5 (3/32) Fixed 2.5 (3/32) Fixed 2.5 (3/32) Fixed 2.5 (3/32) Fixed 2.5 (3/32) Instruction Manual Page 31 31 33 31 31 33 33 Stitch Length Dial Depending on the selected stitch, you may break and cause injury. 1 Stitch length dial...

Owner's Manual (Español) - Spanish
Page 1
1 KNOWING YOUR SEWING MACHINE 2 STRAIGHT AND ZIGZAG STITCHING 3 BUILT-IN STITCHES 4 SEWING BUTTONHOLES AND BUTTONS 5 USING ATTACHMENTS AND APPLICATIONS 6 APPENDIX Operation Manual
1 KNOWING YOUR SEWING MACHINE 2 STRAIGHT AND ZIGZAG STITCHING 3 BUILT-IN STITCHES 4 SEWING BUTTONHOLES AND BUTTONS 5 USING ATTACHMENTS AND APPLICATIONS 6 APPENDIX Operation Manual

Owner's Manual (Español) - Spanish
Page 2
...electrical outlet immediately after using and before cleaning. 2. Do not pull or push fabric while stitching. This sewing machine is used by the manufacturer as described in this manual. 3. The machine should never be used or where oxygen is not working properly, if it to break. 12. Always ... openings of burns, fire, electric shock, or injury to the nearest authorized dealer or service center for use as contained in this manual. Never operate this machine if it has a damaged cord or plug, if it off , then remove plug from the accumulation of electric shock: 1. Do...
...electrical outlet immediately after using and before cleaning. 2. Do not pull or push fabric while stitching. This sewing machine is used by the manufacturer as described in this manual. 3. The machine should never be used or where oxygen is not working properly, if it to break. 12. Always ... openings of burns, fire, electric shock, or injury to the nearest authorized dealer or service center for use as contained in this manual. Never operate this machine if it has a damaged cord or plug, if it off , then remove plug from the accumulation of electric shock: 1. Do...

Owner's Manual (Español) - Spanish
Page 4
... This packing material is still there, consult your machine a longer life 1. To give your local authorized dealer. Do not store this packing material if you are sewing. Use only mild soaps or detergents to inspect and adjust the machine yourself. If the problem is designed to prevent ... material, the machine could be repaired. The contents of this manual and specifications of this product are subject to unpack and repack the machine. Always consult this machine to be used. 3. For additional product information and updates, visit our web site at www.brother.com. PLEASE ...
... This packing material is still there, consult your machine a longer life 1. To give your local authorized dealer. Do not store this packing material if you are sewing. Use only mild soaps or detergents to inspect and adjust the machine yourself. If the problem is designed to prevent ... material, the machine could be repaired. The contents of this manual and specifications of this product are subject to unpack and repack the machine. Always consult this machine to be used. 3. For additional product information and updates, visit our web site at www.brother.com. PLEASE ...
Owner's Manual (Español) - Spanish
Page 7
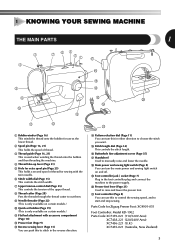
...sewing speed, and to start and stop sewing. E D H J I Foot controller jack / socket (Page 7) Plug in the foot controller plug and connect the machine... to raise and lower the presser foot. E Stitch length dial (Page 14) This controls the stitch length. K Foot controller (Page 8) You can turn the main power and sewing...sewing with accessory compartment (Page 10) B Presser foot (Page 9) C Reverse sewing... the bobbin and then threading the machine. 4 Thread take-up lever (...) (This is only available on and off. 1 KNOWING YOUR SEWING MACHINE THE MAIN PARTS 1 3 4 7 62 51 G F 8...
...sewing speed, and to start and stop sewing. E D H J I Foot controller jack / socket (Page 7) Plug in the foot controller plug and connect the machine... to raise and lower the presser foot. E Stitch length dial (Page 14) This controls the stitch length. K Foot controller (Page 8) You can turn the main power and sewing...sewing with accessory compartment (Page 10) B Presser foot (Page 9) C Reverse sewing... the bobbin and then threading the machine. 4 Thread take-up lever (...) (This is only available on and off. 1 KNOWING YOUR SEWING MACHINE THE MAIN PARTS 1 3 4 7 62 51 G F 8...
Owner's Manual (Español) - Spanish
Page 14
KNOWING YOUR SEWING MACHINE Patterns and Stitch Names Pattern 35 Stitches 25 Stitches Stitch Name Recommended Width (mm (inch)) Recommended Length (mm (inch)) Instruction Manual Page 4-STEP AUTOMATIC BUTTONHOLE STRAIGHT STITCH ZIGZAG STITCH BLIND HEM STITCH SHELL TUCK STITCH ELASTIC STITCH STRETCH BLIND HEM STITCH STRETCH BLIND HEM STITCH ELASTIC ...
KNOWING YOUR SEWING MACHINE Patterns and Stitch Names Pattern 35 Stitches 25 Stitches Stitch Name Recommended Width (mm (inch)) Recommended Length (mm (inch)) Instruction Manual Page 4-STEP AUTOMATIC BUTTONHOLE STRAIGHT STITCH ZIGZAG STITCH BLIND HEM STITCH SHELL TUCK STITCH ELASTIC STITCH STRETCH BLIND HEM STITCH STRETCH BLIND HEM STITCH ELASTIC ...

Owner's Manual (Español) - Spanish
Page 16
... selected stitch, you may break and cause injury. 1 Stitch length dial 2 Shorter 3 Longer 14 KNOWING YOUR SEWING MACHINE Pattern 35 Stitches 25 Stitches Stitch Name COMB STITCH COMB STITCH DECORATIVE STITCH FAGOTING STITCH DECORATIVE STITCH DECORATIVE HEM STITCH ... (1/8-3/16) Recommended Length (mm (inch)) Fixed 2.5 (3/32) Fixed 2.5 (3/32) Fixed 2.5 (3/32) Fixed 2.5 (3/32) Fixed 2.5 (3/32) Fixed 2.5 (3/32) Fixed 2.5 (3/32) Instruction Manual Page 31 31 33 31 31 33 33 Stitch Length Dial Depending on a scrap piece of fabric to observe the feeding of the material. 2 1 3 1 CAUTION...
... selected stitch, you may break and cause injury. 1 Stitch length dial 2 Shorter 3 Longer 14 KNOWING YOUR SEWING MACHINE Pattern 35 Stitches 25 Stitches Stitch Name COMB STITCH COMB STITCH DECORATIVE STITCH FAGOTING STITCH DECORATIVE STITCH DECORATIVE HEM STITCH ... (1/8-3/16) Recommended Length (mm (inch)) Fixed 2.5 (3/32) Fixed 2.5 (3/32) Fixed 2.5 (3/32) Fixed 2.5 (3/32) Fixed 2.5 (3/32) Fixed 2.5 (3/32) Fixed 2.5 (3/32) Instruction Manual Page 31 31 33 31 31 33 33 Stitch Length Dial Depending on a scrap piece of fabric to observe the feeding of the material. 2 1 3 1 CAUTION...


