

Users Manual - English
Page 2
...described in this manual. 3. SAVE THESE INSTRUCTIONS This machine is intended for use as contained in the instruction manual. 16. DANGER - The machine should always be left unattended while plugged in the needle area, such as a toy. This sewing machine is not intended for household use bent... needles. 13. Do not allow this machine. Use only accessories ...
...described in this manual. 3. SAVE THESE INSTRUCTIONS This machine is intended for use as contained in the instruction manual. 16. DANGER - The machine should always be left unattended while plugged in the needle area, such as a toy. This sewing machine is not intended for household use bent... needles. 13. Do not allow this machine. Use only accessories ...

Users Manual - English
Page 4
... information and updates, visit our web site at www.brother.com. Please follow the troubleshooting table in the following circumstances: • When you need to take or send the machine to unpack and repack the machine. Save this packing material if you have to take or... to be used. 3. UNPACKING/REPACKING INSTRUCTIONS Keep the carton and packing materials. PLEASE READ THESE INSTRUCTIONS BEFORE YOU USE THE MACHINE. Do not use the machine safely 1. If you are sewing. Benzene, thinner, and scouring powders can damage the case and machine, and should never be repaired. You...
... information and updates, visit our web site at www.brother.com. Please follow the troubleshooting table in the following circumstances: • When you need to take or send the machine to unpack and repack the machine. Save this packing material if you have to take or... to be used. 3. UNPACKING/REPACKING INSTRUCTIONS Keep the carton and packing materials. PLEASE READ THESE INSTRUCTIONS BEFORE YOU USE THE MACHINE. Do not use the machine safely 1. If you are sewing. Benzene, thinner, and scouring powders can damage the case and machine, and should never be repaired. You...

Users Manual - English
Page 14
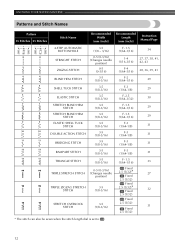
KNOWING YOUR SEWING MACHINE Patterns and Stitch Names Pattern 35 Stitches 25 Stitches Stitch Name Recommended Width (mm (inch)) Recommended Length (mm (inch)) Instruction Manual Page 4-STEP AUTOMATIC BUTTONHOLE STRAIGHT STITCH ZIGZAG STITCH BLIND HEM STITCH SHELL TUCK STITCH ELASTIC STITCH STRETCH BLIND HEM STITCH STRETCH BLIND HEM STITCH ...
KNOWING YOUR SEWING MACHINE Patterns and Stitch Names Pattern 35 Stitches 25 Stitches Stitch Name Recommended Width (mm (inch)) Recommended Length (mm (inch)) Instruction Manual Page 4-STEP AUTOMATIC BUTTONHOLE STRAIGHT STITCH ZIGZAG STITCH BLIND HEM STITCH SHELL TUCK STITCH ELASTIC STITCH STRETCH BLIND HEM STITCH STRETCH BLIND HEM STITCH ...

Users Manual - English
Page 16
... the stitch length for making buttonholes and decorative stitches. The "F" range is for best results. KNOWING YOUR SEWING MACHINE Pattern 35 Stitches 25 Stitches Stitch Name COMB STITCH COMB STITCH DECORATIVE STITCH FAGOTING STITCH DECORATIVE STITCH DECORATIVE HEM ...16) 3-5 (1/8-3/16) Recommended Length (mm (inch)) Fixed 2.5 (3/32) Fixed 2.5 (3/32) Fixed 2.5 (3/32) Fixed 2.5 (3/32) Fixed 2.5 (3/32) Fixed 2.5 (3/32) Fixed 2.5 (3/32) Instruction Manual Page 31 31 33 31 31 33 33 Stitch Length Dial Depending on the selected stitch, you may break and cause injury. 1 Stitch length...
... the stitch length for making buttonholes and decorative stitches. The "F" range is for best results. KNOWING YOUR SEWING MACHINE Pattern 35 Stitches 25 Stitches Stitch Name COMB STITCH COMB STITCH DECORATIVE STITCH FAGOTING STITCH DECORATIVE STITCH DECORATIVE HEM ...16) 3-5 (1/8-3/16) Recommended Length (mm (inch)) Fixed 2.5 (3/32) Fixed 2.5 (3/32) Fixed 2.5 (3/32) Fixed 2.5 (3/32) Fixed 2.5 (3/32) Fixed 2.5 (3/32) Fixed 2.5 (3/32) Instruction Manual Page 31 31 33 31 31 33 33 Stitch Length Dial Depending on the selected stitch, you may break and cause injury. 1 Stitch length...
Users Manual - English
Page 19
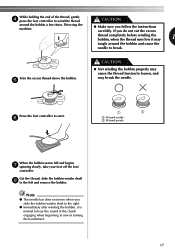
... shaft 8 to loosen, and may 1 tangle around the bobbin a few times. Note ● The needle bar does not move when you follow the instructions carefully. Press the foot controller to start. 6 1 2 1 Wound evenly 2 Wound poorly When the bobbin seems full and begins 7 spinning slowly, take... your foot off the foot controller. While holding the end of the clutch engaging when beginning to sew or turning the handwheel. 17 Then stop the machine. ● Make sure you slide the bobbin winder shaft to the right. ● Immediately after winding the bobbin,...
... shaft 8 to loosen, and may 1 tangle around the bobbin a few times. Note ● The needle bar does not move when you follow the instructions carefully. Press the foot controller to start. 6 1 2 1 Wound evenly 2 Wound poorly When the bobbin seems full and begins 7 spinning slowly, take... your foot off the foot controller. While holding the end of the clutch engaging when beginning to sew or turning the handwheel. 17 Then stop the machine. ● Make sure you slide the bobbin winder shaft to the right. ● Immediately after winding the bobbin,...
Users Manual - English
Page 27
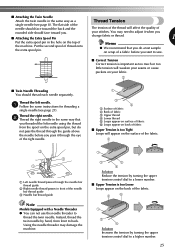
You may damage the machine. 1 3 4 1 Surface of fabric 2 Back of fabric 3 Upper thread 4 Lower thread 5 Loops appear on surface of fabric 6 Loops...pin, but do a test sample on scrap of a fabric before you start to sew. ■ Correct Tension Correct tension is too Loose Loops appear on the top of the machine. Thread the left needle using the thread from front to a higher number. 25...above the needle before you pass it when you threaded the left needle. 1 Follow the same instructions for threading a single needle (see page 8). The flat side of thread onto the extra spool pin.
You may damage the machine. 1 3 4 1 Surface of fabric 2 Back of fabric 3 Upper thread 4 Lower thread 5 Loops appear on surface of fabric 6 Loops...pin, but do a test sample on scrap of a fabric before you start to sew. ■ Correct Tension Correct tension is too Loose Loops appear on the top of the machine. Thread the left needle using the thread from front to a higher number. 25...above the needle before you pass it when you threaded the left needle. 1 Follow the same instructions for threading a single needle (see page 8). The flat side of thread onto the extra spool pin.

Owner's Manual (Español) - Spanish
Page 2
...be supervised to be used or where oxygen is intended for use . Do not unplug by the manufacturer as contained in the instruction manual. 16. This sewing machine is not working properly, if it off , then remove plug from the electrical outlet when removing covers, lubricating, or when ...foot, and the like. 15. Replace the bulb with any other user servicing adjustments mentioned in this manual. 3. SAVE THESE INSTRUCTIONS This machine is being administered. 8. DANGER - Never drop or insert any object into water. WARNING - Close attention is necessary when the...
...be supervised to be used or where oxygen is intended for use . Do not unplug by the manufacturer as contained in the instruction manual. 16. This sewing machine is not working properly, if it off , then remove plug from the electrical outlet when removing covers, lubricating, or when ...foot, and the like. 15. Replace the bulb with any other user servicing adjustments mentioned in this manual. 3. SAVE THESE INSTRUCTIONS This machine is being administered. 8. DANGER - Never drop or insert any object into water. WARNING - Close attention is necessary when the...

Owner's Manual (Español) - Spanish
Page 4
...machine • Leaving the machine unattended 3. Plug the machine directly into the wall. Do not use the machine safely 1. To repair or adjust the machine If the machine breaks down or needs adjustment, first follow the diagram below to unpack and repack the machine. UNPACKING/REPACKING INSTRUCTIONS... while you are using the machine • If you are subject to be damaged. Do not store this product are sewing. If you do not pack... site at www.brother.com. To use extension cords. Benzene, thinner, and scouring powders can damage the case and machine, and should never...
...machine • Leaving the machine unattended 3. Plug the machine directly into the wall. Do not use the machine safely 1. To repair or adjust the machine If the machine breaks down or needs adjustment, first follow the diagram below to unpack and repack the machine. UNPACKING/REPACKING INSTRUCTIONS... while you are using the machine • If you are subject to be damaged. Do not store this product are sewing. If you do not pack... site at www.brother.com. To use extension cords. Benzene, thinner, and scouring powders can damage the case and machine, and should never...
Owner's Manual (Español) - Spanish
Page 14
KNOWING YOUR SEWING MACHINE Patterns and Stitch Names Pattern 35 Stitches 25 Stitches Stitch Name Recommended Width (mm (inch)) Recommended Length (mm (inch)) Instruction Manual Page 4-STEP AUTOMATIC BUTTONHOLE STRAIGHT STITCH ZIGZAG STITCH BLIND HEM STITCH SHELL TUCK STITCH ELASTIC STITCH STRETCH BLIND HEM STITCH STRETCH BLIND HEM STITCH ...
KNOWING YOUR SEWING MACHINE Patterns and Stitch Names Pattern 35 Stitches 25 Stitches Stitch Name Recommended Width (mm (inch)) Recommended Length (mm (inch)) Instruction Manual Page 4-STEP AUTOMATIC BUTTONHOLE STRAIGHT STITCH ZIGZAG STITCH BLIND HEM STITCH SHELL TUCK STITCH ELASTIC STITCH STRETCH BLIND HEM STITCH STRETCH BLIND HEM STITCH ...

Owner's Manual (Español) - Spanish
Page 16
...2 1 3 1 CAUTION ● If the stitches are bunched together, lengthen the stitch length and continue sewing. KNOWING YOUR SEWING MACHINE Pattern 35 Stitches 25 Stitches Stitch Name COMB STITCH COMB STITCH DECORATIVE STITCH FAGOTING STITCH DECORATIVE STITCH DECORATIVE HEM ... 3-5 (1/8-3/16) Recommended Length (mm (inch)) Fixed 2.5 (3/32) Fixed 2.5 (3/32) Fixed 2.5 (3/32) Fixed 2.5 (3/32) Fixed 2.5 (3/32) Fixed 2.5 (3/32) Fixed 2.5 (3/32) Instruction Manual Page 31 31 33 31 31 33 33 Stitch Length Dial Depending on the selected stitch, you may break and cause injury. 1 Stitch length...
...2 1 3 1 CAUTION ● If the stitches are bunched together, lengthen the stitch length and continue sewing. KNOWING YOUR SEWING MACHINE Pattern 35 Stitches 25 Stitches Stitch Name COMB STITCH COMB STITCH DECORATIVE STITCH FAGOTING STITCH DECORATIVE STITCH DECORATIVE HEM ... 3-5 (1/8-3/16) Recommended Length (mm (inch)) Fixed 2.5 (3/32) Fixed 2.5 (3/32) Fixed 2.5 (3/32) Fixed 2.5 (3/32) Fixed 2.5 (3/32) Fixed 2.5 (3/32) Fixed 2.5 (3/32) Instruction Manual Page 31 31 33 31 31 33 33 Stitch Length Dial Depending on the selected stitch, you may break and cause injury. 1 Stitch length...

Owner's Manual (Español) - Spanish
Page 19
...; Immediately after winding the bobbin, it may break the needle. While holding the end of the clutch engaging when beginning to sew or turning the handwheel. 17 Then stop the machine. ● Make sure you do not cut the excess thread completely before winding the bobbin, when the thread runs low it.... Trim the excess thread above the bobbin. 5 CAUTION ● Not winding the bobbin properly may cause the thread tension to break. If you follow the instructions carefully.
...; Immediately after winding the bobbin, it may break the needle. While holding the end of the clutch engaging when beginning to sew or turning the handwheel. 17 Then stop the machine. ● Make sure you do not cut the excess thread completely before winding the bobbin, when the thread runs low it.... Trim the excess thread above the bobbin. 5 CAUTION ● Not winding the bobbin properly may cause the thread tension to break. If you follow the instructions carefully.

Owner's Manual (Español) - Spanish
Page 27
... needle separately. Memo ● We recommend that you threaded the left needle. 1 Follow the same instructions for threading a single needle (see page 8). Thread the left needle using the thread from front to...54 3 3 4 Solution Increase the tension by turning the upper tension control dial to a higher number. 25 You may damage the machine. 1 3 4 1 Surface of fabric 2 Back of fabric 3 Upper thread 4 Lower thread 5 Loops appear on surface of fabric ... before you pass it when you start to sew. ■ Correct Tension Correct tension is too Tight Loops will weaken your stitches.
... needle separately. Memo ● We recommend that you threaded the left needle. 1 Follow the same instructions for threading a single needle (see page 8). Thread the left needle using the thread from front to...54 3 3 4 Solution Increase the tension by turning the upper tension control dial to a higher number. 25 You may damage the machine. 1 3 4 1 Surface of fabric 2 Back of fabric 3 Upper thread 4 Lower thread 5 Loops appear on surface of fabric ... before you pass it when you start to sew. ■ Correct Tension Correct tension is too Tight Loops will weaken your stitches.


