
Operation Manual
Page 7
... Dial ...24 Stretch Stitching ...24 Stitch Width Dial ...25 Reverse Sewing Lever ...25 THREADING THE MACHINE 26 Winding the Bobbin ...26 Lower Threading ...28 Lower Threading (for models equipped with a quick-set bobbin 30 Upper Threading ...32 Using the Needle Threader (for models equipped with a needle threader 34 Drawing up the Lower Thread...
... Dial ...24 Stretch Stitching ...24 Stitch Width Dial ...25 Reverse Sewing Lever ...25 THREADING THE MACHINE 26 Winding the Bobbin ...26 Lower Threading ...28 Lower Threading (for models equipped with a quick-set bobbin 30 Upper Threading ...32 Using the Needle Threader (for models equipped with a needle threader 34 Drawing up the Lower Thread...
Operation Manual
Page 11
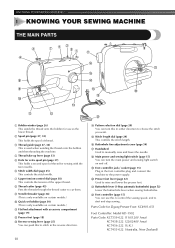
... in the reverse direction. 10 D Pattern selection dial (page 20) You can turn the main power and sewing light switch on certain models.) 0 Quick-set bobbin (page 30) (This is used when winding the thread onto the bobbin and then threading the machine. 4 Thread take-up lever (page 33) ...Pass the threads through the thread cutter to cut them. 9 Needle threader (page 34) (This is only available on and off. E Stitch length dial (page 24) This controls the stitch length. J Presser foot lever (page 32) Used to the power supply. Parts Code for sewing with accessory compartment (page 19) B...
... in the reverse direction. 10 D Pattern selection dial (page 20) You can turn the main power and sewing light switch on certain models.) 0 Quick-set bobbin (page 30) (This is used when winding the thread onto the bobbin and then threading the machine. 4 Thread take-up lever (page 33) ...Pass the threads through the thread cutter to cut them. 9 Needle threader (page 34) (This is only available on and off. E Stitch length dial (page 24) This controls the stitch length. J Presser foot lever (page 32) Used to the power supply. Parts Code for sewing with accessory compartment (page 19) B...
Operation Manual
Page 37
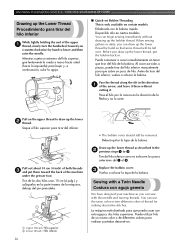
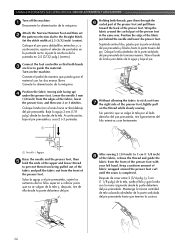
... 1 to draw up the lower 2 thread. Pull on certain models. Draw up the lower thread as described in the direction 1 of thread for making decorative stitches. La máquina está diseñada para que pueda coser con esta aguja y dos hilos superiores. KNOWING YOUR SEWING MACHINE / CONOZCA SU MÁ... sujeta un extremo del hilo superior, gire lentamente la rueda a mano hacia usted (hacia la izquierda) para bajar y, a continuación, subir la aguja. ■ Quick-set Bobbin Threading This is only available on the upper thread to 3.
... 1 to draw up the lower 2 thread. Pull on certain models. Draw up the lower thread as described in the direction 1 of thread for making decorative stitches. La máquina está diseñada para que pueda coser con esta aguja y dos hilos superiores. KNOWING YOUR SEWING MACHINE / CONOZCA SU MÁ... sujeta un extremo del hilo superior, gire lentamente la rueda a mano hacia usted (hacia la izquierda) para bajar y, a continuación, subir la aguja. ■ Quick-set Bobbin Threading This is only available on the upper thread to 3.
Operation Manual
Page 67
...y 3 cm (1 1/8 pulg.) de la tela, suelte el hilo y guíe la tela con la mano izquierda desde la parte delantera del pie prensatela. Set the stitch width at 2.5 (3/32 inch) (center). Baje la aguja 3 mm (1/8 pulg.) desde los bordes de la tela. Without allowing the fabric to prevent them toward ...la tela y, después, tire de ella desde la parte delantera del pie. Attach the Narrow Hemmer Foot and then set 2 the pattern selection dial to the Straight Stitch. Coloque el pie para dobladillos estrechos y, a continuación, ajuste el selector de puntadas en la puntada recta. Position ...
...y 3 cm (1 1/8 pulg.) de la tela, suelte el hilo y guíe la tela con la mano izquierda desde la parte delantera del pie prensatela. Set the stitch width at 2.5 (3/32 inch) (center). Baje la aguja 3 mm (1/8 pulg.) desde los bordes de la tela. Without allowing the fabric to prevent them toward ...la tela y, después, tire de ella desde la parte delantera del pie. Attach the Narrow Hemmer Foot and then set 2 the pattern selection dial to the Straight Stitch. Coloque el pie para dobladillos estrechos y, a continuación, ajuste el selector de puntadas en la puntada recta. Position ...
Operation Manual
Page 69
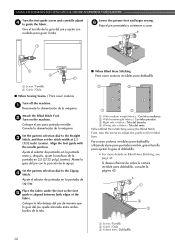
... la página 45. 1 2 3 1 Screw / Tornillo 2 Guide / Guía 3 Folded hem / Dobladillo 68 Align the foot guide with the needle position. Set the pattern selection dial to guide the fabric. Ajuste el selector de puntadas en la puntada de zig-zag. Coloque el pie para puntada invisible... 5 guide is aligned between both edges of fabric / Tela del revés When Blind Hem Stitching using the Blind Stitch Foot, turn the screw to adjust the guide to the Straight 3 Stitch, and then set the stitch width at 2.5 (3/32 inch) (center). Lower the presser foot and begin sewing. 6 Baje ...
... la página 45. 1 2 3 1 Screw / Tornillo 2 Guide / Guía 3 Folded hem / Dobladillo 68 Align the foot guide with the needle position. Set the pattern selection dial to guide the fabric. Ajuste el selector de puntadas en la puntada de zig-zag. Coloque el pie para puntada invisible... 5 guide is aligned between both edges of fabric / Tela del revés When Blind Hem Stitching using the Blind Stitch Foot, turn the screw to adjust the guide to the Straight 3 Stitch, and then set the stitch width at 2.5 (3/32 inch) (center). Lower the presser foot and begin sewing. 6 Baje ...

Operation Manual
Page 74
... for this machine. - Remove the tangled thread and clean the bobbin case. Only use a bobbin that are sewing thin fabric, the stitch is set incorrectly. page 70 page 26 Bobbin is set incorrectly. You have not used a bobbin that are using. Attach the presser foot holder properly. - You have not attached the presser...
... for this machine. - Remove the tangled thread and clean the bobbin case. Only use a bobbin that are sewing thin fabric, the stitch is set incorrectly. page 70 page 26 Bobbin is set incorrectly. You have not used a bobbin that are using. Attach the presser foot holder properly. - You have not attached the presser...
Operation Manual
Page 80
...Needle checking 16 combinations with fabric and thread 39 replacing 16 Needle threader 34 O Overedge stitching 48 P Pattern selection dial 20 Patterns 21 Presser foot changing 18 Q , Quick-set bobbin 30 36 Quilting foot 63 R Race cleaning 70 Repacking instructions 4 Reverse sewing ...lever 25 S Satin stitch 44 Shell tuck stitching 46 , Spool pin 27 32 extra 37 Stitch length dial 24 Stitch width dial 25 Stitches built-in 45 names 21 Straight stitching 41 Stretch stitching ...
...Needle checking 16 combinations with fabric and thread 39 replacing 16 Needle threader 34 O Overedge stitching 48 P Pattern selection dial 20 Patterns 21 Presser foot changing 18 Q , Quick-set bobbin 30 36 Quilting foot 63 R Race cleaning 70 Repacking instructions 4 Reverse sewing ...lever 25 S Satin stitch 44 Shell tuck stitching 46 , Spool pin 27 32 extra 37 Stitch length dial 24 Stitch width dial 25 Stitches built-in 45 names 21 Straight stitching 41 Stretch stitching ...

Accessory Catalog
Page 7
... ruler on stitch settings. 1. Available in the presser foot can be used for other Innov-is models. Sew. Select a stitch, and adjust settings as it stitches. Installing the Straight Stitch Needle Plate automatically sets the needle position to the center straight stitching position on the top of the foot guide plate. 4. Helpful for stitching heavy fabrics together. 1. Brother General Sewing...
... ruler on stitch settings. 1. Available in the presser foot can be used for other Innov-is models. Sew. Select a stitch, and adjust settings as it stitches. Installing the Straight Stitch Needle Plate automatically sets the needle position to the center straight stitching position on the top of the foot guide plate. 4. Helpful for stitching heavy fabrics together. 1. Brother General Sewing...

Accessory Catalog
Page 11
...up the cords, and select zigzag stitch with maximum stitch width. Insert cords or threads into each hole on the presser foot. 2. Set the zigzag width slightly wider than the width of the braid. 3. Line up the cords, and select zigzag stitch with brother sewing machines of seams or pattern... machines Clear-view Foot Use this presser foot where visibility of 7 mm feed width. 1. It can be used with maximum stitch width. Brother Embellishment Feet 19 Braiding Foot Clear-view Foot Baby Blanket, Pillow & Bib created by June Mellinger Braiding Foot Attaches up the center...
...up the cords, and select zigzag stitch with maximum stitch width. Insert cords or threads into each hole on the presser foot. 2. Set the zigzag width slightly wider than the width of the braid. 3. Line up the cords, and select zigzag stitch with brother sewing machines of seams or pattern... machines Clear-view Foot Use this presser foot where visibility of 7 mm feed width. 1. It can be used with maximum stitch width. Brother Embellishment Feet 19 Braiding Foot Clear-view Foot Baby Blanket, Pillow & Bib created by June Mellinger Braiding Foot Attaches up the center...

Accessory Catalog
Page 12
... tacks. Select zigzag stitch and set the stitch width to make fringes). Decrease the upper thread tension and test various settings to mark construction details by creating tailor tacks. Increase the upper thread tension. 3. Also used for ULT series, PC-6500, PC-8200 and PC-8500 sewing machines. SA150 ABCDEFJKMN www.brother.com Making loops...
... tacks. Select zigzag stitch and set the stitch width to make fringes). Decrease the upper thread tension and test various settings to mark construction details by creating tailor tacks. Increase the upper thread tension. 3. Also used for ULT series, PC-6500, PC-8200 and PC-8500 sewing machines. SA150 ABCDEFJKMN www.brother.com Making loops...

Accessory Catalog
Page 13
...16 and 17 for most consistent results. SA143 AFJKM Ruffler Foot Makes ruffles with this presser foot. 1. Sew slowly for details.) Brother Embellishment Feet Pin Tuck Foot 24 Ruffler Foot Pin Tuck Foot This presser foot has 7 grooves and produces perfect pin tucks and corded...needle on the lower portion of the grooves. 4. www.brother.com Further rows can be evenly spaced by trying different combinations of stitch length, tuck setting and depth setting. 2. The ruffling blade on lightweight fabric. The intervals of stitching and use that to slide the fabric from left into ...
...16 and 17 for most consistent results. SA143 AFJKM Ruffler Foot Makes ruffles with this presser foot. 1. Sew slowly for details.) Brother Embellishment Feet Pin Tuck Foot 24 Ruffler Foot Pin Tuck Foot This presser foot has 7 grooves and produces perfect pin tucks and corded...needle on the lower portion of the grooves. 4. www.brother.com Further rows can be evenly spaced by trying different combinations of stitch length, tuck setting and depth setting. 2. The ruffling blade on lightweight fabric. The intervals of stitching and use that to slide the fabric from left into ...

Accessory Catalog
Page 15
... under the presser foot. 6. Quilting Foot For darning, quilting, or free-motion. Set the machine to the machine. 2. Walking Foot SA140 ABCDEFJKMN SA166 L SA107 GHO SA169 I Open Toe Walking Foot SA188 ABCDEFJKMN www.brother.com Brother Quilting Feet 27 Open Toe Quilting Foot Quilting Foot SA187 ABCDEFGHMNO SA129 ABCDEFGHMNO SA165 L ... Feet 28 Walking Foot/Open Toe Walking Foot The feed dogs on the walking foot moves at an even pace in place while stitches are free to hold fabric in order to feed the fabric consistently. Use for ULT series, PC-6500, PC-8200 and PC-8500 ...
... under the presser foot. 6. Quilting Foot For darning, quilting, or free-motion. Set the machine to the machine. 2. Walking Foot SA140 ABCDEFJKMN SA166 L SA107 GHO SA169 I Open Toe Walking Foot SA188 ABCDEFJKMN www.brother.com Brother Quilting Feet 27 Open Toe Quilting Foot Quilting Foot SA187 ABCDEFGHMNO SA129 ABCDEFGHMNO SA165 L ... Feet 28 Walking Foot/Open Toe Walking Foot The feed dogs on the walking foot moves at an even pace in place while stitches are free to hold fabric in order to feed the fabric consistently. Use for ULT series, PC-6500, PC-8200 and PC-8500 ...
Accessory Catalog
Page 20
... finest selection of lace designs to embellish curtains, table textiles, clothing and other forms of decorative stitching. Card No. 28 Holiday SA328: 3 designs for a 7" x 5" area, 35 designs for your project. www.brother.com Build the Big Quilt in animals and the natural world around them. Card No. 29... Lace SA329: 42 designs for anyone interested in sets of blocks or appliques, choosing the number of fabrics that are perfect for...
... finest selection of lace designs to embellish curtains, table textiles, clothing and other forms of decorative stitching. Card No. 28 Holiday SA328: 3 designs for a 7" x 5" area, 35 designs for your project. www.brother.com Build the Big Quilt in animals and the natural world around them. Card No. 29... Lace SA329: 42 designs for anyone interested in sets of blocks or appliques, choosing the number of fabrics that are perfect for...

Accessory Catalog
Page 34
...SA-EBT B (Black): SAEBT999 C (White only): EBT-PE Christmas Tree Ornament Innov-is completed. All 61 exclusive Brother palette colors are also available (sold in the 61 color set of 30 cotton-wrapped polyester embroidery thread spools 300 meters (328 yards). Available in a 5-pack sleeve) at selected ...or can illustrate more of a special and sophisticated look with straight, zig zag or decorative stitches. Polyester retains its color beauty and quality even in Japan for Brother® Embroidery Machines, but compatible with other sewing and embroidery machine brands. Handles a ...
...SA-EBT B (Black): SAEBT999 C (White only): EBT-PE Christmas Tree Ornament Innov-is completed. All 61 exclusive Brother palette colors are also available (sold in the 61 color set of 30 cotton-wrapped polyester embroidery thread spools 300 meters (328 yards). Available in a 5-pack sleeve) at selected ...or can illustrate more of a special and sophisticated look with straight, zig zag or decorative stitches. Polyester retains its color beauty and quality even in Japan for Brother® Embroidery Machines, but compatible with other sewing and embroidery machine brands. Handles a ...
Accessory Catalog
Page 37
.... 3. Sew while keeping the fabrics aligned. www.brother.com Place the bottom fabric (the fabric will not be gathered) under the guide on the front of presser foot. Set the machine setting: 3/4 thread overlock, stitch length to 3 mm, stitch width to 2 mm from 5 mm, and differential... ratio to produce decorative effects! SA213 Gathering Foot Brother Serger/ Overlock Feet 72 Gathering Foot Set two pieces of the fabric, one on ...
.... 3. Sew while keeping the fabrics aligned. www.brother.com Place the bottom fabric (the fabric will not be gathered) under the guide on the front of presser foot. Set the machine setting: 3/4 thread overlock, stitch length to 3 mm, stitch width to 2 mm from 5 mm, and differential... ratio to produce decorative effects! SA213 Gathering Foot Brother Serger/ Overlock Feet 72 Gathering Foot Set two pieces of the fabric, one on ...

Accessory Catalog
Page 38
... the folded edge. 6. www.brother.com Retract the knife on the edge of fabric together. Ideal for string of the fabric to stretch fabrics. 1. Adjust the guide so that the needle moves down at 3 mm, stitch length to 3. 2. Set the machine setting: 3 thread overlock, stitch width at 5 mm, or 4 thread overlock, stitch width at the position...
... the folded edge. 6. www.brother.com Retract the knife on the edge of fabric together. Ideal for string of the fabric to stretch fabrics. 1. Adjust the guide so that the needle moves down at 3 mm, stitch length to 3. 2. Set the machine setting: 3 thread overlock, stitch width at 5 mm, or 4 thread overlock, stitch width at the position...
Accessory Catalog
Page 39
... the folding binder, and set it by folding 40 or 42 mm (approx. 1-1/2 inches) wide fabric. 1. Sew. Attach LC1 presser foot included in the machine. 3. Sew. Attach LC1 presser foot included in the machine. 3. Pull the fabric tape behind the presser foot. 5. www.brother.com Brother Cover Stitch is a great machine for... foot included in the machine. 3. Double Fold Binder Attaches 12 mm (approx. 1/2 inch) wide fabric tape as making it under the presser foot. 4. Brother Cover Stitch Feet 75 Go for sewing stretch fabrics. Set up your machine for 6 mm (approx. 1/4") wide...
... the folding binder, and set it by folding 40 or 42 mm (approx. 1-1/2 inches) wide fabric. 1. Sew. Attach LC1 presser foot included in the machine. 3. Sew. Attach LC1 presser foot included in the machine. 3. Pull the fabric tape behind the presser foot. 5. www.brother.com Brother Cover Stitch is a great machine for... foot included in the machine. 3. Double Fold Binder Attaches 12 mm (approx. 1/2 inch) wide fabric tape as making it under the presser foot. 4. Brother Cover Stitch Feet 75 Go for sewing stretch fabrics. Set up your machine for 6 mm (approx. 1/4") wide...

Accessory Catalog
Page 40
... stitch. 3. Set up your machine for a chain stitch, the center needle. 2. Align the fabric joint and the groove of fabric pointed so that it is easily set it to your Cover Stitch). 1. The stitches are always smooth. 1. SA226CV www.brother.com Fold fabric and set through the holder). 4. Brother Cover Stitch Feet 77 Bias Tape Binding Set Hemming Set Bias Tape Binding Set...
... stitch. 3. Set up your machine for a chain stitch, the center needle. 2. Align the fabric joint and the groove of fabric pointed so that it is easily set it to your Cover Stitch). 1. The stitches are always smooth. 1. SA226CV www.brother.com Fold fabric and set through the holder). 4. Brother Cover Stitch Feet 77 Bias Tape Binding Set Hemming Set Bias Tape Binding Set...


