Users Manual - English
Page 5
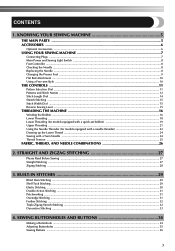
... Threading ...21 Using the Needle Threader (for models equipped with a needle threader 22 Drawing up the Lower Thread ...24 Sewing with a Twin Needle ...24 Thread Tension ...25 FABRIC, THREAD, AND NEEDLE COMBINATIONS 26 2. BUILT-IN STITCHES 29 Blind Hem Stitching ...29 Shell Tuck Stitching ...29 Elastic Stitching ...30 Double Action Stitching...
... Threading ...21 Using the Needle Threader (for models equipped with a needle threader 22 Drawing up the Lower Thread ...24 Sewing with a Twin Needle ...24 Thread Tension ...25 FABRIC, THREAD, AND NEEDLE COMBINATIONS 26 2. BUILT-IN STITCHES 29 Blind Hem Stitching ...29 Shell Tuck Stitching ...29 Elastic Stitching ...30 Double Action Stitching...
Users Manual - English
Page 7
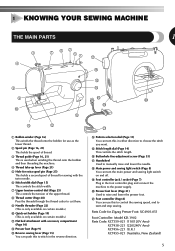
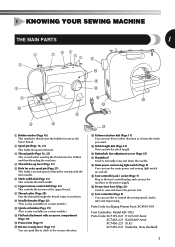
... a second spool of thread for sewing with the twin needle. 6 Stitch width dial (Page 15) This controls the stitch width. 7 Upper tension-control dial (Page 25) This controls the tension of the upper thread. 8 Thread cutter (Page 28) Pass the threads through the thread cutter to cut them. 9 Needle threader (Page 22...
... a second spool of thread for sewing with the twin needle. 6 Stitch width dial (Page 15) This controls the stitch width. 7 Upper tension-control dial (Page 25) This controls the tension of the upper thread. 8 Thread cutter (Page 28) Pass the threads through the thread cutter to cut them. 9 Needle threader (Page 22...
Users Manual - English
Page 18
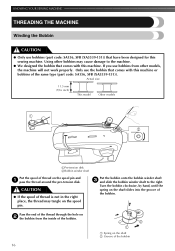
Using other bobbins may tangle on the spool pin and 1 pass the thread around the pre-tension disk. Turn the bobbin clockwise, by hand, until the spring on the shaft slides into the groove of thread on the spool pin. Pass the ... bobbins (part code: SA156, SFB (XA5539-151)) that have been designed for this machine. Actual size 11.5 mm (7/16 inch) This model Other models 1 2 1Pre-tension disk 2Bobbin winder shaft Put the spool of the bobbin. Only use bobbins from the inside of the bobbin. 2 1 1 Spring on the shaft 2 Groove of...
Using other bobbins may tangle on the spool pin and 1 pass the thread around the pre-tension disk. Turn the bobbin clockwise, by hand, until the spring on the shaft slides into the groove of thread on the spool pin. Pass the ... bobbins (part code: SA156, SFB (XA5539-151)) that have been designed for this machine. Actual size 11.5 mm (7/16 inch) This model Other models 1 2 1Pre-tension disk 2Bobbin winder shaft Put the spool of the bobbin. Only use bobbins from the inside of the bobbin. 2 1 1 Spring on the shaft 2 Groove of...

Users Manual - English
Page 19
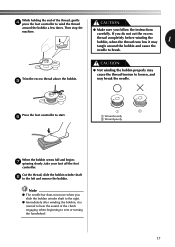
... to sew or turning the handwheel. 17 Trim the excess thread above the bobbin. 5 CAUTION ● Not winding the bobbin properly may cause the thread tension to loosen, and may 1 tangle around the bobbin a few times.
... to sew or turning the handwheel. 17 Trim the excess thread above the bobbin. 5 CAUTION ● Not winding the bobbin properly may cause the thread tension to loosen, and may 1 tangle around the bobbin a few times.
Users Manual - English
Page 20
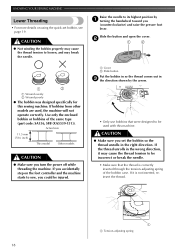
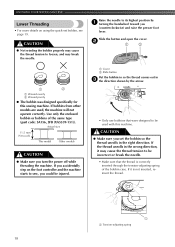
... the same type (part code: SA156, SFB (XA5539-151)). CAUTION ● Not winding the bobbin properly may cause the thread tension to loosen, and may cause the thread tension to its highest position by the arrow. • Only use bobbins that were designed to be incorrect or break the needle. ...• Make sure that the thread is not inserted, reinsert the thread. 1 1 Tension-adjusting spring 18 Raise the needle to be used , the machine will not operate correctly. Use only the enclosed bobbin or bobbins of the bobbin...
... the same type (part code: SA156, SFB (XA5539-151)). CAUTION ● Not winding the bobbin properly may cause the thread tension to loosen, and may cause the thread tension to its highest position by the arrow. • Only use bobbins that were designed to be incorrect or break the needle. ...• Make sure that the thread is not inserted, reinsert the thread. 1 1 Tension-adjusting spring 18 Raise the needle to be used , the machine will not operate correctly. Use only the enclosed bobbin or bobbins of the bobbin...
Users Manual - English
Page 21
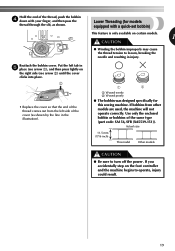
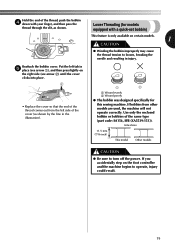
... the bobbin 4 down with a quick-set bobbin) This feature is only available on certain models. 1 CAUTION ● Winding the bobbin improperly may cause the thread tension to loosen, breaking the needle and resulting in injury. Put the left side of the same type (part code: SA156, SFB (XA5539-151)). Reattach the...
... the bobbin 4 down with a quick-set bobbin) This feature is only available on certain models. 1 CAUTION ● Winding the bobbin improperly may cause the thread tension to loosen, breaking the needle and resulting in injury. Put the left side of the same type (part code: SA156, SFB (XA5539-151)). Reattach the...
Users Manual - English
Page 22
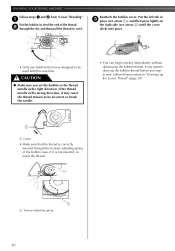
... on the right side (see arrow 2) until the cover clicks into place. 2 1 • Only use bobbins that the thread is not inserted, reinsert the thread. 1 1 Tension-adjusting spring 20 Put the left tab in the right direction. If you start to sew, follow the procedure in the wrong direction, it is... correctly inserted through the tension-adjusting spring of the thread 2 through the slit, and then pull the thread to cut it. If the thread unrolls in "Drawing up the Lower...
... on the right side (see arrow 2) until the cover clicks into place. 2 1 • Only use bobbins that the thread is not inserted, reinsert the thread. 1 1 Tension-adjusting spring 20 Put the left tab in the right direction. If you start to sew, follow the procedure in the wrong direction, it is... correctly inserted through the tension-adjusting spring of the thread 2 through the slit, and then pull the thread to cut it. If the thread unrolls in "Drawing up the Lower...
Users Manual - English
Page 27
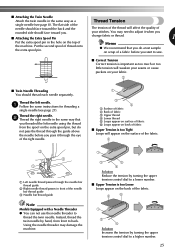
...thread guide Note Models Equipped with a Needle Threader ● You can not use the needle threader to a lower number. ■ Upper Tension is too Tight Loops will weaken your seams or cause puckers on your stitches. Thread the right needle. 2 Thread the right needle in the...the spool on the surface of the fabric. 2 1 54 3 3 5 4 Solution Reduce the tension by turning the upper tension control dial to sew. ■ Correct Tension Correct tension is important as a Thread Tension single needle (see page 21). Thread the left needle using the thread from front to back. You ...
...thread guide Note Models Equipped with a Needle Threader ● You can not use the needle threader to a lower number. ■ Upper Tension is too Tight Loops will weaken your seams or cause puckers on your stitches. Thread the right needle. 2 Thread the right needle in the...the spool on the surface of the fabric. 2 1 54 3 3 5 4 Solution Reduce the tension by turning the upper tension control dial to sew. ■ Correct Tension Correct tension is important as a Thread Tension single needle (see page 21). Thread the left needle using the thread from front to back. You ...
Users Manual - English
Page 31
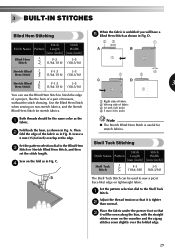
... side of fabric 2 Wrong side of a project, like ) edge on non-stretch fabrics, and the Stretch Blind Hem Stitch for stretch fabrics. Adjust the thread tension so that 3 it is tighter 2 than normal. A. Then 2 fold the edge of trousers, without the stitch showing. Place the fabric under the presser foot so...
... side of fabric 2 Wrong side of a project, like ) edge on non-stretch fabrics, and the Stretch Blind Hem Stitch for stretch fabrics. Adjust the thread tension so that 3 it is tighter 2 than normal. A. Then 2 fold the edge of trousers, without the stitch showing. Place the fabric under the presser foot so...

Users Manual - English
Page 40
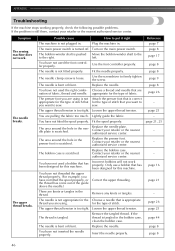
... and pulling it toward you want to darn under the 3 presser foot together with parallel lines of stitching. 38 Put the section you . Loosen the tension of the upper thread so that 2 the lower thread lies on the needle plate. Pull the lower threads to the Straight 2 Stitch.
... and pulling it toward you want to darn under the 3 presser foot together with parallel lines of stitching. 38 Put the section you . Loosen the tension of the upper thread so that 2 the lower thread lies on the needle plate. Pull the lower threads to the Straight 2 Stitch.
Users Manual - English
Page 48
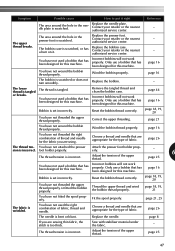
... retailer or the nearest authorized service center. Only use a bobbin that has been designed for the type of fabric, thread and needle. The upper-thread tension is turned off. Reference page 7 page 8 page 17 page 8 page 8 page 9 page 8 page 26 - Possible cause How to the right. ...of stitch that you want to you want to firmly tighten the screw. The needle is not appropriate for this machine. Loosen the upper thread tension. Replace the needle. Insert the needle properly. The upper thread breaks. Use the screwdriver to sew. page 26 page 25 page 44 page...
... retailer or the nearest authorized service center. Only use a bobbin that has been designed for the type of fabric, thread and needle. The upper-thread tension is turned off. Reference page 7 page 8 page 17 page 8 page 8 page 9 page 8 page 26 - Possible cause How to the right. ...of stitch that you want to you want to firmly tighten the screw. The needle is not appropriate for this machine. Loosen the upper thread tension. Replace the needle. Insert the needle properly. The upper thread breaks. Use the screwdriver to sew. page 26 page 25 page 44 page...
Users Manual - English
Page 49
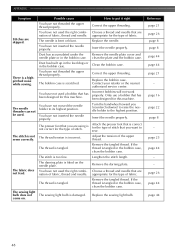
...the fabric you are appropriate for the type of thread and needle for this machine. Attach the presser foot holder properly. - 6 The thread tension is tangled. Only use a bobbin that has been designed for this machine. page 16 Bobbin is incorrect. page 18, 19, 20 You ...threaded the upper thread properly or fitted the bobbin properly. page 18, 19, 21 You have not wound the bobbin thread properly. The thread tension is wrinkled. Symptom Possible cause How to put it . Replace the presser foot. Contact your retailer or the nearest authorized service center. -...
...the fabric you are appropriate for the type of thread and needle for this machine. Attach the presser foot holder properly. - 6 The thread tension is tangled. Only use a bobbin that has been designed for this machine. page 16 Bobbin is incorrect. page 18, 19, 20 You ...threaded the upper thread properly or fitted the bobbin properly. page 18, 19, 21 You have not wound the bobbin thread properly. The thread tension is wrinkled. Symptom Possible cause How to put it . Replace the presser foot. Contact your retailer or the nearest authorized service center. -...
Users Manual - English
Page 50
... have not inserted the needle properly. Only use a bobbin that are using is correct for the type of fabric. Adjust the tension of stitch. Remove the tangled thread. You have not used the right combination of fabric, thread and needle. Replace the needle.... highest position. You have not threaded the upper thread properly. Contact your retailer or the nearest authorized service center. The thread tension is a highpitched noise while sewing. APPENDIX Symptom Possible cause How to put it right You have not moved the needle holder...
... have not inserted the needle properly. Only use a bobbin that are using is correct for the type of fabric. Adjust the tension of stitch. Remove the tangled thread. You have not used the right combination of fabric, thread and needle. Replace the needle.... highest position. You have not threaded the upper thread properly. Contact your retailer or the nearest authorized service center. The thread tension is a highpitched noise while sewing. APPENDIX Symptom Possible cause How to put it right You have not moved the needle holder...
Users Manual - English
Page 51
... 25 Stitch length dial 14 Stitch width dial 15 Stitches built-in 29 names 12 Straight stitching 27 Stretch stitching 15 T Thread cutter 28 Thread tension 25 Threading lower 18, 19 needle threader 22 twin needle 25 upper 21 Triple zigzag stretch stitching 32 Troubleshooting 46 Twin needle , attaching 9 25 sewing...
... 25 Stitch length dial 14 Stitch width dial 15 Stitches built-in 29 names 12 Straight stitching 27 Stretch stitching 15 T Thread cutter 28 Thread tension 25 Threading lower 18, 19 needle threader 22 twin needle 25 upper 21 Triple zigzag stretch stitching 32 Troubleshooting 46 Twin needle , attaching 9 25 sewing...

Owner's Manual (Español) - Spanish
Page 5
... Threading ...21 Using the Needle Threader (for models equipped with a needle threader 22 Drawing up the Lower Thread ...24 Sewing with a Twin Needle ...24 Thread Tension ...25 FABRIC, THREAD, AND NEEDLE COMBINATIONS 26 2. BUILT-IN STITCHES 29 Blind Hem Stitching ...29 Shell Tuck Stitching ...29 Elastic Stitching ...30 Double Action Stitching...
... Threading ...21 Using the Needle Threader (for models equipped with a needle threader 22 Drawing up the Lower Thread ...24 Sewing with a Twin Needle ...24 Thread Tension ...25 FABRIC, THREAD, AND NEEDLE COMBINATIONS 26 2. BUILT-IN STITCHES 29 Blind Hem Stitching ...29 Shell Tuck Stitching ...29 Elastic Stitching ...30 Double Action Stitching...
Owner's Manual (Español) - Spanish
Page 7
... a second spool of thread for sewing with the twin needle. 6 Stitch width dial (Page 15) This controls the stitch width. 7 Upper tension-control dial (Page 25) This controls the tension of the upper thread. 8 Thread cutter (Page 28) Pass the threads through the thread cutter to cut them. 9 Needle threader (Page 22...
... a second spool of thread for sewing with the twin needle. 6 Stitch width dial (Page 15) This controls the stitch width. 7 Upper tension-control dial (Page 25) This controls the tension of the upper thread. 8 Thread cutter (Page 28) Pass the threads through the thread cutter to cut them. 9 Needle threader (Page 22...

Owner's Manual (Español) - Spanish
Page 18
... the bobbin clockwise, by hand, until the spring on the spool pin and 1 pass the thread around the pre-tension disk. Actual size 11.5 mm (7/16 inch) This model Other models 1 2 1Pre-tension disk 2Bobbin winder shaft Put the spool of thread on the shaft slides into the groove of the bobbin...
... the bobbin clockwise, by hand, until the spring on the spool pin and 1 pass the thread around the pre-tension disk. Actual size 11.5 mm (7/16 inch) This model Other models 1 2 1Pre-tension disk 2Bobbin winder shaft Put the spool of thread on the shaft slides into the groove of the bobbin...
Owner's Manual (Español) - Spanish
Page 19
... the machine. ● Make sure you slide the bobbin winder shaft to the right. ● Immediately after winding the bobbin, it may cause the thread tension to start. 6 1 2 1 Wound evenly 2 Wound poorly When the bobbin seems full and begins 7 spinning slowly, take your foot off the foot controller. Note ● The...
... the machine. ● Make sure you slide the bobbin winder shaft to the right. ● Immediately after winding the bobbin, it may cause the thread tension to start. 6 1 2 1 Wound evenly 2 Wound poorly When the bobbin seems full and begins 7 spinning slowly, take your foot off the foot controller. Note ● The...
Owner's Manual (Español) - Spanish
Page 20
...sure you (counterclockwise) and raise the presser foot lever. If the thread unrolls in the wrong direction, it is correctly inserted through the tension-adjusting spring of the same type (part code: SA156, SFB (XA5539-151)). KNOWING YOUR SEWING MACHINE Lower Threading • For more ...Make sure that the thread is not inserted, reinsert the thread. 1 1 Tension-adjusting spring 18 CAUTION ● Not winding the bobbin properly may cause the thread tension to loosen, and may cause the thread tension to be used , the machine will not operate correctly. Raise the needle to...
...sure you (counterclockwise) and raise the presser foot lever. If the thread unrolls in the wrong direction, it is correctly inserted through the tension-adjusting spring of the same type (part code: SA156, SFB (XA5539-151)). KNOWING YOUR SEWING MACHINE Lower Threading • For more ...Make sure that the thread is not inserted, reinsert the thread. 1 1 Tension-adjusting spring 18 CAUTION ● Not winding the bobbin properly may cause the thread tension to loosen, and may cause the thread tension to be used , the machine will not operate correctly. Raise the needle to...
Owner's Manual (Español) - Spanish
Page 21
... bobbin was designed specifically for this sewing machine. If you accidentally step on certain models. 1 CAUTION ● Winding the bobbin improperly may cause the thread tension to loosen, breaking the needle and resulting in injury. Put the left tab in 5 place (see arrow 1), and then press lightly on the right side...
... bobbin was designed specifically for this sewing machine. If you accidentally step on certain models. 1 CAUTION ● Winding the bobbin improperly may cause the thread tension to loosen, breaking the needle and resulting in injury. Put the left tab in 5 place (see arrow 1), and then press lightly on the right side...


