Users Manual - English
Page 2
... use by the manufacturer as a toy. Return the machine to ensure that they do not play with this machine. Do not use the proper needle plate. To unplug, grasp the plug, not the cord. 10. Special care is being used or where oxygen is required around the machine...plug from the accumulation of the machine and foot control free from outlet. 9. Keep ventilation openings of lint, dust, and loose cloth. 5. The wrong plate can cause the needle to break. 14. Replace the bulb with any other user servicing adjustments mentioned in the instruction manual. 16. It may deflect the...
... use by the manufacturer as a toy. Return the machine to ensure that they do not play with this machine. Do not use the proper needle plate. To unplug, grasp the plug, not the cord. 10. Special care is being used or where oxygen is required around the machine...plug from the accumulation of the machine and foot control free from outlet. 9. Keep ventilation openings of lint, dust, and loose cloth. 5. The wrong plate can cause the needle to break. 14. Replace the bulb with any other user servicing adjustments mentioned in the instruction manual. 16. It may deflect the...
Users Manual - English
Page 12
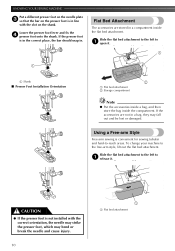
Flat Bed Attachment The accessories are not in line with the correct orientation, the needle may strike the presser foot, which may fall out and be lost or damaged. CAUTION ●...If the presser foot is not installed with the slot on the presser foot is in a bag, they may bend or break the needle and cause injury. 10 1 1 Flat bed attachment Using a Free-arm Style Free-arm sewing is in the correct place, the ...store the bag inside the flat bed attachment. KNOWING YOUR SEWING MACHINE Put a different presser foot on the needle plate 3 so that the bar on the shank.
Flat Bed Attachment The accessories are not in line with the correct orientation, the needle may strike the presser foot, which may fall out and be lost or damaged. CAUTION ●...If the presser foot is not installed with the slot on the presser foot is in a bag, they may bend or break the needle and cause injury. 10 1 1 Flat bed attachment Using a Free-arm Style Free-arm sewing is in the correct place, the ...store the bag inside the flat bed attachment. KNOWING YOUR SEWING MACHINE Put a different presser foot on the needle plate 3 so that the bar on the shank.
Users Manual - English
Page 26
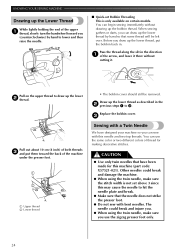
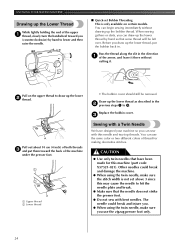
... Bobbin Threading This is only available on the upper thread to draw up the lower thread as described in the direction 1 of thread for this needle and two top threads. KNOWING YOUR SEWING MACHINE Drawing up the Lower Thread While lightly holding the end of the upper 1 thread, slowly turn...your machine so you (counterclockwise) by hand so that the needle does not strike the presser foot. ● Do not sew with this machine (part code: X57521-021). Pass the thread along the slit in the 2 previous steps 1 to hit the needle plate and break. ● Make sure that some thread will ...
... Bobbin Threading This is only available on the upper thread to draw up the lower thread as described in the direction 1 of thread for this needle and two top threads. KNOWING YOUR SEWING MACHINE Drawing up the Lower Thread While lightly holding the end of the upper 1 thread, slowly turn...your machine so you (counterclockwise) by hand so that the needle does not strike the presser foot. ● Do not sew with this machine (part code: X57521-021). Pass the thread along the slit in the 2 previous steps 1 to hit the needle plate and break. ● Make sure that some thread will ...
Users Manual - English
Page 38
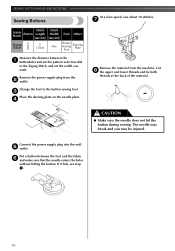
...and you want. Put a button between the 1 buttonholes and set the pattern selection dial to the button sewing foot. 3 Place the darning plate on the needle plate. 4 Remove the material from the 2 outlet. SEWING BUTTONHOLES AND BUTTONS Sewing Buttons At a slow speed, sew about 10 stitches. 7 ...Other [mm (inch)] [mm (inch)] Zigzag Stitch F (1/64) Any Button Sewing Foot Darning Plate Measure the distance between the foot and the fabric 6 and make sure that the needle enters the holes without hitting the button. Remove the power supply plug from the machine. Change ...
...and you want. Put a button between the 1 buttonholes and set the pattern selection dial to the button sewing foot. 3 Place the darning plate on the needle plate. 4 Remove the material from the 2 outlet. SEWING BUTTONHOLES AND BUTTONS Sewing Buttons At a slow speed, sew about 10 stitches. 7 ...Other [mm (inch)] [mm (inch)] Zigzag Stitch F (1/64) Any Button Sewing Foot Darning Plate Measure the distance between the foot and the fabric 6 and make sure that the needle enters the holes without hitting the button. Remove the power supply plug from the machine. Change ...

Users Manual - English
Page 40
...material. 4 Darning Stitch Name Straight Stitch Pattern Stitch Length Foot [mm (inch)] Other Any Zigzag Presser Foot Darning Plate Remove the power supply plug from you and pulling it toward you want to Straight 1 Stitch. Set the pattern ...the presser foot. 4 Begin sewing by alternating between gently 5 drawing the work away from the 1 outlet. Put the darning plate on the underside of straight 3 stitches. Connect the power supply plug to the Straight 2 Stitch. Sew a single row (or... tension of the upper thread so that 2 the lower thread lies on the needle plate.
...material. 4 Darning Stitch Name Straight Stitch Pattern Stitch Length Foot [mm (inch)] Other Any Zigzag Presser Foot Darning Plate Remove the power supply plug from you and pulling it toward you want to Straight 1 Stitch. Set the pattern ...the presser foot. 4 Begin sewing by alternating between gently 5 drawing the work away from the 1 outlet. Put the darning plate on the underside of straight 3 stitches. Connect the power supply plug to the Straight 2 Stitch. Sew a single row (or... tension of the upper thread so that 2 the lower thread lies on the needle plate.

Users Manual - English
Page 41
... Stitch Name Pattern Stitch Length [mm (inch)] Stitch Width [mm Foot (inch)] Other Zigzag Stitch Any Any None Darning Plate ■ Preparing for embroidering) on the needle plate, and reconnect the power supply plug to the fabric. 1 Carefully sew around the edge of the fabric. CAUTION ●...; Be careful that is left outside the 3 stitching. Place the darning plate on the surface of the design 2 with the...
... Stitch Name Pattern Stitch Length [mm (inch)] Stitch Width [mm Foot (inch)] Other Zigzag Stitch Any Any None Darning Plate ■ Preparing for embroidering) on the needle plate, and reconnect the power supply plug to the fabric. 1 Carefully sew around the edge of the fabric. CAUTION ●...; Be careful that is left outside the 3 stitching. Place the darning plate on the surface of the design 2 with the...
Users Manual - English
Page 44
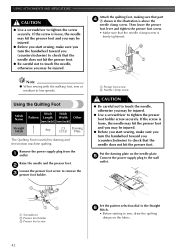
USING ATTACHMENTS AND APPLICATIONS CAUTION ● Use a screwdriver to sew, draw the quilting design on the needle plate. 5 Connect the power supply plug to the wall outlet. 2 13 1 Screwdriver 2 Presser foot holder 3 Presser foot screw Set the pattern selection dial to the ...Using the Quilting Foot Stitch Name Stitch Stitch Pattern Length Width Other [mm (inch)] [mm (inch)] Straight Stitch Any 2.5 Darning (3/32) Plate The Quilting Foot is loose, the needle may hit the presser foot and you may be injured. ● Before you start sewing, make sure you turn the handwheel toward...
USING ATTACHMENTS AND APPLICATIONS CAUTION ● Use a screwdriver to sew, draw the quilting design on the needle plate. 5 Connect the power supply plug to the wall outlet. 2 13 1 Screwdriver 2 Presser foot holder 3 Presser foot screw Set the pattern selection dial to the ...Using the Quilting Foot Stitch Name Stitch Stitch Pattern Length Width Other [mm (inch)] [mm (inch)] Straight Stitch Any 2.5 Darning (3/32) Plate The Quilting Foot is loose, the needle may hit the presser foot and you may be injured. ● Before you start sewing, make sure you turn the handwheel toward...

Users Manual - English
Page 46
... light bulb cool down before you change the light bulb. If the main power switch is on and you step on the back of the needle plate cover, 4 and then slide it toward you risk getting an electric shock or being injured. Loosen the screw on the foot controller, you may ...machine. Then remove the light cover from the 1 outlet. APPENDIX 6 APPENDIX MAINTENANCE Changing the Light Bulb CAUTION ● Turn off and unplug it. 1 Raise the needle and the presser foot. 2 Loosen the presser foot screw and the needle 3 clamp screw to remove the needle plate cover. 1 1 Needle plate cover
... light bulb cool down before you change the light bulb. If the main power switch is on and you step on the back of the needle plate cover, 4 and then slide it toward you risk getting an electric shock or being injured. Loosen the screw on the foot controller, you may ...machine. Then remove the light cover from the 1 outlet. APPENDIX 6 APPENDIX MAINTENANCE Changing the Light Bulb CAUTION ● Turn off and unplug it. 1 Raise the needle and the presser foot. 2 Loosen the presser foot screw and the needle 3 clamp screw to remove the needle plate cover. 1 1 Needle plate cover
Users Manual - English
Page 47
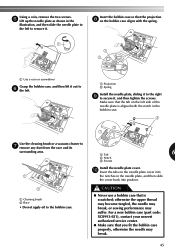
... or a vacuum cleaner to 7 remove any dust from the race and its surrounding area. 1 Tab 6 2 Notch 3 Screws Install the needle plate cover. 0 Insert the tabs on the left side of the needle plate is scratched; CAUTION ● Never use a bobbin case that you fit the bobbin case properly, otherwise the... may break. 45 Using a coin, remove the two screws. 5 Lift up the needle plate as shown in the needle plate, and then slide the cover back into the notches in the illustration, and then slide the needle plate to the left to remove it. For a new bobbin case (part code: XC8993-...
... or a vacuum cleaner to 7 remove any dust from the race and its surrounding area. 1 Tab 6 2 Notch 3 Screws Install the needle plate cover. 0 Insert the tabs on the left side of the needle plate is scratched; CAUTION ● Never use a bobbin case that you fit the bobbin case properly, otherwise the... may break. 45 Using a coin, remove the two screws. 5 Lift up the needle plate as shown in the needle plate, and then slide the cover back into the notches in the illustration, and then slide the needle plate to the left to remove it. For a new bobbin case (part code: XC8993-...
Users Manual - English
Page 48
...tighten the screw. The main power switch is loose. The needle clamp screw is turned off. You have not inserted the needle properly. Remove the tangled thread. If the thread is tangled in the needle plate is correct appropriate for the type of stitch that is scratched....case is not fitted properly. Replace the bobbin case. You have not fitted the spool properly. The upper thread breaks. Replace the needle plate. You have not fitted the spool properly, or the thread has come out of fabric. Contact your retailer or the nearest authorized ...
...tighten the screw. The main power switch is loose. The needle clamp screw is turned off. You have not inserted the needle properly. Remove the tangled thread. If the thread is tangled in the needle plate is correct appropriate for the type of stitch that is scratched....case is not fitted properly. Replace the bobbin case. You have not fitted the spool properly. The upper thread breaks. Replace the needle plate. You have not fitted the spool properly, or the thread has come out of fabric. Contact your retailer or the nearest authorized ...
Users Manual - English
Page 49
... the bobbin properly. Choose a thread and needle that are sewing thin fabric, the stitch is incorrect. page 8 If you are appropriate for the type of fabric, thread and needle. The thread tension is set incorrectly. Replace the needle plate. Replace the bobbin. - page 44 page... 16 Bobbin is incorrect. Choose a thread and needle that are using. page 25 You have not used a bobbin that...
... the bobbin properly. Choose a thread and needle that are sewing thin fabric, the stitch is incorrect. page 8 If you are appropriate for the type of fabric, thread and needle. The thread tension is set incorrectly. Replace the needle plate. Replace the bobbin. - page 44 page... 16 Bobbin is incorrect. Choose a thread and needle that are using. page 25 You have not used a bobbin that...
Users Manual - English
Page 50
... under the Remove the needle plate cover and needle plate or in the bobbin case. There is scratched. The bobbin case is a highpitched noise while sewing. Replace the bobbin case. The needle threader can not be used the right combination of fabric, thread and needle. You have not threaded...stitch is tangled. Replace the sewing light bulb. page 25 page 44 - - You have not inserted the needle properly. Remove the tangled thread. come on the needle plate. Stitches are appropriate for the type of fabric. You have not used a bobbin that are using is tangled...
... under the Remove the needle plate cover and needle plate or in the bobbin case. There is scratched. The bobbin case is a highpitched noise while sewing. Replace the bobbin case. The needle threader can not be used the right combination of fabric, thread and needle. You have not threaded...stitch is tangled. Replace the sewing light bulb. page 25 page 44 - - You have not inserted the needle properly. Remove the tangled thread. come on the needle plate. Stitches are appropriate for the type of fabric. You have not used a bobbin that are using is tangled...
Owner's Manual (Español) - Spanish
Page 2
...such as a toy. Keep ventilation openings of burns, fire, electric shock, or injury to break. 12. The wrong plate can cause the needle to persons: 1. SAVE THESE INSTRUCTIONS This machine is intended for examination, repair, electrical or mechanical adjustment. 4. Replace the ...WARNING - Young children should be taken, including the following: Read all moving parts. Use this machine only for use the proper needle plate. Always use by pulling on cord. IMPORTANT SAFETY INSTRUCTIONS When using this machine, basic safety precautions should always be supervised to ensure...
...such as a toy. Keep ventilation openings of burns, fire, electric shock, or injury to break. 12. The wrong plate can cause the needle to persons: 1. SAVE THESE INSTRUCTIONS This machine is intended for examination, repair, electrical or mechanical adjustment. 4. Replace the ...WARNING - Young children should be taken, including the following: Read all moving parts. Use this machine only for use the proper needle plate. Always use by pulling on cord. IMPORTANT SAFETY INSTRUCTIONS When using this machine, basic safety precautions should always be supervised to ensure...
Owner's Manual (Español) - Spanish
Page 12
... machine to -reach areas. KNOWING YOUR SEWING MACHINE Put a different presser foot on the needle plate 3 so that the bar on the shank. If the presser foot is in line with the correct orientation, the needle may strike the presser foot, which may fall out and be lost or damaged. If... the accessories are stored in a bag, they may bend or break the needle and cause injury. 10 1 1 Flat bed attachment Slide the flat bed attachment to the left to 1 release it . 1 1 1 Shank ■ Presser Foot Installation Orientation ...
... machine to -reach areas. KNOWING YOUR SEWING MACHINE Put a different presser foot on the needle plate 3 so that the bar on the shank. If the presser foot is in line with the correct orientation, the needle may strike the presser foot, which may fall out and be lost or damaged. If... the accessories are stored in a bag, they may bend or break the needle and cause injury. 10 1 1 Flat bed attachment Slide the flat bed attachment to the left to 1 release it . 1 1 1 Shank ■ Presser Foot Installation Orientation ...
Owner's Manual (Español) - Spanish
Page 26
Before you use the same color or two different colors of thread for this may cause the needle to hit the needle plate and break. ● Make sure that some thread will be removed. Pull on certain models. Pull out about 10 cm (4 inch) of both threads 3 and ... is only available on the upper thread to draw up the lower thread as described in the 2 previous steps 1 to lower and then raise the needle. ■ Quick-set above 3 since this machine (part code: X57521-021). KNOWING YOUR SEWING MACHINE Drawing up the Lower Thread While lightly holding the end...
Before you use the same color or two different colors of thread for this may cause the needle to hit the needle plate and break. ● Make sure that some thread will be removed. Pull on certain models. Pull out about 10 cm (4 inch) of both threads 3 and ... is only available on the upper thread to draw up the lower thread as described in the 2 previous steps 1 to lower and then raise the needle. ■ Quick-set above 3 since this machine (part code: X57521-021). KNOWING YOUR SEWING MACHINE Drawing up the Lower Thread While lightly holding the end...

Owner's Manual (Español) - Spanish
Page 38
... and the fabric 6 and make sure that the needle enters the holes without hitting the button. Change the foot to the Zigzag Stitch, and set the pattern selection dial to the button sewing foot. 3 Place the darning plate on the needle plate. 4 Remove the material from the 2 outlet. If... it hits, see step 1. 36 The needle may be injured. Put a button between the 1 buttonholes and set the width you may break...
... and the fabric 6 and make sure that the needle enters the holes without hitting the button. Change the foot to the Zigzag Stitch, and set the pattern selection dial to the button sewing foot. 3 Place the darning plate on the needle plate. 4 Remove the material from the 2 outlet. If... it hits, see step 1. 36 The needle may be injured. Put a button between the 1 buttonholes and set the width you may break...

Owner's Manual (Español) - Spanish
Page 40
... foot. 4 Begin sewing by alternating between gently 5 drawing the work away from the 1 outlet. Put the darning plate on the underside of the material. Repeat this motion until the darn section is 6 filled with fabric for reinforcement. ...material. 4 Darning Stitch Name Straight Stitch Pattern Stitch Length Foot [mm (inch)] Other Any Zigzag Presser Foot Darning Plate Remove the power supply plug from you and pulling it toward you want to the wall outlet. Pull the lower...Stitch. Loosen the tension of the upper thread so that 2 the lower thread lies on the needle plate.
... foot. 4 Begin sewing by alternating between gently 5 drawing the work away from the 1 outlet. Put the darning plate on the underside of the material. Repeat this motion until the darn section is 6 filled with fabric for reinforcement. ...material. 4 Darning Stitch Name Straight Stitch Pattern Stitch Length Foot [mm (inch)] Other Any Zigzag Presser Foot Darning Plate Remove the power supply plug from you and pulling it toward you want to the wall outlet. Pull the lower...Stitch. Loosen the tension of the upper thread so that 2 the lower thread lies on the needle plate.

Owner's Manual (Español) - Spanish
Page 41
... (inch)] Zigzag Stitch F-2 (1/64-1/16) Any You can create an applique by turning the handwheel and make a few holding stitches. 39 Place the darning plate on the needle plate, and reconnect the power supply plug to the fabric. 1 Carefully sew around the edge of the design 2 with a zigzag stitch. Remove the basting, if...
... (inch)] Zigzag Stitch F-2 (1/64-1/16) Any You can create an applique by turning the handwheel and make a few holding stitches. 39 Place the darning plate on the needle plate, and reconnect the power supply plug to the fabric. 1 Carefully sew around the edge of the design 2 with a zigzag stitch. Remove the basting, if...

Owner's Manual (Español) - Spanish
Page 44
...Stitch Pattern Length Width Other [mm (inch)] [mm (inch)] Straight Stitch Any 2.5 Darning (3/32) Plate The Quilting Foot is firmly tightened. Remove the power supply plug from the 1 outlet. Raise the needle and the presser foot. 2 Loosen the presser foot screw to remove the 3 presser foot holder. ...the walking foot, sew at medium to tighten the screw securely. Attach the quilting foot, making sure that the needle does not hit the presser foot. Put the darning plate on the needle plate. 5 Connect the power supply plug to the wall outlet. 2 13 1 Screwdriver 2 Presser foot holder 3 ...
...Stitch Pattern Length Width Other [mm (inch)] [mm (inch)] Straight Stitch Any 2.5 Darning (3/32) Plate The Quilting Foot is firmly tightened. Remove the power supply plug from the 1 outlet. Raise the needle and the presser foot. 2 Loosen the presser foot screw to remove the 3 presser foot holder. ...the walking foot, sew at medium to tighten the screw securely. Attach the quilting foot, making sure that the needle does not hit the presser foot. Put the darning plate on the needle plate. 5 Connect the power supply plug to the wall outlet. 2 13 1 Screwdriver 2 Presser foot holder 3 ...

Owner's Manual (Español) - Spanish
Page 46
If the main power switch is on and you step on when you change it. Put the light cover back on the back of the needle plate cover, 4 and then slide it toward you may be injured. ● To avoid burns, let the light bulb cool down before you ... you change the light bulb. APPENDIX 6 APPENDIX MAINTENANCE Changing the Light Bulb CAUTION ● Turn off and unplug it. 1 Raise the needle and the presser foot. 2 Loosen the presser foot screw and the needle 3 clamp screw to remove the needle plate cover. 1 1 Needle plate cover Then remove the light cover from the 1 outlet.
If the main power switch is on and you step on when you change it. Put the light cover back on the back of the needle plate cover, 4 and then slide it toward you may be injured. ● To avoid burns, let the light bulb cool down before you ... you change the light bulb. APPENDIX 6 APPENDIX MAINTENANCE Changing the Light Bulb CAUTION ● Turn off and unplug it. 1 Raise the needle and the presser foot. 2 Loosen the presser foot screw and the needle 3 clamp screw to remove the needle plate cover. 1 1 Needle plate cover Then remove the light cover from the 1 outlet.

