Users Manual - English
Page 5
... 34 Making a Buttonhole ...34 Adjusting Buttonholes ...35 Sewing Buttons ...36 3 KNOWING YOUR SEWING MACHINE 5 THE MAIN PARTS ...5 ACCESSORIES ...6 Optional Accessories ...6 USING YOUR SEWING MACHINE 7 Connecting Plugs ...7 Main Power and Sewing Light Switch ...8 Foot Controller ...8 Checking the Needle ...8 Replacing the Needle ...8 Changing the Presser Foot ...9 Flat Bed Attachment ...10 Using a Free-arm Style ...10 THE CONTROLS ...11 Pattern Selection...
... 34 Making a Buttonhole ...34 Adjusting Buttonholes ...35 Sewing Buttons ...36 3 KNOWING YOUR SEWING MACHINE 5 THE MAIN PARTS ...5 ACCESSORIES ...6 Optional Accessories ...6 USING YOUR SEWING MACHINE 7 Connecting Plugs ...7 Main Power and Sewing Light Switch ...8 Foot Controller ...8 Checking the Needle ...8 Replacing the Needle ...8 Changing the Presser Foot ...9 Flat Bed Attachment ...10 Using a Free-arm Style ...10 THE CONTROLS ...11 Pattern Selection...
Users Manual - English
Page 12
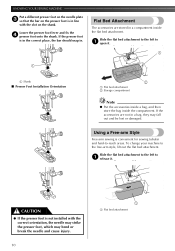
...the flat bed attachment to the left to 1 open it . To change your machine to -reach areas. Flat Bed Attachment The accessories are not in line with ...Free-arm Style Free-arm sewing is in a bag, they may bend or break the needle and cause injury. 10 1 1 Flat bed attachment CAUTION ● If the presser foot is in the correct place, the bar should snap in a compartment inside the compartment. KNOWING YOUR SEWING MACHINE...not installed with the slot on the presser foot is convenient for sewing tubular and hard-to the free-arm style, lift out the flat bed attachment.
...the flat bed attachment to the left to 1 open it . To change your machine to -reach areas. Flat Bed Attachment The accessories are not in line with ...Free-arm Style Free-arm sewing is in a bag, they may bend or break the needle and cause injury. 10 1 1 Flat bed attachment CAUTION ● If the presser foot is in the correct place, the bar should snap in a compartment inside the compartment. KNOWING YOUR SEWING MACHINE...not installed with the slot on the presser foot is convenient for sewing tubular and hard-to the free-arm style, lift out the flat bed attachment.

Owner's Manual (Español) - Spanish
Page 5
... Straight Stitching ...27 Zigzag Stitching ...28 3. KNOWING YOUR SEWING MACHINE 5 THE MAIN PARTS ...5 ACCESSORIES ...6 Optional Accessories ...6 USING YOUR SEWING MACHINE 7 Connecting Plugs ...7 Main Power and Sewing Light Switch ...8 Foot Controller ...8 Checking the Needle ...8 Replacing the Needle ...8 Changing the Presser Foot ...9 Flat Bed Attachment ...10 Using a Free-arm Style ...10 THE CONTROLS ...11 Pattern Selection Dial ...11 Patterns...
... Straight Stitching ...27 Zigzag Stitching ...28 3. KNOWING YOUR SEWING MACHINE 5 THE MAIN PARTS ...5 ACCESSORIES ...6 Optional Accessories ...6 USING YOUR SEWING MACHINE 7 Connecting Plugs ...7 Main Power and Sewing Light Switch ...8 Foot Controller ...8 Checking the Needle ...8 Replacing the Needle ...8 Changing the Presser Foot ...9 Flat Bed Attachment ...10 Using a Free-arm Style ...10 THE CONTROLS ...11 Pattern Selection Dial ...11 Patterns...
Owner's Manual (Español) - Spanish
Page 12
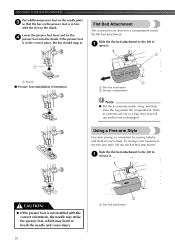
... change your machine to 1 release it . 1 1 1 Shank ■ Presser Foot Installation Orientation 2 1 Flat bed attachment 2 Storage compartment Note ● Put the accessories inside a bag, and then store the bag inside the flat bed attachment. If the presser foot is convenient for sewing tubular and hard-to 1 open it . Using a Free-arm Style Free-arm sewing is in...
... change your machine to 1 release it . 1 1 1 Shank ■ Presser Foot Installation Orientation 2 1 Flat bed attachment 2 Storage compartment Note ● Put the accessories inside a bag, and then store the bag inside the flat bed attachment. If the presser foot is convenient for sewing tubular and hard-to 1 open it . Using a Free-arm Style Free-arm sewing is in...


