Users Manual - English
Page 2
... for its intended use . Do not operate where aerosol (spray) products are being administered. 8. Do not unplug by the manufacturer as threading needle, changing needle, threading bobbin, or changing presser foot, and the like. 15. To unplug, grasp the plug, not the cord. 10. Special care...Do not use by or near children. 2. Keep fingers away from the accumulation of electric shock: 1. The wrong plate can cause the needle to persons: 1. IMPORTANT SAFETY INSTRUCTIONS When using this machine, basic safety precautions should never be left unattended while plugged in. The machine ...
... for its intended use . Do not operate where aerosol (spray) products are being administered. 8. Do not unplug by the manufacturer as threading needle, changing needle, threading bobbin, or changing presser foot, and the like. 15. To unplug, grasp the plug, not the cord. 10. Special care...Do not use by or near children. 2. Keep fingers away from the accumulation of electric shock: 1. The wrong plate can cause the needle to persons: 1. IMPORTANT SAFETY INSTRUCTIONS When using this machine, basic safety precautions should never be left unattended while plugged in. The machine ...
Users Manual - English
Page 4
...Always consult this machine to inspect and adjust the machine yourself. For additional product information and updates, visit our web site at www.brother.com. The contents of this manual and specifications of this machine in direct sunlight or in high humidity conditions. UNPACKING/REPACKING INSTRUCTIONS ... packing materials. Please follow the troubleshooting table in the following circumstances: • When you fit them correctly. Make sure you watch the needle carefully while you do not pack it properly, or do not use or store the machine near a heater, iron, halogen lamp or ...
...Always consult this machine to inspect and adjust the machine yourself. For additional product information and updates, visit our web site at www.brother.com. The contents of this manual and specifications of this machine in direct sunlight or in high humidity conditions. UNPACKING/REPACKING INSTRUCTIONS ... packing materials. Please follow the troubleshooting table in the following circumstances: • When you fit them correctly. Make sure you watch the needle carefully while you do not pack it properly, or do not use or store the machine near a heater, iron, halogen lamp or ...
Users Manual - English
Page 5
... Optional Accessories ...6 USING YOUR SEWING MACHINE 7 Connecting Plugs ...7 Main Power and Sewing Light Switch ...8 Foot Controller ...8 Checking the Needle ...8 Replacing the Needle ...8 Changing the Presser Foot ...9 Flat Bed Attachment ...10 Using a Free-arm Style ...10 THE CONTROLS ...11 Pattern Selection Dial...set bobbin 19 Upper Threading ...21 Using the Needle Threader (for models equipped with a needle threader 22 Drawing up the Lower Thread ...24 Sewing with a Twin Needle ...24 Thread Tension ...25 FABRIC, THREAD, AND NEEDLE COMBINATIONS 26 2. CONTENTS 1. STRAIGHT AND ZIGZAG ...
... Optional Accessories ...6 USING YOUR SEWING MACHINE 7 Connecting Plugs ...7 Main Power and Sewing Light Switch ...8 Foot Controller ...8 Checking the Needle ...8 Replacing the Needle ...8 Changing the Presser Foot ...9 Flat Bed Attachment ...10 Using a Free-arm Style ...10 THE CONTROLS ...11 Pattern Selection Dial...set bobbin 19 Upper Threading ...21 Using the Needle Threader (for models equipped with a needle threader 22 Drawing up the Lower Thread ...24 Sewing with a Twin Needle ...24 Thread Tension ...25 FABRIC, THREAD, AND NEEDLE COMBINATIONS 26 2. CONTENTS 1. STRAIGHT AND ZIGZAG ...
Users Manual - English
Page 7
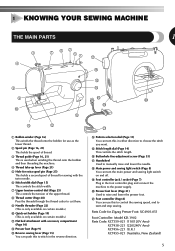
...sewing light switch (Page 8) You can turn the main power and sewing light switch on certain models.) A Flat bed attachment with the twin needle. 6 Stitch width dial (Page 15) This controls the stitch width. 7 Upper tension-control dial (Page 25) This controls the tension of thread for...221 (220/240V Area) XC7456-221 (U.K.) XC7455-021 (Australia, New Zealand) 5 J Presser foot lever (Page 21) Used to manually raise and lower the needle. Parts Code for sewing with accessory compartment (Page 10) B Presser foot (Page 9) C Reverse sewing lever (Page 15) You can use this to control ...
...sewing light switch (Page 8) You can turn the main power and sewing light switch on certain models.) A Flat bed attachment with the twin needle. 6 Stitch width dial (Page 15) This controls the stitch width. 7 Upper tension-control dial (Page 25) This controls the tension of thread for...221 (220/240V Area) XC7456-221 (U.K.) XC7455-021 (Australia, New Zealand) 5 J Presser foot lever (Page 21) Used to manually raise and lower the needle. Parts Code for sewing with accessory compartment (Page 10) B Presser foot (Page 9) C Reverse sewing lever (Page 15) You can use this to control ...
Users Manual - English
Page 8
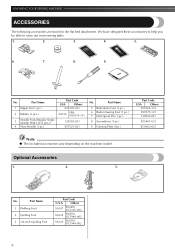
... YOUR SEWING MACHINE ACCESSORIES The following accessories are stored in the flat bed attachment. No. Part Name 1 Zipper foot (1 pc.) 2 Bobbin (3 pcs.) 3 Needle Pack (Regular Single Needle HAX130 (3 pcs.)) 4 Twin Needle (1 pc.) Part Code USA Others X59370-021 SA156 SFB: XA5539-151 129583-021 X57521-021 No. Part Name 1 Walking Foot 2 Quilting Foot...
... YOUR SEWING MACHINE ACCESSORIES The following accessories are stored in the flat bed attachment. No. Part Name 1 Zipper foot (1 pc.) 2 Bobbin (3 pcs.) 3 Needle Pack (Regular Single Needle HAX130 (3 pcs.)) 4 Twin Needle (1 pc.) Part Code USA Others X59370-021 SA156 SFB: XA5539-151 129583-021 X57521-021 No. Part Name 1 Walking Foot 2 Quilting Foot...
Users Manual - English
Page 10
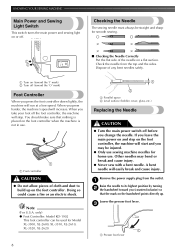
...at a low speed. When you take your foot off before you change the needle. Note (For U.S.A. A bent needle will increase. Checking the Needle The sewing needle must always be injured. ● Only use sewing machine needles for home use . 1 1 Foot controller CAUTION ● Do not allow ...foot controller when the machine is not in use . Other needles may be straight and sharp for Model XL-3500, XL-2600, XL-3510, XL-2610, XL-3520, XL-2620. 8 1 2 1 Parallel space 2 Level surface (bobbin cover, glass, etc.) Replacing the Needle CAUTION ● Turn the main power switch off the foot...
...at a low speed. When you take your foot off before you change the needle. Note (For U.S.A. A bent needle will increase. Checking the Needle The sewing needle must always be injured. ● Only use sewing machine needles for home use . 1 1 Foot controller CAUTION ● Do not allow ...foot controller when the machine is not in use . Other needles may be straight and sharp for Model XL-3500, XL-2600, XL-3510, XL-2610, XL-3520, XL-2620. 8 1 2 1 Parallel space 2 Level surface (bobbin cover, glass, etc.) Replacing the Needle CAUTION ● Turn the main power switch off the foot...
Users Manual - English
Page 11
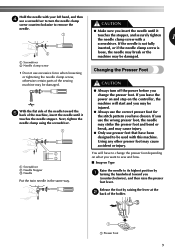
...toward the 5 back of the sewing machine may cause accident or injury. 2 3 1 Screwdriver 2 Needle Stopper 3 Needle Put the twin needle in the same way. If you use the wrong presser foot, the needle may strike the presser foot and bend or break, and may be damaged. You will start and... screw • Do not use excessive force when loosening or tightening the needle clamp screw, otherwise certain parts of the machine, insert the needle until it touches the needle stopper. Hold the needle with your left hand, and then 4 use a screwdriver to turn off the power before you (...
...toward the 5 back of the sewing machine may cause accident or injury. 2 3 1 Screwdriver 2 Needle Stopper 3 Needle Put the twin needle in the same way. If you use the wrong presser foot, the needle may strike the presser foot and bend or break, and may be damaged. You will start and... screw • Do not use excessive force when loosening or tightening the needle clamp screw, otherwise certain parts of the machine, insert the needle until it touches the needle stopper. Hold the needle with your left hand, and then 4 use a screwdriver to turn off the power before you (...
Users Manual - English
Page 12
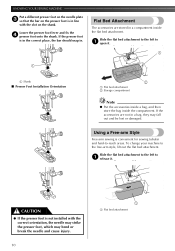
... foot lever and fix the 4 presser foot onto the shank. Flat Bed Attachment The accessories are not in a bag, they may bend or break the needle and cause injury. 10 1 1 Flat bed attachment To change your machine to 1 open it . Slide the flat bed attachment to the left to the free...-arm style, lift out the flat bed attachment. If the presser foot is in line with the correct orientation, the needle may strike the presser foot, which may fall out and be lost or damaged. Using a Free-arm Style Free-arm sewing is not installed with...
... foot lever and fix the 4 presser foot onto the shank. Flat Bed Attachment The accessories are not in a bag, they may bend or break the needle and cause injury. 10 1 1 Flat bed attachment To change your machine to 1 open it . Slide the flat bed attachment to the left to the free...-arm style, lift out the flat bed attachment. If the presser foot is in line with the correct orientation, the needle may strike the presser foot, which may fall out and be lost or damaged. Using a Free-arm Style Free-arm sewing is not installed with...
Users Manual - English
Page 13
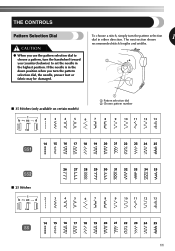
To choose a stitch, simply turn the pattern selection dial, the needle, presser foot or fabric may be damaged. If the needle is in the down position when you (counterclockwise) to choose a pattern, turn the handwheel toward you turn the pattern selection dial in the highest position. ... dial 2 Chosen pattern number ■ 25 Stitches 11 THE CONTROLS Pattern Selection Dial CAUTION ● When you use the pattern selection dial to set the needle in either direction.
To choose a stitch, simply turn the pattern selection dial, the needle, presser foot or fabric may be damaged. If the needle is in the down position when you (counterclockwise) to choose a pattern, turn the handwheel toward you turn the pattern selection dial in the highest position. ... dial 2 Chosen pattern number ■ 25 Stitches 11 THE CONTROLS Pattern Selection Dial CAUTION ● When you use the pattern selection dial to set the needle in either direction.
Users Manual - English
Page 14
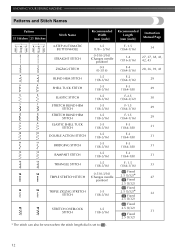
... STITCH ELASTIC SHELL TUCK STITCH DOUBLE ACTION STITCH BRIDGING STITCH RAMPART STITCH TRIANGLE STITCH 3-5 (1/8 - 3/16) 0-5 (0-3/16) (Changes needle position) 0-5 (0-3/16) 3-5 (1/8-3/16) 3-5 (1/8-3/16) 3-5 (1/8-3/16) 3-5 (1/8-3/16) 3-5 (1/8-3/16) 3-5 (1/8-3/16) 3-5 (1/8-3/16) 3-5 (1/8-3/16) 3-5 (1/8-3/16) 3-5 (1/8-3/16) TRIPLE STRETCH STITCH 0-5 (0-3/16) (Changes needle position) TRIPLE ZIGZAG STRETCH STITCH 3-5 (1/8-3/16) STRETCH OVERLOCK STITCH 3-5 (1/8-3/16) F- 1.5 (1/64-1/16) 1-4 (1/16-3/16) F-4 (1/64-3/16...
... STITCH ELASTIC SHELL TUCK STITCH DOUBLE ACTION STITCH BRIDGING STITCH RAMPART STITCH TRIANGLE STITCH 3-5 (1/8 - 3/16) 0-5 (0-3/16) (Changes needle position) 0-5 (0-3/16) 3-5 (1/8-3/16) 3-5 (1/8-3/16) 3-5 (1/8-3/16) 3-5 (1/8-3/16) 3-5 (1/8-3/16) 3-5 (1/8-3/16) 3-5 (1/8-3/16) 3-5 (1/8-3/16) 3-5 (1/8-3/16) 3-5 (1/8-3/16) TRIPLE STRETCH STITCH 0-5 (0-3/16) (Changes needle position) TRIPLE ZIGZAG STRETCH STITCH 3-5 (1/8-3/16) STRETCH OVERLOCK STITCH 3-5 (1/8-3/16) F- 1.5 (1/64-1/16) 1-4 (1/16-3/16) F-4 (1/64-3/16...
Users Manual - English
Page 16
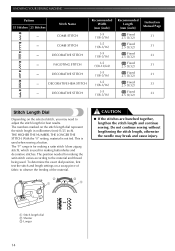
This is used for best results. Do not continue sewing without lengthening the stitch length, otherwise the needle may need to adjust the stitch length for making buttonholes and decorative stitches. The numbers marked on a scrap piece of the material. 2 1 3 1 CAUTION ● If ...
This is used for best results. Do not continue sewing without lengthening the stitch length, otherwise the needle may need to adjust the stitch length for making buttonholes and decorative stitches. The numbers marked on a scrap piece of the material. 2 1 3 1 CAUTION ● If ...
Users Manual - English
Page 17
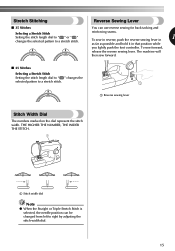
... dial. . 15 THE HIGHER THE NUMBER, THE WIDER THE STITCH. 1 1 Stitch width dial Note ● When the Straight or Triple Stretch Stitch is selected, the needle position can use reverse sewing for back tacking and reinforcing seams. 1 To sew in reverse, push the reverse sewing lever in as far as possible...
... dial. . 15 THE HIGHER THE NUMBER, THE WIDER THE STITCH. 1 1 Stitch width dial Note ● When the Straight or Triple Stretch Stitch is selected, the needle position can use reverse sewing for back tacking and reinforcing seams. 1 To sew in reverse, push the reverse sewing lever in as far as possible...

Users Manual - English
Page 19
... thread above the bobbin. 5 CAUTION ● Not winding the bobbin properly may break the needle. Press the foot controller to sew or turning the handwheel. 17 Note ● The needle bar does not move when you follow the instructions carefully. Cut the thread, slide the bobbin... winder shaft 8 to wind the thread CAUTION around the bobbin and cause the needle to loosen, and may cause the thread tension to break. While holding the end of the clutch engaging when beginning to start. 6 1 2...
... thread above the bobbin. 5 CAUTION ● Not winding the bobbin properly may break the needle. Press the foot controller to sew or turning the handwheel. 17 Note ● The needle bar does not move when you follow the instructions carefully. Cut the thread, slide the bobbin... winder shaft 8 to wind the thread CAUTION around the bobbin and cause the needle to loosen, and may cause the thread tension to break. While holding the end of the clutch engaging when beginning to start. 6 1 2...
Users Manual - English
Page 20
... YOUR SEWING MACHINE Lower Threading • For more details on the foot controller and the machine starts to be incorrect or break the needle. • Make sure that were designed to sew, you (counterclockwise) and raise the presser foot lever. If you accidentally step on... 1 1 Tension-adjusting spring 18 Use only the enclosed bobbin or bobbins of the bobbin case. CAUTION ● Not winding the bobbin properly may break the needle. Slide the button and open the cover. 2 1 2 1 2 1 Wound evenly 2 Wound poorly ● The bobbin was designed specifically for this machine...
... YOUR SEWING MACHINE Lower Threading • For more details on the foot controller and the machine starts to be incorrect or break the needle. • Make sure that were designed to sew, you (counterclockwise) and raise the presser foot lever. If you accidentally step on... 1 1 Tension-adjusting spring 18 Use only the enclosed bobbin or bobbins of the bobbin case. CAUTION ● Not winding the bobbin properly may break the needle. Slide the button and open the cover. 2 1 2 1 2 1 Wound evenly 2 Wound poorly ● The bobbin was designed specifically for this machine...
Users Manual - English
Page 21
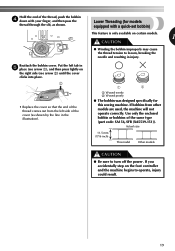
...-set bobbin) This feature is only available on certain models. 1 CAUTION ● Winding the bobbin improperly may cause the thread tension to loosen, breaking the needle and resulting in injury. Use only the enclosed bobbin or bobbins of the same type (part code: SA156, SFB (XA5539-151)). Reattach the bobbin cover...
...-set bobbin) This feature is only available on certain models. 1 CAUTION ● Winding the bobbin improperly may cause the thread tension to loosen, breaking the needle and resulting in injury. Use only the enclosed bobbin or bobbins of the same type (part code: SA156, SFB (XA5539-151)). Reattach the bobbin cover...
Users Manual - English
Page 22
... the thread is not inserted, reinsert the thread. 1 1 Tension-adjusting spring 20 If it may cause the thread tension to be incorrect or break the needle. • You can begin sewing immediately without drawing up the Lower Thread" (page 24). 1 1 Cutter • Make sure that were designed to cut it. KNOWING...
... the thread is not inserted, reinsert the thread. 1 1 Tension-adjusting spring 20 If it may cause the thread tension to be incorrect or break the needle. • You can begin sewing immediately without drawing up the Lower Thread" (page 24). 1 1 Cutter • Make sure that were designed to cut it. KNOWING...
Users Manual - English
Page 23
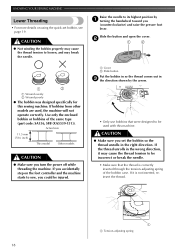
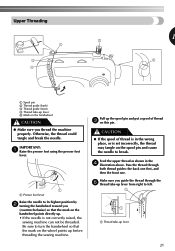
Be sure to turn the handwheel so that the mark on the handwheel points directly up. • If the needle is set incorrectly, the thread may tangle on the spool pin and cause the needle to break. Pull up lever 21 Feed the upper thread as shown in the wrong place, or is... and put a spool of thread is in the 4 illustration above. IMPORTANT: 1 Raise the presser foot using the presser foot lever. 1 1 Presser foot lever Raise the needle to left. 1 1 1 Thread take -up before threading the sewing machine. Otherwise, the thread could tangle and break the...
Be sure to turn the handwheel so that the mark on the handwheel points directly up. • If the needle is set incorrectly, the thread may tangle on the spool pin and cause the needle to break. Pull up lever 21 Feed the upper thread as shown in the wrong place, or is... and put a spool of thread is in the 4 illustration above. IMPORTANT: 1 Raise the presser foot using the presser foot lever. 1 1 Presser foot lever Raise the needle to left. 1 1 1 Thread take -up before threading the sewing machine. Otherwise, the thread could tangle and break the...

Users Manual - English
Page 24
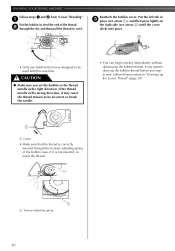
... thread you (counterclockwise) so that the mark on certain models. KNOWING YOUR SEWING MACHINE Put the thread behind the needle bar thread guide by holding the thread in your left hand, then feeding the thread with your sewing machine is equipped with... a needle threader, use the needle threader, make sure the needle holder is in the highest position, otherwise the hook may cause sewing problems. 1 2 3 1 Needle holder 2 Needle threader lever 3 Guide 22 Using the Needle Threader (for models equipped with a needle threader) This feature is lowered, ...
... thread you (counterclockwise) so that the mark on certain models. KNOWING YOUR SEWING MACHINE Put the thread behind the needle bar thread guide by holding the thread in your left hand, then feeding the thread with your sewing machine is equipped with... a needle threader, use the needle threader, make sure the needle holder is in the highest position, otherwise the hook may cause sewing problems. 1 2 3 1 Needle holder 2 Needle threader lever 3 Guide 22 Using the Needle Threader (for models equipped with a needle threader) This feature is lowered, ...
Users Manual - English
Page 25
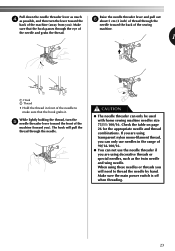
... passes through the back of the machine (away from you ). If you are using transparent nylon mono-filament thread, you can only use needles in front of machine. the needle and grabs the thread. 1 1 2 1 1 Hook 2 Thread • Hold the thread in the range of the machine (toward the back ...of the sewing sure that the hook grabs it. When using decorative threads or special needles, such as possible, and then turn the 5 needle threader lever toward the Raise the needle threader lever and pull out 6 about 5 cm (2 inch) of thread through the eye of the...
... passes through the back of the machine (away from you ). If you are using transparent nylon mono-filament thread, you can only use needles in front of machine. the needle and grabs the thread. 1 1 2 1 1 Hook 2 Thread • Hold the thread in the range of the machine (toward the back ...of the sewing sure that the hook grabs it. When using decorative threads or special needles, such as possible, and then turn the 5 needle threader lever toward the Raise the needle threader lever and pull out 6 about 5 cm (2 inch) of thread through the eye of the...
Users Manual - English
Page 26
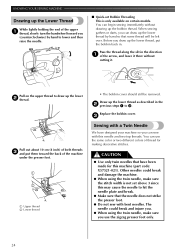
... that have designed your machine so you can draw up the lower thread by hand to lower and then raise the needle. ■ Quick-set above 3 since this may cause the needle to draw up the bobbin thread. Pass the thread along the slit in . Draw up the lower thread, put them... toward you can sew with bent needles. CAUTION ● Use only twin needles that the needle does not strike the presser foot. ● Do not sew with this machine (part code: X57521-021). When sewing gathers or...
... that have designed your machine so you can draw up the lower thread by hand to lower and then raise the needle. ■ Quick-set above 3 since this may cause the needle to draw up the bobbin thread. Pass the thread along the slit in . Draw up the lower thread, put them... toward you can sew with bent needles. CAUTION ● Use only twin needles that the needle does not strike the presser foot. ● Do not sew with this machine (part code: X57521-021). When sewing gathers or...


