
Users Manual - English
Page 6
... CONTENTS IMPORTANT SAFETY INSTRUCTIONS 1 UNPACKING INSTRUCTIONS 3 CONTENTS ...5 1. KNOWING YOUR SEWING MACHINE 7 THE MAIN PARTS ...8 ACCESSORIES ...9 Optional Accessories ...9 USING YOUR SEWING MACHINE 10 Connecting Plugs ...10 Main Power and Sewing Light Switch ...11 Foot Controller ...11 Checking the Needle ...11 Replacing the... THE MACHINE 18 Winding the Bobbin ...18 Lower Threading ...20 Lower Threading (For One-touch lower threading 21 Upper Threading ...23 Using the Needle Threader (Models equipped with a needle threader 24 Drawing up the lower thread ...26 Sewing with ...
... CONTENTS IMPORTANT SAFETY INSTRUCTIONS 1 UNPACKING INSTRUCTIONS 3 CONTENTS ...5 1. KNOWING YOUR SEWING MACHINE 7 THE MAIN PARTS ...8 ACCESSORIES ...9 Optional Accessories ...9 USING YOUR SEWING MACHINE 10 Connecting Plugs ...10 Main Power and Sewing Light Switch ...11 Foot Controller ...11 Checking the Needle ...11 Replacing the... THE MACHINE 18 Winding the Bobbin ...18 Lower Threading ...20 Lower Threading (For One-touch lower threading 21 Upper Threading ...23 Using the Needle Threader (Models equipped with a needle threader 24 Drawing up the lower thread ...26 Sewing with ...
Users Manual - English
Page 9
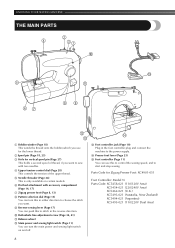
..., 23) 3 Hole for Zigzag Presser Foot: XC4901-051 Foot Controller: Model N Parts Code: XC5458-021 (110/120V Area) XC5454-021 (220/240V Area) XC5462-021 (U.K.) XC5493-021 (Australia, New Zealand) XC5494-021 (Argentina) XC5495-021 (110/220V Dual Area) 8 KNOWING YOUR SEWING MACHINE THE MAIN PARTS 2 4 31 0 E 5 A 67 89 B D C 1 Bobbin winder (Page 18...
..., 23) 3 Hole for Zigzag Presser Foot: XC4901-051 Foot Controller: Model N Parts Code: XC5458-021 (110/120V Area) XC5454-021 (220/240V Area) XC5462-021 (U.K.) XC5493-021 (Australia, New Zealand) XC5494-021 (Argentina) XC5495-021 (110/220V Dual Area) 8 KNOWING YOUR SEWING MACHINE THE MAIN PARTS 2 4 31 0 E 5 A 67 89 B D C 1 Bobbin winder (Page 18...
Users Manual - English
Page 10
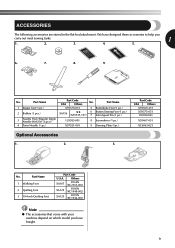
Part Name X59370-051 5 Buttonhole Foot (1 pc.) SA156 SFB (XA5539-151) 6 7 Button Sewing Foot (1 pc.) Extra Spool Pin (1 pc.) 129583-001 8 Screwdriver (1 pc.) X57521-001 9 Darning Plate (1pc.) Part Code USA Others ... (XC2165-002) SA129 F005N (XC1948-002) SA125 F001N (XC1944-002) Note ● The accessories that come with your machine depend on which model you have designed these accessories to help you carry out most sewing tasks. 1 1. 2. 3. 4. 5. 6. 7. 8. 9. No. Part Name 1 Zipper foot (1 pc.) 2 Bobbin (3 pcs.) 3 Needle Pack (Regular Single Needle HAX130...
Part Name X59370-051 5 Buttonhole Foot (1 pc.) SA156 SFB (XA5539-151) 6 7 Button Sewing Foot (1 pc.) Extra Spool Pin (1 pc.) 129583-001 8 Screwdriver (1 pc.) X57521-001 9 Darning Plate (1pc.) Part Code USA Others ... (XC2165-002) SA129 F005N (XC1948-002) SA125 F001N (XC1944-002) Note ● The accessories that come with your machine depend on which model you have designed these accessories to help you carry out most sewing tasks. 1 1. 2. 3. 4. 5. 6. 7. 8. 9. No. Part Name 1 Zipper foot (1 pc.) 2 Bobbin (3 pcs.) 3 Needle Pack (Regular Single Needle HAX130...

Users Manual - English
Page 12
... top and the sides. only) ● Foot Controller: Model N This foot controller can be straight and sharp for Model XL-2121, XL-2125, XL-2230. . 11 Note (For U.S.A. When you press harder, the machine's speed will increase. Main Power and Sewing Light Switch This switch turns the mains power and sewing light on or off. 1 Turn on (toward the...
... top and the sides. only) ● Foot Controller: Model N This foot controller can be straight and sharp for Model XL-2121, XL-2125, XL-2230. . 11 Note (For U.S.A. When you press harder, the machine's speed will increase. Main Power and Sewing Light Switch This switch turns the mains power and sewing light on or off. 1 Turn on (toward the...
Users Manual - English
Page 19
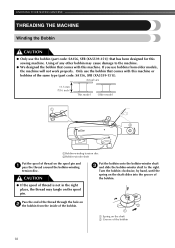
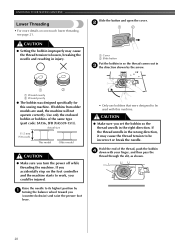
... thread through the hole on 2 the bobbin from older models, the machine will not work properly. Only use the bobbin that has been designed for this sewing machine. Pass the end of the bobbin 18 KNOWING YOUR SEWING MACHINE THREADING THE MACHINE Winding the Bobbin CAUTION ● Only use the bobbin... (part code: SA156, SFB (XA5539-151)) that comes with this machine. If you use bobbins from the...
... thread through the hole on 2 the bobbin from older models, the machine will not work properly. Only use the bobbin that has been designed for this sewing machine. Pass the end of the bobbin 18 KNOWING YOUR SEWING MACHINE THREADING THE MACHINE Winding the Bobbin CAUTION ● Only use the bobbin... (part code: SA156, SFB (XA5539-151)) that comes with this machine. If you use bobbins from the...
Users Manual - English
Page 21
... the thread unrolls in the right direction. Use only the enclosed bobbin or bobbins of the thread, push the bobbin 4 down with this sewing machine. If you accidentally step on one-touch lower threading, see page 21. Hold the end of the same type (part code: SA156, SFB (XA5539-151...9679; Setting the bobbin improperly may cause the thread tension to be incorrect or break the needle. Actual size 11.5 mm (7/16 inch) This model Older model CAUTION ● Make sure you set the bobbin so the thread unrolls in the wrong direction, it may cause the thread tension to loosen, breaking...
... the thread unrolls in the right direction. Use only the enclosed bobbin or bobbins of the thread, push the bobbin 4 down with this sewing machine. If you accidentally step on one-touch lower threading, see page 21. Hold the end of the same type (part code: SA156, SFB (XA5539-151...9679; Setting the bobbin improperly may cause the thread tension to be incorrect or break the needle. Actual size 11.5 mm (7/16 inch) This model Older model CAUTION ● Make sure you set the bobbin so the thread unrolls in the wrong direction, it may cause the thread tension to loosen, breaking...
Users Manual - English
Page 22
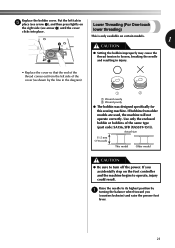
... to its highest position by the line in the diagram). 1 2 1 Wound evenly 2 Wound poorly ● The bobbin was designed specifically for this sewing machine. Raise the needle to operate, injury could result. If bobbins from the left tab in injury. • Replace the cover so that the end of ...the thread comes out from older models are used, the machine will not operate correctly. Put the left side of the same type (part code: SA156, SFB (XA5539-151)). Actual size 11.5 mm (7/16...
... to its highest position by the line in the diagram). 1 2 1 Wound evenly 2 Wound poorly ● The bobbin was designed specifically for this sewing machine. Raise the needle to operate, injury could result. If bobbins from the left tab in injury. • Replace the cover so that the end of ...the thread comes out from older models are used, the machine will not operate correctly. Put the left side of the same type (part code: SA156, SFB (XA5539-151)). Actual size 11.5 mm (7/16...
Users Manual - English
Page 25
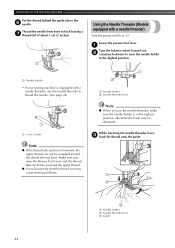
KNOWING YOUR SEWING MACHINE Put the thread behind the guide above the 6 needle. Thread the needle from front to back leaving a 7 thread tail of about 5 cm (2 inches). 1 Using the Needle Threader (Models equipped with a needle threader, use the needle threader, make sure the needle holder is .... Note ● When you 2 (counterclockwise) to raise the needle holder to the highest position. 1 1 Needle holder • If your sewing machine is equipped with a needle threader) Turn the power switch to thread the needle. (See page 24) 2 1 Needle holder 2 Needle threader lever 1 1...
KNOWING YOUR SEWING MACHINE Put the thread behind the guide above the 6 needle. Thread the needle from front to back leaving a 7 thread tail of about 5 cm (2 inches). 1 Using the Needle Threader (Models equipped with a needle threader, use the needle threader, make sure the needle holder is .... Note ● When you 2 (counterclockwise) to raise the needle holder to the highest position. 1 1 Needle holder • If your sewing machine is equipped with a needle threader) Turn the power switch to thread the needle. (See page 24) 2 1 Needle holder 2 Needle threader lever 1 1...
Users Manual - English
Page 27
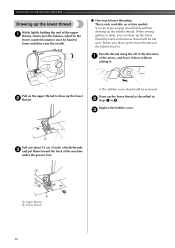
When sewing gathers or darts, you draw up the lower thread as described in the direction 1 of the arrow, and leave it there without drawing up the bobbin thread. Pull on certain models. Draw up the lower thread, put them toward the back of the machine under the presser foot. 1 2 1 Upper ...cm (4 inch) of both threads 3 and put the bobbin back in. Pass the thread along the slit in 2 steps 1 to 3. KNOWING YOUR SEWING MACHINE Drawing up the lower thread While lightly holding the end of the upper 1 thread, slowly turn the balance wheel to the front (counterclockwise) once by...
When sewing gathers or darts, you draw up the lower thread as described in the direction 1 of the arrow, and leave it there without drawing up the bobbin thread. Pull on certain models. Draw up the lower thread, put them toward the back of the machine under the presser foot. 1 2 1 Upper ...cm (4 inch) of both threads 3 and put the bobbin back in. Pass the thread along the slit in 2 steps 1 to 3. KNOWING YOUR SEWING MACHINE Drawing up the lower thread While lightly holding the end of the upper 1 thread, slowly turn the balance wheel to the front (counterclockwise) once by...
Users Manual - English
Page 28
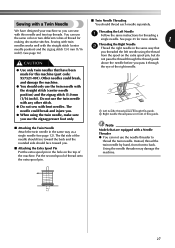
... twin needle. The flat side of the needle should face toward the back and the rounded side should thread each needle separately. Note Models that have designed your machine so you can not use 1 Follow the same instructions for more details. 1 needles works well with the straight stitch (center needle position... passes in the same way as a single needle (see page 16) you use the twin needle with any other stitch. ● Do not sew with twin single needle. you threaded the left needle using the twin needle, make sure 1 Left needle thread passes through the eye of this guide...
... twin needle. The flat side of the needle should face toward the back and the rounded side should thread each needle separately. Note Models that have designed your machine so you can not use 1 Follow the same instructions for more details. 1 needles works well with the straight stitch (center needle position... passes in the same way as a single needle (see page 16) you use the twin needle with any other stitch. ● Do not sew with twin single needle. you threaded the left needle using the twin needle, make sure 1 Left needle thread passes through the eye of this guide...


