

Users Manual - Multi
Page 2
... , symbol "O" position when making any adjustments in the needle area, such as a toy. The sewing machine should always be followed, including the following: "Read all moving parts. WARNING - Keep the ventilation openings of the sewing machine and foot controller free from the electrical outlet when removing covers, lubricating, or when making any other user service...
... , symbol "O" position when making any adjustments in the needle area, such as a toy. The sewing machine should always be followed, including the following: "Read all moving parts. WARNING - Keep the ventilation openings of the sewing machine and foot controller free from the electrical outlet when removing covers, lubricating, or when making any other user service...
Users Manual - Multi
Page 6
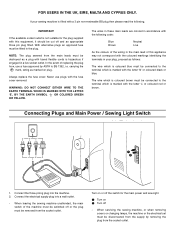
... BY THE EARTH SYMBOL OR COLORED GREEN OR YELLOW. Connect the three-prong plug into a wall outlet. - When leaving the sewing machine unattended, the main switch of the machine must be destroyed as a plug with bared flexible cords is fitted with the letter 'L' or coloured red or brown. NOTE: ... plug from the socket outlet. The wires in these main leads are colored in accordance with the coloured markings identifying the terminals in your sewing machine is hazardous if engaged in a live socket outlet. If your plug, proceed as marked on 2 Turn off or the plug must be...
... BY THE EARTH SYMBOL OR COLORED GREEN OR YELLOW. Connect the three-prong plug into a wall outlet. - When leaving the sewing machine unattended, the main switch of the machine must be destroyed as a plug with bared flexible cords is fitted with the letter 'L' or coloured red or brown. NOTE: ... plug from the socket outlet. The wires in these main leads are colored in accordance with the coloured markings identifying the terminals in your sewing machine is hazardous if engaged in a live socket outlet. If your plug, proceed as marked on 2 Turn off or the plug must be...
Users Manual - Multi
Page 30
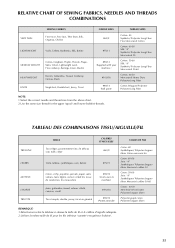
..., NEEDLES AND THREADS COMBINATIONS VERY THIN SEWING FABRICS Fine tricot, Fine lace, Thin linen, Silk, Organza, Chiffon LIGHTWEIGHT Voile, ... Single knit, Double knit, Jersey, Tricot NEEDLE SIZES THREAD SIZES #65/9 #75/11 #90/14 (Supplied with your machine.) #100/16 #90/14 (Ball point) Cotton: 80 Synthetic/ Polyester Long Fiber Fine Mercerized Cotton Cotton: 60-80 Silk... jersey, tricot en général CALIBRES D'AIGUILLES #65/9 #75/11 #90/14 (Livrés avec la machine) #100/16 #90/14 (Pointe arrondie) TAILLES DE FILS Coton: 80 Synthétiques/ Polyester longues fibres Coton ...
..., NEEDLES AND THREADS COMBINATIONS VERY THIN SEWING FABRICS Fine tricot, Fine lace, Thin linen, Silk, Organza, Chiffon LIGHTWEIGHT Voile, ... Single knit, Double knit, Jersey, Tricot NEEDLE SIZES THREAD SIZES #65/9 #75/11 #90/14 (Supplied with your machine.) #100/16 #90/14 (Ball point) Cotton: 80 Synthetic/ Polyester Long Fiber Fine Mercerized Cotton Cotton: 60-80 Silk... jersey, tricot en général CALIBRES D'AIGUILLES #65/9 #75/11 #90/14 (Livrés avec la machine) #100/16 #90/14 (Pointe arrondie) TAILLES DE FILS Coton: 80 Synthétiques/ Polyester longues fibres Coton ...
Users Manual - Multi
Page 39
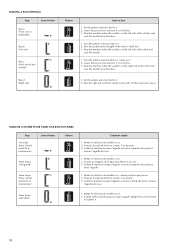
... Step 1er temps (barre d'arrêt avant de la boutonnière) 2ème temps (côté gauch) 3ème position que pour a). 2. Sew the right side until the needle reaches the stitches formed in step a. Abaisser le pied-de-biche et coudre 5 à 6 points. 3. Arrêter ...des points et lever l'aiguille du tissu. 4ème temps (côté droit) d 1. Mettre le sélecteur de modèle sur d. 2. Stop the machine when the needle is at the left side of the stitch and raise the needle from the fabric. 1. Set the pattern selection dial to 6 stitches. 3.
... Step 1er temps (barre d'arrêt avant de la boutonnière) 2ème temps (côté gauch) 3ème position que pour a). 2. Sew the right side until the needle reaches the stitches formed in step a. Abaisser le pied-de-biche et coudre 5 à 6 points. 3. Arrêter ...des points et lever l'aiguille du tissu. 4ème temps (côté droit) d 1. Mettre le sélecteur de modèle sur d. 2. Stop the machine when the needle is at the left side of the stitch and raise the needle from the fabric. 1. Set the pattern selection dial to 6 stitches. 3.

Quick Setup Guide - English
Page 2
...*Please read the manual carefully. Replace the bobbin cace. (See A.) Turn the balance wheel to raise the needle, then remove the fabric. ∗If machine runs but needle does not move, look for customer service. *For the address of the hook, match the hook position opposite the driver and insert... remove the bobbin case. 6 Slide the latch levers out from the retaining ring. 7 Remove the retaining ring. Push the latch levers into the sewing position. ***READ ME FIRST*** Should you still need assistance, call 1-800-284-4357. *KEEP ALL PACKING MATERIAL AND CARTON FOR FUTURE TRANSPORT.
...*Please read the manual carefully. Replace the bobbin cace. (See A.) Turn the balance wheel to raise the needle, then remove the fabric. ∗If machine runs but needle does not move, look for customer service. *For the address of the hook, match the hook position opposite the driver and insert... remove the bobbin case. 6 Slide the latch levers out from the retaining ring. 7 Remove the retaining ring. Push the latch levers into the sewing position. ***READ ME FIRST*** Should you still need assistance, call 1-800-284-4357. *KEEP ALL PACKING MATERIAL AND CARTON FOR FUTURE TRANSPORT.


