
Users Manual - English
Page 3
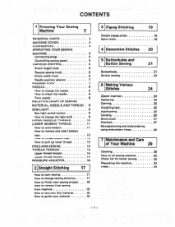
...How to start sewing 17 How to change the light bulb 9 UPPER (NEEDLE) THREAD 10 LOWER (BOBBIN) THREAD 11 How to wind bobbin 11 How to remove and insert bobbin case 12 How to thread bobbin case 12 How to oil sewing machine 30 Check list for better sewing 32... selector 7 PRESSER FOOT 7 NEEDLE 8 How to change the needle 8 How to check the needle 8 Twin needle 8 RELATIVE CHART OF SEWING MATERIAL, NEEDLE AND THREAD . 9 SEW-LIGHT 9 Sew light switch button 9 How to change sewing direction 17 How to finish your sewing project . . 18 How to remove final sewing...
...How to start sewing 17 How to change the light bulb 9 UPPER (NEEDLE) THREAD 10 LOWER (BOBBIN) THREAD 11 How to wind bobbin 11 How to remove and insert bobbin case 12 How to thread bobbin case 12 How to oil sewing machine 30 Check list for better sewing 32... selector 7 PRESSER FOOT 7 NEEDLE 8 How to change the needle 8 How to check the needle 8 Twin needle 8 RELATIVE CHART OF SEWING MATERIAL, NEEDLE AND THREAD . 9 SEW-LIGHT 9 Sew light switch button 9 How to change sewing direction 17 How to finish your sewing project . . 18 How to remove final sewing...
Users Manual - English
Page 4
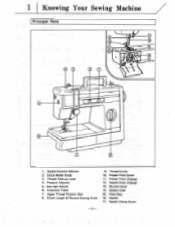
Thread Take-up Lever 4. Stitch Length & Reverse Sewing Knob 9. Needle Position Selector 2. Sew-light Switch 6. Thread Cutter 10. Feed Dog 16. Needle Clamp Screw -2- Bobbin Case 15. Upper Thread Tension Dial 8. Shuttle Hook 14. Stitch Width Knob 3. Extension Table 7. Presser Foot Screw 11. Presser Foot (Zigzag) 12. Pressure Adjuster 5. Needle 17. 1 Knowing Your Sewing Machine Principal Parts 10 11 15 12 0 0 0 2 5 IF I 1. Needle Plate (Zigzag) 13.
Thread Take-up Lever 4. Stitch Length & Reverse Sewing Knob 9. Needle Position Selector 2. Sew-light Switch 6. Thread Cutter 10. Feed Dog 16. Needle Clamp Screw -2- Bobbin Case 15. Upper Thread Tension Dial 8. Shuttle Hook 14. Stitch Width Knob 3. Extension Table 7. Presser Foot Screw 11. Presser Foot (Zigzag) 12. Pressure Adjuster 5. Needle 17. 1 Knowing Your Sewing Machine Principal Parts 10 11 15 12 0 0 0 2 5 IF I 1. Needle Plate (Zigzag) 13.
Users Manual - English
Page 5
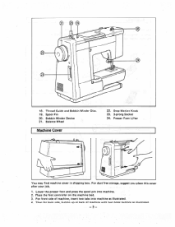
For dust free storage, suggest you place this cover after your job. 1. For front side of machine with two hook buttons as illustrated. 4. Thread Guide and Bobbin Winder Disc. 19. Then for back side, button up at back of machine, insert two tabs into machine. 2. Bobbin Winder Device 21. ...
For dust free storage, suggest you place this cover after your job. 1. For front side of machine with two hook buttons as illustrated. 4. Thread Guide and Bobbin Winder Disc. 19. Then for back side, button up at back of machine, insert two tabs into machine. 2. Bobbin Winder Device 21. ...
Users Manual - English
Page 10
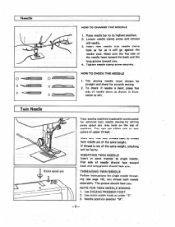
...groove toward back and long groove should face you . 4. INSERTING TWIN NEEDLE Insert in illustration at under "3". 3. The groove should face you. THREADING TWIN NEEDLE Follow instructions for smooth sewing. 2. Use ZIGZAG PRESSER FOOT. 2. Needle X t-r-- Use stitch width knob at left. Needle position ...selector "M". -8- Loosen needle clamp screw and remove old needle. 3. Tighten needle clamp screw securely. Raise needle bar to thread twin needle are of the same weight, stitching will go against the needle stop. You can use either one or two colors...
...groove toward back and long groove should face you . 4. INSERTING TWIN NEEDLE Insert in illustration at under "3". 3. The groove should face you. THREADING TWIN NEEDLE Follow instructions for smooth sewing. 2. Use ZIGZAG PRESSER FOOT. 2. Needle X t-r-- Use stitch width knob at left. Needle position ...selector "M". -8- Loosen needle clamp screw and remove old needle. 3. Tighten needle clamp screw securely. Raise needle bar to thread twin needle are of the same weight, stitching will go against the needle stop. You can use either one or two colors...

Users Manual - English
Page 11
...plate by turning it counterclockwise. MAXIMUM INPUT OF LAMP 12W 110/115V AREA 15W 220/240V AREA -9- Use the same size thread for upper and lower threads. NOTE: 1) Make sure to disconnect electric supply plug from above chart. 2. Sew-light SEW LIGHT SWITCH BUTTON To ... wall outlet before changing light bulb. 2) Always use CORRECT LIGHT BULB. Select correct size of Sewing Material, Needle and Thread SEWING MATERIALS NEEDLE SIZES THREAD SIZES VERY THIN Fine tricot, Fine lace, Thin linen, Silk. Tulle, Chiffon Cotton: 80-120 9 Synthetic Fine Mercerized Cotton ...
...plate by turning it counterclockwise. MAXIMUM INPUT OF LAMP 12W 110/115V AREA 15W 220/240V AREA -9- Use the same size thread for upper and lower threads. NOTE: 1) Make sure to disconnect electric supply plug from above chart. 2. Sew-light SEW LIGHT SWITCH BUTTON To ... wall outlet before changing light bulb. 2) Always use CORRECT LIGHT BULB. Select correct size of Sewing Material, Needle and Thread SEWING MATERIALS NEEDLE SIZES THREAD SIZES VERY THIN Fine tricot, Fine lace, Thin linen, Silk. Tulle, Chiffon Cotton: 80-120 9 Synthetic Fine Mercerized Cotton ...
Users Manual - English
Page 12
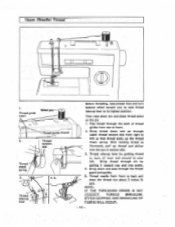
... through slit by guiding thread to back of thread guides from right to front. 2. Thread take -up thread and deliver into eyelet. 4. Thread needle from front to its highest position. Thread check spring Thread guide (front) Thread tension dial •• - 4. 5. Bring thread through the thread guard and guides. 5. Thread guide (rear) Spool pin 2. Pass thread through upper thread tension dial from rear...
... through slit by guiding thread to back of thread guides from right to front. 2. Thread take -up thread and deliver into eyelet. 4. Thread needle from front to its highest position. Thread check spring Thread guide (front) Thread tension dial •• - 4. 5. Bring thread through the thread guard and guides. 5. Thread guide (rear) Spool pin 2. Pass thread through upper thread tension dial from rear...
Users Manual - English
Page 13
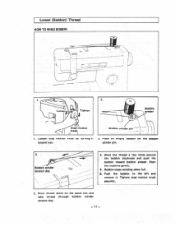
... disc. - 11 - Bobbin stops winding when full. 6. Loosen!, r Tighten C 0 Bobbin presser Stop motion H I 4 2. Bobbin winder pin - - ; 2. Bobbin winder tension disc 4. Place thread spool on the bobbin winder pin. 3. Wind the thread a few times around the bobbin clockwise and push the bobbin toward you. Start the machine gently. 5. Push the bobbin to the...
... disc. - 11 - Bobbin stops winding when full. 6. Loosen!, r Tighten C 0 Bobbin presser Stop motion H I 4 2. Bobbin winder pin - - ; 2. Bobbin winder tension disc 4. Place thread spool on the bobbin winder pin. 3. Wind the thread a few times around the bobbin clockwise and push the bobbin toward you. Start the machine gently. 5. Push the bobbin to the...
Users Manual - English
Page 14
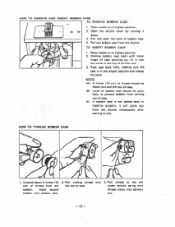
...; 0 Tension spring , a o u, 1/4 • o.--.....--- .• 1. Insert wound bobbin into the notch at the top of bobbin case. 4. NOTE: (A) 4 inches (10 cm) of thread should be drawn out and left out of case. (B) Latch of bobbin case should be open the latch of shuttle race. 3. downa.n0 Pull and ... shuttle cover by turning it will come out from the shuttle immediately after starting to the lef under tension spring until thread enters into the slot of thread from the shuttle. Push case back fully, making sure the case is not placed back in the proper position and ...
...; 0 Tension spring , a o u, 1/4 • o.--.....--- .• 1. Insert wound bobbin into the notch at the top of bobbin case. 4. NOTE: (A) 4 inches (10 cm) of thread should be drawn out and left out of case. (B) Latch of bobbin case should be open the latch of shuttle race. 3. downa.n0 Pull and ... shuttle cover by turning it will come out from the shuttle immediately after starting to the lef under tension spring until thread enters into the slot of thread from the shuttle. Push case back fully, making sure the case is not placed back in the proper position and ...
Users Manual - English
Page 15
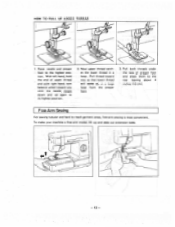
... a large loop from the presser foot. 3. Pull both threads under the toes of upper thread and with right hand, turn balance wheel toward you until the needle moves down and up and slide out extension ...table. -13 - With left hand, hold the end of presser foot and place them to its highest position. 2. Pull thread toward you so that lower thread will come up in a loop. To make your machine a free-arm model, lift -up again to the rear leaving about... convenient. Free-Arm Sewing For sewing tubular and hard to the highest position. HOW TO PULL UP LOWER THREAD N.> 1.
... a large loop from the presser foot. 3. Pull both threads under the toes of upper thread and with right hand, turn balance wheel toward you until the needle moves down and up and slide out extension ...table. -13 - With left hand, hold the end of presser foot and place them to its highest position. 2. Pull thread toward you so that lower thread will come up in a loop. To make your machine a free-arm model, lift -up again to the rear leaving about... convenient. Free-Arm Sewing For sewing tubular and hard to the highest position. HOW TO PULL UP LOWER THREAD N.> 1.
Users Manual - English
Page 16
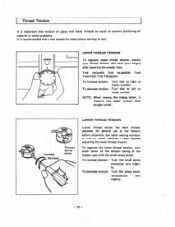
...the small screw driver. To increase tension: Turn the small screw clockwise very slight. TENSION • aa 0 N. 0 UPPER THREAD TENSION To regulate upper thread tension, merely turn small screw on the tension spring of material or other problems. It is recommended that a test sample be.... terclockwise very slightly. - 14 - THE TIGHTER THE TENSION. THE HIGHER THE NUMBER. Increase Decrease Tension spring screw LOWER THREAD TENSION Lower thread tenion has been already adjusted for general use at the factory before starting to sew. To decrease tension: Turn the screw coun...
...the small screw driver. To increase tension: Turn the small screw clockwise very slight. TENSION • aa 0 N. 0 UPPER THREAD TENSION To regulate upper thread tension, merely turn small screw on the tension spring of material or other problems. It is recommended that a test sample be.... terclockwise very slightly. - 14 - THE TIGHTER THE TENSION. THE HIGHER THE NUMBER. Increase Decrease Tension spring screw LOWER THREAD TENSION Lower thread tenion has been already adjusted for general use at the factory before starting to sew. To decrease tension: Turn the screw coun...
Users Manual - English
Page 17
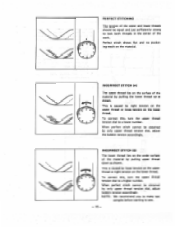
... cannot be obtained by tight tension on the upper thread or loose tension on the lower thread. This is caused by loose tension on the upper thread or tight tension on the material. e 0 INCORRECT STITCH (A) The upper thread lies on the under surface of the material by ... stitch cannot be obtained by only upper thread tension dial, adjust the bobbin tension accordingly. 5 0 its 0 INCORRECT STITCH (B) The lower thread lies on the surface of the material by pulling upper thread down as shown. This is caused by only upper thread tension dial, adjust bobbin tension accordingly. ...
... cannot be obtained by tight tension on the upper thread or loose tension on the lower thread. This is caused by loose tension on the upper thread or tight tension on the material. e 0 INCORRECT STITCH (A) The upper thread lies on the under surface of the material by ... stitch cannot be obtained by only upper thread tension dial, adjust the bobbin tension accordingly. 5 0 its 0 INCORRECT STITCH (B) The lower thread lies on the surface of the material by pulling upper thread down as shown. This is caused by only upper thread tension dial, adjust bobbin tension accordingly. ...
Users Manual - English
Page 19
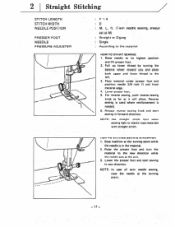
... 3/8 inch (1 cm) from material edge. 4. Lower the presser foot and start sewing in forward direction. Pull up lower thread by turning the balance wheel toward you and place both upper and lower thread to the new direction while the needle acts as it will allow. For reverse sewing, push reverse sewing knob...
... 3/8 inch (1 cm) from material edge. 4. Lower the presser foot and start sewing in forward direction. Pull up lower thread by turning the balance wheel toward you and place both upper and lower thread to the new direction while the needle acts as it will allow. For reverse sewing, push reverse sewing knob...

Users Manual - English
Page 20
...its highest position. 3. HOW TO SEW VERY THIN MATERIAL An underlay of thin paper will help to eliminate skipped stitches and puckering on the thread cutter. 5. HOW TO GUIDE YOUR MATERIAL Do not pull the material. Merely guide the material with gentle tension as shown in case of ...material, your fingers in the illustration. HOW TO REMOVE FINAL SEWING FROM MACHINE 1. This is at the highest position, and you support the material both threads on very thin material. then stopping. 2. Push reverse knob and stitch backwards for 3/5 inch (1 cm) from material edge. Cut both in front and...
...its highest position. 3. HOW TO SEW VERY THIN MATERIAL An underlay of thin paper will help to eliminate skipped stitches and puckering on the thread cutter. 5. HOW TO GUIDE YOUR MATERIAL Do not pull the material. Merely guide the material with gentle tension as shown in case of ...material, your fingers in the illustration. HOW TO REMOVE FINAL SEWING FROM MACHINE 1. This is at the highest position, and you support the material both threads on very thin material. then stopping. 2. Push reverse knob and stitch backwards for 3/5 inch (1 cm) from material edge. Cut both in front and...
Users Manual - English
Page 21
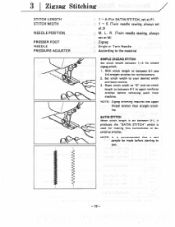
... zigzag stitch. 1. R. (Twin needle sewing, always set at 3) : M. NOTE: It is used for making fine buttonholes or decorative stitches. NOTE: Zigzag stitching requires less upper thread tension than straight stitching. SATIN STITCH When stitch length is set between 0-1, it produces the "SATIN STITCH" which is recommended that a test sample be made...
... zigzag stitch. 1. R. (Twin needle sewing, always set at 3) : M. NOTE: It is used for making fine buttonholes or decorative stitches. NOTE: Zigzag stitching requires less upper thread tension than straight stitching. SATIN STITCH When stitch length is set between 0-1, it produces the "SATIN STITCH" which is recommended that a test sample be made...
Users Manual - English
Page 25
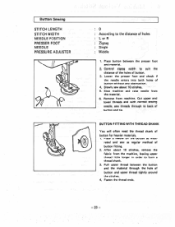
... the presser foot and material. 2. Lower the presser foot and check if the needle enters into both holes of button and upper thread tightly around the stitches. 4. Stop machine and raise needle from machine. Place a needle on the button as illust• rated and ... as regular method of button for heavier materials. 1. Place button between the button and the material through to form a thread shank. 3. Kit BUTTON FITTING WITH THREAD SHANK You will often need the thread shank of button fitting. 2. Remove from the material. 6. After about 10 stitches. 5. Cut upper and lower...
... the presser foot and material. 2. Lower the presser foot and check if the needle enters into both holes of button and upper thread tightly around the stitches. 4. Stop machine and raise needle from machine. Place a needle on the button as illust• rated and ... as regular method of button for heavier materials. 1. Place button between the button and the material through to form a thread shank. 3. Kit BUTTON FITTING WITH THREAD SHANK You will often need the thread shank of button fitting. 2. Remove from the material. 6. After about 10 stitches. 5. Cut upper and lower...
Users Manual - English
Page 26
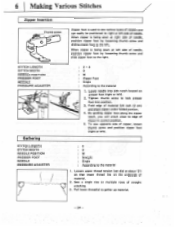
...teach, you will stitch close to right or left ). 4 0 M Straight Single According to the right. Loosen upper thread tension (set dial at about '2') so that lower thread lies on presser foot (right or left . 6 Making Various Stitches Zipper Insertion Thumb screw Zipper foot is used to ...0 M Zipper Foot Single According to gather up material. - 24 - Tighten thumb screw to the left ). 2. Fold edge of straight stitching. 3. Pull lower thread(s) to the material 1. When zipper is being sewn at right side of needle, position zipper foot by loosening thumb screw and slide zipper foot to...
...teach, you will stitch close to right or left ). 4 0 M Straight Single According to the right. Loosen upper thread tension (set dial at about '2') so that lower thread lies on presser foot (right or left . 6 Making Various Stitches Zipper Insertion Thumb screw Zipper foot is used to ...0 M Zipper Foot Single According to gather up material. - 24 - Tighten thumb screw to the left ). 2. Fold edge of straight stitching. 3. Pull lower thread(s) to the material 1. When zipper is being sewn at right side of needle, position zipper foot by loosening thumb screw and slide zipper foot to...
Users Manual - English
Page 29
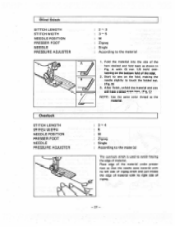
C) NOTE: Use the same color thread as the material. 3. 4 5 M Zigzag Single According to the material The overlock stitch is used to touch the folded top. (Fig. Blind Stitch SITTCH LENGTH STITCH ...
C) NOTE: Use the same color thread as the material. 3. 4 5 M Zigzag Single According to the material The overlock stitch is used to touch the folded top. (Fig. Blind Stitch SITTCH LENGTH STITCH ...
Users Manual - English
Page 30
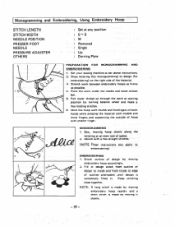
Pull lower thread up through the work at starting position by moving embroidery hoop rapidly and a short stitch is completely filled in design stitch from outline of design ...
Pull lower thread up through the work at starting position by moving embroidery hoop rapidly and a short stitch is completely filled in design stitch from outline of design ...
Users Manual - English
Page 31
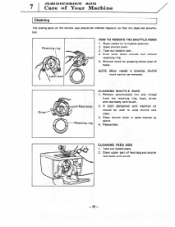
Push latch levers outside and remove retaining ring. 5. NOTE: When needle is lowered, shuttle hook cannot be removed. Remove accumulated lint and thread from the retaining ring, hook, driver and race body with brush. - 29 - CLEANING FEED DOG 1. Clean upper part of feed dog and shuttle race body ...
Push latch levers outside and remove retaining ring. 5. NOTE: When needle is lowered, shuttle hook cannot be removed. Remove accumulated lint and thread from the retaining ring, hook, driver and race body with brush. - 29 - CLEANING FEED DOG 1. Clean upper part of feed dog and shuttle race body ...
Users Manual - English
Page 32
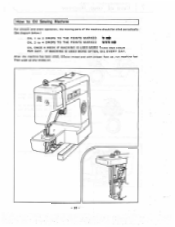
After the machine has been oiled, remove thread and with presser toot up, run machine fast Then wipe up any excess oil. z - 30 - IF MACHINE IS USED MORE OFTEN, OIL EVERY DAY. How to Oil Sewing Machine For smooth and silent operation, the moving parts of the machine should be oiled periodically. (See diagram below.) OIL 1 to 2 DROPS TO THE POINTS MARKED OIL 3 to 4 DROPS TO THE POINTS MARKED * 140. *VS OIL ONCE A WEEK IF MACHINE IS USED MORE THAN ONE HOUR PER DAY.
After the machine has been oiled, remove thread and with presser toot up, run machine fast Then wipe up any excess oil. z - 30 - IF MACHINE IS USED MORE OFTEN, OIL EVERY DAY. How to Oil Sewing Machine For smooth and silent operation, the moving parts of the machine should be oiled periodically. (See diagram below.) OIL 1 to 2 DROPS TO THE POINTS MARKED OIL 3 to 4 DROPS TO THE POINTS MARKED * 140. *VS OIL ONCE A WEEK IF MACHINE IS USED MORE THAN ONE HOUR PER DAY.


