
Users Manual - English
Page 6
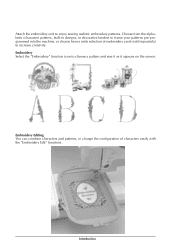
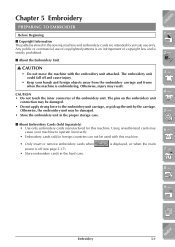
Embroidery Editing You can combine characters and patterns, or change the configuration of embroidery cards (sold separately) to choose a pattern and sew it as it appears on the screen. Introduction Embroidery Select the "Embroidery" function icon to increase creativity. Choose from the alphabetic (character) patterns, built-in designs, or decorative borders to frame your patterns pre-programmed into the machine, or choose from a wide selection of characters easily with the "Embroidery Edit" functions. Attach the embroidery unit to enjoy sewing realistic embroidery patterns.
Embroidery Editing You can combine characters and patterns, or change the configuration of embroidery cards (sold separately) to choose a pattern and sew it as it appears on the screen. Introduction Embroidery Select the "Embroidery" function icon to increase creativity. Choose from the alphabetic (character) patterns, built-in designs, or decorative borders to frame your patterns pre-programmed into the machine, or choose from a wide selection of characters easily with the "Embroidery Edit" functions. Attach the embroidery unit to enjoy sewing realistic embroidery patterns.
Users Manual - English
Page 8
... WHAT YOU CAN DO WITH THIS MACHINE Special Features HOW TO USE THIS MANUAL Chapter 1 Setting Up PRINCIPAL PARTS AND THEIR OPERATION 1-1 Principal Parts 1-1 I Embroidery Unit 1-2 I Hard Case 1-2 I Embroidery Unit Carrying Case ...... 1-2 I Operation Buttons 1-2 I Balance Wheel 1-4 I Presser Foot Lever 1-5 I Sewing Speed Controller 1-5 I Bobbin Winder Button 1-5 I Top Cover 1-5 I Supplemental Spool Pin 1-6 I Flat Bed Attachment/Free...
... WHAT YOU CAN DO WITH THIS MACHINE Special Features HOW TO USE THIS MANUAL Chapter 1 Setting Up PRINCIPAL PARTS AND THEIR OPERATION 1-1 Principal Parts 1-1 I Embroidery Unit 1-2 I Hard Case 1-2 I Embroidery Unit Carrying Case ...... 1-2 I Operation Buttons 1-2 I Balance Wheel 1-4 I Presser Foot Lever 1-5 I Sewing Speed Controller 1-5 I Bobbin Winder Button 1-5 I Top Cover 1-5 I Supplemental Spool Pin 1-6 I Flat Bed Attachment/Free...
Users Manual - English
Page 10
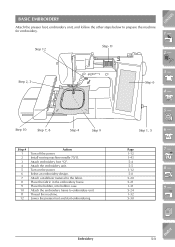
... You Can Not Save the Stitch Pattern 4-28 Retrieving Saved Stitch Patterns 4-31 Chapter 5 Embroidery PREPARING TO EMBROIDER 5-1 Before Beginning 5-1 I Copyright Information 5-1 I About the Embroidery Unit 5-1 I About Embroidery Cards (Sold Separately 5-1 I About Floppy Disks 5-2 BASIC EMBROIDERY 5-3 Attaching Embroidery Foot "Q 5-4 Attaching the Embroidery Unit 5-5 I Removing the Embroidery Unit ...... 5-7 SELECTING PATTERNS 5-8 One Point Patterns 5-9 Character Patterns 5-11 Floral Alphabet Patterns 5-13 Frame...
... You Can Not Save the Stitch Pattern 4-28 Retrieving Saved Stitch Patterns 4-31 Chapter 5 Embroidery PREPARING TO EMBROIDER 5-1 Before Beginning 5-1 I Copyright Information 5-1 I About the Embroidery Unit 5-1 I About Embroidery Cards (Sold Separately 5-1 I About Floppy Disks 5-2 BASIC EMBROIDERY 5-3 Attaching Embroidery Foot "Q 5-4 Attaching the Embroidery Unit 5-5 I Removing the Embroidery Unit ...... 5-7 SELECTING PATTERNS 5-8 One Point Patterns 5-9 Character Patterns 5-11 Floral Alphabet Patterns 5-13 Frame...

Users Manual - English
Page 13
...in the outlet, reverse the plug. If the plug does not fit fully in any way. 2 - 3 - 4 - 5 - 4 1 Carriage 2 Release button 3 Embroidery unit connection 4 Embroidery frame holder 6 - 3 7 - 8 - 9 - ?! 1-2 Setting Up Index If it still does not fit, contact a qualified electrician to fit in a polarized ...outlet only one blade wider than the other). only This appliance has a polarized plug (one way. 1 2 I Embroidery Unit 1 2 I Hard Case CONTENTS 1 Main power switch 2 Power cord 1 - CAUTION • When leaving the machine unattended, the main switch ...
...in the outlet, reverse the plug. If the plug does not fit fully in any way. 2 - 3 - 4 - 5 - 4 1 Carriage 2 Release button 3 Embroidery unit connection 4 Embroidery frame holder 6 - 3 7 - 8 - 9 - ?! 1-2 Setting Up Index If it still does not fit, contact a qualified electrician to fit in a polarized ...outlet only one blade wider than the other). only This appliance has a polarized plug (one way. 1 2 I Embroidery Unit 1 2 I Hard Case CONTENTS 1 Main power switch 2 Power cord 1 - CAUTION • When leaving the machine unattended, the main switch ...

Users Manual - English
Page 14
... cut. CONTENTS I Operation Buttons START STOP "Thread Cutter" Button Press this button after the threads are fully secured. 1 Latches 1 - 2 - 1 3 - 3 2 789 64 5 1 1 Embroidery unit 2 Embroidery frame (large) 3 Embroidery frame (medium plus) 4 Embroidery frame (medium) 5 Embroidery frame (small) 6 Sheet large 7 Sheet medium plus 8 Sheet medium 9 Sheet small 4 - 5 - CAUTION Do not repeat thread cutting after sewing to unhook the...
... cut. CONTENTS I Operation Buttons START STOP "Thread Cutter" Button Press this button after the threads are fully secured. 1 Latches 1 - 2 - 1 3 - 3 2 789 64 5 1 1 Embroidery unit 2 Embroidery frame (large) 3 Embroidery frame (medium plus) 4 Embroidery frame (medium) 5 Embroidery frame (small) 6 Sheet large 7 Sheet medium plus 8 Sheet medium 9 Sheet small 4 - 5 - CAUTION Do not repeat thread cutting after sewing to unhook the...
Users Manual - English
Page 18
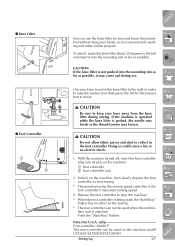
... far as possible, it is the foot controller's maximum sewing speed. 3. If the machine is operated while the knee lifter is being used when the embroidery unit is not pushed into the mounting slot as far as possible. 1 - 2 -
... far as possible, it is the foot controller's maximum sewing speed. 3. If the machine is operated while the knee lifter is being used when the embroidery unit is not pushed into the mounting slot as far as possible. 1 - 2 -
Users Manual - English
Page 20
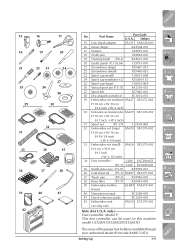
...Vertical spool pin (P.1-37) XA3336-051 27 Spool felt X57045-001 28 Disc-shaped screwdriver XC1074-051 29 Embroidery set (medium) SA427 X81273-002 H 10 cm × W 10 cm (H 4 inch × W 4 inch) 30 Embroidery set (medium plus) SA429 X81329-002 H 18 cm × W 13 cm (H 7 inch ×...-001 37 Touch pen (P.9-3) XA9940-001 38 Knee lifter (P.1-7) XA6941-001 39 Embroidery bobbin SA-EBT XA8375-001 thread 40 Operation manual XC3200-001 41 Quick reference guide XC3265-001 42 Embroidery unit SA528 XC1291-002 carrying case Note (For U.S.A. Part Name Part Code U.S.A. 15...
...Vertical spool pin (P.1-37) XA3336-051 27 Spool felt X57045-001 28 Disc-shaped screwdriver XC1074-051 29 Embroidery set (medium) SA427 X81273-002 H 10 cm × W 10 cm (H 4 inch × W 4 inch) 30 Embroidery set (medium plus) SA429 X81329-002 H 18 cm × W 13 cm (H 7 inch ×...-001 37 Touch pen (P.9-3) XA9940-001 38 Knee lifter (P.1-7) XA6941-001 39 Embroidery bobbin SA-EBT XA8375-001 thread 40 Operation manual XC3200-001 41 Quick reference guide XC3265-001 42 Embroidery unit SA528 XC1291-002 carrying case Note (For U.S.A. Part Name Part Code U.S.A. 15...
Users Manual - English
Page 25
.... Press this key to see an explanation of the 3-11 selected stitch pattern cannot be changed. Attach the embroidery unit and press this key. (Caution: the Embroidery Edit screen will automatically sew reinforcement stitches 2-14 9 - ?! Set 2-15 thread cutting the automatic thread cutting... function before sewing the machine will not display if the embroidery unit is not attached.) Press this key to combine embroidery pat- ning and end of the selected stitch key pattern. Press this key to select a straight stitch, ...
.... Press this key to see an explanation of the 3-11 selected stitch pattern cannot be changed. Attach the embroidery unit and press this key. (Caution: the Embroidery Edit screen will automatically sew reinforcement stitches 2-14 9 - ?! Set 2-15 thread cutting the automatic thread cutting... function before sewing the machine will not display if the embroidery unit is not attached.) Press this key to combine embroidery pat- ning and end of the selected stitch key pattern. Press this key to select a straight stitch, ...
Users Manual - English
Page 32
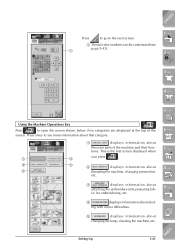
... deal- This is the first screen displayed when 1 4 you press . 2 5 2 displays information about 3 threading the machine, changing presser feet, etc. 3 displays information about attaching the embroidery unit, preparing fabric for embroidering, etc. 4 displays information about changing the lamp, cleaning the machine, etc. 6 - 7 - 8 - 9 - ?! Using the Machine Operations Key Press to open the screen...
... deal- This is the first screen displayed when 1 4 you press . 2 5 2 displays information about 3 threading the machine, changing presser feet, etc. 3 displays information about attaching the embroidery unit, preparing fabric for embroidering, etc. 4 displays information about changing the lamp, cleaning the machine, etc. 6 - 7 - 8 - 9 - ?! Using the Machine Operations Key Press to open the screen...
Users Manual - English
Page 56
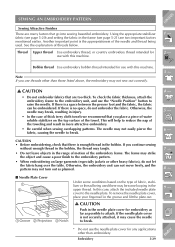
...in mind about needles. • The smaller the needle number, the smaller the needle. Also, the seam may be used for embroidery. Choosing the proper needle for example, denim, puffy foam, etc.). 75/11 needle may skip stitches. Ball point needles (golden... needles with heavyweight fabrics. • To avoid skipped stitches, use ball point needle (golden colored) 90/14 when sewing character or decorative stitches without the embroidery unit. • Use needle 75/11 for the bobbin thread and upper threading. 5 - 6 - 7 - 8 - 9 - ?! Using an improper combination, especially a ...
...in mind about needles. • The smaller the needle number, the smaller the needle. Also, the seam may be used for embroidery. Choosing the proper needle for example, denim, puffy foam, etc.). 75/11 needle may skip stitches. Ball point needles (golden... needles with heavyweight fabrics. • To avoid skipped stitches, use ball point needle (golden colored) 90/14 when sewing character or decorative stitches without the embroidery unit. • Use needle 75/11 for the bobbin thread and upper threading. 5 - 6 - 7 - 8 - 9 - ?! Using an improper combination, especially a ...
Users Manual - English
Page 176
... when power is off and cause injury. • Keep your machine to the embroidery unit carriage, or pick up the unit by the carriage. The pins on the embroidery unit connection may cause your hands and foreign objects away from the embroidery carriage and frame when the machine is displayed, or when the main 1 - 2 - 3 - 4... of copyright law and is strictly prohibited. I About the Embroidery Unit CAUTION • Do not move the machine with this machine. Otherwise, injury may be damaged. • Store the embroidery unit in foreign countries can not be damaged. • Do ...
... when power is off and cause injury. • Keep your machine to the embroidery unit carriage, or pick up the unit by the carriage. The pins on the embroidery unit connection may cause your hands and foreign objects away from the embroidery carriage and frame when the machine is displayed, or when the main 1 - 2 - 3 - 4... of copyright law and is strictly prohibited. I About the Embroidery Unit CAUTION • Do not move the machine with this machine. Otherwise, injury may be damaged. • Store the embroidery unit in foreign countries can not be damaged. • Do ...
Users Manual - English
Page 178
.... Step 1, 5 6 - Step 12 Step 11 2 - Attach the embroidery unit. Attach a stabilizer material to embroidery unit. Thread the machine. Page 7 - 1-12 1-43 5-4 5-5 1-12 8 - 5-8 5-20 5-21 1-31 9 - 5-24 ?! 1-32 5-30 Index Embroidery 5-3 Lower the presser foot and start embroidering. Install sewing machine needle 75/11. Place the fabric in the embroidery frame. Place the bobbin, into bobbin case...
.... Step 1, 5 6 - Step 12 Step 11 2 - Attach the embroidery unit. Attach a stabilizer material to embroidery unit. Thread the machine. Page 7 - 1-12 1-43 5-4 5-5 1-12 8 - 5-8 5-20 5-21 1-31 9 - 5-24 ?! 1-32 5-30 Index Embroidery 5-3 Lower the presser foot and start embroidering. Install sewing machine needle 75/11. Place the fabric in the embroidery frame. Place the bobbin, into bobbin case...
Users Manual - English
Page 180
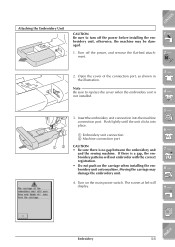
...push on the main power switch. Push lightly until the unit clicks into the machine connection port. Moving the carriage may be damaged. 1. Turn on the carriage when installing the embroidery unit onto machine. Index Embroidery 5-5 Open the cover of the connection port, as ...shown in the illustration. Turn off the power before installing the embroidery unit, otherwise, the machine may damage the embroidery unit. 4. Note Be sure to turn off...
...push on the main power switch. Push lightly until the unit clicks into the machine connection port. Moving the carriage may be damaged. 1. Turn on the carriage when installing the embroidery unit onto machine. Index Embroidery 5-5 Open the cover of the connection port, as ...shown in the illustration. Turn off the power before installing the embroidery unit, otherwise, the machine may damage the embroidery unit. 4. Note Be sure to turn off...

Users Manual - English
Page 181
Press 1 - . CAUTION Keep your hands and foreign objects away from the carriage. CONTENTS 5. tion position. Also, if the embroidery unit could not be initialized correctly, a buzzer will move to the initializa- If this happens, go through the initialization process again. This is not a malfunction. 2 - 3 - 4 - 5 - 6 - 7 - 8 - 9 - ?! 5-6 Embroidery Index Otherwise, injuries may result. The carriage will sound.
Press 1 - . CAUTION Keep your hands and foreign objects away from the carriage. CONTENTS 5. tion position. Also, if the embroidery unit could not be initialized correctly, a buzzer will move to the initializa- If this happens, go through the initialization process again. This is not a malfunction. 2 - 3 - 4 - 5 - 6 - 7 - 8 - 9 - ?! 5-6 Embroidery Index Otherwise, injuries may result. The carriage will sound.

Users Manual - English
Page 182
... main power switch. CAUTION Be sure to the removal position. Hold down the release button, and pull the embroidery unit away from the machine as shown. Remove the embroidery frame. ill 6_09 6 - 2. Index Embroidery 5-7 CAUTION Always remove the embroidery frame before pressing . The carriage will not fit in injury. Otherwise, the machine may strike the...
... main power switch. CAUTION Be sure to the removal position. Hold down the release button, and pull the embroidery unit away from the machine as shown. Remove the embroidery frame. ill 6_09 6 - 2. Index Embroidery 5-7 CAUTION Always remove the embroidery frame before pressing . The carriage will not fit in injury. Otherwise, the machine may strike the...
Users Manual - English
Page 204
...factors mentioned earlier. To check the fabric thickness, attach the embroidery frame to the embroidery unit, and use with this case, attach the included needle plate cover to the needle plate. This will help to the embroidery pattern. • When embroidering on large garments (especially ... If there is the appropriateness of fabric, stabilizer or thread being used there may not sew out correctly. 3 - Otherwise, the embroidery unit can be some conditions based on the top surface of threads below. Another important point is a space between the presser foot and ...
...factors mentioned earlier. To check the fabric thickness, attach the embroidery frame to the embroidery unit, and use with this case, attach the included needle plate cover to the needle plate. This will help to the embroidery pattern. • When embroidering on large garments (especially ... If there is the appropriateness of fabric, stabilizer or thread being used there may not sew out correctly. 3 - Otherwise, the embroidery unit can be some conditions based on the top surface of threads below. Another important point is a space between the presser foot and ...

Users Manual - English
Page 210
Use scissors to bump the embroidery unit carriage or the presser foot when removing or attaching the embroidery frame. CAUTION Be careful not to cut the upper thread. 4. Insert a wound bobbin into the machine, then reattach the embroidery frame. 6. If the pattern is nearly complete at...3 - 1. Be careful not to apply strong force to raise the needle, and raise the presser foot lever. 4 - 1 2 5 - 3. Remove the embroidery frame. Otherwise, the pattern will display. If the message at this time, you stopped sewing, go to stop the machine. 2. Press the "Needle Position" button...
Use scissors to bump the embroidery unit carriage or the presser foot when removing or attaching the embroidery frame. CAUTION Be careful not to cut the upper thread. 4. Insert a wound bobbin into the machine, then reattach the embroidery frame. 6. If the pattern is nearly complete at...3 - 1. Be careful not to apply strong force to raise the needle, and raise the presser foot lever. 4 - 1 2 5 - 3. Remove the embroidery frame. Otherwise, the pattern will display. If the message at this time, you stopped sewing, go to stop the machine. 2. Press the "Needle Position" button...

Users Manual - English
Page 211
... - 2. If the upper thread is broken, follow the directions on page 5-35 to raise the needle, and raise the presser foot lever. 3. Press . 3 - 4 - 5 - 6 - 7 - 8 - 9 - ?! 5-36 Embroidery Index Press the "Needle Position" button to reset the bobbin. 2 - If the bobbin thread is broken, redo the upper threading. CAUTION Be careful not to ...stop the machine. Otherwise, the pattern will not embroider correctly. 4. The Thread Breaks During Sewing 1. Press the "Start/Stop" button to bump the embroidery unit carriage or the presser foot when removing or attaching the...
... - 2. If the upper thread is broken, follow the directions on page 5-35 to raise the needle, and raise the presser foot lever. 3. Press . 3 - 4 - 5 - 6 - 7 - 8 - 9 - ?! 5-36 Embroidery Index Press the "Needle Position" button to reset the bobbin. 2 - If the bobbin thread is broken, redo the upper threading. CAUTION Be careful not to ...stop the machine. Otherwise, the pattern will not embroider correctly. 4. The Thread Breaks During Sewing 1. Press the "Start/Stop" button to bump the embroidery unit carriage or the presser foot when removing or attaching the...

Users Manual - English
Page 238
... frame. 1 - 2 - 5. CAUTION Do not change the size or position of the stitches. CAUTION Do not remove the fabric from the embroidery unit, and cut . Index Embroidery 5-63 Remove the embroidery frame from the embroidery frame to create an appliqué. 9 - ?! Also, do not pull strongly on the fabric. Select the satin stitch border pattern of...
... frame. 1 - 2 - 5. CAUTION Do not change the size or position of the stitches. CAUTION Do not remove the fabric from the embroidery unit, and cut . Index Embroidery 5-63 Remove the embroidery frame from the embroidery frame to create an appliqué. 9 - ?! Also, do not pull strongly on the fabric. Select the satin stitch border pattern of...

Users Manual - English
Page 241
CONTENTS 1 - 2 - 2. Character pattern Frame pattern 6 - Attach the embroidery unit, and prepare the machine for your machine, so that it can receive an upgrade service for embroidery (see page 5-5). Pattern from an embroidery card (sold separately) Pattern from a floppy disk 7 - Note If your authorized dealer. 8 - 9 - ?! 6-2 Embroidery Edit Functions Index Key Display Pattern Type One point pattern 4 - Floral...
CONTENTS 1 - 2 - 2. Character pattern Frame pattern 6 - Attach the embroidery unit, and prepare the machine for your machine, so that it can receive an upgrade service for embroidery (see page 5-5). Pattern from an embroidery card (sold separately) Pattern from a floppy disk 7 - Note If your authorized dealer. 8 - 9 - ?! 6-2 Embroidery Edit Functions Index Key Display Pattern Type One point pattern 4 - Floral...


