

Instruction Manual - English
Page 1
Zigzag Sewing Machine Instruction Manual TZ 1 - 8652 4;# iAt
Zigzag Sewing Machine Instruction Manual TZ 1 - 8652 4;# iAt
Instruction Manual - English
Page 2
... Preparation thread 10 Upper thread 14 Picking up the lower thread 15 Caution in sewing 16 The relation of fabrics, needle and threads 17 Sewing 18 Straight stitch 18 Tension control of straight stitch 20 Zigzag sewing 21 Applied sewing 23 Sewing lace on 23 Patching up 23 Shirring 23 Tacking a padding 24 Coat hemming... the bobbin winder guide 31 Adjustment of the strength of the thread take-up spring 31 Trouble and Check Point 33 How to Set the Machine 35 Table and leg 35 Head 35 Specification 37
... Preparation thread 10 Upper thread 14 Picking up the lower thread 15 Caution in sewing 16 The relation of fabrics, needle and threads 17 Sewing 18 Straight stitch 18 Tension control of straight stitch 20 Zigzag sewing 21 Applied sewing 23 Sewing lace on 23 Patching up 23 Shirring 23 Tacking a padding 24 Coat hemming... the bobbin winder guide 31 Adjustment of the strength of the thread take-up spring 31 Trouble and Check Point 33 How to Set the Machine 35 Table and leg 35 Head 35 Specification 37
Instruction Manual - English
Page 5
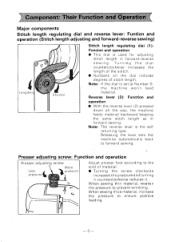
...; With the reverse lever (2) pressed down all the way, the machine feeds material backward keeping the same stitch length as in forward-reverse sewing. When sewing thick material, increase the pressure to forward sewing. Component: Their Function and Operation Major compOnents Stitch length regulating dial...dial (1): Funcion and operation • This, dial is used for adjusting stitch length in forward sewing. Note: The reverse lever is set at Number 0, the machine won't feed material . Presser adjusting screw: Function and operation Presser adjusting screw More Less pressure ...
...; With the reverse lever (2) pressed down all the way, the machine feeds material backward keeping the same stitch length as in forward-reverse sewing. When sewing thick material, increase the pressure to forward sewing. Component: Their Function and Operation Major compOnents Stitch length regulating dial...dial (1): Funcion and operation • This, dial is used for adjusting stitch length in forward sewing. Note: The reverse lever is set at Number 0, the machine won't feed material . Presser adjusting screw: Function and operation Presser adjusting screw More Less pressure ...
Instruction Manual - English
Page 6
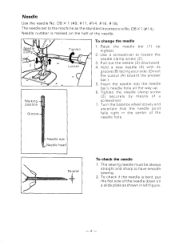
...balance wheel slowly and ascertain that the needle point falls right in left figure. -4- The sewing needle must be always straight and sharp to loosen the needle clamp screw (2). 3. The needle set to the machine as shown in the center of a screwdriver. 7. Insert the needle into the needle bar's... put the flat side of the needle. Raise the needle bar (1) up . 6. To check if the needle is No. Use a screwdriver to have smooth sewing. 2. Needle clamp Marking position Groove Tighten Loosen To change the needle 1 . Needle eye Needle head Pa allel To check the needle 1 . DB X1 ...
...balance wheel slowly and ascertain that the needle point falls right in left figure. -4- The sewing needle must be always straight and sharp to loosen the needle clamp screw (2). 3. The needle set to the machine as shown in the center of a screwdriver. 7. Insert the needle into the needle bar's... put the flat side of the needle. Raise the needle bar (1) up . 6. To check if the needle is No. Use a screwdriver to have smooth sewing. 2. Needle clamp Marking position Groove Tighten Loosen To change the needle 1 . Needle eye Needle head Pa allel To check the needle 1 . DB X1 ...
Instruction Manual - English
Page 8
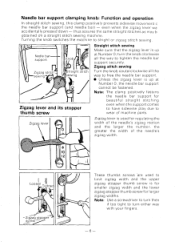
...up at Number 0; thus assures the same straight stitches as may bi obtained an a straight stitch sewing machine. o traight stitch sewing O Zigzag lever and its stopper thumb screw Straight stitch sewing Make sure that the zigzag lever is up at Number 0, the needle bar support cannot be ... the width of the needle's zigzag motion and the larger the number, the greater the width of machine parts. Needle bar support clamping knob: Function and operation In straight stitch sewing, this clamp positively prevents sidewise movement c the needle bar support (and needle bar) - Note:...
...up at Number 0; thus assures the same straight stitches as may bi obtained an a straight stitch sewing machine. o traight stitch sewing O Zigzag lever and its stopper thumb screw Straight stitch sewing Make sure that the zigzag lever is up at Number 0, the needle bar support cannot be ... the width of the needle's zigzag motion and the larger the number, the greater the width of machine parts. Needle bar support clamping knob: Function and operation In straight stitch sewing, this clamp positively prevents sidewise movement c the needle bar support (and needle bar) - Note:...

Instruction Manual - English
Page 20
Straight stitch Sewing As the fabric is sent automatically by turning clockwise the needle bar support clamping knob 1^ 5 0 Presser Needle plate -11 \\\ Feed dog Bobbin case Don't pass ... presser foot and the needle plate, page 8 as to the feed dog and page 12 as to guide it in the proper direction. Setting the sewing machine as follows, the straight stitch can be sewn. 0 Increase the pressure by the function of the feed dog. Put your hand on the fabric only...
Straight stitch Sewing As the fabric is sent automatically by turning clockwise the needle bar support clamping knob 1^ 5 0 Presser Needle plate -11 \\\ Feed dog Bobbin case Don't pass ... presser foot and the needle plate, page 8 as to the feed dog and page 12 as to guide it in the proper direction. Setting the sewing machine as follows, the straight stitch can be sewn. 0 Increase the pressure by the function of the feed dog. Put your hand on the fabric only...

Instruction Manual - English
Page 24
...(2) Satin stitch St tC:-, Satin stitch is a kind of zigzag stitch with very fine stitch length. (3) Beginning (4) How to fasten the final sewing (5) How to control the tension. See "Tension control of the stitch width. (1) Tension control of zigzag stitch On the reverse side of swatch,... the lower thread should form 2/3 of straight stitch" (page 20). How to change the sewing direction (6) Finish sewing See page 19. Caution When the machine stops sewing passing the needle through the swatch, do not move zigzag lever, in order to avoid needle breakage and needle ...
...(2) Satin stitch St tC:-, Satin stitch is a kind of zigzag stitch with very fine stitch length. (3) Beginning (4) How to fasten the final sewing (5) How to control the tension. See "Tension control of the stitch width. (1) Tension control of zigzag stitch On the reverse side of swatch,... the lower thread should form 2/3 of straight stitch" (page 20). How to change the sewing direction (6) Finish sewing See page 19. Caution When the machine stops sewing passing the needle through the swatch, do not move zigzag lever, in order to avoid needle breakage and needle ...

Instruction Manual - English
Page 31
Quantity of oil 2. When oiling, do after sewing. 2. Kind of oil 1 -> I -> Oil 2 or 3 drops Oil 4 or 5 drops Do not oil too much 4. Interval of the standard accessory. 1. Caution 1. Wipe off the excess oil completely. After oiling, run the machine without thread and with the oiler of oiling Description Use the attached oil Replacement: use the machine everyday, oil once a day. - 29 - When you use the oil for Brother Sewing Machines Once or twice in a week 3. Oiling Oil the following portions with the presser foot up. 3. Test sewing. 4.
Quantity of oil 2. When oiling, do after sewing. 2. Kind of oil 1 -> I -> Oil 2 or 3 drops Oil 4 or 5 drops Do not oil too much 4. Interval of the standard accessory. 1. Caution 1. Wipe off the excess oil completely. After oiling, run the machine without thread and with the oiler of oiling Description Use the attached oil Replacement: use the machine everyday, oil once a day. - 29 - When you use the oil for Brother Sewing Machines Once or twice in a week 3. Oiling Oil the following portions with the presser foot up. 3. Test sewing. 4.

Instruction Manual - English
Page 35
... of the upper thread also, otherwise the thread tension will not be good. 3) Scratch on shuttle Small flow - Trouble and Check Poin This sewing machine is needed . 1) Incorrect threading of lower Thread correctly (See page 1 2) thread 2) Too strong tension of the tension spring of needle, ...new one Set needle correctly. (See page 4) 3) Swatch is needed . - 33 - burnish with sandpaper #800 repair is pulled while sewing 4) Improper combination of the bobbin case Adjust the tension by turning counterclockwise the countersunk screw on shuttle hook See page 17 Small flow - Big...
... of the upper thread also, otherwise the thread tension will not be good. 3) Scratch on shuttle Small flow - Trouble and Check Poin This sewing machine is needed . 1) Incorrect threading of lower Thread correctly (See page 1 2) thread 2) Too strong tension of the tension spring of needle, ...new one Set needle correctly. (See page 4) 3) Swatch is needed . - 33 - burnish with sandpaper #800 repair is pulled while sewing 4) Improper combination of the bobbin case Adjust the tension by turning counterclockwise the countersunk screw on shuttle hook See page 17 Small flow - Big...


