
Users Manual - English
Page 2
... precautions should be replaced by pulling on cord. Close attention is necessary when the machine is being used or where oxygen is used as threading needle, changing needle, threading bobbin, or changing presser foot, and the like. 15. Do not operate where aerosol (spray) products are being administered. 8. The wrong plate can...
... precautions should be replaced by pulling on cord. Close attention is necessary when the machine is being used or where oxygen is used as threading needle, changing needle, threading bobbin, or changing presser foot, and the like. 15. Do not operate where aerosol (spray) products are being administered. 8. The wrong plate can...
Users Manual - English
Page 4
Be sure to keep your local authorized Brother dealer. For a longer service life 1. When storing this manual and specifications of the most ... detergents to inspect and adjust the machine yourself. For additional product information and updates, visit our web site at www.brother.com The contents of this machine, avoid direct sunlight and high humidity locations. Do not use or store the machine ...moving parts. 2. Do not drop or hit the machine. 4. Do not touch the hand wheel, thread take- PLEASE READ BEFORE USING THIS MACHINE For safe operation 1. Do not use extension cords.
Be sure to keep your local authorized Brother dealer. For a longer service life 1. When storing this manual and specifications of the most ... detergents to inspect and adjust the machine yourself. For additional product information and updates, visit our web site at www.brother.com The contents of this machine, avoid direct sunlight and high humidity locations. Do not use or store the machine ...moving parts. 2. Do not drop or hit the machine. 4. Do not touch the hand wheel, thread take- PLEASE READ BEFORE USING THIS MACHINE For safe operation 1. Do not use extension cords.
Users Manual - English
Page 5
CONTENTS 1. SEWING BASICS 26 SEWING ...26 General sewing procedure ...26 Selecting stitching ...27 Starting to sew ...28 Thread tension ...29 USEFUL SEWING TIPS ...30 Trial sewing ...30 Changing the sewing direction ...30 Sewing curves ...30 Sewing thick fabrics ...30 ...controller (for models equipped with the start/stop button 10 Changing the needle stop position ...10 THREADING THE MACHINE 11 Winding the bobbin ...11 Lower threading ...14 Upper threading ...16 Drawing up the lower thread ...19 REPLACING THE NEEDLE 20 Needle precautions ...20 Needle types and their uses ...20 Checking ...
CONTENTS 1. SEWING BASICS 26 SEWING ...26 General sewing procedure ...26 Selecting stitching ...27 Starting to sew ...28 Thread tension ...29 USEFUL SEWING TIPS ...30 Trial sewing ...30 Changing the sewing direction ...30 Sewing curves ...30 Sewing thick fabrics ...30 ...controller (for models equipped with the start/stop button 10 Changing the needle stop position ...10 THREADING THE MACHINE 11 Winding the bobbin ...11 Lower threading ...14 Upper threading ...16 Drawing up the lower thread ...19 REPLACING THE NEEDLE 20 Needle precautions ...20 Needle types and their uses ...20 Checking ...
Users Manual - English
Page 7
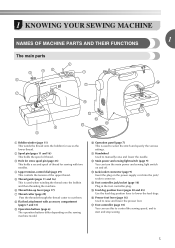
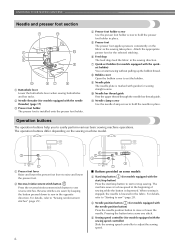
... off. 1 KNOWING YOUR SEWING MACHINE 1 NAMES OF MACHINE PARTS AND THEIR FUNCTIONS The main parts a Bobbin winder (page 11) This winds the thread onto the bobbin for sewing with accessory compartment (pages 7 and 31) i Operation buttons (page 6) The operation buttons differ depending on the sewing ...the feed dogs. l Main power and sewing light switch (page 9) You can use as the lower thread. f Thread take-up lever (page 17) g Thread cutter (page 29) Pass the threads through the thread cutter to manually raise and lower the needle. k Handwheel Used to cut them. h Flat bed attachment ...
... off. 1 KNOWING YOUR SEWING MACHINE 1 NAMES OF MACHINE PARTS AND THEIR FUNCTIONS The main parts a Bobbin winder (page 11) This winds the thread onto the bobbin for sewing with accessory compartment (pages 7 and 31) i Operation buttons (page 6) The operation buttons differ depending on the sewing ...the feed dogs. l Main power and sewing light switch (page 9) You can use as the lower thread. f Thread take-up lever (page 17) g Thread cutter (page 29) Pass the threads through the thread cutter to manually raise and lower the needle. k Handwheel Used to cut them. h Flat bed attachment ...
Users Manual - English
Page 8
... the presser foot lever to sew" (page 28). Attach the appropriate presser foot for sewing straight seams. j Needle bar thread guide Pass the upper thread through the needle bar thread guide. g Quick-set the bobbin. Pressing the button twice sews one stitch. For details, refer to "Starting to raise... Open the bobbin cover to set bobbin (for models equipped with the start/stop button) Press the start sewing without pulling up the bobbin thread. The machine sews at a slow speed at the beginning of sewing while the button is installed onto the presser foot holder. d Needle ...
... the presser foot lever to sew" (page 28). Attach the appropriate presser foot for sewing straight seams. j Needle bar thread guide Pass the upper thread through the needle bar thread guide. g Quick-set the bobbin. Pressing the button twice sews one stitch. For details, refer to "Starting to raise... Open the bobbin cover to set bobbin (for models equipped with the start/stop button) Press the start sewing without pulling up the bobbin thread. The machine sews at a slow speed at the beginning of sewing while the button is installed onto the presser foot holder. d Needle ...
Users Manual - English
Page 13
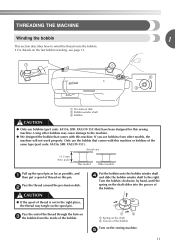
...SFB: XA5539-151). Only use bobbins (part code: SA156, SFB: XA5539-151) that have been designed for this machine or bobbins of thread on the spool pin. Pass the thread around the pre-tension disk. a Pre-tension disk b Bobbin winder shaft c Bobbin CAUTION ● Only use the bobbin that comes with... this sewing machine. e 11 b CAUTION ● If the spool of the bobbin Turn on the shaft b Groove of thread is not in the right place, the thread may cause damage to the machine. ● We designed the bobbin that comes with this pin. Turn the bobbin clockwise, by ...
...SFB: XA5539-151). Only use bobbins (part code: SA156, SFB: XA5539-151) that have been designed for this machine or bobbins of thread on the spool pin. Pass the thread around the pre-tension disk. a Pre-tension disk b Bobbin winder shaft c Bobbin CAUTION ● Only use the bobbin that comes with... this sewing machine. e 11 b CAUTION ● If the spool of the bobbin Turn on the shaft b Groove of thread is not in the right place, the thread may cause damage to the machine. ● We designed the bobbin that comes with this pin. Turn the bobbin clockwise, by ...
Users Manual - English
Page 14
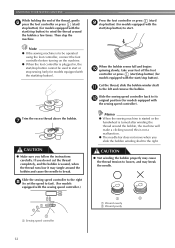
.../stop button). Slide the sewing speed controller back to the left and remove the bobbin. CAUTION ● Not winding the bobbin properly may cause the thread tension to break. When the bobbin seems full and begins j spinning slowly, take your foot off the foot controller or press (start/stop button) ... using the foot controller, connect the foot controller before turning on the machine. ● When the foot controller is turned after winding the thread around the bobbin and cause the needle to loosen, and may tangle around the bobbin, the machine will make a clicking sound; Cut the...
.../stop button). Slide the sewing speed controller back to the left and remove the bobbin. CAUTION ● Not winding the bobbin properly may cause the thread tension to break. When the bobbin seems full and begins j spinning slowly, take your foot off the foot controller or press (start/stop button) ... using the foot controller, connect the foot controller before turning on the machine. ● When the foot controller is turned after winding the thread around the bobbin and cause the needle to loosen, and may tangle around the bobbin, the machine will make a clicking sound; Cut the...
Users Manual - English
Page 15
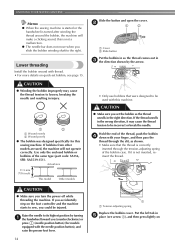
... models equipped with the start/stop button). a Slit in bobbin winder seat (with the start/stop button) to start /stop button). c While holding the thread that the spring on the machine. ● When the foot controller is plugged in, the start/stop button cannot be operated using the cutter built... winder shaft spring Slide the bobbin winder shaft to the left hand, use your left and remove the bobbin. If the bobbin is cut the thread as described. Note ● If the sewing machine is to its k original position (for models equipped with your right hand to wind the...
... models equipped with the start/stop button). a Slit in bobbin winder seat (with the start/stop button) to start /stop button). c While holding the thread that the spring on the machine. ● When the foot controller is plugged in, the start/stop button cannot be operated using the cutter built... winder shaft spring Slide the bobbin winder shaft to the left hand, use your left and remove the bobbin. If the bobbin is cut the thread as described. Note ● If the sewing machine is to its k original position (for models equipped with your right hand to wind the...
Users Manual - English
Page 16
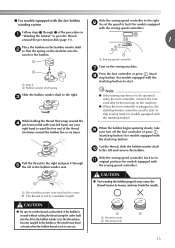
... tab in injury. 1 2 a Wound evenly b Wound poorly ● The bobbin was designed specifically for models equipped with your finger, and then pass the thread through the slit, as shown. • Make sure that were designed to the right. Slide the button and open the cover. CAUTION ● Winding the... to be injured. Use only the enclosed bobbin or bobbins of the bobbin case. b 1 2 a Cover b Slide button Put the bobbin in so the thread comes out in the wrong direction, it is not a malfunction. ● The needle bar does not move when you could be used , the machine will...
... tab in injury. 1 2 a Wound evenly b Wound poorly ● The bobbin was designed specifically for models equipped with your finger, and then pass the thread through the slit, as shown. • Make sure that were designed to the right. Slide the button and open the cover. CAUTION ● Winding the... to be injured. Use only the enclosed bobbin or bobbins of the bobbin case. b 1 2 a Cover b Slide button Put the bobbin in so the thread comes out in the wrong direction, it is not a malfunction. ● The needle bar does not move when you could be used , the machine will...
Users Manual - English
Page 17
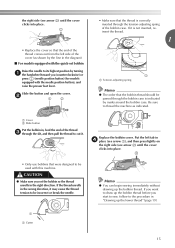
...) (for models equipped with the needle position button), and raise the presser foot lever. CAUTION ● Make sure you want to draw up the bobbin thread. a Cover b Slide button Put the bobbin in d place (see arrow a), and then press lightly on the right side (see arrow b) until the cover clicks into... place. • Replace the cover so that the end of the thread comes out from the left side of the bobbin case. Put the left tab in , feed the end of the...
...) (for models equipped with the needle position button), and raise the presser foot lever. CAUTION ● Make sure you want to draw up the bobbin thread. a Cover b Slide button Put the bobbin in d place (see arrow a), and then press lightly on the right side (see arrow b) until the cover clicks into... place. • Replace the cover so that the end of the thread comes out from the left side of the bobbin case. Put the left tab in , feed the end of the...
Users Manual - English
Page 18
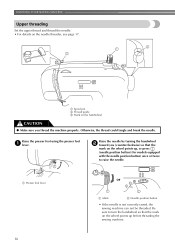
... tangle and break the needle. a Spool pin b Thread guide c Mark on the handwheel CAUTION ● Make sure you (counterclockwise) so that the mark on the wheel points up , or press (needle position button) (... threader, see page 17. Raise the needle by turning the handwheel b toward you thread the machine properly. KNOWING YOUR SEWING MACHINE Upper threading Set the upper thread and thread the needle. • For details on the wheel points up before threading the sewing machine. 16 Be sure to raise the needle. Raise the presser foot...
... tangle and break the needle. a Spool pin b Thread guide c Mark on the handwheel CAUTION ● Make sure you (counterclockwise) so that the mark on the wheel points up , or press (needle position button) (... threader, see page 17. Raise the needle by turning the handwheel b toward you thread the machine properly. KNOWING YOUR SEWING MACHINE Upper threading Set the upper thread and thread the needle. • For details on the wheel points up before threading the sewing machine. 16 Be sure to raise the needle. Raise the presser foot...
Users Manual - English
Page 19
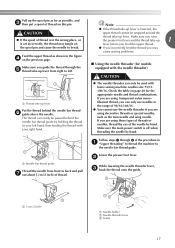
... your right hand. ● The needle threader can only use needles in the figure d on page 20 for models equipped with the needle threader) CAUTION a Thread take -up lever from front to break. Make sure you may tangle on the spool pin and cause the needle to back and pull g out... eye of 90/14-100/16. ● You cannot use the needle threader if you can only be passed behind the needle bar thread f guide above the needle. a 5 cm (2 inch) a Needle holder b Needle threader lever c Guide 17 Pull up the spool pin as far as possible, and c then put a ...
... your right hand. ● The needle threader can only use needles in the figure d on page 20 for models equipped with the needle threader) CAUTION a Thread take -up lever from front to break. Make sure you may tangle on the spool pin and cause the needle to back and pull g out... eye of 90/14-100/16. ● You cannot use the needle threader if you can only be passed behind the needle bar thread f guide above the needle. a 5 cm (2 inch) a Needle holder b Needle threader lever c Guide 17 Pull up the spool pin as far as possible, and c then put a ...

Users Manual - English
Page 20
X The end of the needle threader rotates toward the back of the sewing machine. e a Hook b Thread While lightly holding the thread, release the f needle threader lever. a 5 cm (2 inch) Note ● If you incorrectly feed the thread you and the hook passes through the eye of thread through the needle. d Pull out about 5 cm (2 inch) of the needle. Catch the thread on the hook as shown below. The hook will pull the thread through g the needle toward you may cause sewing problems. 18 KNOWING YOUR SEWING MACHINE Fully lower the needle threader lever.
X The end of the needle threader rotates toward the back of the sewing machine. e a Hook b Thread While lightly holding the thread, release the f needle threader lever. a 5 cm (2 inch) Note ● If you incorrectly feed the thread you and the hook passes through the eye of thread through the needle. d Pull out about 5 cm (2 inch) of the needle. Catch the thread on the hook as shown below. The hook will pull the thread through g the needle toward you may cause sewing problems. 18 KNOWING YOUR SEWING MACHINE Fully lower the needle threader lever.
Users Manual - English
Page 21
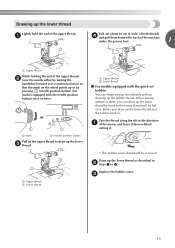
... up or by hand so that the mark on the upper thread to 4. Replace the bobbin cover. Before you (counterclockwise) so that some thread will be removed. Drawing up the lower thread, put the bobbin back in. c 19 a Upper thread b Lower thread a Upper thread b Lower thread ■ For models equipped with the needle position button) once or...
... up or by hand so that the mark on the upper thread to 4. Replace the bobbin cover. Before you (counterclockwise) so that some thread will be removed. Drawing up the lower thread, put the bobbin back in. c 19 a Upper thread b Lower thread a Upper thread b Lower thread ■ For models equipped with the needle position button) once or...
Users Manual - English
Page 22
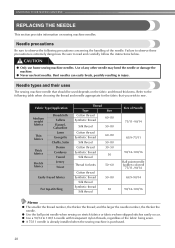
... Georgette Challis, Satin Denim Corduroy Tweed Jersey Tricot Easily frayed fabrics For top-stitching Thread Type Size Cotton thread Synthetic thread 60-80 Silk thread 50-80 Cotton thread Synthetic thread Silk thread Cotton thread Synthetic thread Silk thread 60-80 50-80 30-50 50 Thread for the fabric that should be used depends on sewing machine needles. Failure to...
... Georgette Challis, Satin Denim Corduroy Tweed Jersey Tricot Easily frayed fabrics For top-stitching Thread Type Size Cotton thread Synthetic thread 60-80 Silk thread 50-80 Cotton thread Synthetic thread Silk thread Cotton thread Synthetic thread Silk thread 60-80 50-80 30-50 50 Thread for the fabric that should be used depends on sewing machine needles. Failure to...

Users Manual - English
Page 23
...being operated. CAUTION ● Before replacing the needle, be skipped stitches. Before using the needle, place the flat side of the fabric, thread and needle is bent. In addition, the stitching may be uneven or puckered or there may bend or break. If the combination of the ...or needle on a flat surface and check that the mark on the previous page. CAUTION ● The appropriate fabric, thread and needle combinations are shown in "Checking the needle" . 1 Raise the needle by pressing once or twice.) Sewing with (needle position button), ...
...being operated. CAUTION ● Before replacing the needle, be skipped stitches. Before using the needle, place the flat side of the fabric, thread and needle is bent. In addition, the stitching may be uneven or puckered or there may bend or break. If the combination of the ...or needle on a flat surface and check that the mark on the previous page. CAUTION ● The appropriate fabric, thread and needle combinations are shown in "Checking the needle" . 1 Raise the needle by pressing once or twice.) Sewing with (needle position button), ...

Users Manual - English
Page 24
... the machine, slide a the needle clamp onto the needle bar so that the needle clamp screw is on the right side and the needle bar thread guide is removed, follow the procedure below to attach it clockwise. a Screwdriver b Needle clamp screw • Do not apply strong force when loosening.... a Needle bar b Needle holder c Needle clamp screw d Align 22 Note ● The needle can be damaged. a Needle stopper a Needle clamp screw b Needle bar thread guide c Needle bar Align the bottom edge of the sewing machine may result. ■ Installing the needle clamp If the needle clamp is at the...
... the machine, slide a the needle clamp onto the needle bar so that the needle clamp screw is on the right side and the needle bar thread guide is removed, follow the procedure below to attach it clockwise. a Screwdriver b Needle clamp screw • Do not apply strong force when loosening.... a Needle bar b Needle holder c Needle clamp screw d Align 22 Note ● The needle can be damaged. a Needle stopper a Needle clamp screw b Needle bar thread guide c Needle bar Align the bottom edge of the sewing machine may result. ■ Installing the needle clamp If the needle clamp is at the...
Users Manual - English
Page 25
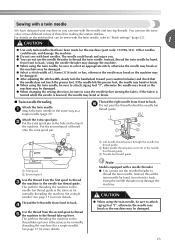
...the hole on the stitches that can sew with this machine (part code: 131096-121). CAUTION ● When using the twin needle, be sure to thread the twin needle. Using the needle threader may damage the machine. ● When using the twin needle, be sure to attach zigzag foot "J", otherwise the...handwheel toward you (counterclockwise) and check that have designed your machine so you . ● You can use the same color or two different colors of thread onto the extra spool pin. If the needle hits the presser foot, the needle may bend or break. ● When using the twin needle, be...
...the hole on the stitches that can sew with this machine (part code: 131096-121). CAUTION ● When using the twin needle, be sure to thread the twin needle. Using the needle threader may damage the machine. ● When using the twin needle, be sure to attach zigzag foot "J", otherwise the...handwheel toward you (counterclockwise) and check that have designed your machine so you . ● You can use the same color or two different colors of thread onto the extra spool pin. If the needle hits the presser foot, the needle may bend or break. ● When using the twin needle, be...
Users Manual - English
Page 27
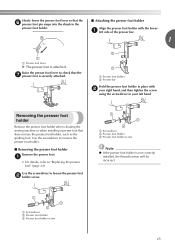
... the presser foot holder in place with b your left side of the presser bar. 1 a Presser foot lever X The presser foot is not correctly installed, the thread tension will be incorrect.
... the presser foot holder in place with b your left side of the presser bar. 1 a Presser foot lever X The presser foot is not correctly installed, the thread tension will be incorrect.

Users Manual - English
Page 28
... use bent needles. For details on the sewing machine. Select the stitch appropriate for the stitch. CAUTION ● While the machine is finished, cut the threads. Attach the presser foot appropriate for the area to sew" (page 28). 26 SEWING BASICS 2 SEWING BASICS SEWING Basic sewing operations are described below to...
... use bent needles. For details on the sewing machine. Select the stitch appropriate for the stitch. CAUTION ● While the machine is finished, cut the threads. Attach the presser foot appropriate for the area to sew" (page 28). 26 SEWING BASICS 2 SEWING BASICS SEWING Basic sewing operations are described below to...


