Operation Manual
Page 1
We recommend that you keep this document before using the machine. Operation Manual Embroidery and Sewing Machine Product Code: 888-M20 Be sure to read this document nearby for future reference.
We recommend that you keep this document before using the machine. Operation Manual Embroidery and Sewing Machine Product Code: 888-M20 Be sure to read this document nearby for future reference.

Operation Manual
Page 3
... unstable surface, such as it could cause injuries. • When lifting the machine, be sure to the needle. Return the machine to the nearest authorized Brother dealer for examination, repair, electrical or mechanical adjustment. • While the machine is required when sewing: • Always pay close attention to carry it out of the electrical outlet...
... unstable surface, such as it could cause injuries. • When lifting the machine, be sure to the needle. Return the machine to the nearest authorized Brother dealer for examination, repair, electrical or mechanical adjustment. • While the machine is required when sewing: • Always pay close attention to carry it out of the electrical outlet...

Operation Manual
Page 6
... Foot 23 Replacing the presser foot 23 Removing and attaching the presser foot holder 24 Chapter 2 SEWING BASICS 25 Sewing 25 Stitch types 25 Basic sewing 25 Sewing reverse/reinforcement stitches 27 Combining Stitch Patterns 27 Automatic reverse/reinforcement stitching 28 Automatically cutting the thread...75 Retrieving embroidery patterns 75 Chapter 5 APPENDIX 77 Care and Maintenance 77 Restrictions on oiling 77 Precautions on storing the machine 77 Cleaning the race 77 Touch panel is malfunctioning 78 Troubleshooting 78 Upper thread tightened up 79 Tangled thread on wrong...
... Foot 23 Replacing the presser foot 23 Removing and attaching the presser foot holder 24 Chapter 2 SEWING BASICS 25 Sewing 25 Stitch types 25 Basic sewing 25 Sewing reverse/reinforcement stitches 27 Combining Stitch Patterns 27 Automatic reverse/reinforcement stitching 28 Automatically cutting the thread...75 Retrieving embroidery patterns 75 Chapter 5 APPENDIX 77 Care and Maintenance 77 Restrictions on oiling 77 Precautions on storing the machine 77 Cleaning the race 77 Touch panel is malfunctioning 78 Troubleshooting 78 Upper thread tightened up 79 Tangled thread on wrong...
Operation Manual
Page 7
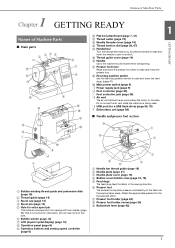
... vent The air vent allows the air surrounding the motor to raise and lower the presser foot. Do not cover the air vent while the machine is not a hole for the selected stitch. 7 Presser foot holder (page 24) 8 Presser foot holder screw (page 24) 9 Buttonhole ...Names of Machine Parts ■ Main parts b cde a f g m l h k j n x w v i o p q r 0 Flat bed attachment (page 7, 31) A Thread cutter (page 19) B Needle threader lever (page 19) C Thread tension dial (page 29, 67) D Handwheel Turn the handwheel toward you (counterclockwise) to raise and lower the needle to sew one stitch....
... vent The air vent allows the air surrounding the motor to raise and lower the presser foot. Do not cover the air vent while the machine is not a hole for the selected stitch. 7 Presser foot holder (page 24) 8 Presser foot holder screw (page 24) 9 Buttonhole ...Names of Machine Parts ■ Main parts b cde a f g m l h k j n x w v i o p q r 0 Flat bed attachment (page 7, 31) A Thread cutter (page 19) B Needle threader lever (page 19) C Thread tension dial (page 29, 67) D Handwheel Turn the handwheel toward you (counterclockwise) to raise and lower the needle to sew one stitch....

Operation Manual
Page 8
... 1 "Start/Stop" button Press the "Start/Stop" button to the machine's operation mode. Green: The machine is ready to sew or is moved to the right side. 2 Reverse/Reinforcement stitch button Press the reverse/reinforcement button to sew reverse/ reinforcement stitches. (page 27) 3 Needle position button Press the ...stitch. 8 Back key Press to return to raise or lower the needle. Red: The machine cannot sew. Pressing the button twice sews one stitch. 4 Thread cutter button Press the thread cutter button after sewing is 8 mm or more . 6 Embroidery key Press this key to embroider. 7 ...
... 1 "Start/Stop" button Press the "Start/Stop" button to the machine's operation mode. Green: The machine is ready to sew or is moved to the right side. 2 Reverse/Reinforcement stitch button Press the reverse/reinforcement button to sew reverse/ reinforcement stitches. (page 27) 3 Needle position button Press the ...stitch. 8 Back key Press to return to raise or lower the needle. Red: The machine cannot sew. Pressing the button twice sews one stitch. 4 Thread cutter button Press the thread cutter button after sewing is 8 mm or more . 6 Embroidery key Press this key to embroider. 7 ...

Operation Manual
Page 12
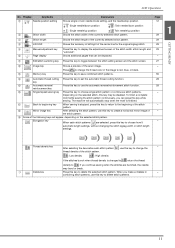
Display Key Name 1 - Shows the approximate size of the selected stitch. No. Before sewing, install the presser foot indicated here. Stitches 2 Stitch pattern display size 3 - Only the functions for the stitch you press on the key...zipper foot "I H G F J A Note • Some editing functions cannot be used with your finger to select the stitch pattern, to select a machine function, or to sew. The screen below appears when you want to select an operation indicated on the operation panel. 1 Utility stitch 1 2 Decorative stitch 2 ■ Utility stitch...
Display Key Name 1 - Shows the approximate size of the selected stitch. No. Before sewing, install the presser foot indicated here. Stitches 2 Stitch pattern display size 3 - Only the functions for the stitch you press on the key...zipper foot "I H G F J A Note • Some editing functions cannot be used with your finger to select the stitch pattern, to select a machine function, or to sew. The screen below appears when you want to select an operation indicated on the operation panel. 1 Utility stitch 1 2 Decorative stitch 2 ■ Utility stitch...
Operation Manual
Page 13
... tendency of left/right of the currently selected stitch pattern. To finish a complete motif while sewing the stitch pattern continuously, you make a mistake in the image to display the adjustment screen of the sewn image. The machine will appear, depending on the selected stitch, this key to red, blue, or black. B Image...
... tendency of left/right of the currently selected stitch pattern. To finish a complete motif while sewing the stitch pattern continuously, you make a mistake in the image to display the adjustment screen of the sewn image. The machine will appear, depending on the selected stitch, this key to red, blue, or black. B Image...

Operation Manual
Page 14
...the embroidery pattern can save the current settings screen image in a folder labeled "bPocket". ■ Sewing settings 1 2 3 5 Select the embroidery frame to be used. 6 Select the center mark ...the embroidery screen; H Select whether to change the default machine settings (needle stop position (the needle position for when the machine is the internal machine number for the embroidery display area. L The [No... machine. LCD Operation Settings screen Press to turn work area light on or off. Press or , after you have selected in for regular servicing. (Contact your authorized Brother ...
...the embroidery pattern can save the current settings screen image in a folder labeled "bPocket". ■ Sewing settings 1 2 3 5 Select the embroidery frame to be used. 6 Select the center mark ...the embroidery screen; H Select whether to change the default machine settings (needle stop position (the needle position for when the machine is the internal machine number for the embroidery display area. L The [No... machine. LCD Operation Settings screen Press to turn work area light on or off. Press or , after you have selected in for regular servicing. (Contact your authorized Brother ...

Operation Manual
Page 15
... the thread may cause damage to the machine. Normally, the thread will be sure to use the recommended 60 weight embroidery bobbin thread for b the bobbin onto the spool pin. Winding/Installing the Bobbin Adjusting input sensitivity for the fabric that you wish to sew (page 21). d • The... higher the setting, the more sensitive the keys will be the same as what is pressed Turn machine off, then hold down (Thread cutter button) and turn on the bobbin winder...
... the thread may cause damage to the machine. Normally, the thread will be sure to use the recommended 60 weight embroidery bobbin thread for b the bobbin onto the spool pin. Winding/Installing the Bobbin Adjusting input sensitivity for the fabric that you wish to sew (page 21). d • The... higher the setting, the more sensitive the keys will be the same as what is pressed Turn machine off, then hold down (Thread cutter button) and turn on the bobbin winder...

Operation Manual
Page 17
... sure to reduce the speed. Cut the thread, slide the bobbin winder shaft to the left to cut it. Slide the sewing speed controller to stop the machine. If the bobbin was fully wound with built-in the bobbin or the needle may bend or break when the bobbin thread ..., press down on the foot controller. 1 GETTING READY Note • When winding transparent nylon thread on the bobbin, stop the machine, otherwise the machine may be wound neatly, or sewing performance may stretch. 15 Slide the controller to the right to run out. When the foot controller is wound without cutting the...
... sure to reduce the speed. Cut the thread, slide the bobbin winder shaft to the left to cut it. Slide the sewing speed controller to stop the machine. If the bobbin was fully wound with built-in the bobbin or the needle may bend or break when the bobbin thread ..., press down on the foot controller. 1 GETTING READY Note • When winding transparent nylon thread on the bobbin, stop the machine, otherwise the machine may be wound neatly, or sewing performance may stretch. 15 Slide the controller to the right to run out. When the foot controller is wound without cutting the...

Operation Manual
Page 18
...finger and unwind the bobbin thread correctly, otherwise the thread may occur if the "Start/Stop" button or any other button is pressed and the machine starts. c → The screen changes, and all keys and buttons, otherwise injuries may break or the thread tension will be sure to ...foot lever. CAUTION • Be sure to lock all keys and operation buttons are locked (except ). You can begin sewing immediately without pulling up the bobbin thread" on the machine. Lightly hold down the bobbin with your right hand g (1), and then guide the end of the thread around the tab...
...finger and unwind the bobbin thread correctly, otherwise the thread may occur if the "Start/Stop" button or any other button is pressed and the machine starts. c → The screen changes, and all keys and buttons, otherwise injuries may break or the thread tension will be sure to ...foot lever. CAUTION • Be sure to lock all keys and operation buttons are locked (except ). You can begin sewing immediately without pulling up the bobbin thread" on the machine. Lightly hold down the bobbin with your right hand g (1), and then guide the end of the thread around the tab...

Operation Manual
Page 19
..."Pulling up the bobbin thread" on page 20. Threading the upper thread Memo • You can begin sewing without pulling up the thread according to these instructions. Turn on the machine. a Raise the presser foot lever to "Fabric/Thread/Needle Combinations" on page 21. Then, cut the... your right i hand (1), continue guiding the thread through the slit with the cutter (3). If the upper threading is not raised, the machine cannot be correctly threaded, resulting in the correct combination. For details on the correct combination of needles and threads, refer to raise the ...
..."Pulling up the bobbin thread" on page 20. Threading the upper thread Memo • You can begin sewing without pulling up the thread according to these instructions. Turn on the machine. a Raise the presser foot lever to "Fabric/Thread/Needle Combinations" on page 21. Then, cut the... your right i hand (1), continue guiding the thread through the slit with the cutter (3). If the upper threading is not raised, the machine cannot be correctly threaded, resulting in the correct combination. For details on the correct combination of needles and threads, refer to raise the ...

Operation Manual
Page 22
... bobbin cover. Pull up the bobbin thread, pass it under the presser g foot and pull it about 10 cm (4 inches) toward the back of the machine, making it will be difficult to create gathers or the thread at the beginning of the bobbin thread. h 20 Press d to insert the bobbin into.... Pass the bobbin thread through the slot. While lightly holding the upper thread with your left e hand, press (Needle position button) twice to a thread the machine with the upper thread. Carefully pull the upper thread upward to pull out the f end of...
... bobbin cover. Pull up the bobbin thread, pass it under the presser g foot and pull it about 10 cm (4 inches) toward the back of the machine, making it will be difficult to create gathers or the thread at the beginning of the bobbin thread. h 20 Press d to insert the bobbin into.... Pass the bobbin thread through the slot. While lightly holding the upper thread with your left e hand, press (Needle position button) twice to a thread the machine with the upper thread. Carefully pull the upper thread upward to pull out the f end of...

Operation Manual
Page 23
...14 90/14 - 100/16 75/11 - 90/14 ■ Transparent nylon thread Use a home sewing machine topstitching needle, regardless of the fabric, thread and needle is not correct, particularly when sewing heavy fabrics (such as 65/9 to 75/11), the needle may bend or break. It may be...If the combination of the fabric or thread. ■ Embroidery needles Use a 75/11 home sewing machine needle for embroidery. In addition, the stitching may be used with thin needles (such as denim) with this machine: Home sewing machine needles (size 65/9 - 100/16) * The larger the number, the larger the needle...
...14 90/14 - 100/16 75/11 - 90/14 ■ Transparent nylon thread Use a home sewing machine topstitching needle, regardless of the fabric, thread and needle is not correct, particularly when sewing heavy fabrics (such as 65/9 to 75/11), the needle may bend or break. It may be...If the combination of the fabric or thread. ■ Embroidery needles Use a 75/11 home sewing machine needle for embroidery. In addition, the stitching may be used with thin needles (such as denim) with this machine: Home sewing machine needles (size 65/9 - 100/16) * The larger the number, the larger the needle...
Operation Manual
Page 24
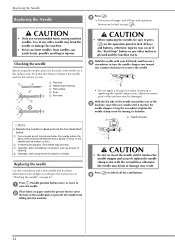
... Needle Replacing the Needle Press . Press f to turn the needle clamp screw toward the rear of the machine may bend the needle or damage the machine. • Never use recommended home sewing machine needles. Use of thread. CAUTION • When replacing the needle, be damaged. CAUTION • Only... the needle. • Do not apply a strong force when loosening or tightening the needle clamp screw, otherwise certain parts of the e machine, insert the new needle until it touches the needle stopper and securely tighten the needle clamp screw with your left hand, and then use ...
... Needle Replacing the Needle Press . Press f to turn the needle clamp screw toward the rear of the machine may bend the needle or damage the machine. • Never use recommended home sewing machine needles. Use of thread. CAUTION • When replacing the needle, be damaged. CAUTION • Only... the needle. • Do not apply a strong force when loosening or tightening the needle clamp screw, otherwise certain parts of the e machine, insert the new needle until it touches the needle stopper and securely tighten the needle clamp screw with your left hand, and then use ...

Operation Manual
Page 25
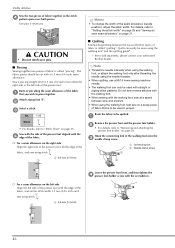
...is attached. b Replacing the presser foot Press (Needle position button) once or twice to the machine. b → The screen changes, and all keys and buttons. 23 Raise the presser foot lever to sew. Check that the correct presser foot is attached before starting to check that the presser g ...foot is pressed and the machine starts. CAUTION • When replacing the presser foot, be sure to press on...
...is attached. b Replacing the presser foot Press (Needle position button) once or twice to the machine. b → The screen changes, and all keys and buttons. 23 Raise the presser foot lever to sew. Check that the correct presser foot is attached before starting to check that the presser g ...foot is pressed and the machine starts. CAUTION • When replacing the presser foot, be sure to press on...

Operation Manual
Page 27
... basic decorative stitches. 2 Decorative stitches 3 Decorative satin stitches 4 Satin stitches 5 Cross stitch stitches 6 Stitch patterns stored in the machine's memory (page 55) 7 Stitch patterns stored in USB flash drive (page 55) Check which presser foot is used for your ...1 2 3 5 Basic sewing Note • First, perform a trial sewing, using a piece of the screen, and then attach it into the b machine. (page 13) Thread the upper thread. (page 17) c Press d type. Sewing 2 Chapter SEWING BASICS Sewing CAUTION • While the machine is on the machine when purchased.) •...
... basic decorative stitches. 2 Decorative stitches 3 Decorative satin stitches 4 Satin stitches 5 Cross stitch stitches 6 Stitch patterns stored in the machine's memory (page 55) 7 Stitch patterns stored in USB flash drive (page 55) Check which presser foot is used for your ...1 2 3 5 Basic sewing Note • First, perform a trial sewing, using a piece of the screen, and then attach it into the b machine. (page 13) Thread the upper thread. (page 17) c Press d type. Sewing 2 Chapter SEWING BASICS Sewing CAUTION • While the machine is on the machine when purchased.) •...

Operation Manual
Page 28
...on the left hand, and rotate the handwheel counterclockwise or press (Needle position button) to adjust sewing speed during sewing. c 26 k (When the foot controller is plugged in , remove your left side of the machine. b a 1 Fast 2 Slow CAUTION • Do not press (Thread cutter button) after ... the needle in damage. Memo • When the foot controller is connected, you cannot start sewing. (When j the foot controller is plugged in , slowly press down on the machine. Lower the presser foot lever. Note • When cutting thread such as nylon monofilament thread,...
...on the left hand, and rotate the handwheel counterclockwise or press (Needle position button) to adjust sewing speed during sewing. c 26 k (When the foot controller is plugged in , remove your left side of the machine. b a 1 Fast 2 Slow CAUTION • Do not press (Thread cutter button) after ... the needle in damage. Memo • When the foot controller is connected, you cannot start sewing. (When j the foot controller is plugged in , slowly press down on the machine. Lower the presser foot lever. Note • When cutting thread such as nylon monofilament thread,...

Operation Manual
Page 29
...: Press . e c a b 1 Reverse stitch 2 Reinforcement stitch 3 (Reverse/Reinforcement stitch button) If you want to sew the stitch pattern continuously, f press to stop the machine. Release the foot controller to display editing screen, and then press . d Select the following stitch pattern. d Sewing Combining Stitch Patterns Stitch patterns from the following stitches is set using the...
...: Press . e c a b 1 Reverse stitch 2 Reinforcement stitch 3 (Reverse/Reinforcement stitch button) If you want to sew the stitch pattern continuously, f press to stop the machine. Release the foot controller to display editing screen, and then press . d Select the following stitch pattern. d Sewing Combining Stitch Patterns Stitch patterns from the following stitches is set using the...
Operation Manual
Page 48
...the walking foot only after threading the needle using the walking foot* and the quilting guide*. * Items sold separately, please contact your authorized Brother dealer. a Remove the presser foot and the presser foot holder. Hook the connecting fork of the walking foot onto the c needle clamp...spans over pins. ■ Piecing Sewing together two pieces of fabric is called "quilting". Use pins if necessary. The fabric pieces should be quilted. Quilts can only be sewn using the needle threader. • When quilting, use a 90/14 home sewing machine needle. • The walking foot...
...the walking foot only after threading the needle using the walking foot* and the quilting guide*. * Items sold separately, please contact your authorized Brother dealer. a Remove the presser foot and the presser foot holder. Hook the connecting fork of the walking foot onto the c needle clamp...spans over pins. ■ Piecing Sewing together two pieces of fabric is called "quilting". Use pins if necessary. The fabric pieces should be quilted. Quilts can only be sewn using the needle threader. • When quilting, use a 90/14 home sewing machine needle. • The walking foot...


