Operation Manual
Page 1
Operation Manual Embroidery and Sewing Machine Product Code: 888-M20 Be sure to read this document nearby for future reference. We recommend that you keep this document before using the machine.
Operation Manual Embroidery and Sewing Machine Product Code: 888-M20 Be sure to read this document nearby for future reference. We recommend that you keep this document before using the machine.

Operation Manual
Page 6
... and the needle position 73 Embroidering linked characters 73 Using the Memory Function 74 Saving embroidery patterns 75 Retrieving embroidery patterns 75 Chapter 5 APPENDIX 77 Care and Maintenance 77 Restrictions on oiling 77 Precautions on storing the machine 77 Cleaning the race 77 Touch panel is malfunctioning 78 Troubleshooting 78 Upper thread tightened...
... and the needle position 73 Embroidering linked characters 73 Using the Memory Function 74 Saving embroidery patterns 75 Retrieving embroidery patterns 75 Chapter 5 APPENDIX 77 Care and Maintenance 77 Restrictions on oiling 77 Precautions on storing the machine 77 Cleaning the race 77 Touch panel is malfunctioning 78 Troubleshooting 78 Upper thread tightened...
Operation Manual
Page 7
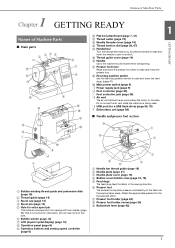
...as the sewing takes place. G Presser foot lever Raise and lower the presser foot lever to circulate. Do not cover the air vent while the machine is not a hole for the selected stitch. 7 Presser foot holder (page 24) 8 Presser foot holder screw (page 24) 9 Buttonhole lever (... Turn the handwheel toward you (counterclockwise) to raise and lower the needle to sew one stitch. N USB port (for a USB flash drive) (page 55, 75) O Embroidery unit (page 58) ■ Needle and presser foot section i a h b GETTING READY 1 s t u y 1 Bobbin winding thread guide and pretension disk (page 15) 2 ...
...as the sewing takes place. G Presser foot lever Raise and lower the presser foot lever to circulate. Do not cover the air vent while the machine is not a hole for the selected stitch. 7 Presser foot holder (page 24) 8 Presser foot holder screw (page 24) 9 Buttonhole lever (... Turn the handwheel toward you (counterclockwise) to raise and lower the needle to sew one stitch. N USB port (for a USB flash drive) (page 55, 75) O Embroidery unit (page 58) ■ Needle and presser foot section i a h b GETTING READY 1 s t u y 1 Bobbin winding thread guide and pretension disk (page 15) 2 ...

Operation Manual
Page 8
...The pressure exerted on the LCD. 3 Next page key Displays the next screen when there are items that its point is sewing. Red: The machine cannot sew. Operate the keys by directly touching them with a thin point or a unique shape. 6 The button changes color according to perform ...Adjusting input sensitivity for operation keys" on using an electrostatic touch pen, make sure that are displayed. Green: The machine is ready to sew or is 8 mm or more . 6 Embroidery key Press this key to embroider. 7 Utility stitch key Press this key before changing the needle, the presser foot...
...The pressure exerted on the LCD. 3 Next page key Displays the next screen when there are items that its point is sewing. Red: The machine cannot sew. Operate the keys by directly touching them with a thin point or a unique shape. 6 The button changes color according to perform ...Adjusting input sensitivity for operation keys" on using an electrostatic touch pen, make sure that are displayed. Green: The machine is ready to sew or is 8 mm or more . 6 Embroidery key Press this key to embroider. 7 Utility stitch key Press this key before changing the needle, the presser foot...
Operation Manual
Page 9
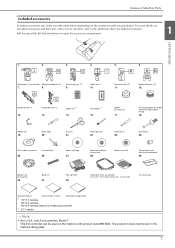
...: Model T This foot controller can be used on machine) Monogramming foot "N" 7. 8. J N G I " 10. A Q Overcasting foot "G" 9. Pre-wound bobbin (60 weight white embroidery bobbin thread) 18. For more details on the machine model you purchased. Cleaning brush 22. Embroidery foot "Q" 14. Bobbin clip 19. Pull the top of Machine Parts Included accessories Included accessories may differ from...
...: Model T This foot controller can be used on machine) Monogramming foot "N" 7. 8. J N G I " 10. A Q Overcasting foot "G" 9. Pre-wound bobbin (60 weight white embroidery bobbin thread) 18. For more details on the machine model you purchased. Cleaning brush 22. Embroidery foot "Q" 14. Bobbin clip 19. Pull the top of Machine Parts Included accessories Included accessories may differ from...
Operation Manual
Page 10
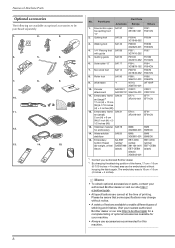
... your nearest authorized Brother dealer or our site http://s.brother/cpjab for embroidery BM3: BM3 XG6683-001 BM3CN 14. Visit your authorized Brother dealer or visit our site http:// s.brother/cpjab. • All specifications are correct at the time of Machine Parts Optional accessories ..., white/ SAEBT999 X81164-001/ EBT-CEBN black) (black) EBT-CEBN (black) (black): XG6643-001 *1 Contact your machine. • Always use accessories recommended for this machine. 8 The embroidery area is 10 cm × 10 cm (4 inches × 4 inches). Part Code No. Roller foot SA190 F066:...
... your nearest authorized Brother dealer or our site http://s.brother/cpjab for embroidery BM3: BM3 XG6683-001 BM3CN 14. Visit your authorized Brother dealer or visit our site http:// s.brother/cpjab. • All specifications are correct at the time of Machine Parts Optional accessories ..., white/ SAEBT999 X81164-001/ EBT-CEBN black) (black) EBT-CEBN (black) (black): XG6643-001 *1 Contact your machine. • Always use accessories recommended for this machine. 8 The embroidery area is 10 cm × 10 cm (4 inches × 4 inches). Part Code No. Roller foot SA190 F066:...

Operation Manual
Page 14
... for operation keys. (page 13) J Display the service count which is a reminder to take your authorized Brother dealer for details.) K Display the total number of stitches sewn on this machine. G Select the display language. E Select whether to turn work area light on or off. I 1... down. thread number, color name. (page 66) 9 When the thread number [#123] is the internal machine number for the embroidery display area. A Press to specify the size of the background for your machine. 12 B Change the color of pattern thumbnails. L The [No.] is selected, select from thread ...
... for operation keys. (page 13) J Display the service count which is a reminder to take your authorized Brother dealer for details.) K Display the total number of stitches sewn on this machine. G Select the display language. E Select whether to turn work area light on or off. I 1... down. thread number, color name. (page 66) 9 When the thread number [#123] is the internal machine number for the embroidery display area. A Press to specify the size of the background for your machine. 12 B Change the color of pattern thumbnails. L The [No.] is selected, select from thread ...

Operation Manual
Page 15
...8226; We recommend selecting the highest setting if an electrostatic touch pen is being used for the upper threading. • When winding bobbin for embroidery, be sure to the front from the bottom. Memo • When winding the bobbin for sewing utility stitches, use the recommended 60 weight... embroidery bobbin thread for this machine or bobbins of the same type (SA156/SFB: XA5539-151/SFB). Normally, the thread will be the same as what is pressed Turn machine off, then hold down (Thread cutter button) and turn on...
...8226; We recommend selecting the highest setting if an electrostatic touch pen is being used for the upper threading. • When winding bobbin for embroidery, be sure to the front from the bottom. Memo • When winding the bobbin for sewing utility stitches, use the recommended 60 weight... embroidery bobbin thread for this machine or bobbins of the same type (SA156/SFB: XA5539-151/SFB). Normally, the thread will be the same as what is pressed Turn machine off, then hold down (Thread cutter button) and turn on...

Operation Manual
Page 23
... 1.8-2.5 (1/16-3/32) Regular stitches 2.0-3.0 (1/16-1/8) Coarse stitches 2.5-4.0 (3/32-3/16) Setting appropriate for the fabric thickness Setting appropriate for embroidery. As the numbers decrease, the needles get finer. • Thread that can be skipped stitches. 21 When sewing lightweight fabrics, make... depends on page 22. • In principle, use thread of the fabric or thread. ■ Embroidery needles Use a 75/11 home sewing machine needle for the fabric thickness CAUTION • The appropriate fabric, thread and needle combinations are consumables. Fabric...
... 1.8-2.5 (1/16-3/32) Regular stitches 2.0-3.0 (1/16-1/8) Coarse stitches 2.5-4.0 (3/32-3/16) Setting appropriate for the fabric thickness Setting appropriate for embroidery. As the numbers decrease, the needles get finer. • Thread that can be skipped stitches. 21 When sewing lightweight fabrics, make... depends on page 22. • In principle, use thread of the fabric or thread. ■ Embroidery needles Use a 75/11 home sewing machine needle for the fabric thickness CAUTION • The appropriate fabric, thread and needle combinations are consumables. Fabric...

Operation Manual
Page 59
... 3 Step 1, 2 Step 5 Step 4 Step 6 Step 7, 8 Step Aim # Action Page 1 Presser foot Attach embroidery foot "Q". 57 attachment 2 Checking the Use needle 75/11 for embroidery. Attaching the Embroidery Foot CAUTION • Be sure to prepare the machine for 22 needle embroidery. 3 Embroidery unit Attach the embroidery unit. 58 attachment 4 Bobbin thread For the bobbin thread, wind 13 setup...
... 3 Step 1, 2 Step 5 Step 4 Step 6 Step 7, 8 Step Aim # Action Page 1 Presser foot Attach embroidery foot "Q". 57 attachment 2 Checking the Use needle 75/11 for embroidery. Attaching the Embroidery Foot CAUTION • Be sure to prepare the machine for 22 needle embroidery. 3 Embroidery unit Attach the embroidery unit. 58 attachment 4 Bobbin thread For the bobbin thread, wind 13 setup...

Operation Manual
Page 60
...cause injury. • Keep your hands and other objects away from the embroidery carriage and frame when they are moving. a Pull the flat bed attachment off the machine. Otherwise, injuries may occur if one of the embroidery foot. Turn off to unlock all keys and buttons. Press h to ... tighten the screw of the operation buttons is no gap between the embroidery unit and the machine, otherwise the embroidery pattern may not be damaged, and it may result. • Do not touch the connector in the embroidery unit until it . CAUTION • Use the included screwdriver to ...
...cause injury. • Keep your hands and other objects away from the embroidery carriage and frame when they are moving. a Pull the flat bed attachment off the machine. Otherwise, injuries may occur if one of the embroidery foot. Turn off to unlock all keys and buttons. Press h to ... tighten the screw of the operation buttons is no gap between the embroidery unit and the machine, otherwise the embroidery pattern may not be damaged, and it may result. • Do not touch the connector in the embroidery unit until it . CAUTION • Use the included screwdriver to ...

Operation Manual
Page 61
... of threads below . Use the included bobbin pre-wound with this machine. Remove the embroidery frame. b There are many factors that no objects or hands are two important factors mentioned earlier. Embroidery Attractive Finishes → The carriage moves to its initial position. ... and follow the instructions below . ■ Thread Upper thread Bobbin thread Use embroidery thread intended for selecting the embroidery pattern type is displayed. Turn off the machine before removing the embroidery unit. Another important point is set [ON] within the settings screen, touch screen...
... of threads below . Use the included bobbin pre-wound with this machine. Remove the embroidery frame. b There are many factors that no objects or hands are two important factors mentioned earlier. Embroidery Attractive Finishes → The carriage moves to its initial position. ... and follow the instructions below . ■ Thread Upper thread Bobbin thread Use embroidery thread intended for selecting the embroidery pattern type is displayed. Turn off the machine before removing the embroidery unit. Another important point is set [ON] within the settings screen, touch screen...

Operation Manual
Page 62
...embroidery when embroidering stretch fabrics, lightweight fabrics, fabrics with your machine... embroidery....embroidery...your embroidery projects...embroidery frame c a b Memo • When embroidering small pieces of less than the embroidery...embroidery frame, the embroidery pattern will help to break. • Always use stabilizer material as terry cloth or fabrics that cannot be ironed onto the fabric, attach it in the embroidery... frame. Using fabrics thicker than 2 mm (1/16 inch) may break and cause injury. ■ Attaching iron-on an embroidery... the embroidery frame CAUTION...
...embroidery when embroidering stretch fabrics, lightweight fabrics, fabrics with your machine... embroidery....embroidery...your embroidery projects...embroidery frame c a b Memo • When embroidering small pieces of less than the embroidery...embroidery frame, the embroidery pattern will help to break. • Always use stabilizer material as terry cloth or fabrics that cannot be ironed onto the fabric, attach it in the embroidery... frame. Using fabrics thicker than 2 mm (1/16 inch) may break and cause injury. ■ Attaching iron-on an embroidery... the embroidery frame CAUTION...
Operation Manual
Page 65
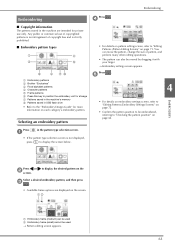
.... • If the pattern type selection screen is strictly prohibited. ■ Embroidery pattern types a b c e f d gh 1 Embroidery patterns 2 Brother "Exclusives" 3 Floral alphabet patterns 4 Character patterns 5 Frame patterns 6 Press this key to position the embroidery unit for storage 7 Patterns saved in the machine's memory 8 Patterns saved in the machine are displayed on the screen. e • For details on...
.... • If the pattern type selection screen is strictly prohibited. ■ Embroidery pattern types a b c e f d gh 1 Embroidery patterns 2 Brother "Exclusives" 3 Floral alphabet patterns 4 Character patterns 5 Frame patterns 6 Press this key to position the embroidery unit for storage 7 Patterns saved in the machine's memory 8 Patterns saved in the machine are displayed on the screen. e • For details on...

Operation Manual
Page 68
..., then press the "Start/Stop" d button to start embroidering. If the e end of the stitching, it may vary slightly from the g machine. Press a and use or to stop the machine. Use or of b Color] or [#123] (thread number). • If the thread is finished. c → When the last color ... is cut. • When [Name of Color] is selected, the name of the thread colors is displayed. • When [#123] is selected, the embroidery thread number is under the presser foot, raise the presser foot, then trim the excess thread. ■ Changing the thread color display You can display...
..., then press the "Start/Stop" d button to start embroidering. If the e end of the stitching, it may vary slightly from the g machine. Press a and use or to stop the machine. Use or of b Color] or [#123] (thread number). • If the thread is finished. c → When the last color ... is cut. • When [Name of Color] is selected, the name of the thread colors is displayed. • When [#123] is selected, the embroidery thread number is under the presser foot, raise the presser foot, then trim the excess thread. ■ Changing the thread color display You can display...
Operation Manual
Page 69
... 6. In this instance, decrease the upper thread tension. 1 Right side (top) of fabric 2 Wrong side (bottom) of fabric 4 EMBROIDERY ■ Upper thread is not installed correctly, it may not be set the correct thread tension. Embroidering Adjusting thread tension The upper thread ...tension is too loose The upper thread has slack. When doing machine embroidery, the tension dial should be possible to set somewhere between 2 to continue or delete the pattern. In this instance, increase ...
... 6. In this instance, decrease the upper thread tension. 1 Right side (top) of fabric 2 Wrong side (bottom) of fabric 4 EMBROIDERY ■ Upper thread is not installed correctly, it may not be set the correct thread tension. Embroidering Adjusting thread tension The upper thread ...tension is too loose The upper thread has slack. When doing machine embroidery, the tension dial should be possible to set somewhere between 2 to continue or delete the pattern. In this instance, increase ...

Operation Manual
Page 70
...appear. Sewing the appliqué position on those in step a of appliqué 2 Base material a b Remove the embroidery frame from the embroidery b unit. Thread the machine with an iron-on the base fabric Sew the appliqué position. Finish embroidering the remainder of the thread colors to ...base fabric with fabric glue or temporary spray adhesive, securely baste it in place with the embroidery thread, lower the presser foot lever, and then press the "Start/Stop" button to the machine. Therefore, carefully cut out the appliqué piece along the inside of the appliqu&#...
...appear. Sewing the appliqué position on those in step a of appliqué 2 Base material a b Remove the embroidery frame from the embroidery b unit. Thread the machine with an iron-on the base fabric Sew the appliqué position. Finish embroidering the remainder of the thread colors to ...base fabric with fabric glue or temporary spray adhesive, securely baste it in place with the embroidery thread, lower the presser foot lever, and then press the "Start/Stop" button to the machine. Therefore, carefully cut out the appliqué piece along the inside of the appliqu&#...

Operation Manual
Page 73
... key to display the font editing screen. (page 72) Font edit key 9 Press this key to call up the embroidery settings screen. (page 72) Edit End key 0 Press this key to the machine's memory or USB flash drive. Memory key (page 75) A When a combined pattern is pressed, the pattern editing screen appears...
... key to display the font editing screen. (page 72) Font edit key 9 Press this key to call up the embroidery settings screen. (page 72) Edit End key 0 Press this key to the machine's memory or USB flash drive. Memory key (page 75) A When a combined pattern is pressed, the pattern editing screen appears...

Operation Manual
Page 74
...; Font editing screen Font editing screen appears by the arrow. (Press Move key the center key to return the pattern to the center of the embroidery area.) (page 73) 72 Depending on the line, press . 3 Press this key to select a part of each character separately. After editing the pattern... switch between the character patterns on the font that they can be separated, and then press to increase or decrease the character spacing. Since the machine stops at the end of the pattern to edit. When selecting an arc ( ), use this key to change the font. 4 Press this...
...; Font editing screen Font editing screen appears by the arrow. (Press Move key the center key to return the pattern to the center of the embroidery area.) (page 73) 72 Depending on the line, press . 3 Press this key to select a part of each character separately. After editing the pattern... switch between the character patterns on the font that they can be separated, and then press to increase or decrease the character spacing. Since the machine stops at the end of the pattern to edit. When selecting an arc ( ), use this key to change the font. 4 Press this...

Operation Manual
Page 75
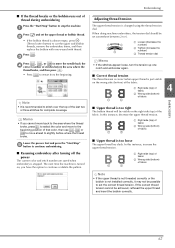
Embroidery key 4 Press this key to save patterns to the Memory key machine's memory or USB flash drive. (page 75) 5 Press this key to check the position of the embroidering a 73 b Press , and then press . The embroidery frame moves so that the needle is positioned correctly). → The... needle is positioned correctly. d Lower the embroidery foot ...
Embroidery key 4 Press this key to save patterns to the Memory key machine's memory or USB flash drive. (page 75) 5 Press this key to check the position of the embroidering a 73 b Press , and then press . The embroidery frame moves so that the needle is positioned correctly). → The... needle is positioned correctly. d Lower the embroidery foot ...


