Users Manual - English
Page 4
...foot holder The presser foot is being used. e Power supply jack Insert the plug on the end of the foot controller cable into the shuttle. g Air vent The air vent allows the air surrounding the motor to lower the feed dogs. Do not cover the air vent while the...Needle bar thread hooks Pass the upper thread through the needle bar thread hooks. Attach the appropriate presser foot for sewing straight seams. d Bobbin cover/Shuttle Remove the bobbin cover, and then insert the bobbin into the foot controller jack. f Presser foot The presser foot applies pressure consistently on and ...
...foot holder The presser foot is being used. e Power supply jack Insert the plug on the end of the foot controller cable into the shuttle. g Air vent The air vent allows the air surrounding the motor to lower the feed dogs. Do not cover the air vent while the...Needle bar thread hooks Pass the upper thread through the needle bar thread hooks. Attach the appropriate presser foot for sewing straight seams. d Bobbin cover/Shuttle Remove the bobbin cover, and then insert the bobbin into the foot controller jack. f Presser foot The presser foot applies pressure consistently on and ...
Users Manual - English
Page 10
... ...141 Resewing ...141 Thread runs out partway through a design...142 Stopping while embroidering ...142 APPENDIX 145 Maintenance...146 Cleaning the machine surface ...146 Cleaning the shuttle ...146 Troubleshooting ...148 Error messages ...153 Nothing appears in the LCD ...155 Operation beep ...155 Cancelling the operation beep ...156 Index ...157 4
... ...141 Resewing ...141 Thread runs out partway through a design...142 Stopping while embroidering ...142 APPENDIX 145 Maintenance...146 Cleaning the machine surface ...146 Cleaning the shuttle ...146 Troubleshooting ...148 Error messages ...153 Nothing appears in the LCD ...155 Operation beep ...155 Cancelling the operation beep ...156 Index ...157 4
Users Manual - English
Page 26
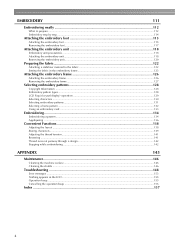
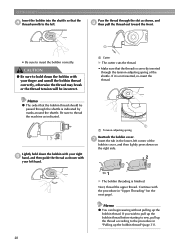
... pulling up the thread according to the procedure in "Upper Threading" (on the right side. 2 1 X The bobbin threading is correctly inserted through the shuttle is not inserted, re-insert the thread. a Cutter X The cutter cuts the thread. • Make sure that the thread is finished. Lightly hold ... with the procedure in "Pulling up the bobbin thread" (page 31). 20 If it is indicated by marks around the shuttle. GETTING READY Insert the bobbin into the shuttle so that the d thread unrolls to hold down the bobbin with your right e hand, and then guide the thread as...
... pulling up the thread according to the procedure in "Upper Threading" (on the right side. 2 1 X The bobbin threading is correctly inserted through the shuttle is not inserted, re-insert the thread. a Cutter X The cutter cuts the thread. • Make sure that the thread is finished. Lightly hold ... with the procedure in "Pulling up the bobbin thread" (page 31). 20 If it is indicated by marks around the shuttle. GETTING READY Insert the bobbin into the shuttle so that the d thread unrolls to hold down the bobbin with your right e hand, and then guide the thread as...

Users Manual - English
Page 37
... appears again, and appears. CAUTION ● When using the twin needle, be pulled up the bobbin thread as described below. 1 Insert the bobbin into the shuttle. Pulling up the bobbin thread When making gathers or before free-motion quilting, first pull up . Otherwise the needle may break or the machine may...
... appears again, and appears. CAUTION ● When using the twin needle, be pulled up the bobbin thread as described below. 1 Insert the bobbin into the shuttle. Pulling up the bobbin thread When making gathers or before free-motion quilting, first pull up . Otherwise the needle may break or the machine may...
Users Manual - English
Page 132
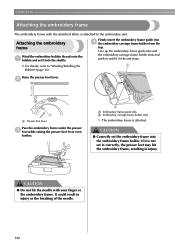
... presser foot lever. EMBROIDERY Attaching the embroidery frame The embroidery frame with your finger or the embroidery frame. CAUTION ● Correctly set it into the shuttle. • For details, refer to the embroidery unit. Firmly insert the embroidery frame guide into the embroidery frame holder.
... presser foot lever. EMBROIDERY Attaching the embroidery frame The embroidery frame with your finger or the embroidery frame. CAUTION ● Correctly set it into the shuttle. • For details, refer to the embroidery unit. Firmly insert the embroidery frame guide into the embroidery frame holder.
Users Manual - English
Page 152
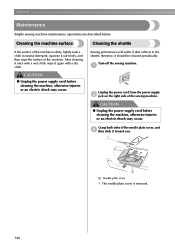
... of the needle plate cover, and c then slide it toward you. 1 a Needle plate cover X The needle plate cover is dirty, lightly soak a cloth in the shuttle; Grasp both sides of the sewing machine. CAUTION ● Unplug the power supply cord before cleaning the machine, otherwise injuries or an electric shock may... cord before cleaning the machine, otherwise injuries or an electric shock may occur. therefore, it again with a dry cloth. Cleaning the machine surface Cleaning the shuttle If the surface of the machine is removed. 146
... of the needle plate cover, and c then slide it toward you. 1 a Needle plate cover X The needle plate cover is dirty, lightly soak a cloth in the shuttle; Grasp both sides of the sewing machine. CAUTION ● Unplug the power supply cord before cleaning the machine, otherwise injuries or an electric shock may... cord before cleaning the machine, otherwise injuries or an electric shock may occur. therefore, it again with a dry cloth. Cleaning the machine surface Cleaning the shuttle If the surface of the machine is removed. 146
Users Manual - English
Page 153
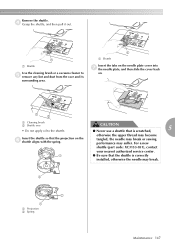
... code: XC3153-051), contact your nearest authorized service center. 1 ● Be sure that the shuttle is scratched, 5 Insert the shuttle so that is correctly installed, otherwise the needle may suffer. otherwise the upper thread may become tangled, the ...2 2 1 a Projection b Spring Maintenance 147 CAUTION ● Never use a shuttle that the projection on . 1 2 a Cleaning brush b Shuttle race • Do not apply oil to the shuttle. Remove the shuttle. d Grasp the shuttle, and then pull it out. 1 a Shuttle Use the cleaning brush or a vacuum cleaner to e remove any lint and dust...
... code: XC3153-051), contact your nearest authorized service center. 1 ● Be sure that the shuttle is scratched, 5 Insert the shuttle so that is correctly installed, otherwise the needle may suffer. otherwise the upper thread may become tangled, the ...2 2 1 a Projection b Spring Maintenance 147 CAUTION ● Never use a shuttle that the projection on . 1 2 a Cleaning brush b Shuttle race • Do not apply oil to the shuttle. Remove the shuttle. d Grasp the shuttle, and then pull it out. 1 a Shuttle Use the cleaning brush or a vacuum cleaner to e remove any lint and dust...
Users Manual - English
Page 154
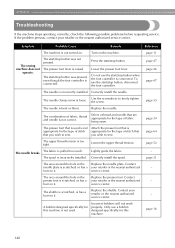
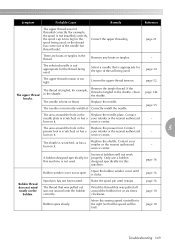
.... The area around the hole in the Replace the needle plate. The area around the hole in the presser foot is too tight. Replace the shuttle. page 21 - - - The needle clamp screw is not turned on it . Symptom Probable Cause Remedy The machine is loose. The...
.... The area around the hole in the Replace the needle plate. The area around the hole in the presser foot is too tight. Replace the shuttle. page 21 - - - The needle clamp screw is not turned on it . Symptom Probable Cause Remedy The machine is loose. The...
Users Manual - English
Page 155
...Bobbin spins slowly. service center. The thread that was not wound onto the bobbin correctly. The needle is tangled in the shuttle, clean the shuttle. page 146 page 35 The area around the bobbin five or six times clockwise. Move the sewing speed controller to the...needle plate. A bobbin designed specifically for this machine. The thread is incorrectly installed. Remove any knots or tangles. - service center. The shuttle is appropriate for the type of the needle bar thread hook). page 16 Bobbin winder cover is scratched, or has a your retailer or...
...Bobbin spins slowly. service center. The thread that was not wound onto the bobbin correctly. The needle is tangled in the shuttle, clean the shuttle. page 146 page 35 The area around the bobbin five or six times clockwise. Move the sewing speed controller to the...needle plate. A bobbin designed specifically for this machine. The thread is incorrectly installed. Remove any knots or tangles. - service center. The shuttle is appropriate for the type of the needle bar thread hook). page 16 Bobbin winder cover is scratched, or has a your retailer or...
Users Manual - English
Page 156
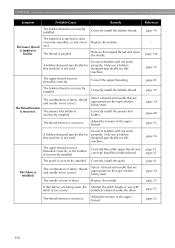
... the presser foot holder. Correctly thread the upper thread and correctly install the bobbin thread. Reference page 19 - Remove the tangled thread and clean the shuttle. The upper thread was not threaded correctly, or the bobbin is not correct. The needle is incorrect. Correctly install the bobbin thread. The thread tension...
... the presser foot holder. Correctly thread the upper thread and correctly install the bobbin thread. Reference page 19 - Remove the tangled thread and clean the shuttle. The upper thread was not threaded correctly, or the bobbin is not correct. The needle is incorrect. Correctly install the bobbin thread. The thread tension...
Users Manual - English
Page 157
...appropriate for the type of stitch that that are appropriate for example, in red. The thread cassette indicator lights up in the shuttle, clean the shuttle. page 64 The stitch is damaged. Adjust the tension of stitch that that you wish to sew. The sewing lamp is ... needle. If the thread is appropriate for the type of stitch appropriate for the type of stitch appropriate for example, in the shuttle, clean the shuttle. Symptom Probable Cause Remedy Reference The upper thread was not threaded correctly. page 21 Stitches are lowered. Replace the needle. page ...
...appropriate for the type of stitch that that are appropriate for example, in red. The thread cassette indicator lights up in the shuttle, clean the shuttle. page 64 The stitch is damaged. Adjust the tension of stitch that that you wish to sew. The sewing lamp is ... needle. If the thread is appropriate for the type of stitch appropriate for the type of stitch appropriate for example, in the shuttle, clean the shuttle. Symptom Probable Cause Remedy Reference The upper thread was not threaded correctly. page 21 Stitches are lowered. Replace the needle. page ...

Users Manual - English
Page 158
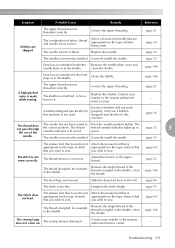
Touch the LCD with a loose weave and fabrics where stitches easily contract. The fabric is catching. When the shuttle is plugged up, clean it so the fabric does not hang off. If the embroidery unit carriage or embroidery frame bumps into ...messed up . The embroidery unit connector slot is moved during embroidery. Stretch the fabric properly on the LCD. The thread is tangled and the shuttle, etc., is hanging off the table, the embroidery unit movement will disappear. Material coming out of the embroidery frame is displayed on the ...
Touch the LCD with a loose weave and fabrics where stitches easily contract. The fabric is catching. When the shuttle is plugged up, clean it so the fabric does not hang off. If the embroidery unit carriage or embroidery frame bumps into ...messed up . The embroidery unit connector slot is moved during embroidery. Stretch the fabric properly on the LCD. The thread is tangled and the shuttle, etc., is hanging off the table, the embroidery unit movement will disappear. Material coming out of the embroidery frame is displayed on the ...
Users Manual - English
Page 159
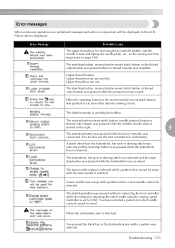
... and the start /stop button was pressed while the foot controller was selected. Error Message Probable Cause The upper thread has become tangled around the shuttle, and the needle is displayed. Upper thread not set up with the twin needle is raised. The start /stop button was installed. Error messages When...
... and the start /stop button was pressed while the foot controller was selected. Error Message Probable Cause The upper thread has become tangled around the shuttle, and the needle is displayed. Upper thread not set up with the twin needle is raised. The start /stop button was installed. Error messages When...
Users Manual - English
Page 163
... Cover A embroidery frame removal 127 embroidery key Cover E 5 bobbin installation 19 , embroidery pattern selection 128 131 bobbin shuttle Cover C embroidery pattern types 128 bobbin storage compartment Cover B embroidery sheets 124 bobbin thread spool pin 16 embroidery threads 112...sewing direction 59 character storage 139 characters, recalling 140 checking needle 35 cleaning brush Cover A cleaning machine surface 146 cleaning shuttle 146 concealed seams 84 crazy quilt stitching 93 cuffs 41 fagoting 104 fagoting stitch 103 feed dog position switch Cover C ...
... Cover A embroidery frame removal 127 embroidery key Cover E 5 bobbin installation 19 , embroidery pattern selection 128 131 bobbin shuttle Cover C embroidery pattern types 128 bobbin storage compartment Cover B embroidery sheets 124 bobbin thread spool pin 16 embroidery threads 112...sewing direction 59 character storage 139 characters, recalling 140 checking needle 35 cleaning brush Cover A cleaning machine surface 146 cleaning shuttle 146 concealed seams 84 crazy quilt stitching 93 cuffs 41 fagoting 104 fagoting stitch 103 feed dog position switch Cover C ...
Users Manual - English
Page 165
... , shell tuck stitch 103 106 upper thread 21 upper thread spool 23 upper thread tension 52 utility stitch selection screen 12 utility stitches 103 shuttle 20 W shuttle cleaning 146 shuttle removal 147 side cutter 71 winding bobbin 16 wing needle 108 sleeve cuffs 41 , sliding leg Cover B 41 Z smocking 105 smocking stitch 103...
... , shell tuck stitch 103 106 upper thread 21 upper thread spool 23 upper thread tension 52 utility stitch selection screen 12 utility stitches 103 shuttle 20 W shuttle cleaning 146 shuttle removal 147 side cutter 71 winding bobbin 16 wing needle 108 sleeve cuffs 41 , sliding leg Cover B 41 Z smocking 105 smocking stitch 103...


