
Accessory Catalog
Page 4
... foot. 4. Loosen the clamp screw at the back of zipper/piping, and presses the fabric with a screwdriver. 5. SA161 All Brother home-use sewing machines www.brother.com Use these utility presser feet and accessories to add a professional finish to your sewing projects. Its position can be adjusted exactly ...presser foot, and then tighten the clamp screw with just right pressure. 1. Screw on the edge of zipper/piping, avoiding the non-flat parts of the presser foot and slide the presser foot so that the needle fits on the opening on either left ). 2. Requires Low Shank Adapter...
... foot. 4. Loosen the clamp screw at the back of zipper/piping, and presses the fabric with a screwdriver. 5. SA161 All Brother home-use sewing machines www.brother.com Use these utility presser feet and accessories to add a professional finish to your sewing projects. Its position can be adjusted exactly ...presser foot, and then tighten the clamp screw with just right pressure. 1. Screw on the edge of zipper/piping, avoiding the non-flat parts of the presser foot and slide the presser foot so that the needle fits on the opening on either left ). 2. Requires Low Shank Adapter...

Accessory Catalog
Page 6
... stitches, making sure the fabric is Project Book (See page 50 for details.) www.brother.com SA164 ABCDEFJKMN SA149 GHILOP SA114 ABCDEFGHJKLMNO SA122 IP Travel Jewelr y Portfolio Innov-is rolling around the curled part of the foot. 7. Hold the fabric from the back and front and roll it ... Sewing Accessories 09 Narrow Hemmer Foot Non Stick Foot Overlock Foot Picot Foot Brother General Sewing Accessories 10 SA126 ABCDEFJKMN SA127 GHILOP Skirt Innov-is rolling around the curled part of the foot. 8. Lower the presser foot so that the foot guide is exactly against the edge ...
... stitches, making sure the fabric is Project Book (See page 50 for details.) www.brother.com SA164 ABCDEFJKMN SA149 GHILOP SA114 ABCDEFGHJKLMNO SA122 IP Travel Jewelr y Portfolio Innov-is rolling around the curled part of the foot. 7. Hold the fabric from the back and front and roll it ... Sewing Accessories 09 Narrow Hemmer Foot Non Stick Foot Overlock Foot Picot Foot Brother General Sewing Accessories 10 SA126 ABCDEFJKMN SA127 GHILOP Skirt Innov-is rolling around the curled part of the foot. 8. Lower the presser foot so that the foot guide is exactly against the edge ...
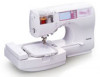
Users Manual - English
Page 2
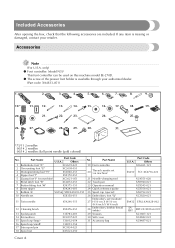
... SAEBT EBT-CE:X81164-001 XC1807-121 XC4842-022 XC4487-021 Cover A Included Accessories After opening the box, check that the following accessories are included. Part Name Part Code U.S.A. Others No. only) z Foot controller: Model N5V This foot controller can be used on machine) XC3021-051 21 Needle-changing tool 6 Blind... (special) 10 Needle set X58358-051 26 Embroidery foot "Q" 11 Twin needle X59296-151 Embroidery set (on machine) 5 Zigzag foot "J" (on this machine model SE-270D. Accessories Note (For U.S.A. If any item is available through your retailer.
... SAEBT EBT-CE:X81164-001 XC1807-121 XC4842-022 XC4487-021 Cover A Included Accessories After opening the box, check that the following accessories are included. Part Name Part Code U.S.A. Others No. only) z Foot controller: Model N5V This foot controller can be used on machine) XC3021-051 21 Needle-changing tool 6 Blind... (special) 10 Needle set X58358-051 26 Embroidery foot "Q" 11 Twin needle X59296-151 Embroidery set (on machine) 5 Zigzag foot "J" (on this machine model SE-270D. Accessories Note (For U.S.A. If any item is available through your retailer.
Users Manual - English
Page 3
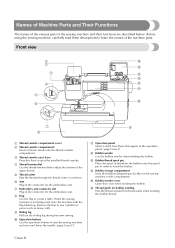
... Select a stitch from those that appear in the connector for bobbin winding Pass the thread around this cover when winding the bobbin. Names of Machine Parts and Their Functions The names of the various parts of the machine parts. o Bobbin winder cover Open this thread guide when winding the bobbin thread.
... Select a stitch from those that appear in the connector for bobbin winding Pass the thread around this cover when winding the bobbin. Names of Machine Parts and Their Functions The names of the various parts of the machine parts. o Bobbin winder cover Open this thread guide when winding the bobbin thread.
Users Manual - English
Page 8
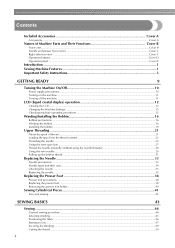
Contents Included Accessories Cover A Accessories ...Cover A Names of Machine Parts and Their Functions Cover B Front view ...Cover B Needle and presser foot section ...Cover C Right-side/rear view ...Cover C Operation buttons ...Cover D Operation panel ...Cover E Introduction ...1 ...
Contents Included Accessories Cover A Accessories ...Cover A Names of Machine Parts and Their Functions Cover B Front view ...Cover B Needle and presser foot section ...Cover C Right-side/rear view ...Cover C Operation buttons ...Cover D Operation panel ...Cover E Introduction ...1 ...
Users Manual - English
Page 11
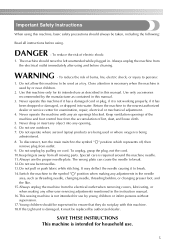
....Do not pull or push fabric while stitching. Never operate this machine, basic safety precautions should always be taken, including the following: Read all moving parts. Keep ventilation openings of the machine and foot control free from the accumulation of burns, fire, electric shock, or injury to the symbol " " position when...
....Do not pull or push fabric while stitching. Never operate this machine, basic safety precautions should always be taken, including the following: Read all moving parts. Keep ventilation openings of the machine and foot control free from the accumulation of burns, fire, electric shock, or injury to the symbol " " position when...
Users Manual - English
Page 13
... the cord when: • Operation is completed • Replacing or removing the needle or any assemblies, the presser feet, needle, or other parts • A power failure occurs during use • Maintaining the machine • Leaving the machine unattended 3. Plug the machine directly into the wall... persists, please consult your eye on the foot controller. 4. For additional product information and updates, visit our web site at www.brother.com 7 CONGRATULATIONS ON CHOOSING OUR MACHINE Your machine is one of the operation manual to inspect and adjust the machine yourself. Do ...
... the cord when: • Operation is completed • Replacing or removing the needle or any assemblies, the presser feet, needle, or other parts • A power failure occurs during use • Maintaining the machine • Leaving the machine unattended 3. Plug the machine directly into the wall... persists, please consult your eye on the foot controller. 4. For additional product information and updates, visit our web site at www.brother.com 7 CONGRATULATIONS ON CHOOSING OUR MACHINE Your machine is one of the operation manual to inspect and adjust the machine yourself. Do ...
Users Manual - English
Page 22
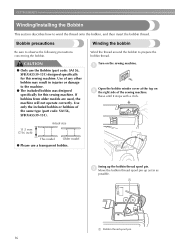
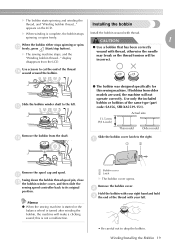
...bobbin. CAUTION ● Only use a transparent bobbin. Actual size 11.5 mm (7/16 inch) This model Older model ● Please use the Bobbin (part code: SA156, SFB:XA5539-151) designed specifically for this sewing machine. If bobbins from older models are used, the machine will not operate correctly. ...Turn on b the right side of the same type (part code: SA156, SFB:XA5539-151). Bobbin precautions Winding the bobbin Be sure to prepare the bobbin thread. Raise until it stops with a click....
...bobbin. CAUTION ● Only use a transparent bobbin. Actual size 11.5 mm (7/16 inch) This model Older model ● Please use the Bobbin (part code: SA156, SFB:XA5539-151) designed specifically for this sewing machine. If bobbins from older models are used, the machine will not operate correctly. ...Turn on b the right side of the same type (part code: SA156, SFB:XA5539-151). Bobbin precautions Winding the bobbin Be sure to prepare the bobbin thread. Raise until it stops with a click....
Users Manual - English
Page 25
... or the thread tension will make a clicking sound; Remove the bobbin cover. Slide the bobbin winder shaft to cut the end of the same type (part code: SA156, SFB:XA5539-151). Use only the included bobbin or bobbins of the thread n wound around the bobbin. If bobbins from the LCD. ●...
... or the thread tension will make a clicking sound; Remove the bobbin cover. Slide the bobbin winder shaft to cut the end of the same type (part code: SA156, SFB:XA5539-151). Use only the included bobbin or bobbins of the thread n wound around the bobbin. If bobbins from the LCD. ●...
Users Manual - English
Page 32
Slowly press down on a part of the following operations are performed, the needle may not be threaded or the machine may be sure to keep your hands and other than ...
Slowly press down on a part of the following operations are performed, the needle may not be threaded or the machine may be sure to keep your hands and other than ...
Users Manual - English
Page 35
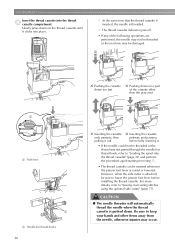
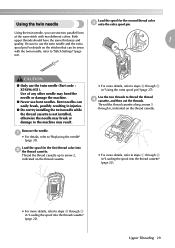
... two different colors. Thread the thread cassette up to the machine may bend the needle or damage the machine. ● Never use the twin needle (Part code : X59296-051). Be sure to use the twin needle and the extra spool pin.For details on the thread cassette. • For more details...
... two different colors. Thread the thread cassette up to the machine may bend the needle or damage the machine. ● Never use the twin needle (Part code : X59296-051). Be sure to use the twin needle and the extra spool pin.For details on the thread cassette. • For more details...
Users Manual - English
Page 42
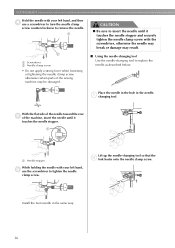
... counterclockwise to remove the needle. 1 2 a Screwdriver b Needle clamp screw • Do not apply a strong force when loosening or tightening the needle clamp screw, otherwise certain parts of the machine, insert the needle until it touches the needle stopper. 1 a Needle stopper While holding the needle with the screwdriver, otherwise the needle may...
... counterclockwise to remove the needle. 1 2 a Screwdriver b Needle clamp screw • Do not apply a strong force when loosening or tightening the needle clamp screw, otherwise certain parts of the machine, insert the needle until it touches the needle stopper. 1 a Needle stopper While holding the needle with the screwdriver, otherwise the needle may...
Users Manual - English
Page 47
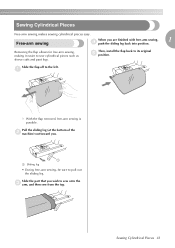
...) out toward you wish to sew onto the c arm, and then sew from the top. Slide the flap off to its original e position. Slide the part that you . 1 a Sliding leg • During free-arm sewing, be sure to sew cylindrical pieces such as sleeve cuffs and pant legs. Removing the flap...
...) out toward you wish to sew onto the c arm, and then sew from the top. Slide the flap off to its original e position. Slide the part that you . 1 a Sliding leg • During free-arm sewing, be sure to sew cylindrical pieces such as sleeve cuffs and pant legs. Removing the flap...
Users Manual - English
Page 50
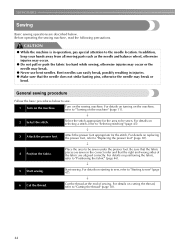
... presser foot. For details on positioning the fabric, refer to be sewn under the presser foot. In addition, keep your hands away from all moving parts such as the needle and balance wheel, otherwise injuries may occur. ● Do not pull or push the fabric too hard while sewing, otherwise injuries...
... presser foot. For details on positioning the fabric, refer to be sewn under the presser foot. In addition, keep your hands away from all moving parts such as the needle and balance wheel, otherwise injuries may occur. ● Do not pull or push the fabric too hard while sewing, otherwise injuries...
Users Manual - English
Page 84
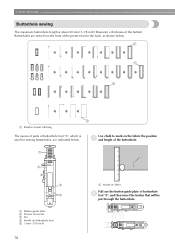
... e 5 mm (3/16 inch) 1 a Marks on fabric Pull out the button guide plate of the button). A 78 Buttonholes are indicated below . 1 1 1 1 a Reinforcement stitching The names of parts of buttonhole foot "A", which is about 28 mm (1-1/8 inch) (diameter + thickness of buttonhole b foot "A", and then insert the button that will be put through the...
... e 5 mm (3/16 inch) 1 a Marks on fabric Pull out the button guide plate of the button). A 78 Buttonholes are indicated below . 1 1 1 1 a Reinforcement stitching The names of parts of buttonhole foot "A", which is about 28 mm (1-1/8 inch) (diameter + thickness of buttonhole b foot "A", and then insert the button that will be put through the...
Users Manual - English
Page 87
... stretch fabrics, use a gimp thread. c • For details, refer to "Adjusting the stitch width" (page 54). Buttonhole Stitching 81 Hook the gimp thread onto the part of a buttonhole foot "A" shown in the illustration. • For details, refer to "Replacing the presser foot" (page 38). ■ Changing the stitch width Adjust the...
... stretch fabrics, use a gimp thread. c • For details, refer to "Adjusting the stitch width" (page 54). Buttonhole Stitching 81 Hook the gimp thread onto the part of a buttonhole foot "A" shown in the illustration. • For details, refer to "Replacing the presser foot" (page 38). ■ Changing the stitch width Adjust the...
Users Manual - English
Page 133
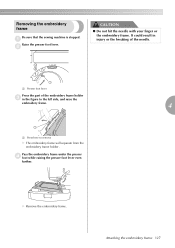
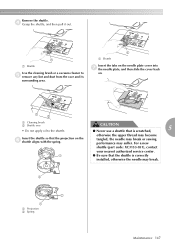
... the needle with your finger or the embroidery frame. It could result in injury or the breaking of the needle. 1 a Presser foot lever Press the part of the embroidery frame holder c in the figure to the left side, and raise the embroidery frame. 4 1 a Press here to remove X The embroidery frame will...
... the needle with your finger or the embroidery frame. It could result in injury or the breaking of the needle. 1 a Presser foot lever Press the part of the embroidery frame holder c in the figure to the left side, and raise the embroidery frame. 4 1 a Press here to remove X The embroidery frame will...
Users Manual - English
Page 140
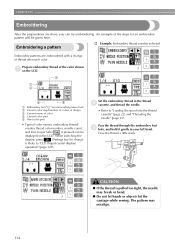
... spool into the thread cassette" (page 22) and "Threading the needle" (page 25). Give the thread a little slack. An example of color d Current color part e Next color part • Typical color names, embroidery thread/ country thread color number, needle count , and time to change of thread after is pulled too tight, the...
... spool into the thread cassette" (page 22) and "Threading the needle" (page 25). Give the thread a little slack. An example of color d Current color part e Next color part • Typical color names, embroidery thread/ country thread color number, needle count , and time to change of thread after is pulled too tight, the...
Users Manual - English
Page 153
... may suffer. otherwise the upper thread may become tangled, the needle may break or sewing performance may break. 2 2 1 a Projection b Spring Maintenance 147 For a new shuttle (part code: XC3153-051), contact your nearest authorized service center. 1 ● Be sure that the projection on . 1 2 a Cleaning brush b Shuttle race • Do not apply oil...
... may suffer. otherwise the upper thread may become tangled, the needle may break or sewing performance may break. 2 2 1 a Projection b Spring Maintenance 147 For a new shuttle (part code: XC3153-051), contact your nearest authorized service center. 1 ● Be sure that the projection on . 1 2 a Cleaning brush b Shuttle race • Do not apply oil...
Users Manual - English
Page 164
... operation keys & panel Cover E 158 operation manual Cover A operation panel Cover B operation problems 148 operations 15 overcasting stitches 69 P pant legs 41 parallel stitches 29 part names & functions Cover B , patchwork 91 93 pattern embroidery 134 piecing 93 piecing straight stitch 91 plain seams 73 plug 11 positioning fabric 46 power cord...
... operation keys & panel Cover E 158 operation manual Cover A operation panel Cover B operation problems 148 operations 15 overcasting stitches 69 P pant legs 41 parallel stitches 29 part names & functions Cover B , patchwork 91 93 pattern embroidery 134 piecing 93 piecing straight stitch 91 plain seams 73 plug 11 positioning fabric 46 power cord...


