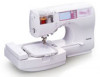
Users Manual - English
Page 3
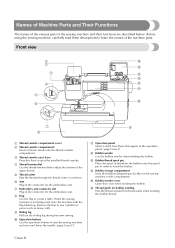
.... (page Cover E) l Bobbin winder Use the bobbin winder when winding the bobbin. When the sewing machine is not being used, store the machine with the flap folded up. j Operation buttons Use the operation buttons to cut them. g Embroidery unit connector slot Plug in the connector for bobbin winding Pass the thread around this thread...
.... (page Cover E) l Bobbin winder Use the bobbin winder when winding the bobbin. When the sewing machine is not being used, store the machine with the flap folded up. j Operation buttons Use the operation buttons to cut them. g Embroidery unit connector slot Plug in the connector for bobbin winding Pass the thread around this thread...
Users Manual - English
Page 124
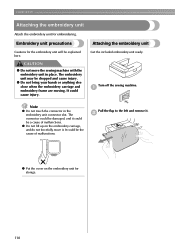
...machine. a Note z Do not touch the connector in place. Get the included embroidery unit ready. z Do not lift up on the embroidery unit for storage. 118 It could be dropped and cause injury. ● Do not bring your hands or anything else close when the embroidery carriage and embroidery frame are moving. Pull the flap... the cover on the embroidery carriage, and do not forcefully move the sewing machine with the embroidery unit in the embroidery unit connector slot. EMBROIDERY Attaching the embroidery unit Attach the embroidery unit for the embroidery unit will be a ...
...machine. a Note z Do not touch the connector in place. Get the included embroidery unit ready. z Do not lift up on the embroidery unit for storage. 118 It could be dropped and cause injury. ● Do not bring your hands or anything else close when the embroidery carriage and embroidery frame are moving. Pull the flap... the cover on the embroidery carriage, and do not forcefully move the sewing machine with the embroidery unit in the embroidery unit connector slot. EMBROIDERY Attaching the embroidery unit Attach the embroidery unit for the embroidery unit will be a ...
Users Manual - English
Page 127
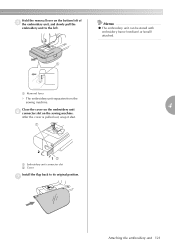
After the cover is pulled out, snap it shut. 1 2 12 a Embroidery unit connector slot b Cover Install the flap back to the left of e the embroidery unit, and slowly pull the embroidery unit to its original position. Memo z The embroidery unit can be stored with embroidery frame (medium) or (small) attached. 1 a Removal lever X The embroidery unit separates from the sewing machine. 4 Close the cover on the embroidery unit f connector slot on the bottom left . Hold the removal lever on the sewing machine. g Attaching the embroidery unit 121
After the cover is pulled out, snap it shut. 1 2 12 a Embroidery unit connector slot b Cover Install the flap back to the left of e the embroidery unit, and slowly pull the embroidery unit to its original position. Memo z The embroidery unit can be stored with embroidery frame (medium) or (small) attached. 1 a Removal lever X The embroidery unit separates from the sewing machine. 4 Close the cover on the embroidery unit f connector slot on the bottom left . Hold the removal lever on the sewing machine. g Attaching the embroidery unit 121

Users Manual - English
Page 158
... placed near the carriage or embroidery frame. Do not place objects within the range of the upper thread. It is pressed. Stop the sewing machine and set up . The brightness of the embroidery frame does not cause problems, rotate the pattern and embroider. The flap is either too light or ...too dark. Remove the flap. The fabric is incorrect. The thread tension is not fully...
... placed near the carriage or embroidery frame. Do not place objects within the range of the upper thread. It is pressed. Stop the sewing machine and set up . The brightness of the embroidery frame does not cause problems, rotate the pattern and embroider. The flap is either too light or ...too dark. Remove the flap. The fabric is incorrect. The thread tension is not fully...


